
Related Manuals for Saswell T19WHB-7-RF


Summary of Contents for Saswell T19WHB-7-RF
- Page 1 Brezžični termostat / Wireless thermostat SASWELL T19WHB-7-RF Uporabniški priročnik User manual...
- Page 2 SI | Uporabniški priročnik Termostat Saswell T19WHB-7-RF je brezžični programski termostat (oddajna enota) za upravljanje ogrevalnih sistemov. je brezžični programski termostat za upravljanje ogrevalnih sistemov. Termostat se lahko uporabi v kombinaciji s SASWELL SCU210DE, SCU209DE, 2011DE s katerimi se izvaja brezžična komunikacija (868MHz).
- Page 3 Za izdelek je bila izdana izjava o skladnosti. Ta in ostala dokumentacija je dostopna na spletni strani www.sen- controls.eu. Proizvajalec izdelka je SASWELL CONTROLS (HONGKONG) LTD. Uvoznik in distributer za Saswell je Sen Controls d.o.o., Belokranjska cesta 29, 8340 Črnomelj, Slovenija...
- Page 4 Lastnosti Specifikacije enote Neodvisnost od žične povezave • Napajanje: Baterije 4xAAA LR03 1.5V • Nastavitev temperature: od 5°C do 35°C Povezljivost RF dosega do 100 metrov • Prikaz temperature: od 5°C do 40°C Moderen Piano Black design izgled s tipkami na Natančnost: ±...
- Page 5 Namestitev termostata Namestitev naprave naj opravi kvalificirana oseba! Pred namestitvijo obvezno preberite vsa navodila za uporabo in varnostna opozorila navedena v teh navodilih in navodilih preostalih naprav, ki so povezane v sistem in omrežje. Vstavitev baterij 1. Termostat vzemite v roke in previdno odstranite pokrov baterij na zadnji strani tako, da navzdignete na označenih mestih (spodaj in zgoraj).
- Page 6 Postavitev Za postavitev termostata lahko uporabite priročno stojalo, vgrajeno v baterijski pokrov. Ta način vam omogoča prenosljivost termostata kamorkoli po prostoru. Lahko ga tudi namestite na steno, prav tako s pomočjo baterijskega pokrova, na kateremu so pripravljene luknje s standardnimi dimenzijami. V tem primeru je termostat vedno na istem mestu. V katerem koli primeru postavitve bodite pozorni, da termostat ne postavite v bližino vira vročega ali hladnega zraka, sijanju sonca, prepihu, da je oddaljen vsaj 30cm od kovinskih delov in vsaj 1 meter od ostalih elektronskih naprav.
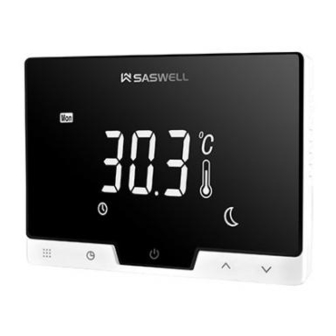
- Page 7 Opis termostata Tipke Tipka za nastavitve termostata / urnika programov ogrevanja Nastavitev ure Tipka za vklop / izklop / potrditev Povišanje vrednosti Zmanjšanje vrednosti Tipka za prebuditev ekrana Ekran Prikaz trenutnega dneva v tednu / Izbira dneva, dni v nastavitvah Glavni prikaz (temp., ura, nastavitve,..) Opozorilo za zamenjavo baterije Uporaba urnika programa ogrevanja /...
- Page 8 Opis funkcij in delovanje termostata Za lažje razumevanje opisa vseh funkcij in delovanja termostata, imejte prejšnjo stran, kjer je opis ekrana in tipk, kot referenco, saj se vsi opisi navezujejo na oznake (številke). Opozorilo za slabo baterijo Ob začetku uporabe termostata vedno vstavite uporabite nove alkalne in ne polnilne baterije. Ko se pojavi simbol za zamenjavo baterij, bodo le te delovale še v povprečju 30 dni.
- Page 9 Nastavitev ure preidete v meni ure. Tukaj se vam najprej pokaže trenutni čas Ko je termostat prižgan s kratkim pritiskom na tipko (ura in datum). Če na kratko pritisnete tipko še enkrat, začnejo utripati minute kar pomeni da sedaj nastavljate minute.
- Page 10 Zaščita proti zmrzovanju Opcija je privzeto izključena. Vključite jo preko naprednih nastavitev termostata. Opcija skrbi, da če temperatura prostora pade pod 5°C, poda termostat sprejemniku ukaz, da vključi črpalko oz. sproži način ogrevanja dokler le ta ne doseže temperature 8°C. Možne napake - Če se zgodi, da pride do okvare termostata, bo le ta na ekranu prikazal napis roomERR.
- Page 11 Programe urejate s tipkami: Tipka vas premika med opcijami (dan, ura preklopa, temperatura, naslednji preklop,…), tipki pa služita spreminjanju vrednosti. Simbol trenutnega preklopa, katerega urejate, se osvetli na desni strani (glej opis ekrana 11). Na ekranu se vam osvetli več možnosti. Najprej vam utripajo dnevi oz. trenutni dan urejanja (glej opis ekrana 1). Če .
- Page 12 Tabela 2 (7 dni, 6 časovnih programov, preklopi) Ogrevanje 1-Jutro 2-Odhod 3-Malica 4-Popoldan 5-Prihod 6-Večer Ponedeljek 6:00 21℃ 8:00 16.5℃ 12:00 21℃ 14:00 16.5℃ 18:00 21℃ 22:00 16.5℃ (Mon) Torek (Tue) 6:00 21℃ 8:00 16.5℃ 12:00 21℃ 14:00 16.5℃ 18:00 21℃...
- Page 13 Tabela 3 (5 + 1 + 1 dni, 4 časovni programi, preklopi) Ogrevanje 1-Jutro 2-Odhod 3-Prihod 4-Večer Ponedeljek (Mon) 6:00 21°C 8:00 16.5°C 21°C 16.5°C 18:00 22:00 Torek (Tue) 6:00 21°C 8:00 16.5°C 21°C 16.5°C 18:00 22:00 Sreda (Wed) 6:00 21°C 8:00 16.5°C...
- Page 14 Tabela 4 (5 + 1 + 1 dni, 6 časovni programi, preklopi) Ogrevanje 1-Jutro 2-Odhod 3-Malica 4-Popoldan 5-Prihod 6-Večer Ponedeljek 6:00 21℃ 8:00 16.5℃ 12:00 21℃ 14:00 16.5℃ 18:00 21℃ 22:00 16.5℃ (Mon) Torek (Tue) 6:00 21℃ 8:00 16.5℃ 12:00 21℃...
- Page 15 Tabela 5 (5 + 2 dni, 4 časovni programi, preklopi) Ogrevanje 1-Jutro 2-Odhod 3-Prihod 4-Večer Ponedeljek (Mon) 6:00 21°C 8:00 16.5°C 21°C 16.5°C 18:00 22:00 Torek (Tue) 6:00 21°C 8:00 16.5°C 21°C 16.5°C 18:00 22:00 Sreda (Wed) 6:00 21°C 8:00 16.5°C 21°C 16.5°C...
- Page 16 Tabela 6 (5 + 2 dni, 6 časovnih programov, preklopi) Ogrevanje 1-Jutro 2-Odhod 3-Malica 4-Popoldan 5-Prihod 6-Večer Ponedeljek 6:00 8:00 12:00 14:00 18:00 22:00 21℃ 16.5℃ 21℃ 16.5℃ 21℃ 16.5℃ (Mon) Torek (Tue) 6:00 8:00 12:00 14:00 18:00 22:00 21℃ 16.5℃...
- Page 17 Napredna nastavitev termostata Za dostop do napredne nastavitve termostata, izklopite napravo z dolgim pritiskom na tipko , da se na ekranu prikaže napis OFF. Nato držite tipko (3 sekunde) in vstopili boste v napredne nastavitve. Na ekranu se prikaže velik napis trenutne vrednosti in pod tem je prikazan simbol s številko 1, ki pomeni trenuten korak nastavitev.
- Page 18 Thermostat Saswell T19WHB-7-RF is a wireless programmable thermostat for controlling heating systems. The thermostat can be used with SASWELL SCU209DE, SCU210DE and 2010DE. The receiver manages the connection function and system switching while the thermostat enables the temperature control and setting function. The system provides wireless, simple and comfortable use of your heating system.
- Page 19 Declaration of conformity has been issued for the product. This and other documentation is available on the website www.sen-controls.eu. Producer of this product is SASWELL CONTROLS (HONGKONG) LTD. Importer and distributor for Saswell is Sen Controls d.o.o., Belokranjska cesta 29, 8340 Črnomelj, Slovenia...
- Page 20 Features Specifications • • Portability of room thermostat and independence Power supply: Batteries 4xAAA LR03 1.5V • from wire connectivity Temperature setting range: from 5°C to 35°C • • Connectivity between the transmitter and the Temperature display range: from 5°C to 40°C •...
- Page 21 Thermostat installation The thermostat installation should be performed by a qualified personnel. Before installation, be sure to read all of the operating instructions and safety notes in these instructions and the instructions of other devices that are connected to the electrical system or the network. Battery installation 1.
- Page 22 Placing the thermostat You can use the attached stand on the back of the thermostat for placing the thermostat anywhere in the room. This way enables you complete portability. The thermostat can also be placed on a wall with the help of the back battery cover, which has standard premade holes for wall and in wall socket installation.
- Page 23 Thermostat description Buttons Thermostat setting /Heating program schedule setting button Hour, day button Turn ON / OFF / Confirmation button Increase value Decrease value Display wake up button Display Current day of the week / Setting day, days in the settings and heating Main display (temperature, hour, settings, …) Low battery warning Using schedule mode / Hour, date...
- Page 24 Function and thermostat description For easier understanding of this user manual, use the previous page, where the display and the buttons are described as a reference. It will be easier to navigate through the whole setting process. Low battery warning Always insert new alkaline and non-rechargeable batteries when using the thermostat.
- Page 25 Setting the time and day When the thermostat is turned on you can view the current time by short pressing button . If you wish to edit the current time and day, short press the same button again. Now you’ll see that minutes are blinking, which means that you’re currently editing minutes.
- Page 26 Anti-freeze protection This function is turned off by default. You can turn it on in the advanced thermostat settings. The function makes sure, that when the room temperature falls below 5°C, the thermostat sends an order to the receiver to turn on the heating (turn on the boiler, pump,…) and it stays on until the room temperature reaches 8°C. When this function is turned on, display shows icon 9.
- Page 27 Editing heating program schedules When the thermostat is turned on and you’ve selected the desired program mode in the advanced thermostat settings, wake up the screen and hold the for at least 5 seconds to enter editing mode for heating program schedules. Editing instructions: Button moves through the options (day, hour of the switch, set temperature, next switch or day,…) , buttons...
- Page 28 Table 2 (7 days, 6 switches) 1-Morning 4-Afternoon 2-Away 3-Lunch 5-Back home 6-Night Heating Monday 6:00 21℃ 8:00 16.5℃ 12:00 21℃ 14:00 16.5℃ 18:00 21℃ 22:00 16.5℃ Tuesday 6:00 21℃ 8:00 16.5℃ 12:00 21℃ 14:00 16.5℃ 18:00 21℃ 22:00 16.5℃ Wednesday 6:00 21℃...
- Page 29 Table 3 (5 + 1 + 1 days, 4 switches) Heating 1-Morning 2-Away 3-Back home 4-Night Monday 6:00 21°C 8:00 16.5°C 21°C 16.5°C 18:00 22:00 Tuesday 6:00 21°C 8:00 16.5°C 21°C 16.5°C 18:00 22:00 Wednesday 6:00 21°C 8:00 16.5°C 18:00 21°C 22:00 16.5°C...
- Page 30 Table 4 (5 + 1 + 1 days, 6 switches) Heating 1-Morning 2-Away 3-Lunch 4-Afternoon 5-Back home 6-Night Monday 6:00 21℃ 8:00 16.5℃ 12:00 21℃ 14:00 16.5℃ 18:00 21℃ 22:00 16.5℃ Tuesday 6:00 21℃ 8:00 16.5℃ 12:00 21℃ 14:00 16.5℃ 18:00 21℃...
- Page 31 Table 5 (5 + 2 days, 4 switches) Heating 1-Morning 2-Away 3-Back home 4-Night Monday 6:00 21°C 8:00 16.5°C 21°C 16.5°C 18:00 22:00 Tuesday 6:00 21°C 8:00 16.5°C 21°C 16.5°C 18:00 22:00 Wednesday 6:00 21°C 8:00 16.5°C 18:00 21°C 22:00 16.5°C Thursday 6:00...
- Page 32 Table 6 (5 + 2 days, 6 switches) Heating 1-Morning 2-Away 3-Lunch 4-Afternoon 5-Back home 6-Night Monday 6:00 21℃ 8:00 16.5℃ 12:00 21℃ 14:00 16.5℃ 18:00 21℃ 22:00 16.5℃ Tuesday 6:00 21℃ 8:00 16.5℃ 12:00 21℃ 14:00 16.5℃ 18:00 21℃ 22:00 16.5℃...
- Page 33 Advanced thermostat settings To access advanced thermostat settings, turn off the device by waking up the screen and holding the button for 3 seconds, so that the display shows “OFF”. Now, hold the button for 3 seconds. Now you’ve entered the advanced thermostat settings and should see a big value on the center of the screen and at the bottom symbol with number 1 near it.
Need help?
Do you have a question about the T19WHB-7-RF and is the answer not in the manual?
Questions and answers