
Related Manuals for Insignia NS-HF2003


Summary of Contents for Insignia NS-HF2003
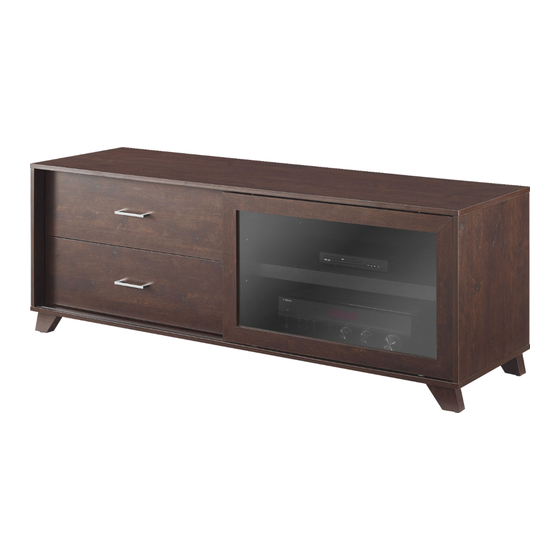
- Page 1 ASSEMBLY GUIDE 60" Espresso TV Stand NS-HF2003 Before using your new product, please read these instructions to prevent any damage.
-
Page 2: Table Of Contents
Contents Introduction ..................3 IMPORTANT SAFETY INSTRUCTIONS . -
Page 3: Introduction
NS-HF2003 Introduction Congratulations on your purchase of a high-quality Insignia product. Your NS-HF2003 represents the state of the art in TV stand design and is designed for reliable and trouble-free performance. IMPORTANT SAFETY INSTRUCTIONS WARNING: Failure to follow these installation instructions or any other abuse, mistreatment, unreasonable use, or neglect... -
Page 4: Tools Needed
60" Espresso TV Stand Tools needed You need the following tools to assemble your new TV stand: Flathead screwdriver Phillips screwdriver Rubber mallet Package contents Make sure that you have all the parts and hardware necessary to assemble your new TV stand. Stand parts 1 Top panel (1) 2 Bottom panel (1) -
Page 5: Stand Hardware
NS-HF2003 Stand hardware Note: You may not use all the included hardware. LABEL HARDWARE QTY. LABEL HARDWARE QTY. Glue Wood screw 4 × 38 × 8 mm (FHWS4388BL) Allen bolt 6 × 50 × 10 mm (AB65010BL) Large wood dowel (WD830) -
Page 6: Installation Tips
60" Espresso TV Stand Installation tips Installing dowels CAUTION: Make sure that you use glue with the dowels. The glue helps stabilize your TV stand and keeps it from coming apart. 1 Put a drop of glue (A) in the dowel hole, then insert about 2/3 of the dowel (B or E) into the hole. You can tap the dowel with a rubber mallet, if necessary. -
Page 7: Assembly Instructions
NS-HF2003 Assembly instructions WARNING: You need two people to assemble your TV stand. STEP 1 - Install the dowels and cam screws. You’ll need C Cam screw (21) A Glue (1) E Small wood dowel (6) B Large wood dowel (16) Rubber mallet 1 Put a drop of glue in each dowel hole, then insert about 2/3 of each dowel (B or E) into the hole. - Page 8 60" Espresso TV Stand Middle panel (7) Right side panel (8) Front trim (11) and adjustable shelf (12) Left drawer panel (14), right drawer panel (15), bottom drawer support (17), and front drawer panel (18) Note: You need to insert dowels into two of each part shown. www.insigniaproducts.com...
-
Page 9: Step 2 - Assemble The Left Side And Middle Panels
NS-HF2003 STEP 2 - Assemble the left side and middle panels. You’ll need 5 Middle crossbar (1) 7 Middle panel (1) 6 Left side panel (1) 4 Upper crossbar (1) A Glue (1) G Wood screw 3.5 × 12 × 6 mm... -
Page 10: Step 3 - Attach The Right Side And Bottom Panels
60" Espresso TV Stand STEP 3 - Attach the right side and bottom panels. You’ll need G Wood screw A Glue (1) 3.5 × 12 × 6 mm (1) 8 Right side panel (1) 2 Bottom panel (1) H Wood screw 4 ×... -
Page 11: Step 4 - Attach The Feet
NS-HF2003 STEP 4 - Attach the feet. You’ll need 10 Middle J Allen bolt 6 × 50 × 10 mm (8) K Allen wrench (1) 9 Side foot foot (1) 1 Carefully turn your stand on its side with the bottom panel (2) facing you. -
Page 12: Step 5 - Attach The Top Panel
60" Espresso TV Stand STEP 5 - Attach the top panel. You’ll need I Wood screw A Glue (1) 4 × 38 × 8 mm (4) D Large cam lock (6) 1 Top panel (1) Flat blade screwdriver Phillips screwdriver 1 Carefully turn your stand upright. -
Page 13: Step 6 - Attach The Back Panel
NS-HF2003 STEP 6 - Attach the back panel. You’ll need L Wood screw 3 × 16 × 8 mm (23) M Wire management strip (2) 3 Back panel (1) WC Mounting tabs (2) Note: WC is part of the Anti-Tip Safety Kit Phillips screwdriver 1 Align the screws on the back panel (3) with the screw holes on the back of your stand. -
Page 14: Step 7 - Attach The Trim To The Shelf
60" Espresso TV Stand STEP 7 - Attach the trim to the shelf. You’ll need A Glue (1) D Large cam lock (3) 11 Front trim (1) 12 Adjustable shelf (1) Flat blade screwdriver 1 With the adjustable shelf (12) face down, insert three cam locks (D). Make sure that the openings on the cam locks face the cam screw holes. -
Page 15: Step 8 - Assemble The Drawers
NS-HF2003 STEP 8 - Assemble the drawers. Assembling the sides and backs of the drawers You’ll need I 4 × 38 × 8 mm screw (8) 13 Back drawer panel (2) 15 Right drawer panel 14 Left drawer panel Phillips screwdriver 1 Make sure that the grooves in the left drawer panel (14), right drawer panel (15), and back drawer panel (13) are on the bottom and facing inward. - Page 16 60" Espresso TV Stand Attaching the drawer fronts and drawer supports. You’ll need A Glue (1) I 4 × 38 × 8 mm screw (4) F Small cam lock (10) 17 Bottom drawer support (2) 18 Front drawer panel (2) Flat blade screwdriver Phillips screwdriver 1 On the outside of the drawer, attach the bottom drawer support (17) to the back drawer panel (13) with two wood...
-
Page 17: Step 9 - Insert The Shelf And Drawers
NS-HF2003 STEP 9 - Insert the shelf and drawers. You’ll need P Shelf pin (4) 12 Adjustable shelf (1) Inserting the shelf 1 Select the level where you want the shelf to sit. You can select from three positions. 2 Insert the four shelf pins (P) into the holes inside your stand. Make sure that the pins are on the same level. -
Page 18: Step 10 - Attach The Door
60" Espresso TV Stand STEP 10 - Attach the door. You’ll need The following parts are pre-installed. Phillips screwdriver ZA Roller ZB Latch 19 Door (1) 1 Put the pre-assembled rollers (ZA) on the bottom of the door (19) into the groove on the bottom panel (2). 2 Make sure that the latches (ZB) are unlocked. -
Page 19: Anti-Tip Safety Strap Installation Instructions
NS-HF2003 Anti-tip safety strap installation instructions Note: We recommend that you install the anti-tip strap as a safety precaution. You’ll need WA Wood screw Phillips screwdriver WB Plastic socket 4 × 25 × 8 mm (2) WC Mounting WD Plastic mounting... -
Page 20: One-Year Limited Warranty
During the Warranty Period, if the original manufacture of the material or workmanship of the Product is determined to be defective by an authorized Insignia repair center or store personnel, Insignia will (at its sole option): (1) repair the Product with new or rebuilt parts; or (2) replace the Product at no charge with new or rebuilt comparable products or parts. - Page 21 For product inquiries, please contact us with the information below: 1-877-467-4289 www.insigniaproducts.com INSIGNIA is a trademark of Best Buy and its affiliated companies. Distributed by Best Buy Purchasing, LLC 7601 Penn Ave South, Richfield, MN 55423 U.S.A. ©2019 Best Buy. All rights reserved.
Need help?
Do you have a question about the NS-HF2003 and is the answer not in the manual?
Questions and answers