Qiagen QIAcube Connect User Manual
Hide thumbs
Also See for QIAcube Connect:
- User manual (162 pages) ,
- Safety instructions and quick start manual (56 pages) ,
- User manual (180 pages)
Table of Contents
Advertisement
Advertisement
Table of Contents

Subscribe to Our Youtube Channel
Related Manuals for Qiagen QIAcube Connect


Summary of Contents for Qiagen QIAcube Connect
- Page 1 September 2019 QIAcube ® Connect User Manual Sample to Insight__...
-
Page 2: Table Of Contents
Contents Introduction ......................5 About this user manual ................5 Intended use of the QIAcube Connect ............6 Requirements for QIAcube Connect users ............6 Safety Information ....................7 Proper use ....................7 Electrical safety ..................9 Environment .....................11 Biological safety ..................11 Chemicals ....................12 Waste disposal ..................13 Mechanical hazards ..................13... - Page 3 Regular maintenance procedure .............. 102 Daily maintenance procedure ..............103 Monthly maintenance procedure .............. 104 Periodic maintenance procedure .............. 105 Decontaminating the QIAcube Connect ............. 120 Troubleshooting ....................121 General information ................121 Contacting QIAGEN Technical Services ............. 121 Operation ..................... 122 Glossary ......................
- Page 4 Appendix B – QIAcube Connect Accessories ............138 Appendix C – Consignes de sécurité ..............140 11.1 Utilisation appropriée ................140 11.2 Sécurité électrique .................. 143 11.3 Atmosphère ..................144 11.4 Sécurité biologique ................144 11.5 Produits chimiques ................. 145 11.6...
-
Page 5: Introduction
1 Introduction Thank you for choosing the QIAcube Connect. We are confident it will become an integral part of your laboratory. Before using the QIAcube Connect, it is essential that you read this user manual carefully and pay attention to the safety information. The instructions and safety information in the user manual must be followed to ensure safe operation of the instrument and to maintain the instrument in a safe condition. -
Page 6: Intended Use Of The Qiacube Connect
QIAcube Connect. The QIAcube Connect is intended to be used only in combination with QIAGEN kits indicated for use with the QIAcube Connect for the applications described in the kit handbooks. -
Page 7: Safety Information
2 Safety Information Before using the QIAcube Connect, it is essential that you read this user manual carefully and pay attention to the safety information. The instructions and safety information in the user manual must be followed to ensure safe operation of the instrument and to maintain the instrument in a safe condition. - Page 8 Avoid spilling water or chemicals onto the QIAcube Connect. Damage caused by water or chemical spillage will void your warranty. In case of emergency, power OFF the QIAcube Connect at the power switch located in front of the instrument and unplug the power cord from the power outlet.
-
Page 9: Electrical Safety
QIAGEN kits or other than outlined in respective Information for use. Use of other reagents and substances may lead to fire or explosion. If hazardous material is spilled on or inside the QIAcube Connect, the user is responsible for carrying out appropriate decontamination. - Page 10 Only perform maintenance that is specifically described in this user manual. To ensure satisfactory and safe operation of the QIAcube Connect, follow these guidelines: The line power cord must be connected to a line power outlet that has a protective conductor ...
-
Page 11: Environment
2.3 Environment 2.3.1 Operating conditions WARNING Explosive atmosphere [W11] The QIAcube Connect is not designed for use in an explosive atmosphere. CAUTION Damage to the instrument [C6] Direct sunlight may bleach parts of the instrument and cause damage to plastic parts. -
Page 12: Chemicals
OSHA : Occupational Safety and Health Administration (United States of America). ACGIH : American Conference of Government Industrial Hygienists (United States of America). † COSHH : Control of Substances Hazardous to Health (United Kingdom). ‡ QIAcube Connect User Manual 09/2019... -
Page 13: Waste Disposal
These hazardous wastes must be collected and disposed of properly according to local safety regulations. For more information about how to dispose of the QIAcube Connect, see section 9.6 Waste Electrical and Electronic Equipment (WEEE). WARNING... - Page 14 CAUTION Damage to the instrument [C7] The QIAcube Connect must not be used if the centrifuge lid is broken, or if the lid lock is damaged. Make sure that no loose material is inside the centrifuge during operation. Make sure that the rotor is installed correctly and that all buckets are properly mounted, regardless of the number of samples to be processed.
-
Page 15: Heat Hazard
Damage to the instrument [C8] After a power failure, do not move the z-module (robotic arm) manually in front of the instrument. Damage may occur if the QIAcube Connect hood is closed and collides with the z-module. WARNING Risk of personal injury and material damage [W20] Raise the centrifuge lid carefully. - Page 16 Risk of personal injury and material damage [W25] WARNING To prevent the rotor nuts from loosening during operation of the centrifuge, securely tightened the nuts using the rotor key supplied with QIAcube Connect. UV irradiation hazard [W26] WARNING A mechanical lock ensures that the hood must be closed for operation of the UV LED.
-
Page 17: Radiation Safety
Damage to the instrument [C11] Do not use spray bottles containing alcohol or disinfectant to clean surfaces of the QIAcube Connect. Spray bottles should be used only to clean items that have been removed from the worktables. 2.10 Radiation safety... -
Page 18: Symbols On The Qiacube Connect
2.11 Symbols on the QIAcube Connect Symbol Location Description Next to the Shaker Heat hazard – the temperature of the shaker can reach up to 70ºC (158ºF). Near the centrifuge; near the robotic arm Mechanical hazard — avoid contact with moving parts. -
Page 19: General Description
RNA cleanup. The user selects a protocol using the touchscreen and loads labware, samples, and reagents onto the QIAcube Connect worktable. The user then closes the instrument hood and starts the protocol, which provides all necessary commands for sample lysis and purification using QIAGEN spin columns. - Page 20 QIAcube Connect User Manual 09/2019...
-
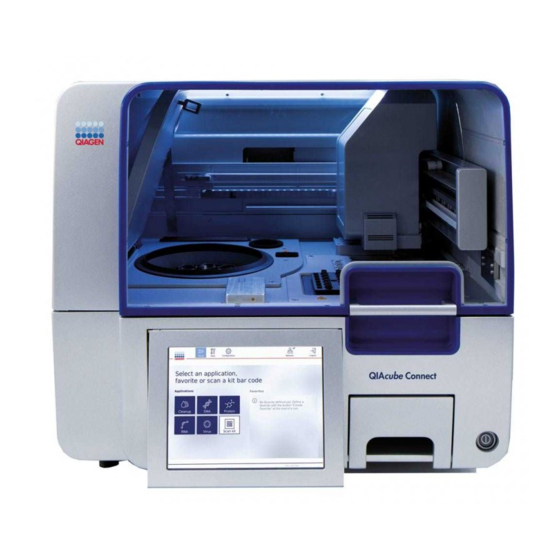
Page 21: External Features Of The Qiacube Connect
3.2 External features of the QIAcube Connect Front view of the QIAcube Connect Pulled-out touchscreen Rear view of QIAcube Connect Rear view of QIAcube Connect Touchscreen 2 USB ports on the left side of the touchscreen; 2 USB ports behind the touchscreen (Wi-Fi module plugged into 1 USB port) - Page 22 Technical Services. Power switch The power switch is located at the front right of the QIAcube Connect. To power ON the QIAcube Connect, press the switch. The beeper sounds, and the startup screen appears. The instrument then automatically performs initialization tests.
- Page 23 USB stick. Data files, such as support package, protocols or report files, can be transferred via the USB port from the QIAcube Connect to the USB stick. The USB ports can also be used to plug in an external 2D bar code reader.
- Page 24 OSHA : Occupational Safety and Health Administration (United States of America). ACGIH : American Conference of Government Industrial Hygienists (United States of America). † COSHH : Control of Substances Hazardous to Health (United Kingdom). ‡ QIAcube Connect User Manual 09/2019...
- Page 25 Power cord socket The power cord socket is located at the rear right of the QIAcube Connect and allows connection of the QIAcube Connect to a power outlet via the supplied power cord.
- Page 26 Only perform maintenance that is specifically described in this user manual. Cooling air outlet Cooling air outlets are located at the rear left side of the QIAcube Connect and allow cooling of the internal components of the QIAcube Connect. CAUTION...
-
Page 27: Internal Features Of The Qiacube Connect
3.3 Internal features of the QIAcube Connect Internal view of the QIAcube Connect. Centrifuge lid Microcentrifuge tube slots Centrifuge 3 Slots for tip racks Shaker Disposal slots for tips and columns Reagent bottle rack Robotic arm (includes 1 channel pipettor, gripper,... - Page 28 Rotor adapter A disposable rotor adapter holds a QIAGEN spin column and a microcentrifuge tube in a centrifuge bucket during sample processing. If required by the protocol, an additional column (e.g., QIAshredder column) can be placed in the middle position of the rotor adapter. For ease of use and high process safety, the rotor adapters are designed so that they fit into a centrifuge bucket only in the correct orientation.
- Page 29 Risk of personal injury and material damage [W5] To prevent plastic crash, load the tubes properly. After a plastic crash, sharp plastic particles could be inside the centrifuge. Be careful when handling items inside the centrifuge. QIAcube Connect User Manual 09/2019...
- Page 30 Carefully remove the samples after a run. Reagent bottle rack The reagent bottle rack holds up to six 30 ml QIAcube Connect specific reagent bottles and, for ease of use and high process safety, fits onto the QIAcube Connect worktable only in the correct orientation.
- Page 31 K or another enzyme is required for the purification protocol. Tip rack slots Three tip racks can be placed on the QIAcube Connect worktable. Tips can be purchased in prefilled tip racks holding 200 µl filter-tips or 1000 µl filter tips, regular or wide-bore.
- Page 32 Used columns (e.g., QIAshredder columns) are discarded through this slot into the waste drawer. Robotic arm The robotic arm provides accurate and precise positioning of the robotic gripper and pipetting system on the QIAcube Connect worktable and includes an optical and ultrasonic sensor, as well as a UV LED. WARNING...
- Page 33 Pipetting system The QIAcube Connect is equipped with a single-channel pipetting system that moves in the X, Y and Z directions. The dilutor, fitted with a tip adapter, is connected to a precision syringe pump, which enables accurate transfer of liquids. The tip adapter allows aspiration and dispensing of liquid through an attached disposable tip.
- Page 34 WARNING Do not expose your skin to UV-C light from the UV LED lamp. External hand scanner The QIAcube Connect is equipped with a 2D handheld scanner to allow kit bar code and sample bar code scanning. WARNING Risk of personal injury...
-
Page 35: Installation Procedures
AC power outlet. The power line to the instrument should be voltage regulated and surge protected. Ensure that the QIAcube Connect is positioned so that it is easy to access the power connector at the back of the instrument and the power switch on the front at all times, and that it is easy to power the instrument OFF and disconnect it. - Page 36 The QIAcube Connect operates at: 100–240 V AC, 50/60 Hz, 650 VA Ensure that the voltage rating of the QIAcube Connect is compatible with the AC voltage available at the installation site. Mains supply voltage fluctuations are not to exceed 10% of nominal supply voltages.
-
Page 37: Installation Of Ac Power Cord
4.2 Installation of AC power cord The AC power cord connects to the socket located at the rear of the QIAcube Connect, and the other end to the AC power outlet. -
Page 38: Installing The Qiacube Connect
Connect has equilibrated to ambient temperature before operating it. 8. Retain the package in case you need to transport the QIAcube Connect in the future. Refer to section 4.6, Packing the QIAcube Connect for more details. Using the original package minimizes the possibility of damage during transportation of the QIAcube Connect. - Page 39 2. Ensure that the power switch is set to OFF: outer position is OFF and inner position is ON. 3. Check that the voltage rating on the label at the back of the QIAcube Connect matches the voltage available at the installation site.
- Page 40 1. Check that the QIAcube Connect operates properly: 2. Make sure that the hood of the QIAcube Connect is closed. 3. Power ON the QIAcube Connect using the power switch (inner position is ON; outer position is OFF). The beeper sounds and the startup screen appears.
- Page 41 Install the rotor nut on top of the rotor and tighten using the rotor key supplied with the QIAcube Connect. Make sure that the rotor is securely seated. Check that all buckets are properly suspended and can swing freely.
-
Page 42: Configuration Of The Qiacube Connect
4.5 Configuration of the QIAcube Connect When using the QIAcube Connect for the first time, it is recommended to define the required settings. Other settings can be made later when needed. For details on using the touchscreen and software, refer to section 5.1 QIAcube Connect software on page 67. - Page 43 For details, refer to section 5.1.1 Entering text and numbers. 7. Press Log in. The Home (main) screen appears. Home (main) screen 8. If you need to return to the Home screen from another screen, press the Setup icon. QIAcube Connect User Manual 09/2019...
- Page 44 Current date and time When using the QIAcube Connect for the first time, it is recommended to set the current date and time. 1. On the main screen, press the Configuration icon. 2. Press the System tab. This tab is only available for users assigned the Administrator role.
- Page 45 Display brightness Internal light The settings apply to the current user. 1. On the main screen, press the Configuration icon. 2. Press the Settings tab. This tab is available for all users. QIAcube Connect User Manual 09/2019...
- Page 46 4.5.3 Managing users The QIAcube Connect is provided with a User Management feature. This feature enables you to set up multiple users with two different roles: administrator and operator. When you use the QIAcube Connect for the first time, a default user named Admin is already pre-installed and configured with both roles assigned.
- Page 47 The E-mail address field is optional. The system does not confirm whether the e-mail address entered is valid. 5. Press OK to save the new user. Changing data for an existing user 1. Press the Configuration icon on the main screen. 2. Press the Users tab. QIAcube Connect User Manual 09/2019...
- Page 48 5. To confirm the changes, press OK. To close the dialog and discard the changes, press Cancel. Deleting or temporarily deactivating a user 1. To delete a user, press the Delete icon ( ) in the user profile row. It is not possible to delete the currently logged-in administrator. QIAcube Connect User Manual 09/2019...
- Page 49 A user with the role Administrator is allowed to change the password for every user by editing the user profile. Refer to section Changing data for an existing user on page 47 for more details. Passwords are never displayed in this process, so the administrator cannot view a user’s password. QIAcube Connect User Manual 09/2019...
- Page 50 QIAGEN’s Application Lab Specialists can also customize these protocols or develop new protocols depending on your needs. Protocols that are no longer required can be easily removed from the QIAcube Connect. Protocols can only be managed by users assigned the Administrator role.
- Page 51 Note: Do not rename or modify the protocol files. Otherwise, they cannot be used. 2. Connect the USB stick to the QIAcube Connect using one of the USB ports at the left of the touchscreen. 3. Select the Configuration icon.
- Page 52 9. Wait a few seconds and then power ON the QIAcube Connect. To use the new protocols, log in again. To transfer all installed protocols to the USB stick, press Copy to USB. Deleting protocols Important: Before deleting, you should back up the protocols on the USB stick provided with the instrument.
- Page 53 3. The currently installed software version is shown at the right. 4. On a computer running Microsoft Windows, download the software to the main folder of the USB stick provided with the QIAcube Connect. Wait until the download has completed before removing the USB stick.
- Page 54 7. The software update tool is displayed. Press Start update to start the software update. Press Cancel if you do not want to update the software. In this case, the instrument will initialize without updating the software. 8. Wait until the update has completed. QIAcube Connect User Manual 09/2019...
- Page 55 USB stick. 4.5.7 Network configuration and Q-Base connection The QIAcube Connect can be connected via intranet to Q-Base, allowing real-time status monitoring on the tablet delivered with the instrument. This configuration requires connecting the QIAcube Q-Base User Manual Connect to your network, either by LAN or by Wi-Fi, but not both.
- Page 56 Subnet mask and Gateway in the respective fields, using the IPv4 format shown in the picture above. Entering the DNS server is optional. These settings will not be validated by the QIAcube Connect. 5. Press Apply to confirm and save the settings made. QIAcube Connect User Manual 09/2019...
- Page 57 USB ports behind the touchscreen. Important: Always turn off the QIAcube Connect before you plug in or unplug the Wi-Fi USB device. Plug-and-play of the Wi-Fi USB device while the instrument is turned on is not supported.
- Page 58 Configuring Q-Base As a prerequisite for connecting to Q-Base, either LAN or Wi-Fi must be configured and at least one Q-Base device must be configured and running within the same network as QIAcube Connect. Refer to the Q-Base User Manual for more details on the Q-Base connection.
- Page 59 Q-Base User Manual for details. 5. Optionally, press Test to test the configured connection. Note: Do not press Test on the QIAcube Connect touchscreen before pressing Finish Configuration on the tablet. Otherwise the test will be unsuccessful. 6. Press Apply.
-
Page 60: Packing The Qiacube Connect
4.6 Packing the QIAcube Connect Warning: The QIAcube Connect is too heavy to be lifted by one person. To avoid personal injury or damage to the instrument, do not lift the instrument alone. WARNING Risk of personal injury and material damage [W2] The QIAcube Connect is too heavy to be lifted by one person. - Page 61 17. Place the handheld scanner into dedicated handheld scanner box. 18. Place the QIAcube Connect onto the pallet and put the black foam lid over the top of the instrument. Place the box onto the instrument. Important: When lifting the QIAcube Connect, slide your fingers under both sides of the instrument and keep your back straight.
- Page 62 Rotor with swing-out buckets Power cord 20. Seal the outside edges of the carton with tape to protect against moisture. Note: Using the original package minimizes potential damage during transportation of the QIAcube Connect. QIAcube Connect User Manual 09/2019...
-
Page 63: Operating Procedures
3.2 and 3.3. Important: The QIAcube Connect is designed for use with QIAGEN spin columns only. Geometry of spin columns manufactured by other suppliers may not be compatible with the QIAcube Connect. CAUTION Damage to the instrument... - Page 64 When using ethanol or ethanol-based liquids on the QIAcube Connect, handle such liquids carefully and in accordance with the required safety regulations. If liquid has been spilled, wipe it off and leave the QIAcube Connect hood open to allow flammable vapors to disperse.
- Page 65 Moving parts [W17] Avoid contact with moving parts during operation of the QIAcube Connect. Under no circumstances should you place your hands under the robotic arm when it is lowering. Do not attempt to move any tip racks or tubes whilst the instrument is operating.
- Page 66 WARNING/ Risk of personal injury and material damage [W22] CAUTION Only perform maintenance that is specifically described in this user manual. QIAcube Connect User Manual 09/2019...
-
Page 67: Qiacube Connect Software
QIAcube Connect software The QIAcube Connect is operated through a touchscreen, which guides you step-by-step through the correct loading of the work deck and selection of the protocol. General functions of the QIAcube Connect touchscreen are described below. Button/Icon Function Enables the user to scroll up through a list. - Page 68 Keyboard for editing a protocol parameter For protocol parameters, the value range is displayed. In the example shown in the screenshot above, values from 50–100 µl can be entered, but only in steps of 10 µl. QIAcube Connect User Manual 09/2019...
-
Page 69: Switching On The Instrument And Logging In
2. Switch on the instrument by pressing the power switch to the inner position. You will hear a sound (if sound settings are enabled), and a startup screen appears. The instrument automatically performs initialization tests. If the centrifuge lid was closed, it will open. QIAcube Connect User Manual 09/2019... - Page 70 User ID and Password again, ensuring that you enter the information correctly. The User ID is case sensitive. Information screen from failed login, for example, due to entering incorrect password QIAcube Connect User Manual 09/2019...
-
Page 71: Setting Up A Protocol Run
Refer to the kit handbook for more information, if required. 2. To start the run setup, select from Applications, Favorites or Scan kit. To scan the 2-D bar code of the QIAGEN kit, press Scan Kit and then use the handheld scanner, or just scan the bar code. - Page 72 Select the kit to be used for your run by touching the corresponding row. Only one kit can be selected per run. Information about the selected kit is shown in the right pane. 2. Press Next to proceed to defining the sample material. QIAcube Connect User Manual 09/2019...
- Page 73 1. Select the protocol by touching the corresponding row. Only one protocol can be selected per run. Make sure to read all essential and critical information in the right pane before proceeding to the next step. 2. Press Next to proceed to defining the run parameters. QIAcube Connect User Manual 09/2019...
- Page 74 Refer to section 5.1.1 for details about the on-screen keyboard. 2. Press Next to proceed to defining the sample number. The software automatically proceeds to the next screen. Follow the instructions in the corresponding section below. 5.3.5 Define sample number screen QIAcube Connect User Manual 09/2019...
- Page 75 Note: To avoid run issues and to guarantee proper sitting of buffer bottle rack, the buffer bottle rack must be equipped with rack labeling strips. Depending on the selected protocol, loading of buffer bottles might not be required. In this case, the software will indicate that this step can be skipped. QIAcube Connect User Manual 09/2019...
- Page 76 When using ethanol or ethanol-based liquids on the QIAcube Connect, handle such liquids carefully and in accordance with the required safety regulations. If liquid has been spilled, wipe it off and leave the QIAcube Connect hood open to allow flammable vapors to disperse.
- Page 77 Press Move left. The robotic arm will start to move. The hood can remain open during this movement. Ensure that you stand clear of the instrument while the robotic arm is moving. Wait until the robotic arm has completed its movements. QIAcube Connect User Manual 09/2019...
- Page 78 There are 3 different kinds of tip racks that can be used on the QIAcube Connect, depending on the protocol selected. A blue rack for 200 µl filter-tips, a light grey rack for 1000 µl filter- tips and a dark grey rack for 1000 µl wide-bore filter-tips.
- Page 79 Depletion Spin Columns), remove the screw cap from the spin column, and screw on a spin column adapter ring (not supplied with the QIAcube Connect; see Appendix B – QIAcube Connect Accessories) onto the column. The spin column adapter ring enables the robotic gripper to transfer the column during the purification procedure.
- Page 80 Correctly loaded rotor adapter. A Rotor adapter is correctly loaded, and the 1.5 ml microcentrifuge tube lid is in the correct position; B Correctly loaded rotor adapter seen from the side. QIAcube Connect User Manual 09/2019...
- Page 81 Risk of personal injury and material damage [W4] Do not use damaged rotor adapters. The rotor adapters can only be used once. High g forces exerted in the centrifuge can cause damage to used rotor adapters. QIAcube Connect User Manual 09/2019...
- Page 82 The table shows how to load and position each rotor adapter. The Pos. column indicates the position in the rotor adapter, and the Lid position column indicates where to place the lid of a particular tube. QIAcube Connect User Manual 09/2019...
- Page 83 For workflows including the shaker unit, refer to section Loading the centrifuge in case samples are loaded onto shaker on page 82. The procedures for loading samples into the centrifuge are shown on both sides of the screen. QIAcube Connect User Manual 09/2019...
- Page 84 If required and described in the table, cut off the lid, or screw on a spin-column adapter ring and break off the bottom of the spin column. 5. Repeat steps 1–4 until all rotor adapters have been prepared. 6. Press Next to proceed loading of rotor adapters into centrifuge. QIAcube Connect User Manual 09/2019...
- Page 85 The Load shaker screen guides you through the loading of the shaker. Depending on the selected protocol, loading of the shaker might not be required. In this case, the software will indicate that this step can be skipped. QIAcube Connect User Manual 09/2019...
- Page 86 Note: Depending on the protocol used, positions 1 and 7 may be used differently from the other positions. Ensure that you follow the instructions in the table and in the schematic to load QIAcube Connect User Manual 09/2019...
- Page 87 In this screen below, no lid or shaker rack plug is required for these positions. Example of protocol using shaker positions 1 and 7 differently. For this example, do not load lids or shaker rack plugs for these positions. QIAcube Connect User Manual 09/2019...
- Page 88 Do not use 1.5 ml microcentrifuge tubes on the shaker. These microcentrifuge tubes can cause filter- tips to stick during sample transfer. Using this tube on the shaker can damage the pipetting system and can cause a centrifuge crash. QIAcube Connect User Manual 09/2019...
-
Page 89: Starting The Protocol Run
Important: Do not open the instrument hood during a run. In the event the hood is opened during a run, the run will stop. If the tip adapter has picked up a tip, it must be removed manually. Note: For the very first run, the estimated run duration is not available. QIAcube Connect User Manual 09/2019... -
Page 90: End Of The Protocol Run
This name will appear in the Home screen in the Favorites section at the right. If this section is filled, the earliest created favorite will be removed from the section to make space for the new favorite. QIAcube Connect User Manual 09/2019... -
Page 91: Stopping A Protocol Run
200. If this number is reached, the oldest run report will be replaced by the new run report. To transfer run reports to the USB stick, proceed as follows: 1. Press the Tools icon. QIAcube Connect User Manual 09/2019... -
Page 92: Operating The Heater/Shaker
Important: Do not remove the USB stick while the files are downloading. Wait until the download is completed. 5.8 Operating the heater/shaker The heater/shaker can be operated individually if the QIAcube Connect is not running a protocol. The heating and shaking functions are not interlinked and can be used independently or in combination. - Page 93 5. Load the shaker rack tubes containing samples. 6. Close the hood to start run. The remaining time and current temperature and status of the heater are displayed on the screen. Wait until the operation is completed. QIAcube Connect User Manual 09/2019...
-
Page 94: Operating The Centrifuge
CAUTION Damage to the instrument [C7] The QIAcube Connect must not be used if the centrifuge lid is broken, or if the lid lock is damaged. Make sure that no loose material is inside the centrifuge during operation. Make sure that the rotor is installed correctly and that all buckets are properly mounted, regardless of the number of samples to be processed. - Page 95 Damage to the instrument [C8] After a power failure, do not move the z-module (robotic arm) manually in front of the instrument. Damage may occur if the QIAcube Connect hood is closed and collides with the z-module. CAUTION Risk of overheating...
- Page 96 10. Close the hood and press Start to start centrifugation. The Close centrifuge lid button is not needed to start a centrifuge run, as the lid will close automatically. It is only required in case you need to prepare the QIAcube Connect for shipment.
-
Page 97: Logging Out
To log out from the instrument, follow these steps: 1. Press Logout at the top right of the screen. 2. To log out, confirm the message with OK. To stay logged in, press Cancel. 3. The Login screen appears. QIAcube Connect User Manual 09/2019... -
Page 98: Maintenance Procedures
The software provides step-by-step guidance under Tools/Maintenance for the maintenance procedures listed above, except for the regular maintenance. Following these procedures ensures that the QIAcube Connect is free from dust and liquid spills. Select the cleaning agent according to the objective of the cleaning procedure, the sample material used and the downstream assay. -
Page 99: Cleaning Agents
Mild Detergents (e.g., Mikrozid ® AF sensitive) 70% ethanol (for cleaning the worktable only; not for cleaning the QIAcube Connect hood) 6.1.1 Disinfection Ethanol-based disinfectants can be used for disinfection of surfaces, such as the worktable or inside the centrifuge: e.g., 25 g ethanol and 35 g 1-propanol per 100 g liquid or Mikrozid Liquid (Schülke... - Page 100 Connect workstation. Spray bottles should be used only for items that have been removed from the workstation. If solvents or saline, acidic, or alkaline solutions are spilt on the QIAcube Connect or if QIAGEN buffers splash the instrument hood, wipe the spilt liquid away immediately.
- Page 101 When using ethanol or ethanol-based liquids on the QIAcube Connect, handle such liquids carefully and in accordance with the required safety regulations. If liquid has been spilled, wipe it off and leave the QIAcube Connect hood open to allow flammable vapors to disperse.
-
Page 102: Servicing
6.2 Servicing Contact your local QIAGEN Field Service Specialist or your local distributor for more information about flexible Service Support Agreements from QIAGEN. WARNING Risk of personal injury and material damage [W1] Improper use of the QIAcube Connect may cause personal injuries or damage to the instrument. -
Page 103: Daily Maintenance Procedure
3. Replace the lids of the reagent bottles and close tightly. Store the bottles according to the instructions in the relevant kit handbook. You can now run another protocol or switch off the QIAcube Connect. 6.4 Daily maintenance procedure After running the last protocol of the day, perform the daily maintenance procedure. The software guides you through each step to be performed: 1. -
Page 104: Monthly Maintenance Procedure
(refer to section 6.1 Cleaning agents). 1. To start the monthly maintenance, press the Tools icon. 2. Then press the Monthly subtab under the Maintenance tab. The screen shows the Last Executed and the Next Due monthly maintenance dates. QIAcube Connect User Manual 09/2019... -
Page 105: Periodic Maintenance Procedure
10. Press Done only when the steps listed above have been successfully completed. The date of the last performed monthly maintenance is updated automatically. Important: Inspect the waste drawer during maintenance. Contact QIAGEN Technical Services if any broken parts are observed. - Page 106 Cleaning the centrifuge Cleaning of the centrifuge arm must be performed periodically or could be performed if required. For example, the centrifuge must be cleaned in case of plastic crash or spillage of liquids due to crash. QIAcube Connect User Manual 09/2019...
- Page 107 5. Turn on the instrument. Press the Tools icon and press the Centrifuge subtab under the Maintenance tab. 6. When cleaning is completed, press Start again then press Done to confirm cleaning. The date of the last performed cleaning of centrifuge is updated automatically. QIAcube Connect User Manual 09/2019...
- Page 108 6. Carefully check the rotor for damage. If the rotor is damaged or shows signs of wear or corrosion, do not use the rotor. Contact QIAGEN Technical Services. 7. Apply a few drops of mineral oil (Anti-Corrosion Oil (rotor), cat. no. 9018543) on a soft, lint- free cloth, and wipe the bucket mount and rotor claw.
- Page 109 After cleaning the rotor thread, apply a few drops of mineral oil (Anti-Corrosion Oil (rotor), cat. no. 9018543) on a lint-free cloth, and wipe the thread. A thin, invisible oil film should cover the rotor thread but no droplets or smear should appear. QIAcube Connect User Manual 09/2019...
- Page 110 Risk of personal injury and material damage [W25] WARNING To prevent the rotor nuts from loosening during operation of the centrifuge, securely tightened the nuts using the rotor key supplied with QIAcube Connect. QIAcube Connect User Manual 09/2019...
- Page 111 2. In the Set speed and Set duration fields, set the speed to 10,000 g and the duration to 1 min (1:0 m:s), respectively. 3. Press Start to begin the centrifuge run. 4. Carefully listen to the sound during centrifugation. See below for more details regarding the sound. QIAcube Connect User Manual 09/2019...
- Page 112 Note: The Open centrifuge lid and Close centrifuge lid buttons are not needed to start a centrifuge run, as the lid will close automatically. Instead, they are needed in case you need to prepare the QIAcube Connect for shipment or during troubleshooting. 6.6.4...
- Page 113 7. Wait until the test has been completed and then press Next. 8. After the protocol is completed, open the QIAcube Connect hood and remove the buffer bottle and tips to store them accordingly. 9. Remove the tube and visually check if liquid is present: If no liquid is present, press Yes to record that the test passed.
- Page 114 Dripping on the worktable The replacement procedure requires the O-Ring change tool and an O-Ring. See Appendix B – QIAcube Connect Accessories for ordering details. O-Ring tool with prepared new O-Ring The O-Ring replacement is semi-automatically and includes movement of robotic arm.
- Page 115 3. To prepare the O-Ring tool, perform the following steps: Slide the new O-Ring over the small end of the peg. Push the grey lever until you reach the black stop, and insert the small end of the peg into the hole. QIAcube Connect User Manual 09/2019...
- Page 116 Open the grey lever and insert the peg with small end first into hole as shown. 4. Press Next to begin loading of the O-Ring tool into the QIAcube Connect. QIAcube Connect User Manual 09/2019...
- Page 117 6. Close the hood and press Next to begin cutting of the O-Ring. 7. To cut and remove the O-Ring, perform the following steps: To cut the O-Ring, open the hood and rotate the grey lever counter-clockwise until you reach the black stop. QIAcube Connect User Manual 09/2019...
- Page 118 [W1] Improper use of the QIAcube Connect may cause personal injuries or damage to the instrument. The QIAcube Connect must only be operated by qualified personnel who have been appropriately trained. Servicing of the QIAcube Connect must only be performed by a QIAGEN Field Service specialist.
- Page 119 UV decontamination must be performed daily. It helps to reduce possible pathogen or nucleic acid contamination of the QIAcube Connect worktables. The efficiency of inactivation is to be determined for each specific organism and depends, for example, on layer thickness and sample type.
-
Page 120: Decontaminating The Qiacube Connect
6.7 Decontaminating the QIAcube Connect If the QIAcube Connect is contaminated with infectious material, it should be decontaminated. If hazardous material is spilt on or inside the QIAcube Connect, the user has responsibility for carrying out appropriate decontamination. The QIAcube Connect should also be decontaminated before shipping (e.g., back to QIAGEN). In this case, a decontamination certificate must be completed to confirm that the decontamination procedure has been carried out. -
Page 121: Troubleshooting
This section provides information about what to do if an error occurs while using the QIAcube Connect. 7.2 Contacting QIAGEN Technical Services Whenever encountering a QIAcube Connect error, be sure to have the following information at hand: Protocol name and version (found in the report file) ... -
Page 122: Operation
3. Connect the USB stick to one of the 2 USB ports next to the touchscreen. 4. Press Create and Download. The support package will be created and saved on the USB stick in the folder Support_Package. The support package is a zip file that can be sent to QIAGEN Technical Services. - Page 123 Handle the waste drawer with both hands when inserting or removing the drawer. Pipet tips not disposed of correctly Make sure the top of the tip disposal slot (refer to section 3.3) is not broken. QIAcube Connect User Manual 09/2019...
- Page 124 Contact QIAGEN Technical Services for repair. Error when copying files to USB Power OFF the QIAcube Connect, wait for a few minutes, and power it ON again. Save the file(s) to the USB stick again. Check the USB stick on a PC to ensure it is functional.
- Page 125 1. Note the step at which the protocol stopped. This is displayed in the touchscreen. 2. Remove the samples and reagents from the QIAcube Connect. 3. Refer to the appropriate protocol in the relevant kit handbook and continue sample processing manually.
- Page 126 6. Remove the waste drawer. The centrifuge release cord will be visible on the left side of the waste drawer compartment. Centrifuge release cord Removed waste drawer 7. Pull the cord firmly to release the lid from the lock. 8. Manually raise the centrifuge lid. QIAcube Connect User Manual 09/2019...
- Page 127 Contact QIAGEN Technical Services for instructions on how to reset the lid. Liquid spills in the centrifuge The rotor adapter is designed for use with QIAGEN automated protocols. Do not fill the rotor adapters with liquid. Liquid spills may occur if QIAGEN spin columns become blocked due to sample overloading. Do not exceed the maximum amount of starting material.
- Page 128 It is recommended to use a touch pen or an unused tip for optimal calibration results. In case you use a tip, discard the tip after calibration. To re-calibrate the touchscreen: 1. Turn OFF the QIAcube Connect. 2. Wait a few minutes and then turn ON the instrument again. QIAcube Connect User Manual 09/2019...
- Page 129 3. In the second screen press the QIAGEN logo. Note: If you do not press the logo, the instrument will continue initialization. 4. Press Calibrate touchscreen. 5. An information message is displayed. The message will close automatically after 10 seconds.
- Page 130 7. The calibration is finished after all five positions have been touched. Calibration results are saved automatically. The previous screen is shown again. 8. Press Start. The instrument continues initialization using the new calibration settings. To cancel the calibration process, turn OFF the QIAcube Connect. QIAcube Connect User Manual 09/2019...
-
Page 131: Glossary
Power switch A button located at the front of the QIAcube Connect in the bottom-right corner. It allows the user to switch the QIAcube Connect on and off; inner position is ON and outer position is OFF. Protocol A set of instructions for the QIAcube Connect that allows the instrument to automate a nucleic acid or protein purification procedure. - Page 132 A metal probe installed on the pipettor head. During operation of the QIAcube Connect, the tip adapter picks up filter-tips from the worktable. Tip disposal slots Slots in the QIAcube Connect worktable through which used filter-tips are discarded into the waste drawer.
-
Page 133: Appendix A - Technical Data
9 Appendix A – Technical data QIAGEN reserves the right to change specifications at any time. 9.1 Operating conditions Power 100–240 V AC, 50/60 Hz, 650 VA Mains supply voltage fluctuations are not to exceed 10% of nominal supply voltages. -
Page 134: Mechanical Data And Hardware Features
Dimensions Width: 65 cm (25.6 in.) (hood open) Height: 86 cm (34 in.) Depth: 62 cm (24.4 in.) Mass QIAcube Connect: 71.5 kg (157.6 lb.) Accessories: 3 kg (6.6 lb.) Centrifuge 10,640 rpm maximum 12,000 maximum Swing-out rotor, maximum 45°... -
Page 135: Declaration Of Conformity
Symbol Contrast: 20% minimum reflectance difference Decode Capability: Reads standard 1D, PDF, 2D, Postal and OCR symbologies Software QIAGEN protocols are preinstalled on the QIAcube Connect or can be downloaded at www.qiagen.com/MyQIAcubeConnect. 9.5 Declaration of Conformity Name and address of the legal manufacturer:... -
Page 136: Fcc Declaration
Recycling can be provided by QIAGEN upon request at additional cost. In the European Union, in accordance with the specific WEEE recycling requirements and where a replacement product is being supplied by QIAGEN, free recycling of its WEEE-marked electronic equipment is provided. -
Page 137: Liability Clause
Representations and warranties made by any person, including representatives of QIAGEN, which are inconsistent or in conflict with the conditions in this warranty shall not be binding upon the Company unless produced in writing and approved by an officer of QIAGEN. -
Page 138: Appendix B - Qiacube Connect Accessories
990392 Connect All configurations include: QIAcube Connect robotic workstation for automated purification of DNA, RNA or proteins using QIAGEN spin-column kits, plus tablet and Q-Base to connect to local network, bar code reader and 1-year warranty on parts and labor. - Page 139 For up-to-date licensing information and product-specific disclaimers, see the respective QIAGEN kit handbook or user manual. QIAGEN kit handbooks and user manuals are available at www.qiagen.com or can be requested from QIAGEN Technical Services or your local distributor.
-
Page 140: Appendix C - Consignes De Sécurité
L’entretien du QIAcube Connect doit être effectué uniquement par des spécialistes de l’entretien sur site QIAGEN ou par des techniciens d'un agent agréé. Procéder à la maintenance comme décrit dans Maintenance Procedures, section 6. QIAGEN facture les réparations dues à une maintenance inappropriée. QIAcube Connect User Manual 09/2019... - Page 141 Connect. Tout dommage causé par de l’eau ou des produits chimiques mettra fin à la garantie. En cas d’urgence, éteindre le QIAcube Connect à l’aide de l’interrupteur d’alimentation situé à l’arrière de l’appareil et débrancher le cordon d’alimentation de la prise de courant.
- Page 142 L’utilisation d’autres réactifs et d’autres substances peut provoquer un incendie ou une explosion. Si des substances dangereuses sont renversées sur le QIAcube Connect ou à l’intérieur de celui-ci, l’utilisateur porte l’entière responsabilité de la réalisation de la procédure de décontamination appropriée.
-
Page 143: Sécurité Électrique
Risque de dommages corporels et matériels Réaliser uniquement la maintenance décrite spécifiquement dans ce manuel. Afin que le QIAcube Connect fonctionne de manière satisfaisante et en toute sécurité, suivre les conseils suivants : Les cordons d’alimentation de l’appareil doivent être branchés sur des prises d’alimentation ... -
Page 144: Atmosphère
Si l’appareil présente un danger électrique, empêcher le reste du personnel de s’en servir et contacter les Services Techniques de QIAGEN. L’appareil peut présenter un danger électrique dans les cas suivants : Le cordon d’alimentation présente des signes de détérioration. -
Page 145: Produits Chimiques
OSHA: Occupational Safety and Health Administration (États-Unis d’Amérique) (Administration pour la santé et la sécurité du travail). ACGIH: American Conference of Government Industrial Hygienists (États-Unis d’Amérique) (Conférence américaine des † hygiénistes industriels gouvernementaux). COSHH: Control of Substances Hazardous to Health (Royaume-Uni) (Contrôle des substances dangereuses pour la santé). ‡ QIAcube Connect User Manual 09/2019... -
Page 146: Traitement Des Déchets
Ces déchets doivent être convenablement collectés et mis au rebut conformément aux règles de sécurité locales. Pour plus d’informations sur la mise au rebut du QIAcube Connect, consultez la section 9.6 Waste Electrical and Electronic Equipment (WEEE). -
Page 147: Dangers Mécaniques
11.7 Dangers mécaniques Le capot du QIAcube Connect doit rester fermé pendant le fonctionnement de l’instrument. Ouvrir le capot uniquement lorsque les instructions d’utilisation vous demandent de le faire. Lors du chargement de la table de travail, restez toujours à bonne distance de l’instrument. Ne vous penchez pas sur la table de travail quand le bras robotisé... - Page 148 Détérioration de l’instrument [C7] Le QIAcube Connect ne doit pas être utilisé si le capot de la centrifugeuse est cassé ou si le verrou du capot est endommagé. Veillez à ce qu’aucun résidu ne se trouve à l’intérieur de la centrifugeuse en cours de fonctionnement.
-
Page 149: Dangers Liés À La Chaleur
Risque d’explosion [W23] AVERTISSEMENT Lors du nettoyage du QIAcube Connect avec un désinfectant à base d’alcool, laisser la porte du QIAcube Connect ouverte pour permettre aux vapeurs inflammables de s’évaporer. Nettoyer le QIAcube Connect uniquement quand les composants de la table de travail ont refroidi. -
Page 150: Sécurité Contre Les Rayonnements
[C11] N’utilisez pas de flacons pulvérisateurs contenant de l’alcool ou un agent désinfectant pour nettoyer les surfaces du QIAcube Connect. Les flacons pulvérisateurs ne doivent être utilisés que pour nettoyer les éléments qui ont été retirés de la table de travail. - Page 151 AVERTISSEMENT Risque de blessure personnelle [W30] Lumière laser avec niveau de danger 2 : Ne regardez pas fixement le faisceau lumineux lors de l’utilisation du lecteur de code-barres portable. QIAcube Connect User Manual 09/2019...
-
Page 152: Symboles Sur Le Qiacube Connect
11.11 Symboles sur le QIAcube Connect Symbol Location Description Agitateur Risque de brûlures — la température de l’agitateur peut atteindre jusqu’à 70°C (158 °F) Près de la centrifugeuse; près du bras Danger mécanique — éviter d’entrer en contact robotique avec les parties mobiles Sur l’instrument, près du portoir de... -
Page 153: Appendix D - Sicherheitshinweise
Servicespezialisten des QIAGEN Außendiensts oder Servicetechniker eines autorisierten Vertreters durchgeführt werden. Führen Sie alle Wartungsarbeiten gemäß den Anweisungen unter Maintenance Procedures, Abschnitt 6, durch. QIAGEN stellt Reparaturen, die auf nicht fachgerecht durchgeführte Wartungsmaßnahmen zurückzuführen sind, in Rechnung. QIAcube Connect User Manual 09/2019... - Page 154 Vermeiden Sie es, Wasser oder Chemikalien auf dem QIAcube Connect zu verschütten. Durch verschüttetes Wasser oder verschüttete Chemikalien verursachte Geräteschäden sind nicht durch die Garantie abgedeckt. Schalten Sie im Notfall den QIAcube Connect aus (der Netzschalter befindet sich auf der Gerätevorderseite), und ziehen Sie den Netzstecker aus der Steckdose. ACHTUNG Beschädigung des Geräts...
- Page 155 Reagenzien und Substanzen kann zu einem Brand oder zu einer Explosion führen. Falls Gefahrstoffe auf dem oder im QIAcube Connect verschüttet werden, ist der Benutzer für die Durchführung einer entsprechenden Dekontamination verantwortlich. Hinweis: Stellen Sie keine Gegenstände oben auf der Gerätehaube des QIAcube Connect ab.
-
Page 156: Schutz Vor Stromschlag
Daten auf dem Typenschild des Geräts. WARNUNG Gefährdung durch Elektrizität [W10] Unter keinen Umständen darf das Gehäuse des QIAcube Connect geöffnet werden. Gefahr von Verletzungen und Sachbeschädigungen Keine Pflege- und Wartungsarbeiten durchführen, die nicht in diesem Handbuch beschrieben sind. -
Page 157: Atmosphären
Falls die elektrische Sicherheit bei der Bedienung des Geräts nicht mehr gewährleistet werden kann, muss das Gerät gegen unbefugte oder unabsichtliche Benutzung gesichert werden. Kontaktieren Sie anschließend den Technischen Service von QIAGEN. Die elektrische Sicherheit des Geräts ist nicht mehr gegeben, wenn: Das Netzkabel beschädigt ist. -
Page 158: Biologische Sicherheit
Arbeitsplatz auf übernationaler, nationaler und regionaler Ebene eingehalten werden. OSHA: Occupational Safety and Health Administration (Vereinigte Staaten von Amerika). ACGIH: American Conference of Government Industrial Hygienists (Vereinigte Staaten von Amerika). † COSHH: Control of Substances Hazardous to Health (Vereinigtes Königreich). ‡ QIAcube Connect User Manual 09/2019... -
Page 159: Chemikalien
Dämpfe abziehen können. WARNUNG Giftige Dämpfe [W14] Verwenden Sie keine Bleichmittel zum Reinigen oder Desinfizieren des QIAcube Connect Geräts. Bleichmittel können mit Salzen, die in den Puffern enthalten sind, reagieren und giftige Dämpfe erzeugen. WARNUNG Giftige Dämpfe [W15] Verwenden Sie zum Desinfizieren von gebrauchtem Labormaterial keine Bleichmittel. -
Page 160: Entsorgen Von Abfällen
Benutzte Kunststoff-Laborartikel können gefährliche Chemikalien enthalten. Derartige Abfälle müssen gemäß den geltenden regionalen Sicherheitsbestimmungen gesammelt und entsorgt werden. Weitere Informationen zur Entsorgung des QIAcube Connect finden Sie unter Abschnitt 9.6 Waste Electrical and Electronic Equipment (WEEE). WARNUNG Gefährliche Chemikalien und infektiöse Erreger [W16] In diesem Abfall können toxische Probenmaterialien enthalten sein, die... - Page 161 ACHTUNG Beschädigung des Geräts [C8] Bewegen Sie den Roboterarm nach einem Stromausfall nicht manuell vor das Gerät. Beim Schließen der QIAcube Connect Haube kann es zu Schäden kommen, wenn diese mit dem Roboterarm kollidiert. QIAcube Connect User Manual 09/2019...
-
Page 162: Hitzegefahr
Gebrauchsanweisung beschrieben sind. Explosionsgefahr [W23] WARNUNG Beim Reinigen des QIAcube Connect mit einem auf Alkohol basierenden Desinfektionsmittel muss die Tür des QIAcube Connect offengelassen werden, damit die brennbaren Dämpfe entweichen können. Den QIAcube Connect nur reinigen, sobald die entsprechenden Module auf der Arbeitsfläche abgekühlt sind. - Page 163 Gefahr von Verletzungen und Sachbeschädigungen [W25] WARNUNG Die Rotorschraube muss zur Sicherheit mit dem Rotorschlüssel angezogen werden, der zusammen mit dem QIAcube Connect geliefert wird. Sollte die Schraube nicht fest genug angezogen sein, kann sie sich während der Zentrifugation lösen. Gefahr durch UV-Strahlung...
-
Page 164: Strahlensicherheit
12.10 Strahlensicherheit WARNUNG Verletzungsgefahr [W29] Die Haut nicht dem UV-C-Licht von der UV-Lampe aussetzen. WARNUNG Verletzungsgefahr [W30] Laserlicht der Gefahrenklasse 2: Schauen Sie bei Verwendung des Bar code- Handscanners nicht in den Laserstrahl. QIAcube Connect User Manual 09/2019... -
Page 165: Symbols On The Qiacube Connect
12.11 Symbols on the QIAcube Connect Symbol Location Description Schüttler Verbrennungsgefahr — die Temperatur des Schüttlers kann bis zu 70°C (158°F) heiß werden Nahe der Zentrifuge; nahe des Mechanische Gefahr — Kontakt mit beweglichen Roboterarms Geräteteilen vermeiden Im Gerät, in der Nähe des Feuergefahr –... -
Page 166: Version History
Updated some screenshots all throughout the document. Added information on Section 5.3.7, “Loading tips and enzymes.” Added information on Section 5.6, “Stopping a protocol run.” Added information on Section 5.8, “Operating the heater/shaker.” HB-2594-001 January 2019 First release QIAcube Connect User Manual 09/2019... -
Page 167: Index
Instrument configuration, 42 Changing password, 49 Instrument operation, 62 Cleaning agents, 97 Intended use, 6 Column disposal slot, 32 Internal features of QIAcube Connect, 27 Configuration, 42 LAN configuration, 55 Changing password, 49 Liability Clause, 135 LAN, 55 Logging out, 95... - Page 168 Starting the protocol run, 87 Waste drawer, 24 Stopping a protocol run, 89 Waste Electrical and Electronic Equipment Switching on the instrument, 68 (WEEE), 133 Symbols on the QIAcube Connect, 18, 163 Wi-Fi configuration, 56 QIAcube Connect User Manual 09/2019...
- Page 169 (Veltek Associates, Inc.). Registered names, trademarks, etc. used in this document, even when not specifically marked as such, are not to be considered unprotected by law. HB-2594-002 09/2019 1115952 © 2019 QIAGEN, all rights reserved. QIAcube Connect User Manual 09/2019...
- Page 170 Technical Support www.support.qiagen.com QIAcube Connect User Manual 09/2019 1115952 09/2019 HB-2594-002...
Need help?
Do you have a question about the QIAcube Connect and is the answer not in the manual?
Questions and answers