Qiagen EZ2 Connect MDx User Manual
Hide thumbs
Also See for EZ2 Connect MDx:
- User manual (184 pages) ,
- Safety instructions and quick start manual (48 pages) ,
- Quick start (4 pages)

Related Manuals for Qiagen EZ2 Connect MDx


Summary of Contents for Qiagen EZ2 Connect MDx
- Page 1 March 2024 Connect MDx ® User Manual For use with software version 1.2 or higher The EZ2 Connect MDx is intended for in vitro diagnostic use. 9003230 QIAGEN GmbH QIAGEN Strasse 1, 40724 Hilden, GERMANY Sample to Insight...
-
Page 2: Table Of Contents
Contents Introduction ..............................5 About this user manual ......................... 5 General information..........................6 Intended use of the EZ2 Connect MDx ....................7 Research mode ........................... 7 Requirements for EZ2 Connect MDx users ....................7 Materials required ..........................8 Materials required but not provided ....................... 8 Glossary ............................. - Page 3 Installing the EZ2 Connect MDx ......................42 Packaging and transportation of the EZ2 Connect MDx ................. 49 Operating Procedures ..........................50 General information........................... 52 Starting the EZ2 Connect MDx ......................56 Configuring the EZ2 Connect MDx ...................... 58 Setting up a protocol run ........................92 Setting up the worktable ........................
- Page 4 California Proposition 65 Warning ......................169 Liability Clause ............................169 License Information ............................ 169 Appendix B – EZ2 Connect MDx Parts and Components/Consumables ..............170 Ordering Information ..........................170 Document Revision History ............................ 171 EZ2 Connect MDx User Manual 03/2024...
-
Page 5: Introduction
This user manual describes the EZ2 Connect MDx. Before using the EZ2 Connect MDx, it is essential that you read this user manual carefully and pay attention to the safety information. The instructions and safety information in the user manual must be followed to ensure safe operation of the instrument and to maintain the instrument in a safe condition. -
Page 6: General Information
QIAGEN customers are a major source of information regarding advanced or specialized uses of our products. This information is helpful to other scientists as well as to the researchers at QIAGEN. We therefore encourage you to contact us if you have any suggestions about product performance or new applications and techniques. -
Page 7: Intended Use Of The Ez2 Connect Mdx
Research Mode used for non-clinical laboratory research applications.* The usage of IVD protocols is only possible and strictly restricted to the IVD mode of the software. This user manual focuses on operating the EZ2 Connect MDx in the IVD mode of the software. -
Page 8: Materials Required
Additionally, the Research mode of the software supports the usage of EZ1&2™ or EZ2 kits for Life Science applications. Kits that are specific for the forensic version of the EZ2 (EZ2 Connect Fx) cannot be used with the EZ2 Connect MDx (e. g., the EZ1&2 DNA Investigator Kit). -
Page 9: Safety Information
Safety Information Before using the EZ2 Connect MDx, it is essential that you read this user manual carefully and pay attention to the safety information. The instructions and safety information in the user manual must be followed to ensure safe operation of the instrument and to maintain the instrument in a safe condition. -
Page 10: Proper Use
Risk of personal injury and material damage Do not attempt to move the EZ2 during operation. Perform the maintenance as described in the Maintenance Procedures section (see page 136). QIAGEN charges for repairs that are required due to incorrect maintenance. -
Page 11: Electrical Safety
Note: If operation of the instrument is interrupted in any way (e.g., due to interruption of the power supply or a mechanical error), first switch off the EZ2 Connect MDx instrument, then disconnect the electrical cord from the power supply before attempting troubleshooting or service activity. - Page 12 If liquid has spilled inside the instrument, switch off the instrument, and if the spill has not been completely contained in the bottom tray, disconnect it from the power outlet, and contact QIAGEN Technical Services for advice before attempting any troubleshooting.
-
Page 13: Operating Conditions
Slits and openings that ensure the ventilation of the instrument must not be covered. WARNING Risk of explosion The EZ2 is intended for use with reagents and substances supplied with QIAGEN kits. Use of other reagents and substances may lead to fire or explosion. CAUTION Damage to the instrument Direct sunlight may bleach parts of the instrument, cause damage to plastic parts. -
Page 14: Biological Safety
* OSHA — Occupational Safety and Health Organization (United States of America) † ACGIH – American Conference of Government Industrial Hygienists (United States of America) COSHH – Control of Substances Hazardous to Health (United Kingdom) ‡ EZ2 Connect MDx User Manual 03/2024... -
Page 15: Chemicals
Used consumables, such as reagent cartridges and disposable filter-tips, may contain hazardous chemicals or infectious agents from the purification process. Such waste must be collected and disposed of properly, according to local safety regulations. For information about how to dispose of the EZ2 Connect MDx, see Appendix A: Waste Electrical and Electronic Equipment (WEEE). -
Page 16: Mechanical Hazards
Mechanical hazards The hood of the EZ2 Connect MDx must remain closed during operation of the instrument. Only open the hood when instructed to do so by the instructions for use or when prompted by the GUI. The worktable of the EZ2 moves during operation of the instrument. While loading the worktable, always stand clear of the instrument. -
Page 17: Radiation
Radiation The EZ2 Connect MDx instrument has a UV LED lamp. The wavelength of the UV light produced by the UV LED lamp is 275 to 285 nm. This wavelength corresponds to ultraviolet light Type C, which can be used to support decontamination procedures. A mechanical lock ensures that the hood is closed for operation of the UV LED. - Page 18 Operate the EZ2 only as described in the Operating Procedures section (see page 50). QIAGEN charges for repairs that are required due to incorrect operation. WARNING Risk of fire When cleaning the EZ2 with alcohol-based disinfectant, leave the instrument door open to allow flammable vapors to disperse.
-
Page 19: Symbols On The Ez2 Connect Mdx Instrument
Symbols on the EZ2 Connect MDx instrument The following symbols appear on the EZ2 Connect MDx instruments. Symbol Location Description Heating system — inside instrument Heat hazard — the temperature of the heating system can reach up to 95ºC. Near the tip rack Biohazard —... - Page 20 Type plate on the back of the instrument Consult instructions for use. Type plate on the back of the instrument See warnings and precautions. Type plate on the back of the instrument Date of manufacture. EZ2 Connect MDx User Manual 03/2024...
-
Page 21: General Description
The EZ2 Connect MDx is designed to automate EZ1 DSP Kits available from QIAGEN (in the IVD mode of the software), processing of life science kits is also supported (in the Research mode of the software). Refer to Section 7 ”Research Mode” for details. -
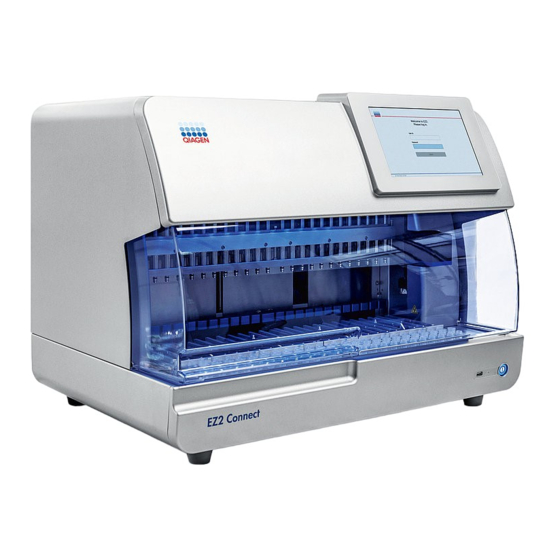
Page 22: External Features Of The Ez2 Connect Mdx
External features of the EZ2 Connect MDx ① ② ④ ③ Figure 1. The front of the EZ2. Touchscreen Hood Power button USB port Note: Two additional USB ports are located on the rear of the touchscreen (not shown). Figure 2. The back of the EZ2. - Page 23 Touchscreen The EZ2 Connect MDx has a 10.1-inch color touchscreen display with a resolution of 1280 x 800 pixels. The Graphical User Interface (GUI) is displayed on the touchscreen, allowing the user to operate the instrument, set up and start runs, perform maintenance procedures, monitor the instrument status, change settings, and download reports.
- Page 24 Hood The EZ2 Connect MDx hood protects the interior of the instrument from external contamination during protocol runs. Additionally, the hood protects operators from moving parts during protocol runs and UV irradiation during decontamination procedures. The hood must be closed to enable a protocol run to start. The hood is locked at the beginning of a run and remains locked throughout the duration of the run.
- Page 25 Power button The power button is located on the front of the EZ2 Connect MDx, on the bottom right corner. To turn on the EZ2, press the button. After you press the button, the power button lights up, the startup screen appears on the touchscreen, and the instrument initializes.
- Page 26 Important: Use only the USB stick provided by QIAGEN. Do not connect other USB stick devices to USB ports. Important: Do not remove the USB drive or interrupt power while downloading or transferring data or software to or from the instrument.
- Page 27 Power cord socket The power cord socket is located on the back of the EZ2 Connect MDx (highlighted white in image below) and is used for connecting the instrument to a power outlet via the supplied power cord. Figure 7. Location of power cord socket (highlighted by white frame).
- Page 28 To check the recommended supply voltage, refer to the specifications indicated on the type plate of the instrument. WARNING Risk of electric shock Do not open any panels on the EZ2. Risk of personal injury and material damage Only perform maintenance that is specifically described in this user manual. EZ2 Connect MDx User Manual 03/2024...
-
Page 29: Internal Features Of The Ez2
Risk of personal injury Hazard Level 2 laser light: Do not stare into the light beam when using handheld barcode scanner. Internal features of the EZ2 Figure 9. Interior of the EZ2 Connect MDx. Pipettor head Cartridge rack Tip rack... - Page 30 Moving parts To avoid contact with moving parts during the operation of the EZ2, the instrument must be operated with the hood closed. If the hood sensor or lock is not functioning correctly, contact QIAGEN Technical Services. WARNING Moving parts Avoid contact with moving parts during operation of the EZ2.
- Page 31 Worktable The EZ2 Connect MDx worktable contains 2 movable rack types (the cartridge rack and the tip rack) that hold all the labware required for a protocol run, and the heating system, which controls the temperature of liquids during a run.
- Page 32 Figure 13. An EZ1/2 cartridge. Tip rack Figure 14. Tip rack with four inserted tip holders/filter tips. Figure 15. Tip racks inside the instrument. EZ2 Connect MDx User Manual 03/2024...
- Page 33 Important: Only use QIAGEN recommended tubes (see respective EZ1 DSP or EZ1&2 kit handbooks for more information). Row B — may contain a tube with manually filled components, such as carrier RNA or Ethanol (see respective EZ1 DSP or ...
- Page 34 11 and 12 of the cartridge (depending of the used protocols). Figure 17. Heatable positions in the cartridge rack (highlighted by white frame). WARNING Hot surface The heating system can reach temperatures of up to 95°C (203°F). Avoid touching it when it is hot. EZ2 Connect MDx User Manual 03/2024...
- Page 35 Figure 18. The EZ2 bottom tray. Magnet module The EZ2 magnet module consists of magnets that are used to capture magnetic particles that are present in the liquid aspirated into the filter-tips. Figure 19. The EZ2 magnet module. EZ2 Connect MDx User Manual 03/2024...
- Page 36 Figure 20. Camera module (highlighted by white frame). The EZ2 Connect MDx has a built-in camera that is used for load checks, which includes reading bar codes from cartridges. Load checks are done before a protocol run starts. The camera checks if labware has been loaded in the correct positions. The results of the load check are shown on the screen.
- Page 37 Internal light The EZ2 Connect MDx has a built-in LED light. The internal light illuminates the worktable and informs about the current status of the run. There are 2 modes of the LED light: Blinking light – indicates that operator activity is required (e.g., when an error occurs).
-
Page 38: Installation Procedures
Site requirements The EZ2 Connect MDx must be located out of direct sunlight, away from heat sources, and away from sources of vibration and electrical interference. Refer to the Technical Specifications section (see page 164) for the operating conditions (temperature and humidity). - Page 39 Power requirements The EZ2 Connect MDx operates at: 100–240 V AC ± 10%, 50/60 Hz, 1000 VA. Make sure the voltage rating of the EZ2 is compatible with the AC voltage available at the installation site.
-
Page 40: Unpacking The Ez2 Connect Mdx
Grounding requirements To protect operating personnel, the National Electrical Manufacturers’ Association (NEMA) recommends the EZ2 Connect MDx should be correctly grounded (earthed). The instrument is equipped with a 3-conductor AC power cord that, when connected to an appropriate AC power outlet, grounds (earths) the instrument. To preserve this protection feature, do not operate the instrument from an AC power outlet that has no ground (earth) connection. - Page 41 To unpack the EZ2 Connect MDx 1. Before unpacking the EZ2 Connect MDx, move the package to the site of installation and check that the arrows on the package point upward. In addition, check whether the package is damaged. In case of damage, contact QIAGEN Technical Service.
-
Page 42: Installing The Ez2 Connect Mdx
14. Read the packing list to check all items have been received.. If anything is missing, contact QIAGEN Technical Services. 15. Check that the EZ2 is not damaged and that there are no loose parts. If anything is damaged, contact QIAGEN Technical Services. - Page 43 EZ2 section (see page 40). Installation of the AC power cord 1. Remove the power cord from the foam packing material on top of the EZ2 Connect MDx. Note: Only use the power cord that is supplied with the EZ2.
- Page 44 2. Before turning on the instrument, plug the Wi-Fi adapter into one of the 3 USB ports located on either the front of the instrument or on the rear of the touchscreen. Note: It may be more convenient to use the USB ports on the rear of the touchscreen. EZ2 Connect MDx User Manual 03/2024...
- Page 45 Note: Make sure that the EZ2 Connect MDx has equilibrated to ambient temperature before powering on. 1. To power on the EZ2 Connect MDx instrument, first ensure the hood is closed. After you press the power button, the power button lights up, the startup screen appears on the touchscreen, a sound plays, and the instrument initializes.
- Page 46 3. From the Configuration menu under the System tab, you can modify the Device Name, Date, and Time fields. You can also find information on the Software version, Serial number, and Firmware version. For further details, see the “Setting basic system data” section (see page 58). Figure 27. The System configuration tab. EZ2 Connect MDx User Manual 03/2024...
- Page 47 To avoid contact with moving parts during the operation of the EZ2, the instrument must be operated with the hood closed. If the hood sensor or lock is not functioning correctly, contact QIAGEN Technical Services. 1. Before first use in the final installation site, the camera exposure calibration must be performed.
- Page 48 4. During the calibration routine, the following message will be displayed: Figure 30. Camera exposure calibration is in progress message. Note: For support or technical advice regarding this, please contact QIAGEN Technical Service Department, or see our Technical Support Center at http://www.qiagen.com/service-and-support/technical-support...
-
Page 49: Packaging And Transportation Of The Ez2 Connect Mdx
The EZ2 is too heavy to be lifted by one person. To avoid personal injury or damage to the instrument, do not lift the instrument alone. Before transporting the EZ2 Connect MDx, the instrument must first be decontaminated. Refer to Disinfecting the EZ2 and Removing contamination sections for more details. Then prepare the instrument as follows. -
Page 50: Operating Procedures
EZ2” and “Internal features of the EZ2” sections (see pages 22 and 29, respectively). The EZ2 is intended to be used only in combination with QIAGEN kits indicated for use with the EZ2 for the applications described in the kit handbooks. - Page 51 EZ2 hood open to allow flammable vapors to disperse. WARNING Risk of explosion The EZ2 is intended for use with reagents and substances supplied with QIAGEN kits as outlined in respective instructions for use. Use of other reagents and substances may lead to fire or explosion. CAUTION...
-
Page 52: General Information
Hazard Level 2 laser light: Do not stare into the light beam when using handheld barcode scanner. General information The EZ2 Connect MDx is operated using a touchscreen display, which guides you step-by-step through the correct loading of the worktable and selection of the protocol. The following actions can be done using the User Interface: Guided run setups ... - Page 53 The part of the screen where the main content of each view is displayed. Footer The footer shows the current date and time and the name of the user that is currently logged in. EZ2 Connect MDx User Manual 03/2024...
- Page 54 Entering text and numbers An on-screen keyboard is used for entering text in editable fields of the EZ2 Connect MDx instrument software. To access the keyboard, tap the field that you want to edit. The keyboard appears. Figure 32. The on-screen keyboard.
- Page 55 To proceed, modify the text, so that it follows the requirements. Figure 34. Example of text field validation. If certain characters are not allowed in a field, they are deactivated on the keyboard and they cannot be entered in the field. EZ2 Connect MDx User Manual 03/2024...
-
Page 56: Starting The Ez2 Connect Mdx
Note: If this is the first time the EZ2 is switched on, enter the default user ID, that is “Admin”. 4. Tap the Password field and enter your password using the on-screen keyboard. Note: If this is the first time the EZ2 is switched on, enter the default password, which is ”Admin”. EZ2 Connect MDx User Manual 03/2024... - Page 57 To activate your account, contact your administrator. If you are the only user with an Administrator role and your account is locked, contact QIAGEN Technical Support. Note: It is recommended to create at least one more account with Administrator role in addition to the default Admin account.
-
Page 58: Configuring The Ez2 Connect Mdx
Configuring the EZ2 Connect MDx Administrators of the EZ2 Connect MDx can adjust instrument settings, manage users, upload and delete protocols, update software, and configure network connectivity. Note: Users whose role is defined as Operator do not have access to settings and configuration features of the software. - Page 59 8. To save the settings, tap Accept. Changing Instrument settings You can adjust the settings of the EZ2 Connect MDx according to your preferences. Note: Only Administrators can change Instrument settings. To modify Instrument settings, follow the steps below: 1.
- Page 60 Note: It is recommended to leave the lock screen function activated in order to avoid unauthorized access to the system. 7. Tap Accept to save the modified settings, or tap Cancel to restore previously saved settings. EZ2 Connect MDx User Manual 03/2024...
- Page 61 Managing users The EZ2 Connect MDx user management allows you to create and edit user accounts with 2 different roles: administrator and operator. When you use the EZ2 for the first time, a default user (Admin) is pre-installed and configured.
- Page 62 Retype password field. The password must meet the criteria displayed in the dialog. To look up the password policy, refer to the “Managing user security” section (see page 68). Figure 45. Set user password dialog. EZ2 Connect MDx User Manual 03/2024...
- Page 63 1. Tap the Configuration icon on the toolbar and tap the User management tab. Existing users are shown in the table. Figure 46. Configuration button on the toolbar. 2. Tap the User management tab. Existing users are shown in the table. Figure 47. The User Management tab. EZ2 Connect MDx User Manual 03/2024...
- Page 64 To look up the password policy, refer to the Managing user security section (see page 68). 8. Tap Change password. 9. To save the changes made to the user account, tap Accept. Note: For cybersecurity reasons, an operator must change the password provided by the administrator upon first login. EZ2 Connect MDx User Manual 03/2024...
- Page 65 3. Tap the table row that corresponds to the user that you want to deactivate or re-activate. 4. Tap Edit. 5. Tap the User status drop-down list and select the desired status (Active or Inactive). 6. Tap Accept. EZ2 Connect MDx User Manual 03/2024...
- Page 66 To change your own password, follow the procedure below. 1. Tap the Configuration icon on the toolbar. Figure 52. The Configuration button on the toolbar. 2. Tap Edit. Figure 53. User Management tab (visible only for Administrator roles). EZ2 Connect MDx User Manual 03/2024...
- Page 67 8. If you are logged in with an operator role, you can change your password directly in the Configuration screen. 9. If the current Admin password is unknown the password can be changed via the help center (see Section 4.3.5). EZ2 Connect MDx User Manual 03/2024...
- Page 68 1 to 360. It is recommended to set to at least 2 incorrect attempts. Otherwise, one typographical error will lock your account. Only administrators can unlock locked accounts. 7. Tap Accept to save all changes, or tap Cancel to restore previously saved settings. EZ2 Connect MDx User Manual 03/2024...
- Page 69 Software in order to update current or provide new protocols. If there is an updated version of the protocols available, it can be found on the EZ2 Connect MDx product page (www.qiagen.com). We recommend to check for the latest protocol package version.
- Page 70 Note: Not all protocols are installable at all instrument variants. Those protocols will be marked as not available on this instrument type if they are included in the protocol update package. The package can still be installed, just the marked protocols will not be installed. EZ2 Connect MDx User Manual 03/2024...
- Page 71 4. Tap OK. A notification will be sent when the download is finished. 5. Tap Configuration on the toolbar. 6. Tap Check for updates. 7. If protocol upload packages were downloaded, a pop-up window appears. EZ2 Connect MDx User Manual 03/2024...
- Page 72 Note: Downloaded protocol packages (via QIAsphere) can be deleted by tapping the Manage updates button (under Protocols tab) and selecting the protocol package to delete. Subsequently, tap Delete. Figure 64. Manage updates from QIAsphere dialog. EZ2 Connect MDx User Manual 03/2024...
- Page 73 Software to update current or provide new languages. If there is an updated version of the language pack available, it can be found on the EZ2 product page (www.qiagen.com). Plug in a USB stick with a language package.
- Page 74 7. Select the desired language package, and tap Install. Only one language package at a time can be uploaded. 8. From the Language screen, tap the Language settings dropdown. 9. Select the required language. 10. Tap Accept. Note: The EZ2 will need to be restarted to set the selected language. EZ2 Connect MDx User Manual 03/2024...
- Page 75 Important: Do not remove the USB drive while downloading or transferring data or software to or from the instrument. The latest version of the software can be found on the EZ2 product page (www.qiagen.com). We recommend to check for the latest version.
- Page 76 5. If a software update package has been detected on the USB stick, a pop-up window appears. Figure 70. Update package pop-up window. 6. Start the installation by choosing the desired software package and tap Update. 7. After the installation is finished, restart the device. EZ2 Connect MDx User Manual 03/2024...
- Page 77 Figure 71. Software update pop-up window. 3. Tap on Download. The download process will start. Figure 72. Download request notification pop-up window. 4. Tap OK. A notification will be sent when the download is finished. EZ2 Connect MDx User Manual 03/2024...
- Page 78 Configuring network and QIAsphere Base connections Configuring a LAN connection Note: LAN tab is only available to users with Administrator role. 1. Tap the Configuration icon on the toolbar. Figure 74. Configuration button on the toolbar. EZ2 Connect MDx User Manual 03/2024...
- Page 79 4. Tap Accept. Note: Configure the department network in a way that makes the EZ2 not visible outside the network of your organization. Note: Hardware address = MAC address Figure 76. Configured LAN tab. EZ2 Connect MDx User Manual 03/2024...
- Page 80 The SSID of the network must be visible. It is not possible to connect to a network with a hidden SSID. To configure the Wi-Fi connection, follow the steps below: 1. Tap the Configuration icon on the toolbar. Figure 77. The Wi-Fi tab. 2. Tap the Wi-Fi tab. Figure 78. The Wi-Fi tab. EZ2 Connect MDx User Manual 03/2024...
- Page 81 Note: If you failed to connect to the network several times despite entering the correct password, it is recommended to restart the instrument. Note: In case of errors, refer to the “Troubleshooting” section (page 159) for more information. EZ2 Connect MDx User Manual 03/2024...
- Page 82 For communication with QIAsphere Base, the outbound TCP port 443 (https) is used; ping is supported. 1. Tap the Configuration icon on the toolbar. Figure 82. Configuration button on the toolbar. EZ2 Connect MDx User Manual 03/2024...
- Page 83 Note: System Configuration is only available to users with Administrator role. Note: QIAGEN offers a dedicated service to establish the communication between the EZ2 Connect MDx and your LIMS system. If you wish QIAGEN to set up such a connection, contact your QIAGEN Sales Representative to request a quotation.
- Page 84 In some rare cases, you might need to re-upload the QIAGEN LIMS Connector certificate. This certificate was originally generated by the QIAGEN Service Team during the LIMS Connector set up and was saved on a USB drive. The certificate can only be created locally and cannot be provided remotely.
- Page 85 3. Tap the LIMS tab. Figure 85. LIMS configuration tab. 4. Tap Upload new. Figure 86. Select certificate screen. 5. Select the certificate and tap Update. Figure 87. Successful certificate update. EZ2 Connect MDx User Manual 03/2024...
- Page 86 8. Tap OK. 9. Install the generated certificate from the USB stick on the QIAGEN LIMS Connector. 10. Tap the QIAGEN LIMS Connector URL box to enter the URL using the on-screen keyboard. Figure 89. Enter QIAGEN LIMS Connector URL.
- Page 87 13. If you want to select a new configuration, you can also tap Register in the LIMS configuration tab. Figure 91. LIMS registration. 14. Select configuration from the drop-down list and tap Register. Figure 92. LIMS registration successful. EZ2 Connect MDx User Manual 03/2024...
- Page 88 LIMS after the run. This setting does not change after the instrument restart. Note: If the user disables the “Send results to LIMS” checkbox the following warning is displayed. EZ2 Connect MDx User Manual 03/2024...
- Page 89 17. Tapping on the icon directs the user to the Results sending status screen. The information in the table on the Results sending status screen depends on the status of the results currently being sent. Status icon: EZ2 Connect MDx User Manual 03/2024...
- Page 90 Results with the Sending status are currently being sent to the LIMS system. Results with Pending status are queued and waiting to be sent. The user also sees the LIMS results status icon with the cached symbol. Figure 98. Results sending status In Progress. EZ2 Connect MDx User Manual 03/2024...
- Page 91 Unsent results are not resent automatically after the failure. The user can select unsent results and tap the Send button to resent results to a configured LIMS. Unsent results will be sent automatically only after the instrument restart. Figure 99. Results sending status error. EZ2 Connect MDx User Manual 03/2024...
-
Page 92: Setting Up A Protocol Run
To setup a protocol run, press the Setup tab on the Home screen. All available QIAGEN protocols are pre-installed on the EZ2 upon delivery. You can download all available QIAGEN protocols from the QIAGEN website (www.qiagen.com). For MDx applications, choose the IVD mode when logging in the EZ2 Connect MDx. - Page 93 Note: Barcode information may also be entered manually. Figure 101. Scanning the information into the Instrument. WARNING Risk of personal injury Hazard Level 2 laser light: Do not stare into the light beam when using handheld barcode scanner. EZ2 Connect MDx User Manual 03/2024...
- Page 94 Figure 102. Setup screen. 2. Tap into the field showing up in the next screen and scan the 1D Barcode on the Q-Card provided with the kit. Figure 103. Scan the Q-Card barcode screen. EZ2 Connect MDx User Manual 03/2024...
- Page 95 3. By scanning the 1D Barcode on the Q-Card provided with the kit, the application type is selected and information on protocol options is given. See the “LIMS Workflow“ section (see page 118). Figure 105. Select protocol screen. 4. Tap Next to continue. Tap Back or Cancel to return to the Setup screen. EZ2 Connect MDx User Manual 03/2024...
- Page 96 Note: The description on the GUI is supportive only. Please ensure you to read the respective information in the kit handbook. To proceed to the Select sample positions step, tap Next. To return to the previous screen, tap Back. To cancel the protocol, tap Cancel. EZ2 Connect MDx User Manual 03/2024...
- Page 97 Figure 107. Select sample positions screen. Figure 108. Select sample positions step. After you select at least one sample position, the Next button is enabled. To proceed to the Enter sample IDs step, tap Next. EZ2 Connect MDx User Manual 03/2024...
- Page 98 To import sample list in .xlsx format from the USB stick tap Import. Note: After importing the sample list, verify on the touchscreen if all information is correct. Figure 109. Select sample list dialog. EZ2 Connect MDx User Manual 03/2024...
- Page 99 Note: The user can enter/edit all sample IDs or notes without the need to manually select the next sample cell from the table. When the user edits the sample ID, and scans the barcode, the input is saved and the new keyboard appears for the next sample Figure 110. Enter sample IDs step (two IDs autogenerated). EZ2 Connect MDx User Manual 03/2024...
- Page 100 Optionally, you can add a note to each sample. Tap the Note (optional) box next to the relevant sample ID, and use the on- screen keyboard to enter the note. Figure 112. Adding a note to a sample. EZ2 Connect MDx User Manual 03/2024...
-
Page 101: Setting Up The Worktable
5. Slide the reagent cartridges, with the orientation depicted in the user interface, into the cartridge rack in the direction of the arrow that is engraved on each cartridge rack section, until you feel resistance. The cartridge should click into place. EZ2 Connect MDx User Manual 03/2024... - Page 102 Note: Make sure that you follow any protocol-specific directions shown on the screen in the Load the tip rack step of the run setup process. You could be required to perform some additional actions. The instructions can also be found in the kit handbooks. EZ2 Connect MDx User Manual 03/2024...
- Page 103 Important: Both Tip Racks should be inserted even if just one is used. To proceed to the start of the protocol, tap Next. Before the run starts, you will see an overview of the selections you made during the run setup process. EZ2 Connect MDx User Manual 03/2024...
-
Page 104: Starting The Protocol Run And Monitoring Its Progress
To start the run and view its progress, follow the steps below: 1. Tap Next in the Load the tip rack step. The Run setup selection overview dialog is shown. Figure 116. Run setup selection overview dialog. EZ2 Connect MDx User Manual 03/2024... - Page 105 (e.g., due to operator errors during worktable setup), the run will not start, and operator action will be required. If the instrument is left unattended for an extended time period, stability of samples and reagents may be impaired. Figure 118. Load check in progress screen. EZ2 Connect MDx User Manual 03/2024...
- Page 106 5. After successful completion of the Load Check progress of the run and the elapsed run time are displayed on the “Protocol run in progress” screen. Figure 119. Run progress screen. 6. Tap the Show details button to displayed the protocol parameters during the run. Figure 120. Run details dialog window. EZ2 Connect MDx User Manual 03/2024...
- Page 107 Important: Operator should confirm completion of load check prior to leaving the EZ2 unattended as in the event of failed load check operator intervention may be required. If the instrument is left unattended for an extended time period, stability of samples and reagents may be impaired. Figure 121. Load check is in progress screen. EZ2 Connect MDx User Manual 03/2024...
- Page 108 The run/sample is not valid anymore if you use a kit with an expired shelf life, and accordingly, the run results cannot be used for diagnostic use. This will be marked as invalid sample in the run report. EZ2 Connect MDx User Manual 03/2024...
- Page 109 Note: In case of repeated load check failure, after correct worktable setup has been confirmed, please recalibrate the camera (refer to Section 6.6). Contact QIAGEN Technical Support for additional support. During this time samples should be removed from the worktable and held at appropriate storage conditions.
- Page 110 Figure 124. Warning after unlocking the hood. Figure 125. Hood unlocked pop-up window. Figure 126. Warning on the Load check failed screen. EZ2 Connect MDx User Manual 03/2024...
- Page 111 Once correct loading is confirmed, tap Next to proceed to the Run setup selection overview screen where the Skip load check button will now be available. Figure 127. Skip load check option. EZ2 Connect MDx User Manual 03/2024...
- Page 112 Note: If the operator unlocks the hood because of correcting actions or goes back to the Select sample positions screen or Scan sample ID screen (LIMS workflow), the load check will again be mandatory. EZ2 Connect MDx User Manual 03/2024...
-
Page 113: End Of The Protocol Run
Hazardous materials and infectious agents The waste contains samples and reagents. This waste may contain toxic or infectious material and must be disposed of properly. Refer to your local safety regulations for proper disposal procedures. EZ2 Connect MDx User Manual 03/2024... - Page 114 The process can be aborted if not required. Note: After the last run of the day, the daily maintenance needs to be conducted (see Section 6.3). EZ2 Connect MDx User Manual 03/2024...
-
Page 115: Saving A Run Report
Information about the samples: their positions, names and any notes that were added by the user Information on sample flags Maintenance information (due, executed, etc.) Validity status of samples EZ2 Connect MDx User Manual 03/2024... -
Page 116: Canceling The Protocol Run Setup
1. In the “Protocol run in progress” screen, tap Abort run. A confirmation dialog appears. 2. Tap Yes to stop the run, or tap No to go back to the “Protocol run in progress” screen. Figure 131. Aborting protocol run dialog. EZ2 Connect MDx User Manual 03/2024... - Page 117 Figure 133. Protocol run aborted screen. 5. Also, for aborted protocol runs, the after run maintenance needs to be performed. Please follow the instructions regarding the cleaning of the piercing unit from “Daily maintenance” section (page 143). EZ2 Connect MDx User Manual 03/2024...
-
Page 118: Lims Workflow
The EZ2 Connect MDx has to be integrated with existing LIMS, by setting up and configuring external service called LIMS Connector; this can be done with help from QIAGEN Service Team. To begin set up of a protocol run using the LIMS interface, start at the Setup tab, then tap the LIMS button. - Page 119 2. Tap Scan sample ID to scan either using the handheld barcode scanner or using the on-screen keyboard. Figure 136. Scan or enter sample ID. 3. After scanning the first sample the Check parameters and load the holder screen is displayed. Figure 137. Check parameters and load holder screen. EZ2 Connect MDx User Manual 03/2024...
- Page 120 Also, samples that have not been found in LIMS can be processed. Note: If the “Sample ID” fields contain scanned sample IDs found in LIMS, these fields are not editable. Figure 139. Review collected samples. EZ2 Connect MDx User Manual 03/2024...
- Page 121 Important: Read the instructions carefully before loading the rack, and make sure to follow all directions including those in the respective kit handbook. Figure 141. Load the cartridge rack. EZ2 Connect MDx User Manual 03/2024...
- Page 122 Important: Read the instructions carefully before loading the rack, and make sure to follow all directions including those in the respective kit handbook. Figure 142. Load the holder. 8. Tap Next to proceed to the run overview screen. Figure 143. Run setup overview. EZ2 Connect MDx User Manual 03/2024...
- Page 123 5 runs, a warning message is displayed. Figure 145. Pop-up window with Low disk space after attempting to start a run. Previous run reports should be downloaded and deleted to free up disk space. EZ2 Connect MDx User Manual 03/2024...
-
Page 124: Data Menu
Data menu Important: Use only the USB stick provided by QIAGEN. Do not connect other USB stick devices to USB ports. Important: Do not remove the USB drive while downloading or transferring data or software to or from the instrument. - Page 125 All run reports Recent reports, for this option you should also specify the number of reports Tap either Download or Download and delete. Figure 148. Data tab. Figure 149. Download reports in progress. EZ2 Connect MDx User Manual 03/2024...
- Page 126 If Download and delete is selected, the following screen is displayed prior to start of the delete process. Figure 151. Confirm delete run reports. Tap OK to confirm deletion, or Cancel to go back. Downloaded files should be copied from the USB stick to a final destination of the user’s choosing. EZ2 Connect MDx User Manual 03/2024...
- Page 127 Figure 152. Run reports deleted confirmation. Tap OK to complete process. If no USB drive is inserted, the following screen is displayed: Figure 153. USB drive not inserted. Insert a USB drive and attempt the process again. EZ2 Connect MDx User Manual 03/2024...
- Page 128 Note: Download of the Audit trail file(s) is only available to Admin users. Tap the Download button, in the Audit trail section of the Data screen. The following screen is displayed: Figure 154. Download audit trail in progress. Figure 155. Audit trail download successful. EZ2 Connect MDx User Manual 03/2024...
- Page 129 Note: Download of a sample list template is only available to Admin users. 1. To download the sample list template tap the Download button in the sample list template section of the data screen. Figure 157. Data screen. EZ2 Connect MDx User Manual 03/2024...
-
Page 130: Session Handling
Important: Do not switch the instrument off when a protocol run, or maintenance procedure, or file transfer is in progress. This could result in damage to the instrument and samples and/or data may be lost. EZ2 Connect MDx User Manual 03/2024... -
Page 131: Notifications And Banners
The Notifications icon changes the status, if new warning, errors, and important info notification appears in the system. The Notifications icon has two states: — There are no new notifications. — There is at least one new notification. EZ2 Connect MDx User Manual 03/2024... - Page 132 The screen is blocked until all notifications are closed. To see the rest of the notifications tap the Notifications icon on top. EZ2 Connect MDx User Manual 03/2024...
- Page 133 The background task banner will also appear by tapping on the status icon in the footer (UV or snowflake). The icon appears only when a background task is running. Figure 167. Status icons indicating a specific background task. EZ2 Connect MDx User Manual 03/2024...
-
Page 134: Cooling After Run
The snowflake can be tapped for further information when the banner is closed. The cooling can be aborted when there is a timeout or by tapping Abort cooling. EZ2 Connect MDx User Manual 03/2024... - Page 135 Figure 169. Pop-up window with aborted cooling after run. EZ2 Connect MDx User Manual 03/2024...
-
Page 136: Maintenance Procedures
An overview of the status of the maintenance tasks can be found under the Maintenance tab. The Overview tab displays a table with the tasks listed, when they were last performed, and when they should be performed again. Additionally, the table has a column with an icon that warns of overdue maintenance. EZ2 Connect MDx User Manual 03/2024... - Page 137 UV run).The background task is indicated by a banner and by a sign in the lower right corner. In case of a running active cooling process, a snowflake is shown (Figure 171). A scheduled UV run is indicated by a UV sign. Figure 171. Background tasks tab. EZ2 Connect MDx User Manual 03/2024...
-
Page 138: Cleaning Agents
WARNING Risk of fire Do not allow cleaning fluid or decontamination agents to come into contact with the electrical parts of the EZ2. EZ2 Connect MDx User Manual 03/2024... - Page 139 Do not use spray bottles containing alcohol or disinfectant to clean surfaces of the EZ2. Spray bottles should be used only to clean items that have been removed from the worktable and if permitted by local laboratory operating practices. EZ2 Connect MDx User Manual 03/2024...
-
Page 140: After Run Maintenance
Moving parts To avoid contact with moving parts during the operation of the EZ2, the instrument must be operated with the hood closed. If the hood sensor or lock is not functioning correctly, contact QIAGEN Technical Services. WARNING Moving parts Avoid contact with moving parts during operation of the EZ2. - Page 141 2. If position 11 of the reagent cartridge has been equipped with a tube, this can either be removed before removing the reagent cartridge, but it is also possible to lift the cartridge rack with the tube inside. 3. Close the hood. EZ2 Connect MDx User Manual 03/2024...
- Page 142 7. Carefully wipe the piercing unit using a lint-free tissue moistened with 70% ethanol. Enclose each individual piercing spike with the tissue, apply firm pressure and twist several times. Repeat for all piercing spikes. Figure 174. Cleaning the EZ2 piercing unit. EZ2 Connect MDx User Manual 03/2024...
-
Page 143: Daily Maintenance
Moving parts To avoid contact with moving parts during the operation of the EZ2, the instrument must be operated with the hood closed. If the hood sensor or lock is not functioning correctly, contact QIAGEN Technical Services WARNING Moving parts Avoid contact with moving parts during operation of the EZ2. - Page 144 9. Clean the bottom tray with 70% ethanol, and then with distilled water. Note: After removal of the bottom tray for cleaning purposes, ensure it is correctly reinstalled. The right bottom tray must be inserted first. EZ2 Connect MDx User Manual 03/2024...
- Page 145 Figure 176-A. Right side of the bottom tray installed. Figure 176-B. Installing left side of the bottom tray. Figure 176-C. Correct installation of the bottom trays. EZ2 Connect MDx User Manual 03/2024...
-
Page 146: Weekly Maintenance
To maintain good contact between tip adapters and filter-tips, and to prevent liquid leaking from the tips, a light application of grease should be applied to the D-rings (on tip adapter) of the tip adapters every week. Figure 177. Tip adapter with a highlighted D-Ring. EZ2 Connect MDx User Manual 03/2024... - Page 147 4. Clean the D-rings (on tip adapter) with a lint-free tissue to remove any previously applied grease. 5. Apply a small amount of silicon grease (see Appendix B – EZ2 Connect MDx Parts and Components/Consumables, Ordering Information, page 170) onto the inner wall of the large end of a fresh filter-tip by using the fine end of a second fresh tip.
- Page 148 Residues at adapter Residues at the pipettor Residues at the pipetting hole Figure 180. Example of an overgreased tip adapter. All marked spots should be checked and all visible grease residues should be removed. EZ2 Connect MDx User Manual 03/2024...
-
Page 149: Uv Decontamination
The racks are not affected by the UV light and must be inserted before the UV run. Note: The bottom trays should be inserted before the UV run is started. The UV run can be set manually (for all users) or in scheduled mode (only for administrator and service users). EZ2 Connect MDx User Manual 03/2024... - Page 150 Figure 181. UV run maintenance tab with manual UV run settings (for all user). Figure 182. UV run maintenance tab with scheduled UV run turned on (for administrator and service user). EZ2 Connect MDx User Manual 03/2024...
- Page 151 3. Tap UV run. The date when the procedure was last completed is shown on the screen. 4. Select the number of decontamination cycles. The required decontamination time depends on the biological material processed on the device. One cycle takes around 34 minutes. EZ2 Connect MDx User Manual 03/2024...
- Page 152 2 minutes. 7. A message (see the Figure 186 below) is displayed after execution of the UV run. Tap Finish to complete the UV run. Figure 186. UV run finished screen. EZ2 Connect MDx User Manual 03/2024...
- Page 153 Note: When the instrument is turned off, a protocol run is performed or the hood is open, the scheduled UV run will not be performed. The user will receive a notification that the UV run was not performed. EZ2 Connect MDx User Manual 03/2024...
- Page 154 When the UV run starts the scheduled UV run banner appears at the bottom of the screen. Additionally, a UV sign will appear in the lower right corner during the UV run. This sign can be tapped for more information. EZ2 Connect MDx User Manual 03/2024...
-
Page 155: Camera Calibration
Figure 190. Scheduled UV run is in progress banner. Camera calibration The EZ2 Connect MDx provides an internal camera which performs an inventory scan prior to run execution. Note: The camera calibration should be performed as part of installation procedure, after moving the instrument, as well as in case of load check issues. -
Page 156: Servicing
Contact your local QIAGEN Technical Services or your local distributor for more information about flexible Service Support Agreements from QIAGEN. Note: Before service of the EZ2 Connect MDx can be performed, the instrument must first be decontaminated. Refer to “Disinfecting the EZ2” and “Removing contamination” sections (pages 139 and 140, respectively). -
Page 157: Research Mode
To start the EZ2 Connect MDx in Research mode, select Research Mode at the log-in screen. If this is the first time use of the EZ2 Connect MDx, use “Admin” as User ID and Password. Tap Log in to launch the ... - Page 158 See subsections within the “Setting up a protocol run” section (see page 92) for further details. Note: Using the EZ2 Connect MDx in Research mode gives the option to skip the initial load check. When skipping the load check, the instrument will not check the worktable setup but immediately start the protocol run.
-
Page 159: Troubleshooting
Photos of the error conditions (if appropriate) This information will help you and your QIAGEN Technical Service Specialist to deal most efficiently with your issue. Note: Information about the latest software and protocol versions can be found at www.qiagen.com. In some cases, updates may be available for addressing specific problems. - Page 160 5. The support package is now saved on the USB stick. The download successful screen is displayed. Tap OK to close. Note: The support package contains information about the last performed runs and hence can contain sensitive information (e.g., sample IDs). Figure 196. Download successful status. EZ2 Connect MDx User Manual 03/2024...
-
Page 161: Operation
Incorrect tubes: Just use the tubes delivered with the kit or explicitly mentioned in the kit handbook / loading screen If the liquid passed through the filter, please reach out to QIAGEN Technical Services. Hood lock Error Check if the hood is firmly closed. Confirm by pressing down the hood with light force. - Page 162 Make sure samples and cartridge rack were handled properly. Software/protocol update fails Restart the device and try to start the update again. Use only the QIAGEN USB stick. USB stick should stay plugged in during the entire update procedure.
-
Page 163: Glossary
A number that represents an error of the EZ2. EZ2 kits Kits supplied by QIAGEN containing reagents, reagent cartridges and plasticware for use with EZ2 instruments. Filter-tip Labware that is picked up by a tip adapter during operation of the EZ2. Liquid is aspirated into and dispensed from a filter-tip. -
Page 164: Technical Specifications
Technical Specifications QIAGEN reserves the right to change specifications at any time. Operating conditions Power 100−240 V AC, 50/60 Hz, 1000 VA Mains supply voltage fluctuations are not to exceed 10% of nominal supply voltages. Fuse AC Inlet: T4A H 250 V... -
Page 165: Mechanical Data And Hardware Features
Steps that require heating occur on the heating system, which accommodates the heating positions of the reagent cartridges. Purified nucleic acids are collected in 1.5 mL elution tubes. UV LED lamp UV LED wavelength: 275–285 nm EZ2 Connect MDx User Manual 03/2024... - Page 166 Height: 34 mm (1.34 in) Depth: 39 mm (1.54 in) Network Wi-Fi: Designed for usage with Wi-Fi adapter provided by QIAGEN. The Wi-Fi adapter supports the 802.11b, 802.11g, and 802.11n Wi-Fi standards, and WEP, WPA-PSK, and WPA2-PSK encryption. Supports LAN...
-
Page 167: Barcode Reader Specifications
PDF417: 10 mils: 0.5 to 31.0 cm / 0.2 to 12.2 in QR Code: 10 mils: 2.0 to 25.0 cm / 0.8 to 9.8 in Note: Further information can be found in the Barcode reader manual. EZ2 Connect MDx User Manual 03/2024... -
Page 168: Declaration Of Conformity
Recycling can be provided by QIAGEN upon request at additional cost. In the European Union, in accordance with the specific WEEE recycling requirements and where a replacement product is being supplied by QIAGEN, free recycling of its WEEE- marked electronic equipment is provided. -
Page 169: California Proposition 65 Warning
QIAGEN. The EZ2 is equipped with an Ethernet port and a Wi-Fi USB device. The Purchaser of the EZ2 Connect MDx is solely responsible for preventing any and all computer viruses, worms, trojans, malware, hacks, or any other type of cybersecurity breaches. -
Page 170: Appendix B - Ez2 Connect Mdx Parts And Components/Consumables
Filter-tips and holder, EZ1 (50) 994900 additional tips and holders for use with EZ1 Kits For up-to-date licensing information and product-specific disclaimers, see the respective QIAGEN kit handbook or user manual. QIAGEN kit handbooks and user manuals are available at www.qiagen.com or can be requested from QIAGEN Technical Services or your local distributor. -
Page 171: Document Revision History
Update according to new SW 1.2 functionalities: Cooling after run, UV run scheduler, patch management via QIAsphere, screen lock, time synchronization with QIAsphere, time zone support, notification center. Improved description of the weekly maintenance procedure. Improved structure. 04/2022 Initial version of the EZ2 Connect MDx User Manual EZ2 Connect MDx User Manual 03/2024... - Page 172 This page intentionally left blank EZ2 Connect MDx User Manual 03/2024...
- Page 173 This page intentionally left blank EZ2 Connect MDx User Manual 03/2024...
- Page 174 This page intentionally left blank EZ2 Connect MDx User Manual 03/2024...
- Page 175 ® (Ambion, Inc.). Registered names, trademarks, etc. used in this document, even when not specifically marked as such, are not to be considered unprotected by law. HB-2907-002 03/2024 © 2023 QIAGEN, all rights reserved. EZ2 Connect MDx User Manual 03/2024...
- Page 176 Ordering www.qiagen.com/contact | Technical Support support.qiagen.com | Website www.qiagen.com EZ2 Connect MDx User Manual 03/2024...
Need help?
Do you have a question about the EZ2 Connect MDx and is the answer not in the manual?
Questions and answers