Qiagen EZ2 Connect User Manual
Hide thumbs
Also See for EZ2 Connect:
- User manual (176 pages) ,
- Safety instructions and quick start manual (48 pages) ,
- Quick start (4 pages)

Related Manuals for Qiagen EZ2 Connect


Summary of Contents for Qiagen EZ2 Connect
- Page 1 March 2024 ® Connect and EZ2 Connect Fx User Manual For use with EZ2 Connect software version 1.2 9003210, 9003220 QIAGEN, GmbH, QIAGEN Strasse 1, 40724 Hilden, GERMANY Sample to Insight...
-
Page 2: Table Of Contents
4. Installation Procedures 4.1. Installation environment 4.2. Unpacking the EZ2 Connect 4.3. Installing the EZ2 Connect 4.4. Packaging and transportation of the EZ2 Connect 5. Operating Procedures 5.1. General information 5.2. Starting the EZ2 Connect 5.3. Configuring the EZ2 Connect 5.4. - Page 3 9.5. Barcode reader specifications Appendix A Declaration of Conformity California Proposition 65 Warning Liability clause License information Appendix B – EZ2 Connect Parts and Components/Consumables Ordering information Appendix C – Consignes de sécurité Utilisation appropriée Sécurité électrique Conditions de fonctionnement Sécurité...
-
Page 4: Introduction
This user manual describes the EZ2 Connect and EZ2 Connect Fx. Before using the EZ2 Connect, it is essential that you read this user manual carefully and pay attention to the safety information. The instructions and safety information in the user manual must be followed to ensure safe operation of the instrument and to maintain the instrument in a safe condition. -
Page 5: General Information
QIAGEN customers are a major source of information regarding advanced or specialized uses of our products. This information is helpful to other scientists and to the researchers at QIAGEN. We therefore encourage you to contact us if you have any suggestions about product performance or new applications and techniques. -
Page 6: Requirements For Ez2 Connect Users
Note: Please ensure that the chosen kit is compatible with your system. Kits for forensic use are only compatible with the EZ2 Connect Fx. Kits for diagnostic sample preparation (DSP) can only be used with the EZ2 Connect MDx. Check the associated kit webpage if your kit is compatible or ask your sales representative. -
Page 7: Safety Information
2. Safety Information Before using the EZ2 Connect, it is essential that you read this user manual carefully and pay attention to the safety information. The instructions and safety information in the user manual must be followed to ensure safe operation of the instrument and to maintain the instrument in a safe condition. -
Page 8: Electrical Safety
Perform the maintenance as described in the Section 6 (see page 131). QIAGEN charges for repairs that are required due to incorrect maintenance. In case of emergency, power OFF the EZ2 Connect at the power switch located in front of the instrument and unplug the power cord from the power outlet. - Page 9 The EZ2 Connect has been subjected to severe transport stresses. Liquids have come into direct contact with electrical components of the EZ2 Connect. The power cord has been exchanged with a power cord that was not intended to be used with the EZ2 Connect. WARNING Electric hazard Do not touch the EZ2 Connect with wet hands.
-
Page 10: Operating Conditions
CAUTION Damage to the instrument Direct sunlight may bleach parts of the instrument, cause damage to plastic parts. The EZ2 Connect must be located out of direct sunlight. CAUTION Damage to the instrument... -
Page 11: Chemicals
WARNING Toxic fumes Do not use bleach to clean or disinfect the EZ2 Connect or the labware, as bleach in contact with salts from the buffers can produce toxic fumes. Note: If you work with volatile solvents, toxic substances, etc., you must provide an efficient laboratory ventilation system to remove vapors that may be produced. -
Page 12: Mechanical Hazards
2.9. Radiation The EZ2 Connect instrument has a UV LED lamp. The wavelength of the UV light produced by the UV LED lamp is 275 to 285 nm. This wavelength corresponds to ultraviolet light Type C, which can be used to support decontamination procedures. -
Page 13: Maintenance Safety
Connect must only be operated by qualified personnel who have been appropriately trained. Servicing of the EZ2 Connect must only be performed by a QIAGEN Field Service Specialist. Operate the EZ2 only as described in the Section 5 (see page 41). QIAGEN charges for repairs that are required due to incorrect operation. -
Page 14: Symbols On The Ez2 Connect Instrument
2.11. Symbols on the EZ2 Connect instrument The following symbols appear on the EZ2 Connect instruments. Symbol Location Description Heating system — inside instrument Heat hazard — the temperature of the heating system can reach up to 95ºC. Near the tip rack Biohazard —... - Page 15 Symbol Location Description Type plate on the back of the See warnings and precautions. instrument Type plate on the back of the Date of manufacture. instrument EZ2 Connect and EZ2 Connect Fx User Manual | 03/2024...
-
Page 16: General Description
Afterward, the operator loads labware and samples onto the EZ2 Connect worktable, while following the instructions shown on the display. The order and contents of the labware are determined by each protocol. When the protocol run starts, the isolation of nucleic acids is carried out automatically in a modular workflow. -
Page 17: External Features Of The Ez2 Connect
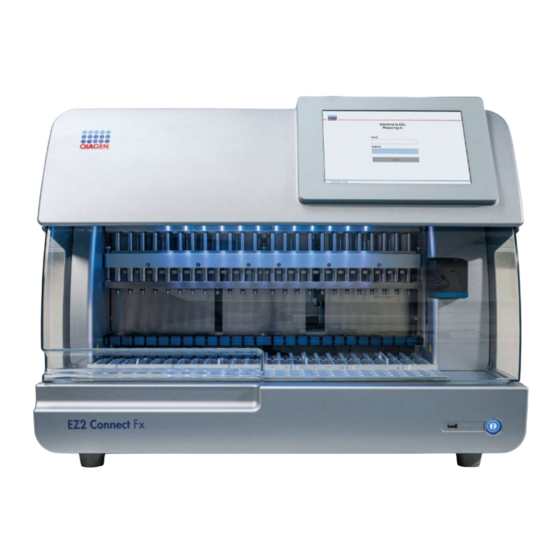
3.2. External features of the EZ2 Connect Figure 1. The front of the EZ2 Connect. Touchscreen Hood Power button USB ports Note: Two additional USB ports are located on the rear of the touchscreen (not shown). EZ2 Connect and EZ2 Connect Fx User Manual | 03/2024... - Page 18 3.2.1. Touchscreen The EZ2 Connect has a 10.1 inch color touchscreen display with a resolution of 1280 x 800 pixels. The GUI is displayed on the touchscreen, allowing the user to operate the instrument, set up and start runs, perform maintenance procedures, monitor the instrument status, change settings, and download reports.
- Page 19 This protects users from moving parts on the worktable. The hood can be manually opened to gain access to the worktable when no protocol is running. During operation of the EZ2 Connect, the hood must remain closed and should only be opened when you are instructed to do so by the user manual or instructions on the GUI.
- Page 20 3.2.3. Power button The power button is located on the bottom right corner of the front of the EZ2 Connect. To turn on the EZ2 Connect, press the button. After you press the button, the power button lights up, the startup screen appears on the touchscreen, and the instrument initializes.
- Page 21 Figure 6. Location of RJ-45 port (highlighted by white frame). 3.2.6. Power cord socket The power cord socket is located on the back of the EZ2 Connect (highlighted white in image below) and is used for connecting the instrument to a power outlet via the supplied power cord.
- Page 22 Risk of personal injury and material damage Only perform maintenance that is specifically described in this user manual. 3.2.7. Ventilation openings EZ2 Connect ventilation openings allow the internal components of the instrument to be cooled. WARNING Risk of overheating To ensure proper ventilation, maintain a minimum clearance of 10 cm at the sides and rear of the EZ2 Connect.
-
Page 23: Internal Features Of The Ez2 Connect
3.2.8. Barcode scanner The barcode scanner delivered with the instrument can be connected to the EZ2 Connect using any one of the 3 USB ports. The scanner is used for reading the barcode on the kit Q-Card (supplied with sample preparation kits) and sample barcodes. - Page 24 Figure 10. EZ2 Connect pipettor head. WARNING Moving parts To avoid contact with moving parts during the operation of the EZ2 Connect, the instrument must be operated with the hood closed. If the hood sensor or lock is not functioning properly, contact QIAGEN Technical Services.
- Page 25 3.3.2. Worktable The EZ2 Connect worktable contains two movable rack types (the cartridge rack and the tip rack) that hold all the labware required for a protocol run, and the heating system, which controls the temperature of liquids during a run.
- Page 26 13 to 24. The tip racks are located at the front of the worktable. Each consists of 4 rows and 12 positions: Important: Only use QIAGEN recommended tubes (see respective kit handbooks for more information). Figure 16. Tip holders and filter tips.
- Page 27 Connect that could be caused by liquids that are unintentionally spilled. The bottom trays can be removed and cleaned as described in the Section 6.3 (see page 137). Figure 18. TheEZ2 Connect bottom tray. EZ2 Connect and EZ2 Connect Fx User Manual | 03/2024...
- Page 28 3.3.3. Magnet module The EZ2 Connect magnet module consists of magnets that are used to capture magnetic particles that are present in the liquid aspirated into the filter-tips. Figure 19. The EZ2 Connect magnet module. 3.3.4. Camera Figure 20. Camera module (highlighted by white frame; just EZ2 Connect Fx).
- Page 29 If the hood sensor or lock is not functioning properly, contact QIAGEN Technical Services. 3.3.6. Internal light The EZ2 Connect has a built-in LED light. The internal light illuminates the worktable and informs about the current status of the run. There are two modes of the LED light: Blinking light –...
-
Page 30: Installation Procedures
Use a level workbench that is large enough and strong enough to accommodate the EZ2 Connect. To ensure proper ventilation, maintain a minimum clearance of 10 cm at the sides and rear of the EZ2 Connect. Refer to Section 9 (see page 157) for the weight and dimensions of the EZ2 Connect. -
Page 31: Unpacking The Ez2 Connect
4.1.2. Power requirements TheEZ2 Connect operates at: 100–240 V AC ± 10%, 50/60 Hz, 1000 VA. Make sure the voltage rating of the EZ2 Connect is compatible with the AC voltage available at the installation site. WARNING Damage to electronics Before powering ON the instrument, make sure that the correct supply voltage is used. - Page 32 5. Remove the 2 pieces of protective foam from the unit. 6. Move the unit to the workbench or trolley from the packaging. When lifting the EZ2 Connect, slide your fingers under the side of the instrument and keep your back straight.
-
Page 33: Installing The Ez2 Connect
Technical Services. Make sure that the EZ2 Connect has equilibrated to ambient temperature before powering on. 16. Retain the package in case you need to transport the EZ2 Connect in the future. Refer to the Section 4.4 (page 40) for more details. Using the original package minimizes the possibility of damage during transportation of the EZ2 Connect. - Page 34 3. Check that the voltage rating on the type plate at the back of the EZ2 Connect matches the voltage available at the installation site. Note: The EZ2 Connect AC inlet is set up to accept all input voltages within the range 100–240 V AC and does not need to be configured manually – see Section 3.2.6 Power cord socket.
- Page 35 2. Before turning on the instrument, plug the Wi-Fi adapter into one of the three USB ports located on either the front of the instrument or on the rear of the touchscreen. Note: It may be more convenient to use the USB ports on the rear of the touchscreen. EZ2 Connect and EZ2 Connect Fx User Manual | 03/2024...
- Page 36 Note: Make sure that the EZ2 Connect has equilibrated to ambient temperature before powering on. 1. To power on the EZ2 Connect instrument, first ensure the hood is closed. After pressing the power button, the power button lights up, the startup screen appears on the touchscreen, a sound plays, and the instrument initializes.
- Page 37 Note: Only Administrators can change instrument settings. Note: The system requires a password change for all newly created accounts. The EZ2 Connect default password policy is a strong password, which requires a password between 8 and 40 characters and includes upper and lower case characters, a number, and a special character.
- Page 38 4. You may adjust settings of the EZ2 Connect according to your preferences through the Instrument settings tab under the Configuration menu. For further details see Section 5.3.2 (see page 51). Figure 28. Details on the Instrument setting tab. 4.3.6. Performing camera exposure calibration (for EZ2 Connect Fx only) Note: Only Administrators can perform the camera exposure calibration.
- Page 39 4. During the calibration routine, the following message will be displayed: Figure 30. Camera exposure calibration is in progress message. Note: For support or technical advice regarding this, please contact QIAGEN Technical Service Department, or see our Technical Support Center at support.qiagen.com...
-
Page 40: Packaging And Transportation Of The Ez2 Connect
Risk of personal injury The EZ2 Connect is too heavy to be lifted by one person. To avoid personal injury or damage to the instrument, do not lift the instrument alone. Use the handle attached to the box to lift the Before transporting the EZ2 Connect, the instrument must first be decontaminated. -
Page 41: Operating Procedures
Before proceeding, it is recommended that you familiarize yourself with the features of the instrument as described in the Sections 3.2 and 3.3 (see pages 17 and 23, respectively). The EZ2 Connect is intended to be used only in combination with QIAGEN kits indicated for use with the EZ2 Connect for the applications described in the kit handbooks. - Page 42 CAUTION Risk of personal injury Ensure that the EZ2 Connect is switched off before you manually move the mechanical components of the instrument. CAUTION Damage to the instrument Do not lean against the instrument or touchscreen. WARNING Samples containing infectious agents Samples used with the EZ2 Connect may contain infectious agents.
-
Page 43: General Information
5.1. General information The EZ2 Connect is operated using a touchscreen display, which guides you step-by-step through the correct loading of the worktable and selection of the protocol. The following actions can be done using the user interface: Guided run setups... - Page 44 Toolbar The toolbar is used to access the main sections of the EZ2 Connect software, to check the connection status of the LAN/Wi-Fi, and notifications, and to log out of the application. The toolbar contains the same buttons throughout the whole application, but some buttons are disabled during protocol setup, protocol runs, and maintenance procedures.
- Page 45 The footer shows the current date and time and the name of the user that is currently logged in. 5.1.1. Entering text and numbers An on-screen keyboard is used for entering text in editable fields of the EZ2 Connect instrument software. To access the keyboard, tap the field that you want to edit. The keyboard appears.
- Page 46 To proceed, modify the text, so that it follows the requirements. Figure 35. Example of text field validation. If certain characters are not allowed in a field, they are deactivated on the keyboard and they cannot be entered in the field. EZ2 Connect and EZ2 Connect Fx User Manual | 03/2024...
-
Page 47: Starting The Ez2 Connect
4. Tap the Password field and enter your password using the on-screen keyboard. Note: If this is the first time the EZ2 Connect is switched on, enter the default password, which is ”Admin”. Note: After log in, the system will check available disk space and a warning message will appear if insufficient disk space is available for five protocol runs. - Page 48 To activate your account, contact your Administrator. If you are the only user with an Administrator role and your account is locked, contact QIAGEN Technical Support. Note: It is recommended to create at least one more account with Administrator role in addition to the default Admin account.
-
Page 49: Configuring The Ez2 Connect
5.3. Configuring the EZ2 Connect Administrators of the EZ2 Connect can adjust instrument settings, manage users, upload and delete protocols, update software, and configure network connectivity. Note: Users whose role is defined as Operator do not have access to settings and configuration features of the software. - Page 50 6. To set the time, tap the Time field and enter the time using the on-screen keyboard. 7. To use the 24-hour time format, select the “24-hour time format” checkbox. To use the 12 hour format, clear the “24-hour time format” checkbox. 8. To save the settings, tap Accept. EZ2 Connect and EZ2 Connect Fx User Manual | 03/2024...
- Page 51 5.3.2. Changing instrument settings You can adjust the settings of the EZ2 Connect according to your preferences. Note: Only Administrators can change Instrument settings. To modify Instrument settings, follow the steps below: 1. Tap the Configuration icon on the toolbar.
- Page 52 5.3.3. Managing users The EZ2 Connect user management allows you to create and edit user accounts with 2 different roles: Administrator and Operator. When you use the EZ2 Connect for the first time, a default user (Admin) is pre-installed and configured.
- Page 53 Note: It is recommended to create at least one more account with Administrator role in addition to the default Admin account. In case one Administrator is locked due to wrong credentials, the other Administrator can unlock the account. EZ2 Connect and EZ2 Connect Fx User Manual | 03/2024...
- Page 54 4. To edit the First name or Last name, tap the respective boxes and modify the contents using the on-screen keyboard. 5. To change the User role or User status, tap the respective drop-down lists and select an option. EZ2 Connect and EZ2 Connect Fx User Manual | 03/2024...
- Page 55 8. Tap Change password. 9. To save the changes made to the user account, tap Accept. Note: For cybersecurity reasons, an Operator must change the password provided by the Administrator upon first login. EZ2 Connect and EZ2 Connect Fx User Manual | 03/2024...
- Page 56 3. Tap the table row that corresponds to the user that you want to deactivate or reactivate. 4. Tap Edit. 5. Tap the User status drop-down list and select the desired status (Active or Inactive). 6. Tap Accept. EZ2 Connect and EZ2 Connect Fx User Manual | 03/2024...
- Page 57 To change your own password, follow the procedure below. 1. Tap the Configuration icon on the toolbar. Figure 53. The Configuration button on the toolbar. 2. Tap Edit. Figure 54. User Management tab (visible only for Administrator roles). EZ2 Connect and EZ2 Connect Fx User Manual | 03/2024...
- Page 58 8. If you are logged in with an Operator role, you can change your password directly in the Configuration screen. 9. If the current Admin password is unknown, the password can be changed via the help center (see Section 4.3.5). EZ2 Connect and EZ2 Connect Fx User Manual | 03/2024...
- Page 59 1 to 360. It is recommended to set to at least two incorrect attempts. Otherwise, one typographical error will lock your account. Only Administrators can unlock locked accounts. 7. Tap Accept to save all changes or tap Cancel to restore previously saved settings. EZ2 Connect and EZ2 Connect Fx User Manual | 03/2024...
- Page 60 Protocols can be installed by using a USB stick or by using the QIAsphere. The QIAsphere will automatically check for the latest version and notify if there is a new package available. During installation via the USB stick, the EZ2 Connect will inform the user if the latest version is already installed or if the package contains newer versions or even new protocols.
- Page 61 Note: Not all protocols are installable at all instrument variants. Those protocols will be marked as not available on this instrument type if they are included in the protocol update package. The package can still be installed, just the marked protocols will not be installed. EZ2 Connect and EZ2 Connect Fx User Manual | 03/2024...
- Page 62 4. Tap OK. A notification will be sent when the download is finished. 5. Tap Configuration on the toolbar. 6. Tap Check for updates. 7. If protocol upload packages were downloaded, a pop-up window appears. EZ2 Connect and EZ2 Connect Fx User Manual | 03/2024...
- Page 63 Note: Downloaded protocol packages (via QIAsphere) can be deleted by tapping the Manage updates button (under Protocols tab) and selecting the protocol package to delete. Subsequently, tap Delete. Figure 65. Manage updates from QIAsphere dialog box. EZ2 Connect and EZ2 Connect Fx User Manual | 03/2024...
- Page 64 If there is an updated version of the language pack available, it can be found on the EZ2 Connect product page (www.qiagen.com). Plug in a USB stick with a language package.
- Page 65 8. From the Language screen, tap the Language settings dropdown. 9. Select the required language. 10. Tap Accept. Note: The EZ2 Connect will need to be restarted to set the selected language. EZ2 Connect and EZ2 Connect Fx User Manual | 03/2024...
- Page 66 Note: System configuration is only available to users with Administrator role. Note: To ensure that your EZ2 Connect has the latest software versions installed, please visit the EZ2 Connect webpage at www.qiagen.com. Currently installed software version can be found from the Configuration menu, under the System configuration tab.
- Page 67 4. Tap Check for updates to check the attached USB drive. 5. If a software update package has been detected on the USB stick, a pop-up window appears. Figure 71. Update package pop-up window. EZ2 Connect and EZ2 Connect Fx User Manual | 03/2024...
- Page 68 2. If there is an update available, the QIAsphere will automatically inform the user about an available update. Figure 72. Software update pop-up window. 3. Tap on Download. The download process will start. Figure 73. Download request notification pop-up window. EZ2 Connect and EZ2 Connect Fx User Manual | 03/2024...
- Page 69 Figure 74. Update selection pop-up window. 8. Start the installation by choosing the desired software package, and tap Update. 9. As instructed by the user interface, restart the device one or several times during the update process. EZ2 Connect and EZ2 Connect Fx User Manual | 03/2024...
- Page 70 3. Enter the appropriate network setting, as provided by your IT department. 4. Tap Accept. Note: Configure the department network in a way that makes the EZ2 Connect not visible outside the network of your organization. Note: Hardware address = MAC address...
- Page 71 Note: For ordering information of the Wi- Fi USB device (Connectivity Package B), please contact your QIAGEN Sales Representative. The EZ2 Connect can be connected to a Wi-Fi network using the Wi-Fi adapter inserted into one of the USB ports. The Wi-Fi adapter supports the 802.11b, 802.11g, and 802.11n Wi-Fi standards, and WEP, WPA-PSK, and WPA2-PSK encryption.
- Page 72 Figure 80. List of available Wi-Fi networks. 4. To select a network, tap the row that corresponds to the network you want to select. 5. To connect to the selected network, tap Connect. EZ2 Connect and EZ2 Connect Fx User Manual | 03/2024...
- Page 73 7. To disconnect from a network, tap the row that represents the network that the instrument is connected to. Then, tap Disconnect. Note: Configure the department network in a way that makes the EZ2 Connect not visible outside the network of your organization.
- Page 74 For information on how to configure QIAsphere Base for connection to the QIAsphere App, refer to the QIAsphere User Manual. For more details on the QIAsphere Base network configuration and how to connect the EZ2 Connect, refer to the QIAsphere User Manual that is available at www.qiagen.com/qiasphere...
- Page 75 In some rare cases, you might need to re-upload the QIAGEN LIMS Connector certificate. This certificate was originally generated by the QIAGEN Service Team during the LIMS Connector set up and was saved on a USB drive. The certificate can only be created locally and cannot be provided remotely. If you need support with a QIAGEN LIMS Connector certificate, contact your local Technical Service team.
- Page 76 3. Tap the LIMS tab. Figure 86. LIMS configuration tab. 4. Tap Upload new. Figure 87. Select certificate screen. EZ2 Connect and EZ2 Connect Fx User Manual | 03/2024...
- Page 77 7. From the LIMS configuration tab, tap Generate new. Certificate will be stored on attached USB stick. Figure 89. Generation of Instrument certificate. 8. Tap OK. 9. Install the generated certificate from the USB stick on the QIAGEN LIMS Connector. EZ2 Connect and EZ2 Connect Fx User Manual | 03/2024...
- Page 78 10. Tap the QIAGEN LIMS Connector URL box to enter the URL using the on-screen keyboard. Figure 90. Enter QIAGEN LIMS Connector URL. 11. Tap Accept. Figure 91. URL accepted. 12. Tap Register to register the instrument and select a configuration.
- Page 79 Note: If the user checks the “Send results to LIMS” checkbox, the LIMS results status will be displayed, and the results for each sample will be sent to LIMS after the run. This setting does not change after the instrument restart. EZ2 Connect and EZ2 Connect Fx User Manual | 03/2024...
- Page 80 Figure 96. Disable sending results warning. The LIMS results status is shown by an icon in the upper right corner of the screen. This icon has three states: Figure 97. LIMS icon status. EZ2 Connect and EZ2 Connect Fx User Manual | 03/2024...
- Page 81 The results sending status table is empty when all results have been successfully sent and nothing is queued to be sent. The user sees the LIMS results status icon with a checkmark. Figure 98. Results sending status Empty. EZ2 Connect and EZ2 Connect Fx User Manual | 03/2024...
- Page 82 Results with the Sending status are currently being sent to the LIMS system. Results with Pending status are queued and waiting to be sent. The user also sees the LIMS results status icon with the cached symbol. Figure 99. Results sending status in progress. EZ2 Connect and EZ2 Connect Fx User Manual | 03/2024...
- Page 83 Unsent results are not resent automatically after the failure. The user can select unsent results and tap the Send button to resent results to a configured LIMS. Unsent results will be sent automatically only after the instrument restart. Figure 100. Results sending status error. EZ2 Connect and EZ2 Connect Fx User Manual | 03/2024...
-
Page 84: Setting Up A Protocol Run
Figure 101. The log in screen. The EZ2 Connect software will guide you through the protocol run setup process. The steps of the protocol wizard vary, depending on the selected protocol and may differ from the figures included in this section. Some descriptions shown on the touchscreen may only be visible by using a scrollbar. - Page 85 To begin set up of a protocol run, start at the Setup tab, then tap the Scan button or choose an application type in the “Applications” pane. The EZ2 Connect Fx also supports a shortcut function that can be used if a shortcut was created during the run setup.
- Page 86 Note: Barcode information may also be entered manually. Figure 104. Scanning the information into the instrument. WARNING Risk of personal injury Hazard Level 2 laser light: Do not stare into the light beam when using handheld barcode scanner. EZ2 Connect and EZ2 Connect Fx User Manual | 03/2024...
- Page 87 Figure 105. Setup screen. 2. Tap into the field showing up in the next screen and scan the 1D barcode on the Q-Card provided with the kit. Figure 106. Scan the Q-Card barcode screen. EZ2 Connect and EZ2 Connect Fx User Manual | 03/2024...
- Page 88 3. By scanning the 1D barcode on the Q-Card provided with the kit, the application type is selected and information on protocol options is given. See Section 5.13 (see page 113). Figure 107. Select protocol screen. 4. Tap Next to continue. Tap Back or Cancel to return to the Setup screen. EZ2 Connect and EZ2 Connect Fx User Manual | 03/2024...
- Page 89 After selecting a protocol, the Next button is enabled. To proceed to the “Define parameters” step, tap Next. If there are no parameters to define, you will be taken to the “Select sample positions” step. To return to the previous screen, tap Back. To cancel the protocol, tap Cancel. EZ2 Connect and EZ2 Connect Fx User Manual | 03/2024...
- Page 90 Note: The description on the GUI is supportive only. Please ensure you to read the respective information in the kit handbook. To proceed to the “Select sample positions” step, tap Next. To return to the previous screen, tap Back. To cancel the protocol, tap Cancel. EZ2 Connect and EZ2 Connect Fx User Manual | 03/2024...
- Page 91 Figure 110. Select sample positions screen. Figure 111. Select sample positions step. After you select at least one sample position, the Next button is enabled. To proceed to the “Enter sample IDs” step, tap Next. EZ2 Connect and EZ2 Connect Fx User Manual | 03/2024...
- Page 92 USB stick with the sample list and tap Import on the select sample position screen. Note: The EZ2 Connect will detect and show all *.xlsx files on the USB stick. To avoid confusion it is recommended to just have one *.xlsx file with a meaningful title on the USB stick for sample list upload.
- Page 93 When the user edits the sample ID, and scans the barcode, the input is saved and the new keyboard appears for the next sample ID. Note: The EZ2 Connect Fx user with Administrator or Advanced user role can create a shortcut at this stage. Figure 113. Enter sample IDs step (two IDs autogenerated).
- Page 94 There is an 80-character limit for the Note (optional) field. Tap Accept to save the changes, or tap Cancel to go back to the Enter sample IDs screen. To proceed to the “Load the cartridge rack” step, tap Next. To return to the previous screen, tap Back. To cancel the protocol, tap Cancel. EZ2 Connect and EZ2 Connect Fx User Manual | 03/2024...
-
Page 95: Shortcuts (Ez2 Connect Fx Only)
5.5. Shortcuts (EZ2 Connect Fx only) The EZ2 Connect Fx software can create shortcuts, which are pre-setting the kit, protocol, protocol settings (e.g., elution volume, rack, etc.) and sample positions. Sample IDs are filled out automatically but can be changed. The shortcut will also skip all loading instruction screens to speed up the process. - Page 96 7. An overview window will appear where you can check the settings. 8. Start the protocol run with load check by tapping the Start button or skip the load check by tapping the Skip load check button. EZ2 Connect and EZ2 Connect Fx User Manual | 03/2024...
- Page 97 6. The new shortcut button is now available in the setup screen. Note: All other settings of the previous shortcut are copied to the new shortcut. Just the sample positions have changed. EZ2 Connect and EZ2 Connect Fx User Manual | 03/2024...
-
Page 98: Setting Up The Worktable
5.6. Setting up the worktable This section is about setting up the EZ2 Connect worktable that consists of removing the empty tip rack(s) and the cartridge rack(s) from the instrument, prepare them with respective cartridge(s), consumables and sample(s) and reload them onto the instrument. - Page 99 Important: Ensure that the tubes are inserted as far as possible into the rack, that is, push them all the way down into the respective position. Do not use thick tube labels, as the tube may get stuck at an elevated position, which may interfere with subsequent pipetting steps. EZ2 Connect and EZ2 Connect Fx User Manual | 03/2024...
- Page 100 To return to the previous screen, tap Return. To start the protocol run, tap Start. EZ2 Connect Fx users have the additional option to skip the load check. By tapping Skip load check, the run will start without a load check being performed.
-
Page 101: Starting The Protocol Run And Monitoring Its Progress
Figure 125. Close the hood dialog box. 4. The Load Check might start (for EZ2 Connect Fx user when started with load check). For more information about the load check, refer to Section 5.7.1 (see page 103). The run will start after the check is successfully completed. To stop the load check, tap Abort. - Page 102 Figure 126. Load check in progress screen. 5. After successful completion of the Load Check progress of the run and the elapsed run time are displayed on the Protocol run in progress screen. Figure 127. Run progress screen. EZ2 Connect and EZ2 Connect Fx User Manual | 03/2024...
- Page 103 5.7.1. Load check (for EZ2 Connect Fx only) The EZ2 Connect Fx comes with a built-in camera, which is designed as an aid to ensure the operator has loaded all of the cartridges and labware into the correct positions on the worktable. However, the contents of the labware (e.g., liquid levels) in the tip rack are not checked, so the operators must make sure that they have carefully followed the instructions related to the protocol being run.
- Page 104 To return to the loading instructions and start the load check procedure again, tap Back. The Load the tip rack screen is shown. If you need the instructions from the previous screen, press Back again. Once you have confirmed correct loading of EZ2 Connect and EZ2 Connect Fx User Manual | 03/2024...
- Page 105 Note: In case of repeated load check failure, after correct worktable setup has been confirmed, please recalibrate the camera (refer to Section 6.6). Contact QIAGEN Technical Support for additional support. During this time samples should be removed from the worktable and held at appropriate storage conditions.
- Page 106 Tap Unlock hood button to correct the loading. Figure 132. Warning after unlocking the hood. Figure 133. Hood unlocked pop-up window. Figure 134. Warning on the Load check failed screen. EZ2 Connect and EZ2 Connect Fx User Manual | 03/2024...
-
Page 107: End Of The Protocol Run
Important: Make sure to timely remove eluates from the instrument after the run has finished and store as indicated in the corresponding kit handbook. The eluates are exposed to ambient temperature in the EZ2 Connect and extended time before removal may cause nucleic acid degradation. - Page 108 The process can be aborted if not required. Note: After the last run of the day, the daily maintenance needs to be conducted (see Section 6.3). EZ2 Connect and EZ2 Connect Fx User Manual | 03/2024...
-
Page 109: Saving A Run Report
5.9.1. Run report contents An EZ2 Connect run report is created by the software application after a run is completed, aborted, or if it fails, after the user taps the Finish button on the screen that is shown after a run ends. -
Page 110: Canceling The Protocol Run Setup
1. In the Protocol run in progress screen, tap Abort run. A confirmation dialog box appears. 2. Tap Yes to stop the run, or tap No to go back to the Protocol run in progress screen. Figure 137. Aborting protocol run dialog box. EZ2 Connect and EZ2 Connect Fx User Manual | 03/2024... - Page 111 Figure 139. Protocol run aborted screen. 5. Also, for aborted protocol runs, the after run maintenance needs to be performed. Please follow the instructions regarding the cleaning of the piercing unit from Section 6.3 (page 137). EZ2 Connect and EZ2 Connect Fx User Manual | 03/2024...
-
Page 112: Sample Recovery
5.12. Sample recovery In case of a run failure, the EZ2 Connect Fx provides a recovery feature which allows localization and recovery of the sample. For more information, refer to the EZ2 Connect Fx Recover Procedure Instruction Manual, which can be found on the EZ2 Connect Fx product page in the Resource section (www.qiagen.com). -
Page 113: Lims Workflow
The EZ2 Connect has to be integrated with existing LIMS, by setting up and configuring external service called LIMS Connector; this can be done with help from QIAGEN Service Team. To begin set up of a protocol run using the LIMS interface, start at the Setup tab, then tap the LIMS button. - Page 114 2. Tap Scan sample ID to scan either using the handheld barcode scanner or using the on-screen keyboard. Figure 143. Scan or enter sample ID. 3. After scanning the first sample the “Check parameters and load the holder” screen is displayed. Figure 144. Check parameters and load holder screen. EZ2 Connect and EZ2 Connect Fx User Manual | 03/2024...
- Page 115 Also, samples that have not been found in LIMS can be processed. Note: If the “Sample ID” fields contain scanned sample IDs found in LIMS, these fields are not editable. Figure 146. Review collected samples. EZ2 Connect and EZ2 Connect Fx User Manual | 03/2024...
- Page 116 Important: Read the instructions carefully before loading the rack, and make sure to follow all directions including those in the respective kit handbook. Figure 148. Load the cartridge rack. EZ2 Connect and EZ2 Connect Fx User Manual | 03/2024...
- Page 117 Important: Read the instructions carefully before loading the rack, and make sure to follow all directions including those in the respective kit handbook. Figure 149. Load the holder. 8. Tap Next to proceed to the run overview screen. Figure 150. Run setup overview. EZ2 Connect and EZ2 Connect Fx User Manual | 03/2024...
- Page 118 5 runs, a warning message is displayed. Figure 152. Pop-up window with Low disk space after attempting to start a run. Previous run reports should be downloaded and deleted to free up disk space. EZ2 Connect and EZ2 Connect Fx User Manual | 03/2024...
-
Page 119: Data Menu
5.14. Data menu Important: Use only the USB stick provided by QIAGEN. Do not connect other USB stick devices to USB ports. Important: Do not remove the USB drive while downloading or transferring data or software to or from the instrument. - Page 120 All run reports Recent reports, for this option you should also specify the number of reports Tap either Download or Download and delete. Figure 155. Data tab. Figure 156. Download reports in progress. EZ2 Connect and EZ2 Connect Fx User Manual | 03/2024...
- Page 121 Tap OK to confirm deletion, or Cancel to go back. Downloaded files should be copied from the USB stick to a final destination of the user’s choosing. Figure 159. Run reports deleted confirmation. Tap OK to complete process. EZ2 Connect and EZ2 Connect Fx User Manual | 03/2024...
- Page 122 Note: Download of the Audit trail file(s) is only available to Admin users. Tap the Download button, in the Audit trail section of the Data screen. The following screen is displayed: Figure 161. Download audit trail in progress. EZ2 Connect and EZ2 Connect Fx User Manual | 03/2024...
- Page 123 The sample list template is an *.xlsx file that can be used to pre-define sample positions, sample IDs and optional sample notes. It can be filled-in on an external PC by using a spreadsheet calculation software and uploaded to the EZ2 Connect during protocol run setup.
- Page 124 4. Fill out the sample IDs of the used sample positions in the table. It is possible to leave positions empty. It is optional to add sample notes. Figure 166. Sample list template. EZ2 Connect and EZ2 Connect Fx User Manual | 03/2024...
-
Page 125: Session Handling
Important: Do not switch the instrument off when a protocol run, or maintenance procedure, or file transfer is in progress. This could result in damage to the instrument and samples and/or data may be lost. Figure 167. Location of the Session button. Figure 168. Session handling dialog window. EZ2 Connect and EZ2 Connect Fx User Manual | 03/2024... -
Page 126: Notifications And Banners
(yellow), information, and notifications (gray) in the particular section are sorted by date. Figure 170. Notification center. To see detailed description of the info listed in the notification center tap the info icon ( EZ2 Connect and EZ2 Connect Fx User Manual | 03/2024... - Page 127 The banners appear on the bottom of the screen when the user starts a background task (e.g., cooling after the run or scheduled UV run). When the banners are displayed, the rest of the screen becomes inactive until all banners have been closed by tapping X. EZ2 Connect and EZ2 Connect Fx User Manual | 03/2024...
- Page 128 The background task banner will also appear by tapping on the status icon in the footer (UV or snowflake). The icon appears only when a background task is running. Figure 174. Status icons indicating a specific background task. EZ2 Connect and EZ2 Connect Fx User Manual | 03/2024...
-
Page 129: Cooling After Run
The snowflake can be tapped for further information when the banner is closed. The cooling can be aborted when there is a timeout or by tapping Abort cooling. EZ2 Connect and EZ2 Connect Fx User Manual | 03/2024... - Page 130 Figure 176. Pop-up window with aborted cooling after run. EZ2 Connect and EZ2 Connect Fx User Manual | 03/2024...
-
Page 131: Maintenance Procedures
Only perform maintenance that is specifically described in this user manual. To ensure reliable operation of the EZ2 Connect, maintenance procedures must be performed. The procedures are shown in the table below. Each maintenance procedure must be carried out by appropriate personnel, as specified below. - Page 132 UV run).The background task is indicated by a banner and by a sign in the lower right corner. In case of a running active cooling process, a snowflake is shown (Figure 178). A scheduled UV run is indicated by a UV sign. Figure 178. Background tasks tab. Figure 179. Scheduled UV run is running. EZ2 Connect and EZ2 Connect Fx User Manual | 03/2024...
-
Page 133: Cleaning Agents
Note: If you want to use different disinfectants than the recommended ones, make sure that they have the same composition. If you are unsure about the suitability of the detergents or disinfectants to be used with the EZ2 Connect, do not use them. - Page 134 Damage to the instrument Do not use spray bottles containing alcohol or disinfectant to clean surfaces of the EZ2 Connect. Spray bottles should be used only to clean items that have been removed from the worktable and if permitted by local laboratory operating practices.
-
Page 135: After Run Maintenance
Venting for fumes and disposal of waste must be in accordance with all national, state, and local health and safety regulations and laws. Materials used on the EZ2 Connect, such as human blood, serum, or plasma, are potentially infectious. Thus, the EZ2 Connect should be decontaminated after use (for more details, see Sections 6.1.1 and 6.1.2). - Page 136 Repeat for all piercing spikes. Figure 181. Cleaning the EZ2 Connect piercing unit. 8. Carefully wipe the piercing unit with a lint-free tissue moistened with distilled water. Enclose individual piercing spike with the tissue, apply firm pressure and twist several times.
-
Page 137: Daily Maintenance
Daily maintenance is required after the last run of each day. WARNING Moving parts To avoid contact with moving parts during the operation of the EZ2 Connect, the instrument must be operated with the hood closed. If the hood sensor or lock is not functioning properly, contact QIAGEN Technical Services. - Page 138 6. Close the hood. 7. To return the piercing unit to home position, tap Move up. 8. To allow bottom tray removal, tap Move to back. Note: Left bottom tray must be removed first. EZ2 Connect and EZ2 Connect Fx User Manual | 03/2024...
- Page 139 10. Wipe the cartridge and tip racks with 70% ethanol or Mikrozid AF, and then with distilled water. 11. Wipe the surface of the instrument using a lint-free tissue moistened with 70% ethanol. 12. Tap Move to front. Racks can now be inserted into the instrument again. EZ2 Connect and EZ2 Connect Fx User Manual | 03/2024...
- Page 140 Note: The hood and touchscreen should ONLY be cleaned with lint-free tissue moistened with water. EZ2 Connect and EZ2 Connect Fx User Manual | 03/2024...
-
Page 141: Weekly Maintenance
Risk of personal injury and material damage CAUTION Improper use of the EZ2 Connect may cause personal injuries or damage to the instrument. The EZ2 Connect must only be operated by qualified personnel who have been appropriately trained. Servicing of the EZ2 Connect must only be performed by a QIAGEN Field Service Specialist. - Page 142 4. Clean the D-rings (on tip adapter) with a lint-free tissue to remove any previously applied grease. 5. Apply a small amount of silicon grease (see Appendix B – EZ2 Connect Parts and Components/Consumables) onto the inner wall of the large end of a fresh filter-tip by using the fine end of a second fresh tip.
-
Page 143: Uv Decontamination
Risk of personal injury and material damage CAUTION Improper use of the EZ2 Connect may cause personal injuries or damage to the instrument. The EZ2 Connect must only be operated by qualified personnel who have been appropriately trained. Servicing of the EZ2 Connect must only be performed by a QIAGEN Field Service Specialist. - Page 144 Note: The bottom trays should be inserted before the UV run is started. Note: For a proper decontamination of the system, QIAGEN recommends to additionally wiping the surfaces with disinfectants. The procedure is described in Section 6.1.1. The UV run can be set manually (for all users) or in scheduled mode (only for Administrator and service users).
- Page 145 3. Tap UV run. The date when the procedure was last completed is shown on the screen. 4. Select the number of decontamination cycles. The required decontamination time depends on the biological material processed on the device. One cycle takes around 34 minutes. EZ2 Connect and EZ2 Connect Fx User Manual | 03/2024...
- Page 146 2 minutes. 7. A message (see the Figure 193 below) is displayed after execution of the UV run. Tap Finish to complete the UV run. Figure 193. UV run finished screen. EZ2 Connect and EZ2 Connect Fx User Manual | 03/2024...
- Page 147 3. Enable the “Scheduled UV run” checkbox. Set Start time. Set weekdays by selecting corresponding checkboxes. Set time for the Close hood notification. Set number of cycles. Figure 194. Scheduled UV run settings. EZ2 Connect and EZ2 Connect Fx User Manual | 03/2024...
- Page 148 By going back to the home screen from the protocol setup. The user can go to the Notification tab and check details by tapping the More info button. Figure 196. Close the hood notification. EZ2 Connect and EZ2 Connect Fx User Manual | 03/2024...
- Page 149 When the UV run starts the scheduled UV run banner appears at the bottom of the screen. Additionally, a UV sign will appear in the lower right corner during the UV run. This sign can be tapped for more information. Figure 197. Scheduled UV run is in progress banner. EZ2 Connect and EZ2 Connect Fx User Manual | 03/2024...
-
Page 150: Camera Calibration
Contact your local QIAGEN Technical Services or your local distributor for more information about flexible Service Support Agreements from QIAGEN. Note: Before service of the EZ2 Connect can be performed, the instrument must first be decontaminated. Refer to Sections 6.1.1 and 6.1.2 (pages 134 and 134, respectively). -
Page 151: Troubleshooting
7. Troubleshooting This section contains information about what to do if an error occurs when using the EZ2 Connect. 7.1. Contacting QIAGEN Technical Services Whenever encountering an EZ2 Connect error, be sure to have the following information at hand: Note: Most of the information listed below can be found in the run report. - Page 152 7.1.1. Creating a support package The EZ2 Connect can create a support package containing information about the device and the device status. This information will help QIAGEN Technical Services troubleshoot the issue. 1. Log into the EZ2 Connect, if not already logged in.
- Page 153 6. If creation of the support package is not possible, the screen below is displayed and the creation should be attempted again. Figure 202. Support package creation failure status. Note: The support package contains information about the last performed runs and hence can contain sensitive information. EZ2 Connect and EZ2 Connect Fx User Manual | 03/2024...
-
Page 154: Operation
Wait a few seconds after plugging the USB stick. Unplug and plug in the USB stick again. Restart the device. Try using a different USB detected port or supported USB stick. Check the USB stick on a PC to ensure it is functional. Make sure you use the QIAGEN USB stick. If the error persists, contact QIAGEN Technical Services. - Page 155 Ensure that only the cleaning agents as described in Section 6.1 were used. Display does not turn Do not touch the display with excessive force or use corrosive chemicals to clean the display surface. Contact QIAGEN Technical Services for repair.
-
Page 156: Glossary
The main door at the front of theEZ2 Connect. When open, it provides complete access to the worktable. Pipettor head The component of the EZ2 Connect that aspirates and dispenses liquid, and pierces cartridges via the piercing unit. The pipettor head moves up and down above the worktable and contains 24 syringe pumps, each of which is connected to a tip adapter. -
Page 157: Technical Specifications
9. Technical Specifications QIAGEN reserves the right to change specifications at any time. 9.1. Operating conditions Description Requirement Power 100−240 V AC, 50/60 Hz, 1000 VA Mains supply voltage fluctuations are not to exceed 10% of nominal supply voltages. Fuse... -
Page 158: Mechanical Data And Hardware Features
Attach to the tip adapters of the pipettor head to allow liquid aspiration and dispensation. Capacity of 10–1000 μL. The EZ2 Connect accommodates up to 48 tip holders in 2 rows, each containing a filter-tip, in the tip rack on the worktable. -
Page 159: Barcode Reader Specifications
9.5. Barcode reader specifications Note: The following specifications are referring to the supported Barcode Reader (cat. no. 9027101) for the EZ2 Connect system. Decoding Capability: 1D / LINEAR CODES: Autodiscriminates all standard 1D codes including GS1 DataBar™ linear codes. 2D CODES: Aztec Code; China Han Xin Code; Data Matrix; MaxiCode; Micro QR Code; QR Code STACKED CODES: EAN/JAN Composites;... - Page 160 QR Code: 10 mils: 2.0 to 25.0 cm / 0.8 to 9.8 in Note: Further information can be found in the Barcode reader manual. EZ2 Connect and EZ2 Connect Fx User Manual | 03/2024...
-
Page 161: Declaration Of Conformity
Recycling can be provided by QIAGEN upon request at additional cost. In the European Union, in accordance with the specific WEEE recycling requirements and where a replacement product is being supplied by QIAGEN, free recycling of its WEEE-marked electronic equipment is provided. -
Page 162: Liability Clause
QIAGEN. The EZ2 Connect is equipped with an Ethernet port and a Wi-Fi USB device. The Purchaser of the EZ2 Connect is solely responsible for preventing any and all computer viruses, worms, trojans, malware, hacks, or any other type of cybersecurity breaches. -
Page 163: Appendix B - Ez2 Connect Parts And Components/Consumables
9027101 barcode scanning Silicone Grease 9027102 For up-to-date licensing information and product-specific disclaimers, see the respective QIAGEN kit handbook or user manual. QIAGEN kit handbooks and user manuals are available at www.qiagen.com or can be requested from QIAGEN Technical Services or your local distributor. -
Page 164: Appendix C - Consignes De Sécurité
Appendix C – Consignes de sécurité Avant d’utiliser le EZ2 Connect, il est impératif de lire attentivement ce manuel et de porter une attention particulière aux consignes de sécurité. Afin de garantir un fonctionnement de l’appareil en toute sécurité et de maintenir l’appareil en bon état de marche, il est impératif de suivre les instructions et consignes de sécurité... -
Page 165: Utilisation Appropriée
Procéder à la maintenance comme décrit à la Section 6. QIAGEN facture les réparations dues à une maintenance inappropriée. En cas d’urgence, éteindre l’EZ2 Connect à l’aide de l’interrupteur d’alimentation situé à l’avant de l’instrument et débrancher le câble d’alimentation de la prise secteur. -
Page 166: Sécurité Électrique
Si un liquide s’est répandu à l’intérieur de l’appareil, éteignez-le, déconnectez-le de la prise secteur et prenez contact avec les services techniques QIAGEN pour obtenir des conseils avant de tenter un dépannage ou une activité de service. Si l’instrument présente un danger électrique, empêcher le reste du personnel de s’en servir et contacter les services techniques QIAGEN. -
Page 167: Conditions De Fonctionnement
Détérioration de l’instrument La lumière directe du soleil peut blanchir certaines parties de l’instrument endommager les pièces en plastique ou nuire au bon fonctionnement du contrôle de charge. L’EZ2 Connect doit être tenu à l’abri de la lumière directe du soleil. -
Page 168: Sécurité Biologique
Vapeurs toxiques AVERTISSEMENT Vapeurs toxiques N'utilisez pas de javellisant pour nettoyer ou désinfecter l’appareil EZ2 Connect. Le contact de l’eau de Javel avec des sels provenant des tampons peut produire des vapeurs toxiques. EZ2 Connect and EZ2 Connect Fx User Manual | 03/2024... -
Page 169: Élimination Des Déchets
Ces déchets doivent être convenablement collectés et mis au rebut conformément aux règles de sécurité locales. Pour en savoir plus sur la mise au rebut de l’EZ2 Connect, se reporter à l’Annexe A : Waste Electrical and Electronic Equipment (WEEE). -
Page 170: Danger Lié À La Chaleur
Radiations L’instrument EZ2 Connect contient une lampe UV LED. La longueur d’onde de la lumière UV produite par la lampe UV LED est de 270 à 285 nm. Cette longueur d’onde correspond à une lumière ultraviolette de type C, qui peut être utilisée pour des procédures de décontamination. -
Page 171: Symboles Sur L'instrument Ez2 Connect
AVERTISSEMENT Risque d’incendie Lorsque l’instrument EZ2 Connect est nettoyé avec un désinfectant à base d’alcool, laisser la porte de l’instrument ouverte pour permettre la dispersion des vapeurs inflammables. Nettoyer l’instrument EZ2 Connect avec un désinfectant à base d’alcool seulement lorsque les composants de la table de travail ont refroidi. - Page 172 Plaque signalétique à l’arrière de Numéro de série. l’instrument Plaque signalétique à l’arrière de Lire le mode d’emploi. l’instrument Plaque signalétique à l’arrière de Se reporter aux avertissements et précautions. l’instrument EZ2 Connect and EZ2 Connect Fx User Manual | 03/2024...
-
Page 173: Appendix D - Sicherheitshinweise
Appendix D – Sicherheitshinweise Lesen Sie dieses Handbuch sorgfältig durch, bevor Sie den EZ2 Connect benutzen. Beachten Sie dabei insbesondere die Sicherheitshinweise. Die Gebrauchsanweisungen und Sicherheitshinweise im Handbuch müssen befolgt werden, um einen sicheren Betrieb des Geräts zu gewährleisten und das Gerät in einem sicheren Zustand zu erhalten. -
Page 174: Sachgemäße Handhabung
Führen Sie alle Wartungsarbeiten gemäß den Anweisungen im Abschnitt 6 dieses Handbuchs durch. QIAGEN stellt Reparaturen, die auf nicht fachgerecht durchgeführte Wartungsmaßnahmen zurückzuführen sind, in Rechnung. Schalten Sie den EZ2 Connect im Notfall am Netzschalter an der Front des Geräts aus und ziehen Sie das Netzkabel aus der Netzsteckdose. -
Page 175: Elektrische Sicherheit
Hinweis: Falls der Betrieb des Geräts auf irgendeine Weise unterbrochen wurde (z. B. aufgrund einer Unterbrechung der Stromversorgung oder eines mechanischen Fehlers), schalten Sie zuerst das EZ2 Connect Gerät aus und ziehen Sie das Netzkabel aus der Steckdose, bevor Sie Maßnahmen zur Fehlerbehebung oder Inspektion ergreifen. -
Page 176: Betriebsbedingungen
Nehmen Sie das Gerät nicht in Betrieb, wenn Abdeckungen oder Teile entfernt worden sind. Falls Flüssigkeit im Gerät verschüttet wurde, schalten Sie es aus, ziehen Sie den Netzstecker und setzen Sie sich für Hilfestellung mit dem Technischen Service von QIAGEN in Verbindung, bevor Sie Maßnahmen zur Fehlerbehebung oder Inspektion ergreifen. -
Page 177: Biologische Sicherheit
Sonneneinstrahlung geschützt ist. VORSICHT Beschädigung des Geräts Der EZ2 Connect darf nicht in der unmittelbaren Nähe von Quellen starker elektromagnetischer Strahlung (z. B. nicht abgeschirmten, absichtlich betriebenen HF-Quellen oder Funkgeräten) aufgestellt oder betrieben werden, da diese den ordnungsgemäßen Betrieb des Geräts stören können. -
Page 178: Chemikalien
Benutzte Verbrauchsartikel, z. B. Reagenzienkartuschen und Einweg-Filterpipettenspitzen, können gefährliche Chemikalien oder infektiöse Erreger aus dem Aufreinigungsprozess enthalten. Derartige Abfälle müssen gesammelt und sachgerecht gemäß den geltenden kommunalen Sicherheitsbestimmungen entsorgt werden. Weitere Informationen zur Entsorgung des EZ2 Connect finden Sie in Anhang A: Waste Electrical and Electronic Equipment (WEEE). VORSICHT Gefährliche Chemikalien und infektiöse Erreger... -
Page 179: Gefahr Durch Mechanische Teile
Gefahr durch mechanische Teile Die Haube des EZ2 Connect muss während des Betriebs des Geräts geschlossen sein. Öffnen Sie die Haube nur, wenn Sie dazu in der Gebrauchsanweisung angewiesen werden. Die Arbeitsplattform des EZ2 Connect Geräts bewegt sich während des Betriebs des Geräts. Halten Sie immer Abstand zum Gerät, wenn Sie die Arbeitsplattform beladen. -
Page 180: Wartungssicherheit
Lassen Sie nach dem Reinigen des EZ2 Connect Geräts mit einem Desinfektionsmittel auf Alkoholbasis die Gerätetür offen, damit sich entzündliche Dämpfe verflüchtigen können. Reinigen Sie das EZ2 Connect Gerät erst mit einem Desinfektionsmittel auf Alkoholbasis, wenn sich die Komponenten der Arbeitsplattform abgekühlt haben. -
Page 181: Symbole Auf Dem Ez2 Connect Gerät
Symbole auf dem EZ2 Connect Gerät Die folgenden Symbole befinden sich auf dem EZ2 Connect und EZ2 Connect Fx Gerät. Symbol Beschreibung Heizsystem – im Inneren des Gefahr durch Hitze – die Temperatur des Heizsystems kann bis zu 95 °C betragen. Geräts Nahe am Tip-Rack Biogefährdung –... -
Page 182: Document Revision History
Update according to new SW 1.2 functionalities: Cooling after run, UV run scheduler, patch management via QIAsphere, screen lock, time synchronization with QIAsphere, time zone support, notification center. Improved description of the weekly maintenance procedure. Improved structure. EZ2 Connect and EZ2 Connect Fx User Manual | 03/2024... - Page 183 Trademarks: QIAGEN ® , Sample to Insight ® , QIAsphere ® , EZ1&2™, EZ1 ® , EZ2 ® (QIAGEN Group); DNA-ExitusPlus™ (AppliChem); Gigasept ® , Mikrozid®, Lysetol ® (Schülke & Mayr GmbH); RNaseZap ® (Ambion, Inc.). Registered names, trademarks, etc. used in this document, even when not specifically marked as such, are not to be considered unprotected by law.
- Page 184 Ordering www.qiagen.com/shop | Technical Support support.qiagen.com | Website www.qiagen.com...
Need help?
Do you have a question about the EZ2 Connect and is the answer not in the manual?
Questions and answers
DOES THE EZ CONNECT HAVE A HEPA FILTER