Table of Contents
Advertisement
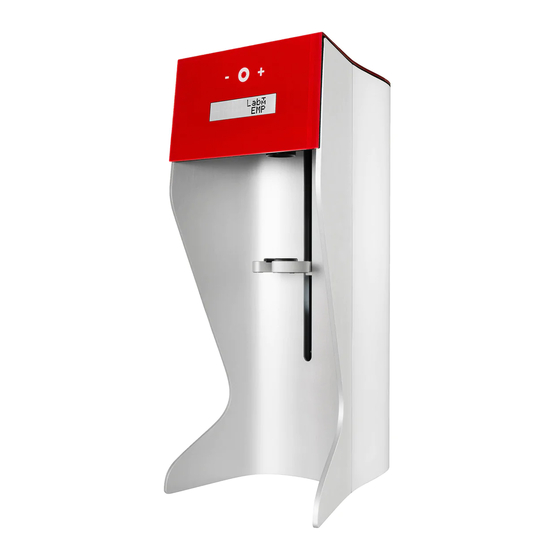
How to register your gako unguator EMP device
Display handling
Lift arm with integrated quick-lock coupling
•
Hold the gako logo on top of the jar to the front; insert the mixing shaft directly from the
front into the lift arm
•
Insert the mixing unit from below
•
Fix the jar with a slight turn counterclockwise (about a quarter turn) into the lift arm and
push the gako button
Quick - Start
•
Go to unguator.com/reg
•
Enter the 12 digit serial number
•
Enter the four digit unlock PIN on your device
--> review chapter 3
•
Touch panel with
•
start display shows jar size, mixing time and mixing speed
•
After pushing the gako button for two seconds the lift arm
moves automatically into the mounting postition
--> review chapter 3
--> review chapter 4
minus button (left)
gako button (middle)
plus button (right)
Advertisement
Table of Contents

Summary of Contents for gako unguator EMP
- Page 1 Quick - Start How to register your gako unguator EMP device • Go to unguator.com/reg • Enter the 12 digit serial number • Enter the four digit unlock PIN on your device --> review chapter 3 Display handling • Touch panel with...
- Page 2 Dear gako unguator user, thank you for choosing the Unguator Technology. You purchased a quality system for advanced pharmaceutical compounding. Please read the following operation manual carefully. For more information and compounding recommendation consult our homepage www.unguator.com For additional support, operation handling and all other questions regarding the Unguator Technology please feel free to contact us by E-Mail: contact@unguator.com...
- Page 3 Table of content Installation Information / Initial Operation The Unguator Technology - Competence from the start gako unguator Mixing Devices gako unguator Assortment Display Handling Initial Operation Compounding with the gako unguator BASIC Aborting the mixing process Compounding guidelines for the Unguator Technology Preparing the gako unguator Mixing Unit Weighed Portion of the Formulation The Mixing Process...
- Page 4 Installation Information / Initial Operation gako unguator EMP front gako unguator EMP rear The Unguator Technology - Competence from the start gako unguator BASIC / EMP gako unguator PRO gako unguator Standard Mixing Blade gako unguator Disposable Blade gako unguator Disposable Blade Shaft...
- Page 5 / jar size correlation letter / time correlation number / rpm correlation error codes Operation Errors / Stirrer Operation Errors / Jar Operation Errors / Common Errors Service and Warranty Technical Data of the gako unguator EMP chapter 0 - page 4...
- Page 6 30 minutes, this will prevent humidity and condensation from interfering with the device’s proper operation. The socket outlet is located on the rear of the gako unguator EMP. First connect the power cord to the socket outlet and then plug the power cord into the power outlet.
- Page 7 Button Minus Button Plus Button Display automatic lift arm with quick-lock coupling pic.: gako unguator EMP front power button / emergency button RS232 port socket outlet pic.: gako unguator EMP rear chapter 1 - page 2...
- Page 8 Mixing parameters and examples of formulation are found at www.unguator.com. gako unguator Mixing Devices The current gako unguator Mixing Devices - gako unguator BASIC, gako unguator EMP and gako unguator PRO - are useful and advanced improvements over the first gako unguator Device, launched in 1994.
- Page 9 Jar size, mixing time and ten mixing speeds can be set on the gako unguator BASIC. gako unguator EMP The gako unguator EMP ensures a GMP suitable preparation of semi-solid compounds up to 500 ml. The integrated quick-lock coupling allows for faster attach- ment of the mixing unit into the lift mount.
- Page 10 In addition, is the gako unguator PRO preloaded with a database of several mixing parameters for semi-solid NRF formulations. This will optimize the manufacturing of NRF and NRF similar formulations and increase the compound quality. The gako unguator Pro is equipped with several ports and together with the optional gako software ready for potential interconnection with electronic scales, printers (label, paper), keyboard and networking.
- Page 11 cess. When using the Disp. Blade, however there are no recesses of flow and no remedial work is generally required. • Warming The warmth that develops from the friction between the stirrer and the inside wall of the jar is generally desired. Decreased viscosity increases the wettability of powders and ac- celerates the penetration of potential powder pockets.
- Page 12 • gako unguator Disposable Blade (Disp. Blade) The gako unguator Disp. Blade is suitable for all gako unguator Devices. The one time use mixing blade is connected to the disp. blade shaft by pushing it down and twisting the blade counterclockwise, it can be disconnected after the mixing process with a clockwise turn.
- Page 13 Additionally, it is possible to open the jar by unscrewing the lid and removing compound remainders. The jar is resistant to hot-water baths and microwaves with temperatures maximum of 85°C/185°F. Higher temperatures may alter the tightness of the jar and the sliding ability of the jar bottom might be negatively impacted.
- Page 14 The jar is subject to periodic inspections in accordance to the guidelines of the Bundesapothe- kerkammer “Examination and Storage of primary packaging material”. A certificate of analysis is issued after batch-defined examinations. After a visual receiving inspection the manufacturer‘s test certificate (certificate of analysis) is retained for the documentation of primary packing materials as stipulated.This certificate is affixed to the plastic packaging of the jar.
- Page 15 In this case, the ointment can also be removed, similar to handling conventional jars with a regular lid, by removing the lid and with the help of a spatula. If the jar lid has been remo- ved, the ointment should be pushed up close to the lid after each dispensing process. In larger jars by using the spindle or the AirDynamic.
- Page 16 • gako unguator Applicator long The gako unguator Applicator long with a diameter of 2 mm al- lows formulations to be introduced into large orifices of the body or probes. In addition, the applicator long also comes inside each gako un- guator 200 ml Jar to help pushing up the bottom of this jar size in full.
- Page 17 In addition to the coupling, required for transferring from a 300 ml or 500 ml jar into a smaller jar, both the spindle and the AirDynamic may also be used. Dispensing and transferring a formulation via the regular jar nozzle from a 1000 ml and 2000 ml jar is practically only possible using the AirDynamic.
- Page 18 With pushing the jar bottom upwards the ExactDose chamber will be filled with the exact amount of compound and the coloured ball will be pushed up to its highest position. With a 180 degree turn of the set screw the coloured ball will be in the lowest position again, the compound will be extracted by pushing the jar bottom upwards and the chamber will be filled again with compound for the next dosage extraction.
- Page 19 Display Handling Initial Operation The touch panel is on the front of the gako EMP, with a minus button (left), the gako button (middle) and a plus button (right). pic.: Display gako unguator EMP After starting up the device with the power switch, located on the back, the display shows the device type “gako unguator EMP”.
- Page 20 Registration Enter the 12 digit serial number online at unguator.com/reg to register the new device. Then a four digit PIN number will be provided to activate the gako unguator EMP. pic.: Display PIN Enter the four digit PIN on the display of the gako unguator EMP.
- Page 21 If the mixing speed level test determines discrepancies, the display shows “please contact gis@ unguator.com”. Please contact the technical service per email with the serial number of the gako unguator EMP. pic.: Display contact By pushing the gako button the start screen appears.
- Page 22 • The device transfers to the start screen. pic.: start screen • Skip the IQ-Mode Push the minus button for two seconds and the start screen will automatically appear. • After 1000 preparations After 1000 preparations upon start the request to perform a functional test appears - Operation Qualification (OQ) -.
- Page 23 After 1500 preparations we recommend a maintenance performed by our technical service. pic.: Display maintenance Compounding with the gako unguator EMP The touch panel is on the front of the gako EMP, with a minus button (left), the gako button (middle) and a plus button (right). pic.: Display gako unguator BASIC After starting up the device with the power switch, located on the back, the display shows the device type “gako unguator EMP”.
- Page 24 Followed by the current number of preparations. pic.: Display current preparations After a few seconds, it forwards to the next screen. The start display shows the jar size, mixing time and the mixing speed in levels. pic.: start screen Both, the mixing parameters and the jar size, can be changed individually through pressing the plus and minus touch button.
- Page 25 The mixing unit is automatically unlocked and can be removed from the gako unguator EMP. With every finished mixing process, the gako unguator EMP will automatically issue an identifi- cation number. The identification number will help with easier documentation and exact repro- duction of the mixing process.
- Page 26 Compounding guidelines for the Unguator Technology Preparing the gako unguator Mixing Unit The gako unguator Mixing Unit consists of a gako unguator Jar, a gako unguator stirrer and the components of the formulation to be mixed. First, the jar cap (small white screw cap) of the jar and then the jar lid (large red, white or coloured screw cap) must be unscrewed from the jar.
- Page 27 The Mixing Process The gako unguator EMP is the result of continuous improvements of the gako unguator e of the year 1997. This was a further development from the original unguator from the year 1994 featuring an automated lift arm, programmable mixing time and mixing speed.
- Page 28 Quick-lock Coupling pic.: quick-lock Coupling Hold the gako logo, on top of the jar, to the front. Load the stirring shaft directly from the front into the lift arm. Push the mixing unit up and with a slight turn counterclockwise (about a quarter turn) fix the mixing unit into the lift arm.
- Page 29 9. The MB will be mostly clean, the mixing process is finished and the lift arm will move the mixing unit into the removal position for an easy extraction. With every finished mixing process the gako unguator EMP will automatically issue an identifi- cation number (ID). The identification number will simplify documentation and exact reproduc- tion of the mixing process and will be shown in the display after the mixing process.
- Page 30 Suspension < 2 % After finalizing the pre-grinding process both the remaining foundation and all active subs- tances will be weighed in. To incorporate air as little as possible push the movable jar bottom up until resistance is felt. Level 7 (1900 rpm) Jar size 15 - 30 ml 50 - 100 ml...
- Page 31 Emulsion (Solution ointment) With the mixing parameters “Emulsion” liquid components can be incorporated into hydro- philic foundations at room temperature. As an example, the preparation of aqueous hydrophilic ointment, aqueous lanolin alcohol oint- ment or eucerin c. aqua aa. To ensure a homogenous distribution we recommend applying disp. blades for jar sizes up to 200 ml and the standard mixing blades for larger batches.
- Page 32 To support the cool down process with the gako unguator EMP a cooling cuff can be used around the jar and the mixing process for larger jar sizes can be repeated. Step 1: combining phase - Level 1 (600 rpm)
- Page 33 Step 1: moistening - Level 8 (2150 rpm) Jar size 15 - 30 ml 50 - 100 ml 200 ml 300 - 500 ml Time (min.) 0:30 0:30 0:30 1:00 Stirrer Disp. Blade Disp. Blade Disp. Blade Step 2: swelling phase - Level 1 (600 rpm) Jar size 15 - 30 ml 50 - 100 ml...
- Page 34 Specialties With the mixing parameters “Specialities” surface-active or sensitive active substances or force sensitive foundations can be processed. As an example, metronidazole, chlorhexidine gluconate, Linola ® Therefore with suspension ointments < 2 % first use the “pre-grinding” parameters and for the main mixing process the mixing parameters “specialties”...
- Page 35 Components to be Melt Components, that have been weigh out to fuse, may be placed inside a jar, douse with heated aqueous or oily phases of the formulation components (< 85 °C / 185 °F) to melt the content in full.
- Page 36 Dispensing System. After completion of every single process the gako unguator EMP issues automatically an iden- tification number (ID). The display shows the ID and it conducts an easier documentation and an exact reproduction of the mixing process.
- Page 37 General Notes on the gako unguator Mixing System Patent Protection The gako unguator Mixing System consists of the gako unguator Technology, the gako ungu- ator Mixing Machines and various gako unguator assortment. The mixing system, the Unguator Technology, also the integrated gako unguator AirDynamic and gako unguator ExactDose therein are inventions of the pharmacist Albrecht Konietzko from Bamberg in Germany.
- Page 38 The first number of the Identification Number provides information about the jar size, whereby each jar size is assigned to one of the following numbers: gako unguator jar Jar size in ml tab.: number/jar size correlation As from the second position the mixing time and the rotation speed in 6 mixing stages are represented.
- Page 39 Stirrer Error Troubleshooting The stirrer used is not an original gako unguator stirrer. The gako unguator EMP has only been The stirrer used is not compatible with the gako tested, centered and aligned with original gako unguator EMP.
- Page 40 Jar Error Troubleshooting The jar connected to the gako unguator EMP is The jar has to be substituted for a gako unguator not a gako unguator jar. jar. The gako unguator Jar Lid was screwed alsant onto the jar and the stirrer cants on automatic Open the jar and screw the lid on correctly.
- Page 41 70 %. Make sure that no liquids enter the device. If liquids enter the interior of the gako unguator EMP, keep the device turned off and inform customer service. An unauthorized opening of the gako unguator EMP device is not permitted.
- Page 42 • After 1500 preparations it is recommended to send the gako unguator EMP for service to Gako International GmbH to preserve gears and motor for continuous untroubled opera- tion chapter 6 - page 1 contact@unguator.com | unguator.com...
- Page 43 The device should be allowed to acclimatize for approx. 30 minutes at initial commissio- ning and/or after extended storage time in cold rooms • the gako unguator EMP should be placed to ensure easy access to the power switch and power cable also to avoid use by unauthorized persons •...
- Page 44 22 lbs/10 kg Dimensions (LxWxH in mm) 255x211x512 Testing certifications tab.: Technical Data of the gako unguator EMP The gako unguator EMP is certified: Certificate of Conformity The certificate is available at the license holder Gako Konietzko GmbH, D-96049 Bamberg.
- Page 45 Distribution, Manufacturing and Customer Service Gako Konietzko GmbH Oberer Stephansberg 49g D-96049 Bamberg Tel: +49 (0) 951/ 58 25 5 Fax: +49 (0) 951/ 50 06 02 E-Mail: kontakt@unguator.com Web: www.unguator.com Gako International GmbH Am Steinernen Kreuz 24 96110 Scheßlitz, Germany Tel: +49 (0) 89/ 1222 387 200 Fax: +49 (0) 89/ 1222 387 201 E-Mail: contact@unguator.com...
- Page 46 WARRANTY CERTIFICATE for the Date of registration: Serial number: Stamp and signature The manufacturer will accept, independent from the obligations of the vendor against the buyer, a warranty period of twenty-four (24) months from the date of registration. Gako International GmbH Am Steinernen Kreuz 24 96110 Scheßlitz Telefon: +49 (0) 89 1222 387 200...
- Page 47 Installation Qualification (IQ) Company (Pharmacy) Device Identification Assessment not OK Examination of readability of the labels on the device Serial Number (SN): ___________________________ Date of Purchase: ___________________________ chapter 7 - page 1...
- Page 48 Considering Appropriate Installation Conditions Assessment not OK Stable, flat surface, observe product weight Suitable space for the device and unobstructed access to the power cord and power switch No direct air flow (windows, heating, fans, air conditions) No direct sunlight No extreme humidity or temperature fluctuations Clean, dry, dust-free Correctly installed, earthed socket with 220 V or country-specific nominal...
- Page 49 Place the device securely Establish the power supply, connect the device with the power outlet Turn on the gako unguator EMP device with the power switch The display shows the device type “gako unguator EMP” The display shows the number of current number of preparations “mixed <<---->>”...
- Page 50 Operation Qualification (OQ) Company (Pharmacy) Device Identification Assessment not OK Examination of readability of the labels on the device Serial Number (SN): ___________________________ Date of Purchase: ___________________________ chapter 7 - page 4...
- Page 51 OK The device is securely placed Power is supplied Turn on the gako unguator EMP device with the power switch The display shows the device type “gako unguator EMP” The display shows the number of current number of preparations “mixed <<---->>”...
- Page 52 Gako International GmbH is DIN EN ISO 9001:2015 certified Manufacturer’s certificate The entire gako unguator assortment is exclusively produced from materials and color components that meet the requirements for the German consumer goods ordinance (BedGgstVO) from 10th of April 1992 (revised version from 23th of November 1997, last amendment from 24th of June 2009), Database BfR Recommendations on Food Contact Materials legal specifications regulation (EU) Nr.
Need help?
Do you have a question about the EMP and is the answer not in the manual?
Questions and answers