Advertisement
VHX-53C
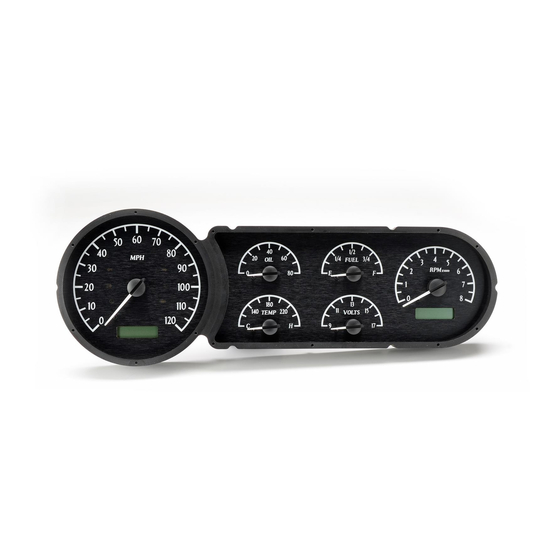
Dakota Digital VHX Instrument Installation
For 1953-54 Chevy Car
Your new VHX-53C kit includes:
VHX Display
Universal Sender
Pack
(6) 10-24 x 3" Studs
and Hex Nuts
Installation Manuals
(2) Mounting
Brackets
Switch Assembly
CAT5 Cable
Control Box
ABS Back plate
Installation
1. Remove the stock bezel, gauges, and the trim between the gauges from the dash. Also remove all
the studs so you have a bare bezel. The only item to be reused is the original front bezel.
Manual # 650408B
Advertisement
Table of Contents

Subscribe to Our Youtube Channel
Related Manuals for Dakota Digital VHX-53C


Summary of Contents for Dakota Digital VHX-53C
- Page 1 VHX-53C Dakota Digital VHX Instrument Installation For 1953-54 Chevy Car Your new VHX-53C kit includes: VHX Display Universal Sender Pack (6) 10-24 x 3” Studs and Hex Nuts Installation Manuals (2) Mounting Brackets Switch Assembly CAT5 Cable Control Box ABS Back plate Installation 1.
- Page 2 2. Insert the six (6) supplied studs in the holes shown below. Thread them in until they stop; tighten with pliers, taking care not to damage the end of the threads or twist them off. 3. Place the VHX display in the original bezel, using care to not scratch the lens. 4.
- Page 3 5. With the cut lines marked, you can now cut the center of the dash out to fit the new VHX display. Be sure to prep the rest of the car as needed to protect the interior and especially glass from sparks and metal shards. Use the metal cutting tool of your choice and work slowly as to not overheat the metal and damage the paint in a visible area.
- Page 4 7. Ensure the lens fits flush to the bezel and that the bezel itself fits snug against the dash; there should be no gaps around the lens or where the bezel meets the dash. 8. Connect the CAT5 cable to the system and take care when routing this cable to the control box.
Need help?
Do you have a question about the VHX-53C and is the answer not in the manual?
Questions and answers