Advertisement
Quick Links
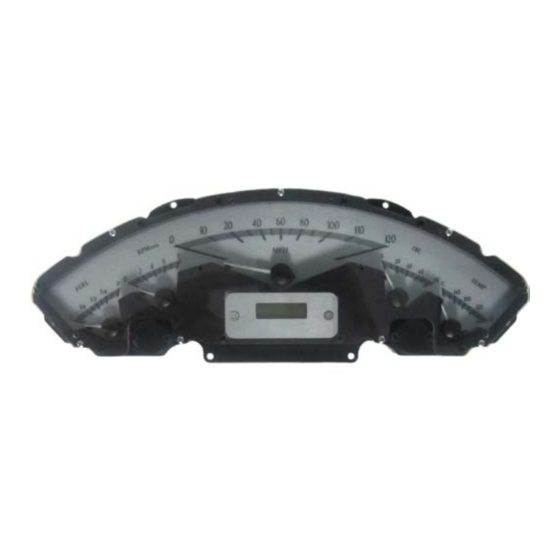
VHX-57F
Dakota Digital VHX Instrument Installation
For 1957 Ford Car
Your new VHX-57F kit includes:
(2X) 2" Screws
VHX Display
(6X) 1.25 Screws
Main Bezel
Universal Sender Pack
Odometer Bezel
Installation Manuals
Control Box
Ford Adapter
Switch Assembly
36" CAT5 Cable
Installation
1. Remove the stock gauge cluster from the dash and retain the factory hardware for reassembly.
Manual # 650513A
Advertisement

Related Manuals for Dakota Digital VHX-57F


Summary of Contents for Dakota Digital VHX-57F
- Page 1 VHX-57F Dakota Digital VHX Instrument Installation For 1957 Ford Car Your new VHX-57F kit includes: (2X) 2” Screws VHX Display (6X) 1.25 Screws Main Bezel Universal Sender Pack Odometer Bezel Installation Manuals Control Box Ford Adapter Switch Assembly 36” CAT5 Cable Installation 1.
- Page 2 2. Remove the back panel from the bezel by removing the six (6) screws. Retain the hardware for reassembly. 3. The inside of the gauge panel needs to have all the clips, trim pieces, and lens removed so it is a bare panel only.
- Page 3 5. Hold the front of the odometer bezel in place while inserting and mounting the VHX system to the panel using the six (6) factory screws. 6a. With the VHX system in place, carefully hold the front of the included main bezel while securing it on the backside using the supplied screws.
- Page 4 Attach the provided CAT5 cable to the back of the VHX system and carefully route the open end to the control box mounting location before reassembly of the dash. 8. Re-install the gauge cluster to the dash using the factory hardware and refer to the main manual for wiring instructions to complete the VHX installation.
Need help?
Do you have a question about the VHX-57F and is the answer not in the manual?
Questions and answers