Antunes VCT-2000 Owner's Manual
Vertical contact toaster
Hide thumbs
Also See for VCT-2000:
- Owner's manual (28 pages) ,
- Owner's manual (25 pages) ,
- Owner's manual (28 pages)
Table of Contents
Advertisement
Quick Links
Download this manual
See also:
Owner's Manual
Advertisement
Table of Contents

Related Manuals for Antunes VCT-2000


Summary of Contents for Antunes VCT-2000
- Page 1 Vertical Contact Toaster Model VCT-2000 Owner’s Manual Manufacturing Numbers: 9210112 www.antunes.com P/N 1011213 Rev. F 06/18...
-
Page 2: Table Of Contents
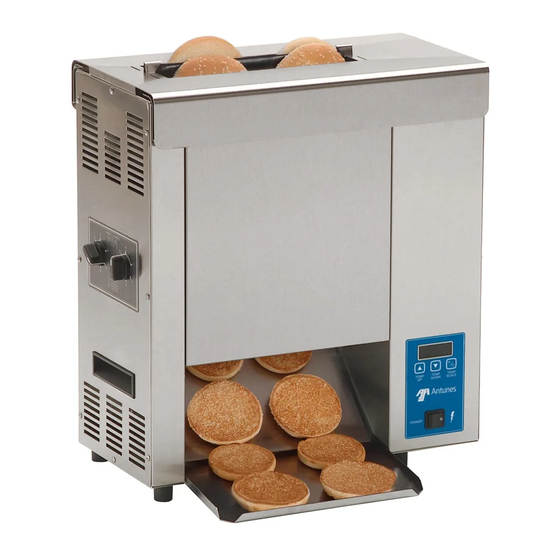
Overview Service/Technical Assistance Overview The Vertical Contact Toaster Model Before Use VCT-2000 is designed for contact If any parts are missing or damaged, In Case of Damage toasting of buns. The toaster design contact Antunes Customer Service Website allows the operator to place buns on... -
Page 3: Safety Information
Have the toaster serviced only sanitizers, degreasers, and by qualified personnel. Contact Electrical shock detergents) can permanently Antunes Technical Service hazard. Failure to follow these damage stainless steel equipment. for adjustment or repair. instructions could result in serious The damage is usually in the form y Turn the power off, allow the injury or death. -
Page 4: Specifications
Specifications Dimensions Electrical Ratings Model & Model & Width Depth Height Volts Watts Amp. Mfg. No. Mfg. No. VCT-2000 3291 15.8 VCT-2000 21 1/4” 15 1/4” 23 3/4” 9210112 9210112 (540 mm) (387 mm) (603 mm) Electrical Cord & Plug Configurations Model & Description Configuration Mfg. -
Page 5: Equipment Setup
Platen (Figure 1). Verify COULD RESULT IN SERIOUS damaged, that it is properly in place INJURY OR DEATH. contact Antunes Customer before proceeding. Service IMMEDIATELY at +1- y Electrical ground is required Remove Bun Chute and Bun Feeder on this appliance. - Page 6 Safety Front Interlock Conveyor Switch Belt Chain (some mod- els) Rear Conveyor Cover Assembly Front Belt (with Roller Wrap Tensioner) Front Conveyor Cover Assembly Bun Chute (some Roller Tensioner models only) Figure 1. VCT-2000 Toaster P/N 1011213 Rev. F 06/18...
-
Page 7: Operating Instructions
Daily Cleaning as out- THICKNESS THICKNESS lined in the Maintenance section of this manual. Temperature Adjustments The VCT-2000 uses a Platen Heater and two Auxiliary Air Heaters. The Platen Heater consists of a heat- ing element built into the Platen to 1/2"(12.7mm) 5/8"(15.9mm) toast the cut side of the bun. -
Page 8: Temperature Control Panel
Auxiliary Air heater NOTICE: The maximum Auxiliary Air Temperature control panel temperature adjustment Heater setpoint temperature NOTICE: The term “setpoint tem- is 400°F (204°C). 1. Turn the power on and wait for perature” refers to the desired 4. Release the button when the Temperature Display to finish the temperature setting. -
Page 9: Hi-Limit Reset Button
Safety Features Hi-Limit Reset Button A Hi-Limit Control turns off electrical °F °F power to the °C °C heater and control circuits if the TEMP TEMP TEMP TEMP TEMP TEMP DOWN SCALE DOWN SCALE platen overheats. To reset the con- trol, allow 10-15 minutes for the unit to cool, then locate the Reset Button at the rear of the unit. - Page 10 The VCT-2000 features a digital controller for making precise adjustments to the quality of the toast. A built-in auxiliary heater warms the top sides of the buns to help keep the assembled sandwich warmer for longer.
-
Page 11: Maintenance
Maintenance 14. Install the Bun Chute so the 6. Once the silver side is dry, re- hooks are installed over the peat Step 5 on the black side of lower rear yellow Support Rod. the Release Sheet. WARNING Turn the power off, unplug the pow- 15. -
Page 12: Replacing The Black And Silver Release Sheet (Every 4-6 Weeks)
Replacing the Belt Wraps 4. Remove and discard the old Belt Replacing the Black and Silver Wrap(s). Release Sheet (Every 3–6 Months) 5. Clean both Conveyor Belt Chains (Every 4–6 Weeks) NOTICE: Depending on toaster just as you would clean the Belt usage and how well they are Depending on toaster NOTICE:... -
Page 13: Checking The Conveyor Belt Chains
Checking the Conveyor Belt 12. Measure the gap again to ensure it is not too tight. Chains 13. Check the opposite side of the toaster using the same steps. (Every 3–6 Months) NOTICE: If the Conveyor Belt Chain is too tight to be reassembled, remove The Bun Thickness Com- NOTICE: an additional small 1/2”... -
Page 14: Checking The Roller Tensioners
Checking the Roller Tensioners (Every 3–6 months) Measuring the Roller Tensioners 1. Measure the Roller Tensioner on both inner Conveyor Covers (Figure 14) using a U.S Nickel. 2. The space between the inner Conveyor Cover and bottom of the Tensioner wheel should be 13/16”... -
Page 15: Troubleshooting
Troubleshooting WARNING To avoid possible personal injury and/or damage to the unit, inspection, test and repair of electrical equipment should be performed by qualified service personnel. The unit should be unplugged when servicing, except when electrical tests are required. Use extreme care during electrical circuit tests. Live circuits will be exposed. Problem Possible Cause Corrective Action... - Page 16 Troubleshooting Continued Problem Possible Cause Corrective Action Conveyor does not Safety Interlock Switch (some mod- Reposition the Heat Shield properly. If the Interlock turn. els) is not activated. Switch has failed, order kit 7001436 to remove and bypass the Interlock Switch. Heat Shield is bent or damaged.
- Page 17 Troubleshooting Continued Problem Possible Cause Corrective Action Crowns and/or Heels Belt Wraps not being cleaned Clean Belt Wraps as described in the Maintenance must be forced into properly. section of this manual. the toaster. Buns Conveyor Belt Wraps are not tacky/ Clean Belt Wraps.
- Page 18 Troubleshooting Continued Problem Possible Cause Corrective Action Toaster makes Compression Settings are too tight. Set Compression Settings to the correct (or larger) unusual sounds. setting. Conveyor Belt Wrap is installed Belt Wraps must be installed as described in the incorrectly. Maintenance section of this manual.
-
Page 19: Replacement Parts
Replacement Parts Parts Identification Platen Conveyor Safety Interlock Switch (Some models) Front Auxiliary Rear Auxiliary Air Heater Air Heater Auxiliary Air Thermocouple Drive Chain Idler Sprocket Transformer Front Drive Rear Drive Sprocket Sprocket Auxiliary Relay Platen Platen Relay Thermocouple Temperature Hi-Limit Control Capillary Probe... - Page 20 Replacement Parts Continued Heated Base Only Heated Base Only P/N 1011213 Rev. F 06/18...
- Page 21 Replacement Parts Continued NOTICE: As of March 2017, the Interlock Switch (item 97) is discontinued from use. If your toaster has the Interlock Switch and it fails, order kit 7001436 to remove and bypass the Interlock Switch. P/N 1011213 Rev. F 06/18...
- Page 22 Replacement Parts Continued 30, 94 31, 95 P/N 1011213 Rev. F 06/18...
- Page 23 Part # Description QTY. NOTICE 7000249 Release Sheet (3-Pack) Use only genuine Antunes replacement parts in this 7000250 Release Sheet (10-Pack) egg station. Use of parts other than those supplied by 0021169 Control Housing the manufacturer will void the warranty.
- Page 24 Replacement Parts List Continued Item Part # Description QTY. 308P124* Screw, 1-Way, #8-32 x 1/2” 10P1022* Label, Heaters 310P180* Screw, #10-32 x 1-3/4” 308P133* Screw, #8-32 x 1/4” 308P157* Screw, Tap, #8-32 x 3/8” Screw, Flat Hd., #8-32 x 308P181* 3/8”...
-
Page 25: Wiring Diagram
Wiring Diagram *Motor connections: 50hz requires male to male adapter (not in- cluded). P/N 1011213 Rev. F 06/18... - Page 26 Wiring Diagram Continued P/N 1011213 Rev. F 06/18...
-
Page 27: Limited Warranty
Travel Time & Mileage in excess of 2 hours (100 miles/160 km) round trip from the nearest authorized service agency. Antunes reserves the right to make changes in design or add any improvements on any product. The right is always reserved to modify equipment because of factors beyond our control and government regulations. Changes to update equipment do not constitute a warranty charge.
Need help?
Do you have a question about the VCT-2000 and is the answer not in the manual?
Questions and answers