Table of Contents
Advertisement
Advertisement
Table of Contents

Related Manuals for Antunes VCT-1000CF


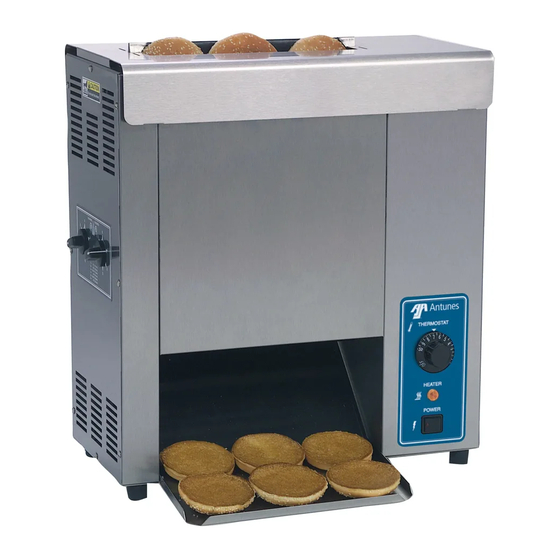
Summary of Contents for Antunes VCT-1000CF
- Page 1 Vertical Contact Toaster Model VCT-1000 owner’s manual Manufacturing Numbers: 9210700, 9210702, 9210704, 9210705, 9210706, 9210707 9210708, 9210709, 9210710, 9210711, 9210712, 9210713, 9210714, 9210716, 9210720, 9210722, 9210727 www.antunes.com P/N 1010807 Rev. P 02/18...
-
Page 2: Table Of Contents
Information Please read all of the information contained installation or operation of your system, in this manual prior to installing and operat- Service/Technical contact Antunes Technical Service at +1- ing the toaster. Assistance 877-392-7854 (toll free). Important Safety Your toaster is manufactured from the finest... -
Page 3: Important Safety Information
This equipment should be serviced If a chemical cleaner is used, be sure by qualified personnel only. Contact it is safe to use on cast aluminum. Antunes Technical Service for adjust- Observe all precautions and warnings ment or repair. on product label. -
Page 4: Specifications
(516.0 mm) 23-7/32” (590.0 mm) 22-11/16” (576.2 mm) 9-3/4” (248.0 mm) Model & Volts Watts Amp. Hertz Description Mfg. No. VCT-1000CF 9210700 5-15P, 15 Amp., 9210706 1800 15.0 120 VAC, Non-locking 9210716 (Assembly Only) 9210722 VCT-1000CV 9210702 9210708 6-20P, 20 Amp.,... -
Page 5: Installation
CONVEYOR NOTE: If any parts are missing or dam- COVER ASSY. CONVEYOR (REAR) aged, contact Antunes Customer COVER ASSY. (REAR) Service IMMEDIATELY at +1-877- 392-7856 (toll free). SHOWN WITHOUT OPTIONAL ROLLER TENSIONERS AND BELT Assembling the Unit WRAPS. -
Page 6: Equipment Setup
OPERATING Equipment Setup Drop buns into toaster. Cut sides of heel and crown must face each INSTRUCTIONS When placing the toaster into service, pay other. attention to the following guidelines. Toasted product will drop into the Set the Bun Thickness Compression Make sure power to the unit is off and bun landing area (Figure 6). -
Page 7: Maintenance
MAINTENANCE Replacing the Black and Silver Close the front Conveyor Cover, open the rear Conveyor Cover, and clean Release Sheet (Every 4–6 weeks) Daily the Belt Wrap (if used) or Conveyor NOTE: Depending on toaster usage and Belt Chain as described in Step 7. on how well it is cleaned daily, Close the rear Conveyor Cover and CAUTION... -
Page 8: Checking The Conveyor Belt Chains
Checking the Conveyor Belt CONVEYOR BELT CHAINS Chains CONVEYOR COVER ASSY. INTERLOCK SWITCH NOTE: The Bun Thickness Compression (SOME MODELS) Knobs (Figure 7) must be set to “6 & 6” or “6 & F” prior to measuring or removing or reinstalling the Conveyor Belt Chains. -
Page 9: Checking The Roller Tensioners
Replacing conveyor belt Chains Turn the power off, unplug the power cord, and allow the unit to cool before proceeding. Remove the Butter Wheel, Pan, and Heat Shield and set the Compression Control Knobs to 6 & 6 or 6 & F. Open both Conveyor Covers and pull the Belt Wrap Pin out of the zipper. -
Page 10: Troubleshooting
TROUBLESHOOTING WARNING To avoid possible personal injury and/or damage to the unit, inspection, test and repair of electrical equipment should be performed by qualified service personnel. The unit should be unplugged when servicing, except when electri- cal tests are required. Use extreme care during electrical circuit tests. Live circuits will be exposed. Problem Possible Cause Corrective Action... - Page 11 Problem Possible Cause Corrective Action Product is over toasted, Platen Temperature set too high. Set temperature control to a lower setting. heat is too high, or drop time is Bun Thickness Compression Knobs set Measure bun thickness and set Bun Thickness Compression Knobs cor- too slow.
-
Page 12: Wiring Diagram
WIRING DIAGRAM P/N 1010807 Rev.P 02/18... -
Page 13: Replacement Parts
REPLACEMENT PARTS Parts Identification INTERLOCK SWITCH (SOME MODELS) DRIVE CHAIN IDLER SPROCKET FRONT DRIVE SPROCKET REAR DRIVE SPROCKET TEMPERATURE CONTROL THERMOSTAT FAN BLADE POWER SWITCH HI-LIMIT CONTROL DRIVE MOTOR ASSY. P/N 1010807 Rev. P 02/18... - Page 14 Hinged Conveyor Cover with Optional Roller Tensioner Assembly. 92 (optional - use only with #93 P/N 1010807 Rev.P 02/18...
- Page 15 NOTE: As of March 2017, the Interlock Switch (item 53) is discontinued from use. If your toaster has the Interlock Switch and it fails, order kit 7001436 to remove and bypass the Interlock Switch. P/N 1010807 Rev. P 02/18...
- Page 16 P/N 1010807 Rev.P 02/18...
- Page 17 Item Part No. Description Qty. Item Part No. Description Qty. 308P101* Nut, #8-32 306P101* Nut, Hex, #6-32 0011266 Conveyor Belt (Incl. Items 4010245 Rocker Switch, On/Off 306P123* Screw, #6-32 x 7/8” Below) 4060355 Terminal Block 308P145* Nut, Hex Acorn, #8-32 0800204 1/2”...
-
Page 18: Mechanical Butter Wheel Kit
Mechanical Butter Wheel Kit (P/N 7000298) Requires Professional Installation. 2 " 8 " 6 " 4 " 6 " 8 " ... -
Page 19: Notes
NOTES P/N 1010807 Rev. P 02/18... -
Page 20: Limited Warranty
Travel Time & Mileage in excess of 2 hours (100 miles/160 km) round trip from the nearest authorized service agency. Antunes reserves the right to make changes in design or add any improvements on any product. The right is always re- served to modify equipment because of factors beyond our control and government regulations.
Need help?
Do you have a question about the VCT-1000CF and is the answer not in the manual?
Questions and answers