Table of Contents
Advertisement
Quick Links
Advertisement
Table of Contents

Related Manuals for Kramer KT-107S


Summary of Contents for Kramer KT-107S
- Page 1 USER MANUAL MODEL: KT‑107S Touch Panel P/N: 2900-300744 Rev 1 www.kramerAV.com...
-
Page 2: Table Of Contents
Kramer Electronics Ltd. Contents Introduction Getting Started Overview Typical Applications Defining the KT‑107S KT‑107S Touch Panel KT‑107S Tabletop Mount KT‑107S On-Wall Mount Mounting the KT‑107S Mounting the KT‑107S on a Table Mounting the KT‑107S on a Wall Connecting Options Setting up the KT‑107S Initial Setup Additional KT‑107S Important Functions... -
Page 3: Introduction
Safety Instructions Caution: There are no operator serviceable parts inside the unit Warning: Use only the Kramer Electronics power supply that is provided with the unit Warning: Disconnect the power and unplug the unit from the wall before installing Recycling Kramer Products... -
Page 4: Overview
Kramer Electronics Ltd. arrival at the EARN facility. For details of Kramer’s recycling arrangements in your particular country go to our recycling pages at www.kramerav.com/support/recycling. Overview Congratulations on purchasing your Kramer KT‑107S Touch Panel. KT‑107S is a 7-inch IPS multi-touch, powerful Touch Panel with 1280x800 resolution. -
Page 5: Typical Applications
Kramer Electronics Ltd. Security • Secured Deployment – Flexible locking options to prevent unwanted panel-mount removal, elegantly designed to remain out of site. • Secured Operation – Highly secured operation of applications such as auto boot start for a selected application, password protected exit, hidden control buttons and so on. -
Page 6: Defining The Kt-107S
For connecting to the on-wall mount unit. Connector Connecting For connecting to the tabletop mount or the panel mount plate. Holes To prevent potential damage to the Touch Panel, use only Kramer supplied screws and mounts. KT‑107S – Defining the KT‑107S... -
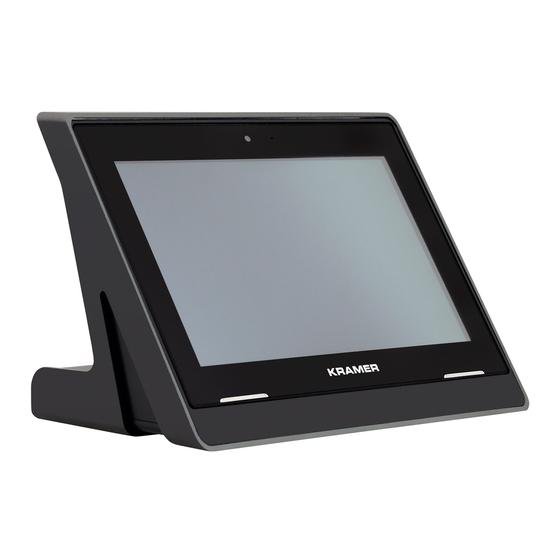
Page 7: Kt-107S Tabletop Mount
Kramer Electronics Ltd. KT‑107S Tabletop Mount This section defines the KT‑107S tabletop mount. Figure 2: Tabletop Mount Front View Feature Function Screw Openings (x2) For attaching the Touch Panel to the tabletop mount using the supplied M2x4 screws (see Mounting the KT‑107S on a Table on page 8). - Page 8 Kramer Electronics Ltd. Figure 3: Tabletop Mount Rear View Feature Function Micro USB Port For connecting to an external USB device, such as a headset or a memory disk. Connect external devices only with the OTG type USB cable (supplied).
-
Page 9: Kt-107S On-Wall Mount
Kramer Electronics Ltd. KT‑107S On-Wall Mount This section defines the KT‑107S on-wall mount. Figure 4: KT‑107S Touch Panel Front Panel Feature Function Groove (x4) For hanging the panel mount plate (attached to KT‑107S) on a wall. Flat Cable Connector Connect to the rear side of the KT‑107S... -
Page 10: Mounting The Kt-107S
The thickness of the table should be 76.2mm (3”) or less. Correctly measure the location of the M5x60 screw holes and the cable pass-through opening using the cut-out template available on the Kramer website at www.kramerav.com/downloads/KT‑107S. Figure 5: Cut-Out Dimensions (image not to scale) - Page 11 Figure 5 are not to scale. Kramer Electronics is not responsible for any damage caused to the table. To drill the M5x60 screw hole in a table: 1. Measure the exact location on the surface of the table where you want to install the KT‑107S.
- Page 12 Kramer Electronics Ltd. Secure the Tabletop Mount To secure the KT‑107S tabletop mount: 1. Remove the rubber covers Screw Openings with Rubber Covers (x2) from the rear tabletop mount. 2. Remove the cable cover Figure 6: Removing Cable Cover and Rubber Screw Cover 3.
- Page 13 Kramer Electronics Ltd. Installing KT‑107S on the Tabletop Mount Before you begin, verify that the cable cover is removed. To connect the cables and set the KT‑107S on the tabletop mount: 1. Connect the RJ-45 port on the tabletop mount to the PoE-enabled network.
-
Page 14: Mounting The Kt-107S On A Wall
Kramer Electronics Ltd. 7. Connect the Ethernet and micro-USB cables by either passing the cables from underneath the table via the cable opening (see Preparing the Table for a Secure Mount on page 8), or by placing them over the table. - Page 15 Kramer Electronics Ltd. Inserting the On-Wall Mount Unit To mount the on-wall mount unit: 1. Attach the on-wall mount unit to the installed in-wall junction box, (top side up, see the indication arrows on the mount 2. Screw the 4 wall-mounting screws (supplied) through the screw openings The on-wall mount screw openings are set in different locations to fit various types of in-wall junction boxes.
- Page 16 Kramer Electronics Ltd. Connecting the flat Cable The flat cable passes power and PoE-enabled Ethernet to the Touch Panel. To connect the flat cable: 1. On the rear side of the KT‑107S, unscrew the cover and remove (by slightly pressing downwards and then pulling out), and set the cover and screw aside.
- Page 17 Kramer Electronics Ltd. 5. Connect the flat cable between the on-wall mount and the KT‑107S. Figure 13: Connecting the On-wall Mount Flat Cable 6. Hang the KT‑107S on the wall by sliding the tabs on the attached panel mount plate over the grooves on the on-wall mount unit.
-
Page 18: Connecting Options
Kramer Electronics Ltd. Connecting Options You can power the KT‑107S using any or all of the following options: 1. Connect the PoE-enabled LAN RJ-45 connector to your local area PoE-enabled network. 2. Connect the power adapter to the 2-pin terminal block connector on the mount rear side. -
Page 19: Setting Up The Kt-107S
Kramer Electronics Ltd. Setting up the KT‑107S Once the tabletop mount or On-wall installation is complete and power is connected, you can slide the KT‑107S in place and wait for the default opening page to appear (to change the default opening page, see... - Page 20 To initially access the Home-page: 1. Press the Control button The following screen appears: Figure 17: Initial Access to Home Page 2. Type the Password (Kramer by-default) and click OK. The Following pop-up menu appears: Figure 18: Pop-up Page for Home-Page 3. Select Home-page.
- Page 21 Kramer Electronics Ltd. Connecting to the Ethernet To connect via the Ethernet: 1. Connect KT‑107S to the network. 2. In the Home-page, click Settings. 3. Click More and select Ethernet. Figure 19: Connecting to Ethernet – Enabling Ethernet 4. If Ethernet is disabled, enable it and wait a few seconds for Ethernet to connect.
- Page 22 Kramer Electronics Ltd. Setting the Date and Time To set the date and time: 1. In the Home-page, click Settings. Figure 21: Settings – Date & Time 2. Scroll down to the System area and click Date & time. Figure 22: Settings – Automatic Date & Time 3.
- Page 23 Setting the Boot Start App Upon Power Up By-default KT‑107S includes the following apps: • Kramer Control (set as the default) • K-touch To set which of these will appear upon start up: 1. In the Home-page, click Settings. 2. Select Control.
- Page 24 Kramer Electronics Ltd. Modifying the Display Settings To modify Display Settings: 1. In the Home-page, click Settings. Figure 25: Settings - Display 2. Click Display. Figure 26: Settings – Display Setup KT‑107S – Setting up the KT‑107S...
- Page 25 The following table defines how to access the Home-page when the bars are hidden, under the following conditions: The Control button is enabled or disabled and the Touch Panel is or is not password protected (default password is Kramer). Control Button Enabled Control Button Disabled Press the Control button .
- Page 26 Kramer Electronics Ltd. Setting the Control Button KT‑107S Control button is located under the Kramer logo . Use the Settings > Control to: • Enable/disable the Control button. • Set the button as password protected (when enabled) or not. •...
- Page 27 Kramer Electronics Ltd. To enable/disable the control button: 1. In the Home-page, click Settings. 2. Select Control. Figure 28: Control Button Activation 3. Enable or disable the control button. KT‑107S – Setting up the KT‑107S...
- Page 28 2. Select Control. 3. Click Control button password protected to enable or disable this feature (see Figure 28). The protected exit password is “Kramer”. To change the password: 1. In the Home-page, click Settings. 2. Select Control. 3. Click Change password: Figure 29: Changing the Password 4.
-
Page 29: Additional Kt-107S Important Functions
Kramer Electronics Ltd. Additional KT‑107S Important Functions This section describes the following additional KT‑107S functions: • About Touch Panel Page on page 27. • Top Bar Functions on page 27. • Lower Bar Functions on page 27.s About Touch Panel Page... -
Page 30: Upgrading The Firmware
Upgrade, on page 30. ▪ Upgrade the Firmware via PC, on page 30. The latest firmware version can be downloaded from the Kramer web site at www.kramerav.com/downloads/KT‑107S. Setup your PC for Firmware Upgrade To prepare the PC for upgrading the KT‑107S: 1. -
Page 31: Install The Rockchip Driver Assistant
Kramer Electronics Ltd. Install the RockChip Driver Assistant If the ‘Rockchip_driverAssistant’ driver is already installed on your PC, skip this section and proceed to Prepare the KT‑107S for Firmware Upgrade on page 30. If it is not installed or if you are unsure, complete the installation steps in this section. -
Page 32: Prepare The Kt-107S For Firmware Upgrade
USB cable or port. Upgrade the Firmware via PC To upgrade the firmware: 1. In the ‘KT FW Upgrade Tool’ folder, double-click ‘Kramer Touch Panel FW Upgrade Tool.exe’. The FW Upgrade Tool window appears: Figure 35: Firmware Upgrade Tool KT‑107S –... - Page 33 Kramer Electronics Ltd. 2. Click the … button next to the FW Path text box to select the path to the Update.img file in the unzipped ‘KT-107 Firmware Release xx’ folder. Figure 36: Update File Loaded 3. On the rear side of the...
- Page 34 Kramer Electronics Ltd. Figure 37: Touch Panel Connected to PC 4. Click Upgrade (after all the Connected Devices icons turn green). The upgrade progress is displayed: Figure 38: Firmware Upgrade Progress 5. Wait for the green “Success” message to appear:...
- Page 35 Kramer Electronics Ltd. Figure 39: Firmware Upgrade Complete Following successful firmware installation, wait for the Touch Panel to power up. This process may take a few minutes. KT‑107S – Upgrading the Firmware...
-
Page 36: Technical Specifications
Kramer Electronics Ltd. Technical Specifications Tabletop Mount Ports 1 1000/100/10BaseT Ethernet on RJ-45 connector 1 micro USB 2.0 1 2-pin terminal block for DC power supply On-wall Mount Ports 1 1000/100/10BaseT Ethernet on RJ-45 connector 1 2-pin terminal block for DC power supply... - Page 37 Electronics products, this product must be insured during shipment, with the insurance and shipping charges prepaid by you. If this product is returned uninsured, you assume all risks of loss or damage during shipment. Kramer Electronics will not be responsible for any costs related to the removal or re- installation of this product from or into any installation.
- Page 38 SAFETY WARNING Disconnect the unit from the power supply before opening and servicing For the latest information on our products and a list of Kramer distributors, visit our Web site where updates to this user manual may be found. We welcome your questions, comments, and feedback.
Need help?
Do you have a question about the KT-107S and is the answer not in the manual?
Questions and answers