Table of Contents
Advertisement
Advertisement
Table of Contents

Related Manuals for KERN EOC 6K-3


Summary of Contents for KERN EOC 6K-3
- Page 1 Operating manual Industrial Scales KERN EOC Version 1.1...
-
Page 2: Table Of Contents
KERN EOC Version 1.1 2017-11 Operating manual Platform balance Contents Technical data .................... 4 Appliance overview .................. 12 Overview of display ......................15 Keyboard overview ......................16 2.2.1 Numerical input via the navigation buttons ................17 Basic Information (General) ..............18 Proper use........................... - Page 3 Data output RS232C ................. 48 10.1 Technical data ........................48 10.2 Printer mode ........................48 10.3 Remote control instructions ..................... 49 10.4 KERN Communications Protocol (KERN Interface Protocol) ........50 Instant help ....................51 Declaration of conformity ................ 52 EOC-BA-e-1711...
-
Page 4: Technical Data
1 Technical data KERN EOC 6K-3 EOC 6K-4A EOC 10K-3 Readability (d) 1 g / 2 g 0.5 g 2 g / 5 g Weighing range (max) 3 kg / 6 kg 6 kg 6 kg / 12 kg Minimum piece weight 0.25 g... - Page 5 KERN EOC 10K-3A EOC 10K-4 EOC 20K-3A Readability (d) 0,2 g / 0,5 g Weighing range (max) 12 kg 6 kg / 15 kg 24 kg Minimum piece weight 0.5 g 0.5 g Reproducibility 0.2 g / 0.5 g Linearity ±...
- Page 6 KERN EOC 30K-3 EOC 30K-3L EOC 30K-4 Readability (d) 5 g / 10 g 5 g / 10 g 0,5 g / 1 g Weighing range (max) 15 kg / 35 kg 15 kg / 35 kg 15 kg / 35 kg...
- Page 7 KERN EOC 60K-2 EOC 60K-2L EOC 60K-3 Readability (d) 10 g / 20 g 10 g / 20 g 1 g / 2 g Weighing range (max) 30 kg / 60 kg 30 kg / 60 kg 30 kg / 60 kg...
- Page 8 KERN EOC 60K-3A EOC 60K-3L EOC 100K-2 Readability (d) 1 g / 2 g 20 g / 50 g Weighing range (max) 60 kg 30 kg / 60 kg 60 kg / 150 kg Minimum piece weight Reproducibility 1 g / 2 g...
- Page 9 KERN EOC 100K-2L EOC 100K-2A EOC 100K-2XL Readability (d) 20 g / 50 g 10 g 20 g / 50 g Weighing range (max) 60 kg / 150 kg 120 kg 60 kg / 150 kg Minimum piece weight Reproducibility...
- Page 10 KERN EOC 100K-2XXL EOC 100K-3 EOC 100K-3L Readability (d) 20 g / 50 g 2 g / 5 g 2 g / 5 g Weighing range (max) 60 kg / 150 kg 60 kg / 150 kg 60 kg / 150 kg...
- Page 11 KERN EOC 300K-2 EOC 300K-2L EOC 300K-3 Readability (d) 50 g / 100 g 50 g / 100 g 5 g / 10 g Weighing range (max) 150 kg / 300 kg 150 kg / 300 kg 150 kg / 300 kg...
-
Page 12: Appliance Overview
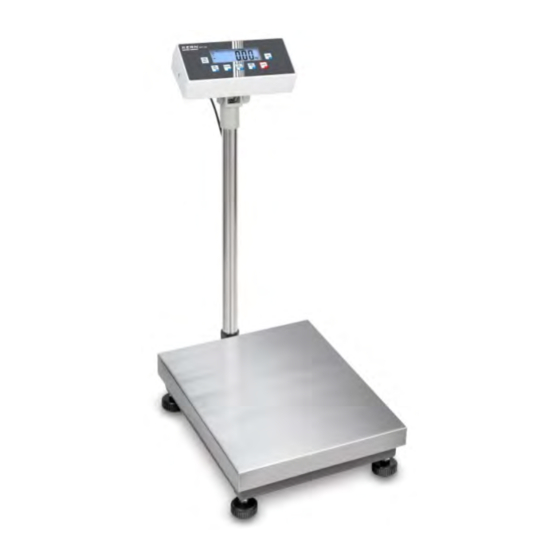
2 Appliance overview 1. Weight display 2. Weighing unit 3. Keyboard 4. Connection of mains adapter 5. RS232 6. Input connection load cell cable 7. Battery compartment 8. Guide rail support base / stand EOC-BA-e-1711... - Page 13 Support base/Wall fixture Balance EOC with assembly plate EOC-A03 (optional): 1. Platform 2. Fitting panel 3. Display Unit EOC-BA-e-1711...
- Page 14 Balance with tripod EOC-A05 (optional): Flip/Flop evaluation device: May be positioned in many ways, e.g. self-supporting or screwed into the wall (optional). By turning the upper housing shell, the angle of the display as well as the exit position of the cables can be changed. EOC-BA-e-1711...
-
Page 15: Overview Of Display
2.1 Overview of display Display Significance Weighing range 1 Weighing range 2 Battery very low Stability display Zero indicator GROSS Gross weight Net weight Pre-Tare hold Hold function Parts counting Weighing unit Totalization Indicators for weighing with tolerance range EOC-BA-e-1711... -
Page 16: Keyboard Overview
2.2 Keyboard overview Buttons Function • Turn on/off • Zeroing Navigation button • Confirm entry • Taring • At numeric input increase flashing digit Navigation button • Scroll forward in menu • Display sum total Navigation button • Digit selection to the right •... -
Page 17: Numerical Input Via The Navigation Buttons
2.2.1 Numerical input via the navigation buttons Press , the current setting will be displayed. The first digit will be flashing and is ready for changing. If you do not wish to change the first digit, press , the second digit will start flashing. -
Page 18: Basic Information (General)
The balance may only be used according to the described conditions. Other areas of use must be released by KERN in writing. 3.3 Warranty Warranty claims shall be voided in case •... -
Page 19: Monitoring Of Test Equipment
The responsible user must define a suitable interval as well as type and scope of this test. In KERN’s accredited DKD calibration laboratory test weights and balances may be calibrated (return to the national standard) fast and at moderate cost. -
Page 20: Unpacking, Setup And Commissioning
6 Unpacking, Setup and Commissioning 6.1 Installation Site, Location of Use The balances are designed in a way that reliable weighing results are achieved in common conditions of use. You will work accurately and fast, if you select the right location for your balance. Therefore, observe the following for the installation site: •... -
Page 21: Scope Of Delivery
Before connecting or disconnecting of additional devices (printer, PC) to the data interface, always disconnect the balance from the power supply. With your balance, only use accessories and peripheral devices by KERN, as they are ideally tuned to your balance. -
Page 22: Adjustment
6.8 Adjustment As the acceleration value due to gravity is not the same at every location on earth, each display unit with connected weighing plate must be coordinated - in compliance with the underlying physical weighing principle - to the existing acceleration due to gravity at its place of location (only if the weighing system has not already been adjusted to the location in the factory). - Page 23 How to carry out adjustment: Confirm menu setting „noLin“ by Ensure that there are no objects on the weighing plate. Wait for stability display, then press The currently set adjustment weight will be displayed. (example) To change by using the navigation buttons (see chap. 2.2.1) select the desired setting, the active digit is flashing.
-
Page 24: Linearisation
6.9 Linearisation Linearity shows the greatest deviation of a weight display on the scale to the value of the respective test weight according to plus and minus over the entire weighing range. If linearity deviation is discovered during a monitoring of test equipment, you can improve this by means of linearization. -
Page 25: Operation
7 Operation 7.1 Start-up Start balance by pressing . The unit will carry out a self-test. As soon as the weight display appears, the instrument will be ready to weigh. 7.2 Switching Off Press , the display will disappear. 7.3 Zeroing Resetting to zero corrects the influence of light soiling on the weighing plate. -
Page 26: Decimal Point
7.4 Decimal point The position of the decimal point can be adjusted in the menu as follows: Invoke menu item „P3 CAL“, see chap. 8.2 Press . „Count“ is displayed. Press , „Deci“ will be displayed Press , the last saved decimal points will be displayed: Example: „0.000 kg“... -
Page 27: Simple Weighing
7.5 Simple weighing Place load – Wait for stability display – Read-off weighing result. Overload warning Overloading exceeding the stated maximum load (max) of the device, minus a possibly existing tare load, must be strictly avoided. This could damage the instrument. -
Page 28: Weighing With Tare
Switch-over weighing unit: Keep pressed, the display changes over to the weighing units activated before (e.g. kg lb) (example) 7.7 Weighing with tare Deposit weighing vessel. After successful standstill control press the button. Zero display and indicator „NET“ will appear. The weight of the container is now internally saved. -
Page 29: Weighing With Tolerance Range
7.8 Weighing with tolerance range You can set an upper or lower limit when weighing with tolerance range and thus ensure that the weighed load remains exactly within the set limits. During tolerance tests such as dosing, portioning and sorting the unit will indicate exceeded or undershot limits by emitting an optical or acoustic signal. -
Page 30: Tolerance Check For Target Weight
7.8.1 Tolerance check for target weight Settings Press at the same time in weighing mode. „net H“ will be displayed. Press , the display for entering the lower limit value „nEt Lo“ appears. Press , the current setting will be displayed. The decimal point at the extreme left flashes. - Page 31 Press and the current setting for the acoustic signal will be shown. Select desired setting (no, ok, ng) by Confirm input by Press ; weighing system is in tolerance weighing mode. From here evaluation takes place whether the load is within the two tolerance limits. Weighing with tolerance range: Tare when using a weighing container.
-
Page 32: Tolerance Check For Target Quantity
7.8.2 Tolerance check for target quantity Settings Press at the same time in weighing mode. „net H“ will be displayed. Press repeatedly, until the display for entering the lower limit value „PCS L“ appears. Press , the current setting will be displayed. To enter the lower limit, e. - Page 33 Press repeatedly until „BEEP“ will be displayed. Press , the current setting for the acoustic signal will be shown. Select desired setting (no, ok, ng) by Confirm input by Press ; weighing system is in tolerance weighing mode. From here evaluation takes place whether the load is within the two tolerance limits.
-
Page 34: Manual Totalizing
7.9 Manual totalizing With this function the individual weighing values are added into the summation memory by pressing and edited, when an optional printer is connected. • Menu setting: „P2 COM“ „MODE“ „PR2“, see chap. 8.2 • The totalizing function is not active when the weight is under 20d. Add up: Place load A. - Page 35 Display and output sum „Total“: Press , number of weighing, followed by the total weight will be displayed for 2 sec. Press to print out this display. Delete weighing data: Press at the same time The data in the summation memory are deleted. Printout example: ******************** No.:...
-
Page 36: Automatic Adding-Up
7.10 Automatic adding-up With this function the individual weighing values are automatically added into the summation memory when the balance is unloaded without pressing edited, when an optional printer is connected. • Menu setting: „P2 COM“ „MODE“ „AUto““, see chap. 8.2 Add up: Place load A. -
Page 37: Parts Counting
7.11 Parts counting Before the balance can count parts, it must know the average part weight (i.e. reference). Proceed by putting on a certain number of the parts to be counted. The balance determines the total weight and divides it by the number of parts, the so- called reference quantity. -
Page 38: Percentage Weighing
7.12 Percentage weighing Percentage weighing allows for displaying the weight in percentages with regard to the reference load mass. In the weighing mode, push button (ca. 3 s) until „rEF 10%” is displayed. Using button, select the desired percentage value which shall serve as a reference value. -
Page 39: Animal Weighing
7.13 Animal weighing The mean value function is suitable for weighing restless loads. The weighing system will display a mean value derived from several weighing results. The animal weighing program can be enabled by either calling up menu block „P4 OTH“ „ANM“ „ON“ (See chap. 8.2) or faster via key combination. The symbol „hold“... -
Page 40: Display Background Illumination
7.15 Display background illumination Keep pressed (3s) until „SEtbL“ appears. Press again, the current setting will be displayed. Press to select the desired setting. bl on Continuous background lighting bl off Background illumination off bl Auto Automatic background illumination on when weighing pate is loaded or key pressed. -
Page 41: Automatic Switch-Off Function „Auto Off
7.16 Automatic switch-off function „AUTO OFF“ The unit is automatically switched off within the preset time when the display unit or the weighing bridge are not operated. Keep pressed (3s) until „SEtbL“ appears. Press to call up Auto-Off function. „SEtoF“ appears. -
Page 42: The Menu
8 The menu 8.1 Navigation in the menu Call up menu Switch-on balance and during the selftest press Press subsequently, the first menu block „PO CHK“ will be displayed. Select menu block With help of , the individual menu items can be selected one after the other. -
Page 43: Menu Overview
8.2 Menu overview Menu block Menu item Available settings / explanation Main menu Submenu PO CHK nEt H Upper limit value „Tolerance check weighing“, input see chap. 7.8.1 Weighing with tolerance range, nEt L Lower limit value „Tolerance check weighing“, input see chap. - Page 44 For automatic add-up see chap. 7.10. AUTO* This function is used to issue and add individual weighing values automatically to the summation memory on unloading of weighing scale. Remote control instructions wirel Not documented Available Baudrate: 600, 1200, 2400, 4800, 9600* BAUd 7 bits, even parity 7 bits, odd parity...
- Page 45 P5 Unt Switch-over weighing unit see chap. 7.6 P6 XCL not documented P7 rSt to reset balance settings to factory default. Factory settings are marked by *. Tab. 1. Printout examples Standard printer ********************** ******************* ********************** 5.000kg 5.000kg 5.000kg 5.000kg 5.000kg TW: 5.000kg TOTAL: 10.000kg...
-
Page 46: Servicing, Maintenance, Disposal
• Do not use aggressive detergents (solvents or similar). 9.2 Servicing, maintenance The appliance may only be opened by trained service technicians who are authorized by KERN. Before opening, disconnect from power supply. 9.3 Disposal Disposal of packaging and appliance must be carried out by operator according to valid national or regional law of the location where the appliance is used. -
Page 47: Error Messages
9.4 Error messages Error message Description Excess load if weight exceeds capacity of +9d Underweight (less than 20 d) The weight is too low (less than -20 d) Zero setting range exceeded on start-up of balance. Zero setting range during start-up of weighing scale or on pressing of exceeded. -
Page 48: Data Output Rs232C
• Use a suitable cable to connect the display unit to the interface of the printer. Faultless operation requires an adequate KERN interface cable. • Communication parameters (baud rate, bits and parity) of display unit and printer must match. -
Page 49: Remote Control Instructions
Symbols: Stable value Instable value GS / GW Gross weight Net weight Tare weight Number weighing processes TOTAL Total of all individual weighings <lf> Space line <lf> Space line • Counting **************************** **************************** 10.3 Remote control instructions Function Printout examples mand Stable weighing value for the weight is sent ST,GS... -
Page 50: Kern Communications Protocol (Kern Interface Protocol)
10.4 KERN Communications Protocol (KERN Interface Protocol) Shows all implemented KCP commands I0 0 "I0" Showing KCP level and KCP version I0 0 "I1" Sending weighing data I0 0 "I2" Inquiry software version I0 0 "I3" Inquiry serial number I0 0 "I4"... -
Page 51: Instant Help
11 Instant help In case of an error in the program process, briefly turn off the balance and disconnect from power supply. The weighing process must then be restarted from the beginning. Help: Fault Possible cause The displayed weight does not glow. •...
Need help?
Do you have a question about the EOC 6K-3 and is the answer not in the manual?
Questions and answers