Advertisement
Table of Contents
- 1 Parts and Fasteners Included
- 2 This Page for Laminate Version Only.
- 3 Using the Drill and 1/8” Hex Bit, Install ¼-20 X 3/8” Low Profile Socket Head Screws and EM-1332
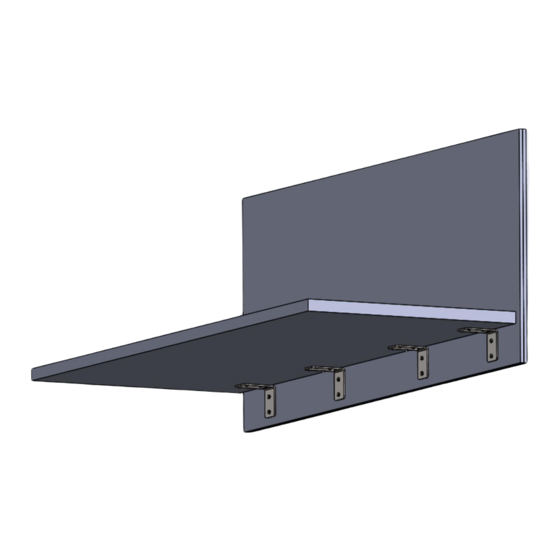
- 4 After Brackets Are Installed, Hold the Screen up to the Back of the Work Surface
- 5 Two Installation Options
- 6 If ½” Offset on the Back of the Work Surface Is Desired, Align Attachment Brackets to the Edge
- Download this manual
Advertisement
Table of Contents

Related Manuals for Enwork TI0023


Summary of Contents for Enwork TI0023
- Page 1 • TI0023 Laminate/Fabric Privacy/Modesty Installation Instructions...
- Page 2 INSTALLATION GUIDE [Laminate Version Only **] 1) Parts and Fasteners Included # 10 x .875” Phillips • Wood Screw ¼-20 x 3/8” Low Profile • (Screw 1) Socket Head Screw EM-1332 • ¼-20 threaded insert • L-Bracket w/out flange ** Parts and Fasteners Needed Drill/Driver 1/8”...
- Page 3 This page for laminate version only. For laminate screens, use the drill and 6mm Hex bit to install required threaded inserts. DO NOT OVER TIGHTEN. Inserts should sit flush or just inset of laminate surface.
- Page 4 1) Using the drill and 1/8” Hex bit, install ¼-20 x 3/8” Low Profile Socket Head Screws and EM-1332 as shown below. Be sure the slot of EM-1332 is facing the top of the screen.
- Page 5 2) After brackets are installed, hold the screen up to the back of the work surface with the brackets flush to the bottom of the work surface.
- Page 6 3) Two Installation Options: A. Install the screen flush to the edge of the work surface. B. Install the screen ½” offset from the edge of the work surface. Option A Option B...
- Page 7 4) If ½” offset on the back of the work surface is desired, align attachment brackets to the edge of the work surface as shown below. Slot should just disappear behind the edge.
- Page 8 5) With screen still held in place, attach to bottom of work surface using #10 x .875” Phillips Wood Screws, drill, and #2 Square bit.
Need help?
Do you have a question about the TI0023 and is the answer not in the manual?
Questions and answers