Table of Contents
Advertisement
Available languages
Available languages
15 M 187
ENGLISH
FRANÇAIS
DEUTSCH
ESPAÑOL
ITALIANO
IMPACT WRENCH
BOULONNEUSE TIREFONNEUSE A PERCUSSIONS
SCHLAGSCHRAUBER
ATORNILLADOR DE IMPACTO
AVVITATORE AD IMPULSI
NR-11P
OPERATION AND MAINTENANCE MANUAL
NOTICE D'UTILISATION ET ENTRETIEN
BEDIENUNGSANLEITUNG
MANUAL DE USO Y MANTENIMIENTO
MANUALE D'USO E MANUTENZIONE
1
Advertisement
Table of Contents

Related Manuals for Cembre NR-11P


Summary of Contents for Cembre NR-11P
- Page 1 15 M 187 ENGLISH FRANÇAIS DEUTSCH ESPAÑOL ITALIANO IMPACT WRENCH BOULONNEUSE TIREFONNEUSE A PERCUSSIONS SCHLAGSCHRAUBER ATORNILLADOR DE IMPACTO AVVITATORE AD IMPULSI NR-11P OPERATION AND MAINTENANCE MANUAL NOTICE D'UTILISATION ET ENTRETIEN BEDIENUNGSANLEITUNG MANUAL DE USO Y MANTENIMIENTO MANUALE D'USO E MANUTENZIONE...
- Page 2 FIG. 1...
- Page 3 ATTENTION! Before using the machine, carefully read the instructions contained in this manual. Always wear hearing protection. RISK OF HEARING DAMAGE Under normal operating conditions, this machine may cause the operator to be exposed to a personal and daily noise level of over 85 db (A).
-
Page 4: Attention / General Characteristics
ENGLISH 1. GENERAL CHARACTERISTICS – Application range: suitable for tightening and loosening operations using an impact system, for railway and industrial applications. – Capacity: (max. bolt diameter) ..................33 mm (1.3 inches) – Max. torque developed: ....................2500 Nm (1844 ft.lbs) – Dimensions: ........................refer to Fig. 16, page 71 –... -
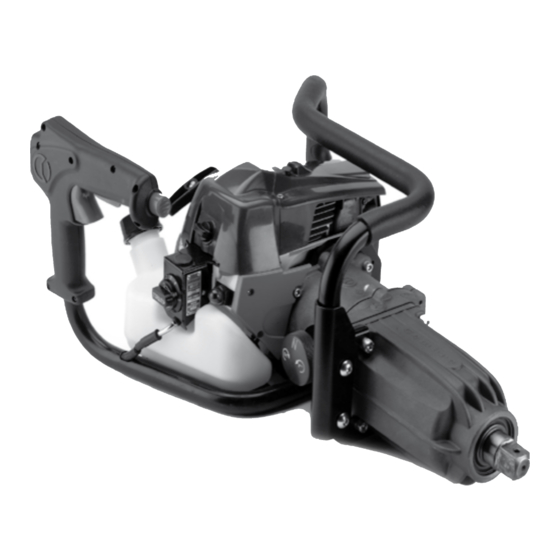
Page 5: Description
ENGLISH 2. DESCRIPTION (Ref. to Fig. 1) 01 – CONTROL GRIP 02 – ACCELERATOR 03 – TRANSPORT HANDLE 04 – HANDGRIP 05 – EXHAUST MUFFLER 06 – TRANSPARENT OIL LEVEL PORT 07 – IMPACT UNIT 08 – SQUARE DRIVE SHAFT 09 –... -
Page 6: Instructions For Use
ENGLISH 3. INSTRUCTIONS FOR USE 3.1) Control grip The control grip has been designed to provide easy and comfortable access to the operating but- tons both in vertical and horizontal positions (Ref. to fi g. 8, 9). Refer to Fig. 2 and operate as follows: Horizontal use - Hold the control grip so as to use SAFETY INTERLOCK (15H) and ACCELERATOR BUTTON (02H). - Page 7 ENGLISH To assemble the socket (Ref. to Fig. 7 page 67): 1 Slide the socket onto the square shaft (08) lining up the bores of the socket and the shaft (Ref. to Fig. 7a). 2 Fully insert the central split pin of “CLIP-NR” into the through bore, ensuring the sprung arms are correctly located in the slot around the socket (Ref.
-
Page 8: Fuel Mixture Preparation
– On fi nishing the operation, release the accelerator. The impact wrench can be used independently or in conjuntion with the Cembre support trolley (Ref. to Figs. 10, 11) and appropriate interface device (see § 8). -
Page 9: Starting The Engine
ENGLISH 5. STARTING THE ENGINE – Move rotation selector (12) to position “ ” (see § 3.4). PRELIMINARY PHASE: – Press the easy start button (D) (Fig. a). – Draw mixture into the carburettor by pressing primer (P) 5- 6 times (Fig. - Page 10 ENGLISH OPERATING IN WINTER (Ref. to Fig. 5) To optimise carburettor function when operating in temperatures below 10°C we advise mixing cold air with the hot air coming from the cylinder area so as to pre-heat the intake air. To do this all that is required is to: –...
-
Page 11: Maintenance
ENGLISH 6. MAINTENANCE Before servicing or removing any parts, stop the engine and allow it to cool. Always remove the spark plug cap from the spark plug when servicing the engine to prevent accidental starting. 6.1) ORDINARY MAINTENANCE Avoid placing the wrench on dusty or muddy ground. After each day’s use, carefully clean the wrench with a cloth making sure to remove any dirt it has picked up, paying particular attention to moving parts and the anvil zone. - Page 12 ENGLISH – Remove the grommet from the tank and extract the fi lter (Ref. to Fig. 12b). – Clean the fi lter with a non-fl ammable solvent or one with a high infl ammability level. – Carefully dry the fi lter before reassembling. –...
-
Page 13: Troubleshootting Guide
ENGLISH 7. TROUBLESHOOTING GUIDE SYMPTOM CAUSE REMEDY - Engine diffi cult to start: Switch (14) in “STOP” position. Move switch to “START” position. No fuel. Add fuel to tank. Switch (14) in wrong position Check switch position (see § 5) Fuel fi... -
Page 14: Optional Accessories
ENGLISH 8. OPTIONAL ACCESSORIES AVAILABLE ON REQUEST – Standard and long socket wrenches of diff erent types and sizes (hexagonal, square, rectangular) – Extensions – Adaptors – Joints – “CLIP-NR” retaining circlip code 2874205 for sockets with grooved diameter between 47 and 57 mm (1.85 and 2.25 in.) –... - Page 15 – Support trolley type CS-SD and CS-SD-E NOTE: Fit the 10 cm socket extension when using the wrench on support trolley. Contact Cembre for further information. Check that the trolley is fi tted with a gas spring calibrated at 1500 N rather than 1900 N.
- Page 16 FRANÇAIS RECOMMANDATIONS ! Avant d'utiliser la machine, lire attentivement les instructions de cette notice. Porter toujours un casque de protection auditive. RISQUE DE DOMMAGE AUDITIF. Dans les conditions normales d’utilisation, cet appareil peut exposer l’opérateur à un niveau sonore d’exposition personnelle et quoti- dienne au bruit supérieur ou égal à...
-
Page 17: Recommandations / Caracteristiques Generales
FRANÇAIS 1. CARACTERISTIQUES GENERALES – Domaine d’application: conçue pour les opérations de vissage/dévissage par un système à percussions dans des applications ferroviaires et industrielles. – Capacité: (ø boulon maxi.) ......................... 33 mm – Couple maxi. développé: ....................2500 Nm (1844 ft.lbs) –... -
Page 18: Description
FRANÇAIS 2. DESCRIPTION (Voir Fig. 1) 01 – POIGNEE DE COMMANDES 02 – ACCELERATEUR 03 – GUIDON 04 – POIGNEE 05 – SILENCIEUX 06 – BOUCHON TRANSPARENT NIVEAU D’HUILE 07 – BLOC A PERCUSSIONS 08 – CARRE ENTRAINEUR 09 – MOTEUR THERMIQUE 2 TEMPS 10 –... -
Page 19: Instructions D'utilisation
FRANÇAIS 3. INSTRUCTIONS D’UTILISATION 3.1) Poignée de commande La poignée de commande double a été spécialement étudiée afi n de permettre une utilisation pra- tique et confortable de la boulonneuse, tant en position verticale que horizontale (Voir Fig. 8 et 9). Pour une utilisation en position horizontale - Prendre la poignée de façon à... - Page 20 FRANÇAIS Pour le montage de la douille, il suffi t (Voir Fig. 7 pag. 67): 1 D’enfi ler la douille sur le carré entraîneur (08) en alignant les orifi ces de la douille et du carré (voir Fig. 7 a). 2 Insérer complètement le ressort “CLIP-NR”...
-
Page 21: Preparation Du Melange
– À la fi n de l’opération, lâcher l’accélérateur. En l’occurrence, il est possible de travailler sur le chariot support de Cembre (voir Fig. 10, 11); il suffi t d’acquérir séparément le chariot support avec le dispositif d’assemblage correspondant (voir § 8). -
Page 22: Mise En Marche Du Moteur Thermique
FRANÇAIS 5. MISE EN MARCHE DU MOTEUR THERMIQUE – Placer le sélecteur (12) dans la position “N” (voir § 3.4) PHASES PRÉLIMINAIRES: – Appuyer sur le bouton de décompression (D) (Fig. a). – Amener du mélange dans le carburateur en agissant 5-6 fois sur la pompe (P) (Fig. - Page 23 FRANÇAIS UTILISATION EN HIVER (Voir Fig. 5) Pour optimiser le fonctionnement du carburateur, en opérant sous des températures ambiantes inférieures à 10°C, nous conseillons de mélanger l’air froid avec l’air chaud provenant de la zone du cylindre de façon à préchauff er l’air d’aspiration. Pour ce faire, il faudra procéder de la façon suivante: –...
-
Page 24: Entretien
FRANÇAIS 6. ENTRETIEN Pour toute opération d’entretien, arrêter le moteur et attendre qu’il se refroidisse. Pour éviter des démarrages accidentels, enlever toujours le câble de la bougie avant toute opération d’entretien. 6.1) ENTRETIEN COURANT Eviter de poser la machine directement sur des terrains poussiéreux ou boueux. Après chaque jour d’utilisation, nettoyer soigneusement celle-ci à... - Page 25 FRANÇAIS – Enlever la capsule en caoutchouc noire du réservoir et extraire le fi ltre (voir Fig. 12b). – Nettoyer le fi ltre avec un solvant non infl ammable ou à point d’infl ammabilité élevé. – Sécher complètement le fi ltre avant de le remonter. –...
-
Page 26: Anomalies Possibles
FRANÇAIS 7. ANOMALIES POSSIBLES CAUSES POSSIBLES: SOLUTIONS: SYMPTOMES: - Démarrage laborieux Starter (14) en position “STOP”. Mettre le starter sur la position “START”. du moteur: Manque de carburant. Ajouter du mélange carburant dans le réservoir. Starter (14) en mauvaise position. Vérifi... -
Page 27: Accessoires En Option
FRANÇAIS 8. ACCESSOIRES EN OPTION – Douilles standards et longues de diff érents types et dimensions: (hexagonales, carrées, rectangulaires) – Rallonges – Adaptateurs – Articulations – Ressorts “CLIP-NR”, code 2874205 Pour la fi xation des douilles avec diamètre de gorge compris entre 47 et 57 mm. –... - Page 28 NOTE: Pour l’emploi de la tirefonneuse avec le chariot, l’utilisation de la rallonge de 10 cm est conseillé. Contacter Cembre pour tout renseignement complémentaire. Vérifi ez que le chariot soit équipé du vérin à gaz taré à 1.500N au lieu de 1900N.
-
Page 29: Achtung / Allgemeine Eigenschaften
DEUTSCH ACHTUNG! Vor Inbetriebnahme unbedingt die Bedienungsanleitungen durch- lesen. Tragen Sie stets einen Gehörschutz! ES BESTEHT DIE GEFAHR VON GEHÖRSCHÄDEN! Unter normalen Gebrauchsbedingungen kann der zuständige Be- diener dieser Maschine einer täglichen Lärmbelastung von 85db (A) und mehr ausgesetzt sein. Es sind eine Schutzbrille, Arbeitshandschuhe sowie Sicherheits- schuhe zu tragen. - Page 30 DEUTSCH 1. ALLGEMEINE EIGENSCHAFTEN – Anwendungsbereich: geeignet zum Lösen und Anziehen von Muttern mit Schlagwerk im Eisen- bahn- und Industriebereich. – Leistungen: (Max. Schraubendurchmesser) ..................33 mm – Max. Drehmoment:......................2500 Nm (1844 ft.lbs) – Abmessungen:........................siehe Bild 16, Seite 71 – Gewicht: (mit leerem Benzintank) ..................19,2 kg (42.2 lbs) –...
-
Page 31: Beschreibung
DEUTSCH 2. BESCHREIBUNG (Siehe Bild 1) 01 – FUNKTIONSGRIFF 02 – GASHEBEL 03 – TRANSPORTGRIFF 04 – GRIFF 05 – SCHALLDÄMPFER 06 – ÖLSCHAUGLAS 07 – SCHLAGWERK 08 – STECKSCHLÜSSELAUFNAHME 09 – 2-TAKT MOTOR 10 – STARTERKORDEL 11 – VERRIEGELUNGSTASTER FÜR ANFAHRT 12 –... -
Page 32: Bedienungshinweise
DEUTSCH 3. BEDIENUNGSHINWEISE 3.1) Funktionsgriff Der Griff ist mit zwei Funktionen ausgestattet, so dass ein einfaches Bedienen in waagerechter und senkrechter Position möglich ist (siehe Bild 8, 9). Für die Bedienung Bild 2 beachten! Bei waagerechter Benutzung - den Sicherheitshebel (15H) drücken und gleichzeitig den Gashebel (02H) betätigen. - Page 33 DEUTSCH Für die Montage des Steckschlüssels folgendes beachten (Siehe Bild 7, Seite 67): 1 Den Steckschlüssel auf die Steckschlüsselaufnahme (08) stecken, wobei die Bohrung in der Steckschlüsselaufnahme und im Steckschlüssel in der Flucht sein muss (siehe Bild 7a). 2 Die Spezialfeder “CLIP-NR” (mit dem Schlagschrauber geliefert) ganz durch die Bohrung führen (siehe Bild 7b).
-
Page 34: Benzingemisch Vorbereitung
DEUTSCH – Kontrollieren Sie, dass der Wählschalter (12) sich in der Position “N” Leerlauf befi ndet. – Lassen Sie den Motor an, indem Sie die in § 5 beschriebenen Punkte befolgen. – Stellen Sie das notwendige Drehmoment an der Drehmomenteneinstellung (13) ein (siehe § 3.3). –... -
Page 35: Starten Des Motors
DEUTSCH 5. STARTEN DES MOTORS – Den Wählschalter (12) auf Position “ ” bringen (Siehe § 3.4). VORBEREITUNG: – Den Dekompressionsknopf (D) drücken (Bild a). – Erneut Gemisch in den Vergaser leiten, indem 5-6 Mal die Pumpe (P) betätigt wird (Bild b). Bei kaltem Motor: –... - Page 36 DEUTSCH WINTERBETRIEB (Siehe Bild 5) Um die Funktionsfähigkeit des Vergasers bei einer Umgebungstemperatur von weniger als 10°C zu optimieren, empfehlen wir, kalte Luft mit aus dem Zylinderbereich kommender, warmer Luft zu mischen, sodass die Einlassluft vorgewärmt wird. Dazu ist folgendes zu beachten: –...
-
Page 37: Wartung
DEUTSCH 6. WARTUNG Bei Reparaturen oder Wartung an der Maschine ist die Maschine abzustellen und abkühlen zu lassen. Um ein versehentliches Starten der Maschine zu verhindern, ist der Zündker- zenstecker von der Zündkerze zu entfernen. 6.1) ORDENTLICHE WARTUNG Vermeiden Sie es, den Schrauber direkt auf staubigen oder schlammigen Boden zu stellen. Nach jedem Einsatztag ist der Schrauber mit einem sauberen Tuch sorgfältig zu reinigen, wobei man darauf achtet, dass der abgelagerte Schmutz entfernt wird, besonders in der Gegend der beweglichen Teile wie dem Bereich des Schlagwerkes. - Page 38 DEUTSCH – Entfernen Sie die schwarze Gummidichtung vom Tank und ziehen Sie den Filter heraus (Bild 12b). – Reinigen Sie den Filter mit einem nicht entzündbaren Lösungsmittel oder einemLösungsmittel mit hohem Flammpunkt. – Trocknen Sie den Filter vollständig, bevor Sie diesen erneut montieren. –...
-
Page 39: Problemlösung
DEUTSCH 7. PROBLEMLÖSUNG ERSCHEINUNG URSACHE LÖSUNG - Anlass-Schwierigkeiten Schalter (14) in Position “STOP”. Den Schalter (14) auf Position “START” stellen. des Motors: Kraftstoff mangel. Kraftstoff gemisch im Tank hinzufügen. Schalter (14) in fehlerhafter Position. Schalter überprüfen (siehe § 5). Kraftstoff -Filter verstopft. Reinigen bzw. -
Page 40: Zubehör Auf Anfrage
DEUTSCH 8. ZUBEHÖR AUF ANFRAGE – Steckschlüssel verschiedener Art und Grösse: (Sechs- und Vierkant; Rechteck) – Verlängerungen – Adapter – Kugelgelenke – Spezialfeder Typ “CLIP-NR” Bestell-Nr. 2874205 Für die Arretierung der Steckschlüssel mit einem Nut Durchmesser von 47 und 57 mm –... - Page 41 Bei Verwendung des Schlagschraubers mit dem Stützwagen ist eine 10 cm Verlän- gerung einzusetzen. Für weitere Informationen, bitte mit Cembre Kontakt aufnehmen. Immer berücksichtigen, dass die Ga- sfeder auf dem Stützwagen auf 1500 N anstatt 1900 N eingestellt ist. – Anschlusskit “KCS-NR” Bestell Nr. 2874001 Für den Gebrauch des Schlagschraubers in...
- Page 42 ESPAÑOL ¡ATENCION! Antes de utilizar la máquina leer atentamente las instrucciones contenidas en este manual. Ponerse siempre cascos de protección para el oído. RIESGO DE DAÑO AUDITIVO. En las condiciones normales de utilización, esta máquina, puede llevar consigo para el operario encargado un nivel sonoro de expo- sición personal y diario al ruido igual o superior a 85 db (A).
-
Page 43: Atencion / Características Generales
ESPAÑOL 1. CARACTERÍSTICAS GENERALES – Campo de aplicación: adecuado para operaciones de atornillado/destornillado por medio de un sistema a impulsos, en aplicaciones ferroviarias e industriales. – Capacidad: (ø max. bulón) ..........................33 mm – Par de torsión máx desarrollado: ................2500 Nm (1844 ft.lbs) –... -
Page 44: Descripción
ESPAÑOL 2. DESCRIPCIÓN (Ref. Fig. 1) 01 – EMPUÑADURA DE MANDO 02 – ACELERADOR 03 – MANGO DE TRANSPORTE 04 – EMPUÑADURA 05 – TUBO DE ESCAPE 06 – TAPÓN TRANSPARENTE NIVEL ACEITE 07 – BLOQUE DE IMPACTO 08 – EJE DE TRANSMISIÓN 09 –... -
Page 45: Instrucciones De Uso
ESPAÑOL 3. INSTRUCCIONES DE USO 3.1) Empuñadura de mandos La empuñadura que reúne los mandos ha sido estudiada para permitir un uso ágil y cómodo del atornillador tanto en posición horizontal como en posición vertical (ver Fig. 8 y 9). Por tanto, con referencia a la Fig. - Page 46 ESPAÑOL ESPAÑOL Para el montaje del vaso será sufi ciente (Ver Fig. 7, pág. 67): 1 Introducir el vaso sobre el eje del cuadro (08) alineando los orifi cios del vaso y del cuadro (ver Fig. 7 a). 2 Introducir completamente el muelle “CLIP-NR”(suministrado con el atornillador) en el orifi cio pasante del vaso (ver Fig.
-
Page 47: Preparación De La Mezcla Carburante
– Al fi nal de la operación soltar el acelerador. Si es necesario el atornillador puede ser utilizado con el carro de soporte Cembre (Ref. a Fig. 10, 11) pidiendo esto por separado con el correspondiente dispositivo de interconexión (ver § 8). -
Page 48: Puesta En Marcha Del Motor
ESPAÑOL 5. PUESTA EN MARCHA DEL MOTOR – Portar el selector (12) en la posición “N” (ver § 3.4). FASES PRELIMINARES: – Presionar el pulsador de descompresión (D) (Fig. a). – Hacer llegar la mezcla al carburador operando 5-6 vece sobre la bomba (P) (Fig. - Page 49 ESPAÑOL TRABAJO INVERNAL (Ref. a Fig. 5) Para optimizar el funcionamiento del carburador, operando con temperaturas ambiente inferiores a 10°C, recomendamos mezclar el aire frío con el caliente proveniente de la zona del cilindro para precalentar el aire de aspiración. Para ello será sufi ciente: –...
-
Page 50: Mantenimiento
ESPAÑOL 6. MANTENIMIENTO Para cualquier intervención de mantenimiento detener el motor y esperar a que se enfríe. Para evitar puestas en marcha accidentales quitar siempre el cable de la bujía antes de cualquier intervención de mantenimiento. 6.1) MANTENIMIENTO ORDINARIO Evitar apoyar el atornillador directamente sobre terrenos polvorientos o fangosos. Después de cada día de uso, limpiar con cuidado el atornillador con un trapo limpio, teniendo cuidado de eliminar la suciedad que se ha depositado sobre él, especialmente cerca de las partes móviles como la zona del bloque de impacto. - Page 51 ESPAÑOL – Quitar la parte de goma negra del depósito y extraer el fi ltro (Ref. a Fig. 12b). – Limpiar el fi ltro con un disolvente no infl amable o con alto punto de infl amabilidad. – Secar completamente el fi ltro antes de volver a montarlo. –...
-
Page 52: Solución De Los Problemas
ESPAÑOL 7. SOLUCIÓN DE LOS PROBLEMAS SINTOMA CAUSA REMEDIO - Puesta en marcha Interruptor (14) en posición “STOP”. Poner el interruptor en posición “START”. difi cultosa del motor Falta de carburante. Añadir mezcla de carburante en el depósito. Interruptor (14) en posición errónea. -
Page 53: Accesorios Suministrados Bajo Demanda
ESPAÑOL 8. ACCESORIOS SUMINISTRADOS BAJO DEMANDA – Llaves de vaso standard y largos de varias tipologías y dimensiones: (hexagonales, cuadradas y rectangulares) – Prolongaciones – Adaptadores – Articulaciones – Muelles “CLIP-NR” código 2874205 Para la fi jación de las llaves de vaso normalmente comercializadas con diámetro entre la ranura de 47 a 57 mm. - Page 54 NOTA: Para la utilización del atornillador con el carro es recomendable el uso de una prolongación de 10 cm. Para más información contactar con Cembre. Verifi car que el carro esté provis-to de pistón a gas calibrado a 1500N en vez de1900N. –...
- Page 55 ITALIANO ATTENZIONE ! Prima di utilizzare questa macchina, leggere attentamente le istru- zioni contenute in questo manuale. Indossare sempre cuffi e di protezione per l'udito RISCHIO DI DANNO UDITIVO. Nelle normali condizioni di utilizzo, questa macchina può compor- tare per l'operatore addetto un livello sonoro di esposizione per sonale e giornaliero al rumore pari o superiore a 85 db (A).
-
Page 56: Attenzione / Caratteristiche Generali
ITALIANO 1. CARATTERISTICHE GENERALI – Campo di applicazione: adatto per operazioni di avvitamento/svitamento tramite sistema ad impulsi, in applicazioni ferroviarie e industriali. – Prestazioni: (ø max. bullone) ........................33 mm – Coppia max. sviluppata: ....................2500 Nm (1844 ft.lbs) – Dimensioni: ..........................rif. Fig. 16, pag. 71 –... -
Page 57: Descrizione
ITALIANO 2. DESCRIZIONE (Rif. a Fig. 1) 01 – MANOPOLA COMANDI 02 – ACCELERATORE 03 – MANICO DI TRASPORTO 04 – IMPUGNATURA 05 – MARMITTA DI SCARICO 06 – TAPPO TRASPARENTE LIVELLO OLIO 07 – GRUPPO BATTENTE 08 – QUADRO ALBERO DI TRASMISSIONE 09 –... -
Page 58: Istruzioni Per L'uso
ITALIANO 3. ISTRUZIONI PER L'USO 3.1) Manopola comandi La manopola che raggruppa i comandi è stata studiata per permettere un agevole e comodo utilizzo dell’avvitatore sia in posizione verticale che orizzontale (Rif. a Fig. 8, 9). A tale scopo, con riferimento alla Fig. 2, operare come segue: Utilizzo orizzontale - impugnare la manopola in modo da agire sulla LEVA DI SICUREZZA (15H) e sull’ACCELERATORE (02H). - Page 59 ITALIANO Per il montaggio della bussola sarà suffi ciente (Rif. a Fig. 7 pag. 67): 1 Infi lare la bussola sul quadro dell’albero (08) allineando i fori della bussola e dell'albero (vedi Fig. 7 a). 2 Introdurre completamente la molla di ritenuta “CLIP-NR” (fornita in dotazione all’avvitatore) nel foro passante della bussola (vedi Fig.
-
Page 60: Preparazione Della Miscela Carburante
All'occorrenza l'avvitatore può essere reso "carrellabile" (Rif. a Fig. 10, 11) richiedendo separatamente il carrello di supporto Cembre ed il relativo dispositivo di interfacciamento (vedi § 8). – Per l’utilizzo dell'avvitatore in posizione verticale con il carrello di supporto é necessario montare sull’avvitatore il dispositivo di interfacciamento tipo KCS-NR. -
Page 61: Avviamento Del Motore
ITALIANO 5. AVVIAMENTO DEL MOTORE – Portare il selettore marcia/folle (12) in posizione "N". (vedi § 3.4) FASI PRELIMINARI: – Premere il pulsante di decompressione (D) (Fig. a). – Richiamare miscela nel carburatore agendo 5-6 volte sulla pompa (P) (Fig. b). Con motore freddo: –... - Page 62 ITALIANO ESERCIZIO INVERNALE (Rif. a Fig. 5) Per ottimizzare il funzionamento del carburatore, operando con tem pe ra tu re ambiente inferiori a 10°C, consigliamo di miscelare l'aria fredda con quella calda pro ve nien te dalla zona del cilindro in modo da preriscaldare l'aria d'aspirazione.
-
Page 63: Manutenzione
ITALIANO 6. MANUTENZIONE Per qualsiasi intervento di manutenzione spegnere il motore e aspet ta re il suo raff red- damento. Per evitare avviamenti accidentali rimuovere sempre il cavetto della candela prima di qualsiasi intervento di manutenzione. 6.1 MANUTENZIONE ORDINARIA Evitare di appoggiare l'avvitatore direttamente su terreni polverosi o fangosi. Dopo ogni giorno d’uso, pulire accuratamente l'avvitatore con uno straccio pulito, avendo cura di eliminare lo sporco depositatosi su di esso, specialmente vicino alle parti mobili come la zona del gruppo battente. - Page 64 Le operazioni di manutenzione descritte ai § 6.2.1 e 6.2.2 richiedono l'intervento di personale qualifi cato, per questo consigliamo di contattare la Cembre. 6.2.3) Rabbocco o cambio dell’olio nel gruppo cambio-riduttore (ogni 4 anni) Per rabboccare o sostituire l'olio nel gruppo cambio-riduttore operare come segue: –...
-
Page 65: Soluzione Dei Problemi
ITALIANO 7. SOLUZIONE DEI PROBLEMI SINTOMO CAUSA RIMEDIO - Avviamento diffi coltoso Interruttore (14) in posizione Portare l’interruttore in posizione "START". del motore: "STOP". Mancanza di carburante. Aggiungere miscela carburante nel serbatoio. Starter in posizione errata. Verifi care Selettore (S) (vedi § 5). Filtro carburante intasato. -
Page 66: Accessori Fornibili A Richiesta
ITALIANO 8. ACCESSORI FORNIBILI A RICHIESTA – Chiavi a bussola standard e lunghe di varie tipologie e dimensioni: (esagonali, quadre, rettangolari) – Prolunghe – Adattatori – Snodi – Molle di ritenuta “CLIP-NR” cod. 2874205 Per un agevole fi ssaggio delle chiavi a bussola comunemente diff use, aventi diametro di gola compreso fra 47 e 57 mm. - Page 67 – Carrello di supporto tipo “CS-SD”. NOTA: Per l’utilizzo dell’avvitatore con il carrello é consigliabile l’uso di una prolunga da 10 cm. Contattare la Cembre per ulteriori informazioni a riguardo. Verifi care che il carrello sia provvi- sto di molla a gas tarata a 1500N anziché...
- Page 68 “CLIP” Socket wrench Douille Steckschlüssel Llave de vaso Chiave a bussola “CLIP” “CLIP” Push here Presser ici Hier drücken Empujar aqui Spingere qui...
- Page 69 FIG. 10...
- Page 70 FIG. 12a FIG. 12b...
- Page 71 Air fi lter - Filtre à air - Luftfi lter - Filtro del aire - Filtro aria Spark plug Bougie Zündkerze Bujía Candela Max. oil level Niveau maxi. d’huile Max. Ölstand Nivel de aceite máx. Livello max. olio...
- Page 72 640 (25.2) FIG. 16 DIMENSIONS - ABMESSUNGEN - DIMENSIONES - DIMENSIONI mm (inches)
- Page 73 431 (16.9) Serial Number Numéro de série Seriennummer Número de serie Numero di Matricola...
-
Page 74: Return To Cembre For Overhaul
Centre; if possible, attach a copy of the Test Certifi cate supplied by Cembre together with the tool or fi ll in and attach the form available in the “ASSISTANCE” section of the Cembre website. -
Page 75: Table Of Contents
4. Fuel mixture preparation ........................7 5. Starting the engine ..........................8 6. Maintenance ............................10 7. Troubleshootting guide ........................12 8. Optional accessories .......................... 13 Cembre 9. Return to for overhaul ...................... 73 FRANÇAIS INDEX 1. Recommandations / Caracteristiques generales ..............15-16 2. - Page 76 CS 92014 - 91423 Morangis Cédex E-mail: sales@cembre.com E-mail: sales@cembre.co.uk E-mail: info@cembre.fr www.cembre.com www.cembre.co.uk www.cembre.fr Cembre España S.L.U. Cembre GmbH IKUMA GmbH & Co. KG Cembre Inc. Calle Verano 6 y 8 Heidemannstraße 166 Boschstraße 7 Raritan Center Business Park 28850 Torrejón de Ardoz...
Need help?
Do you have a question about the NR-11P and is the answer not in the manual?
Questions and answers