Table of Contents
Advertisement
Quick Links
Advertisement
Table of Contents

Related Manuals for Sper scientific Food Safety Thermometer


Summary of Contents for Sper scientific Food Safety Thermometer
- Page 1 Food Safety Thermometer 800115 Instruction Manual...
-
Page 2: Table Of Contents
TABLE OF CONTENTS INTRODUCTION ...........3 FEATURES .............4 MATERIAL SUPPLIED ........4 FRONT PANEL DESCRIPTION ....5 LCD DISPLAY ..........6 SET UP ............7 MEASUREMENT PROCEDURES ....12 CARE AND MAINTENANCE .......14 SPECIFICATIONS ........15 WARRANTY ..........16... -
Page 3: Introduction
As the FDA’s requirements for Hazard Analysis and Critical Control Point (HACCP) in food safety continue to become more stringent , Sper Scientific has responded with the convenient Food Safety Thermometer (800115) offering both a penetration probe and an infrared thermometer in one portable convenient unit. -
Page 4: Features
FEATURES • IP65 waterproof • HACCP compliant • High/Low alarm settings • Flashlight • Multi-position penetration probe • Backlit LCD MATERIALS SUPPLIED • Food Safety Thermometer • 2 AAA batteries • Instruction manual... -
Page 5: Front Panel Description
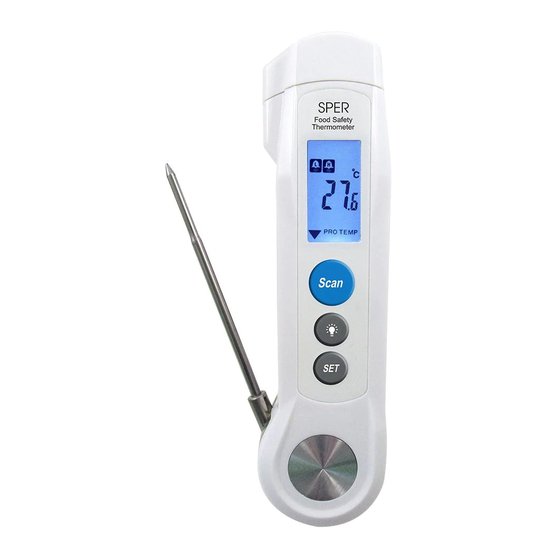
FRONT PANEL DESCRIPTION 1. Infrared sensor and flashlight 2. LCD screen 3. SCAN button 4. LIGHT/UNIT button 5. SET button 6. Penetration probe... -
Page 6: Lcd Display
LCD DISPLAY 1. IR Temperature Active Indicator 2. Hold Function Indicator 3. Temperature Unit of Measure 4. Temperature Reading 5. Low Battery Indicator 6. Probe Temperature Active Indicator 7. Low or High Alarm Active... -
Page 7: Set Up
SET UP Battery Installation This thermometer uses 2 AAA batteries. To install the batteries before first use: 1. Unscrew the single screw on the back of the thermometer. 2. Remove the battery cover. 3. Insert two new AAA batteries, ensuring correct polarity. - Page 8 Turning the Thermometer On and Off There are two ways to turn the thermometer on/off. Method One: 1. Press SCAN to turn the thermometer on. 2. The thermometer will turn off automatically after 7 seconds of inactivity. This mode is useful for IR only measurements.
- Page 9 Setting Audible Alarms LOW Alarm: Note… The LOW alarm activates when the temperature goes below the programmed temperature. The LOW alarm sound is different from the high alarm because it beeps slower. The LOW alarm occurs at one beep per second while the high alarm is two beeps per second.
- Page 10 HIGH Alarm: 1. Turn the thermometer on. 2. Press SET repeatedly until the icon appears on the LCD with a number. 3. Adjust the HIGH alarm value using the SCAN and LIGHT buttons. 4. Press SET to confirm. 5. The thermometer will power off and save the HIGH alarm setting.
- Page 11 Backlight The backlight of this thermometer is always on when the power is on. Flashlight Press the central LIGHT button to turn the Flashlight ***IMPORTANT: The flashlight area does not represent the infrared measuring area. The white circle that appears in IR mode is for aiding visibility and does not represent the distance to spot ratio.
-
Page 12: Measurement Procedures
MEASUREMENT PROCEDURES Penetration Probe Note… The penetration probe does not have to be fully extended to function. It will function from 30°-180°. 1. Fold the penetration probe out using the thumb notch. 2. Insert the tapered end of the metal probe into food to at least 4mm. - Page 13 3. Release SCAN when you are perfectly centered on the object.* 4. The LCD displays the temperature. “HOLD” also appears on the screen. 5. The LCD will display the last temperature on the screen for 6 seconds after the scan button is released.
-
Page 14: Care And Maintenance
Store the thermometer with the temperature probe in the closed position. Repairs or services not covered in this manual should be performed by qualified personnel only. Please contact Sper Scientific to speak with a technician. -
Page 15: Specifications
SPECIFICATIONS Range Resolution Accuracy Penetrating -40 – 280°C ±2°C (3.6°F) Probe (-40 – 536°F) below freezing ±1°C (1.8°F) for all other temperatures Infrared -40 – 200°C ±3°C (5.4°F) Thermometer (-40 – 392°F) from -40 – 20°C ±1°C (1.8°F) for all other temperatures Infrared Distance to Spot Ratio... -
Page 16: Warranty
WARRANTY Sper Scientific warrants this product against defects in materials and workmanship for a period of five (5) years from the date of purchase, and agrees to repair or replace any defective unit without charge. If your model has since been discontinued, an equivalent Sper Scientific product will be substituted if available.
Need help?
Do you have a question about the Food Safety Thermometer and is the answer not in the manual?
Questions and answers