Table of Contents
Advertisement
Quick Links
Advertisement
Table of Contents

Related Manuals for Sper scientific 800117C


Summary of Contents for Sper scientific 800117C
- Page 1 Waterproof Thermometer Certified 800117C Instruction Manual...
-
Page 3: Table Of Contents
TABLE OF CONTENTS INTRODUCTION..............4 PANEL DESCRIPTION............5 MEASUREMENT PROCEDURES........6 ADVANCED SETTINGS............8 POWER MANAGEMENT...........12 AUTO POWER OFF............12 BATTERY REPLACEMENT..........13 SPECIFICATIONS..............14 OPTIONAL ACCESSORIES..........14 WARRANTY................16... -
Page 4: Introduction
INTRODUCTION A sturdy, fully waterproof IP67 housing protects the thermo- meter in wet environments and makes clean up easy. The platinum resistance temperature probe offers high accuracy and stability even at very low temperatures and under changing environmental conditions. Results are displayed in °C or °F on a large backlit LCD along with, Min/Max/Avg readings. -
Page 5: Panel Description
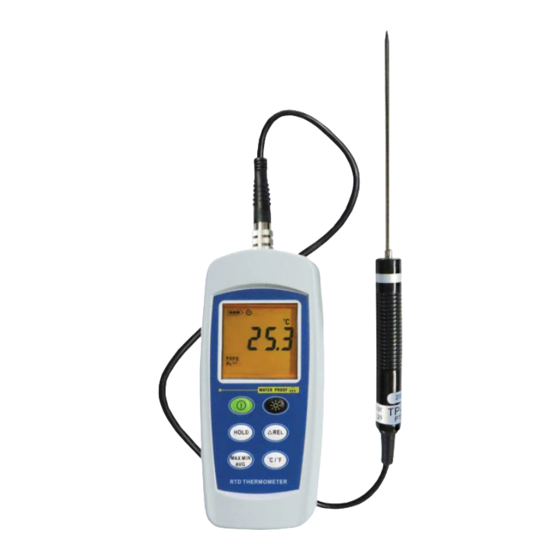
RTD THERMOMETER PANEL DESCRIPTION Pt type temperature sensor connector ○ LCD display ○ Power ON/OFF button ○ HOLD button ○ MAX MIN Average control button ○ Back light button ○ Relative readout button ○ °C , °F control button ○... -
Page 6: Measurement Procedures
MEASUREMENT PROCEDURES Temperature Measurement 1. Plug the probe into the top of the meter and ensure a water- proof seal by threading the connection closed. 2. Press the POWER button. Temperature readings will appear on the LCD. 3. The temperature sensor is located at the end of the metal temperature probe. - Page 7 MEASUREMENT PROCEDURES 2. Press MAX/MIN/AVE again. “MIN” appears on the LCD and the lower display shows a continually updated minimum. 3. Press MAX/MIN/AVE again. “AVE” appears on the LCD and the lower display shows a continually updated average of the last 8 data points updated with each change in reading.
-
Page 8: Advanced Settings
ADVANCED SETTINGS Turn power off prior to advanced settings. Advanced settings mode will be cancelled if POWER is pressed. During Advanced Set-up mode the Buttons will function as below. - Page 9 RTD THERMOMETER ADVANCED SETTINGS PT Probe Selection 6.1 Pt type selection 6-1-1. Press and hold “Power” + “Light” buttons for 2 seconds to enter setup mode. 6-1-2. Press “Hold” button to enter PT selection mode. 6-1-3. Press “Max” button to select between PT probe type.
- Page 10 ADVANCED SETTINGS 6.3 Recall Default factory setting value 6-3-1. Press and hold “Power” + “Light” buttons for 2 seconds to enter setup mode. RTD THERMOMETER 6-3-2. 6-3-3. Press “REL” button to enter calibration Press “°C/°F” button to confirm PT selection mode.
- Page 11 6-3-4. Press “Light” button to enter recall mode. ADVANCED SETTINGS 6-3-5. Press “°C/°F” button to confirm revert back to “Default factory setting value” 6-3-6. Press “°C/°F” button to confirm selection.
-
Page 12: Power Management
POWER MANAGEMENT Auto Power Off The Meter automatically powers off after 30 minutes of inactivity. To override Auto Power Off press and hold the HOLD button while turning the meter on. Two beeps will sound to indicate that auto power off has been disabled. Low Battery Indicator Batteries ok, measurements are possible. -
Page 13: Battery Replacement
POWER MANAGEMENT... -
Page 14: Specifications
SPECIFICATIONS OPTIONAL ACCESSORIES PT1000 probe 800117P - Accuracy ±0.15°C ±0.002t... - Page 15 NOTES...
-
Page 16: Warranty
If your model has since been discontinued, an equiva- lent Sper Scientific product will be substituted if available. This warranty does not cover damage resulting from accident, misuse, or abuse of the product. To obtain warranty service or...
Need help?
Do you have a question about the 800117C and is the answer not in the manual?
Questions and answers