Table of Contents
Advertisement
Quick Links
Advertisement
Table of Contents

Related Manuals for Sper scientific 800118C


Summary of Contents for Sper scientific 800118C
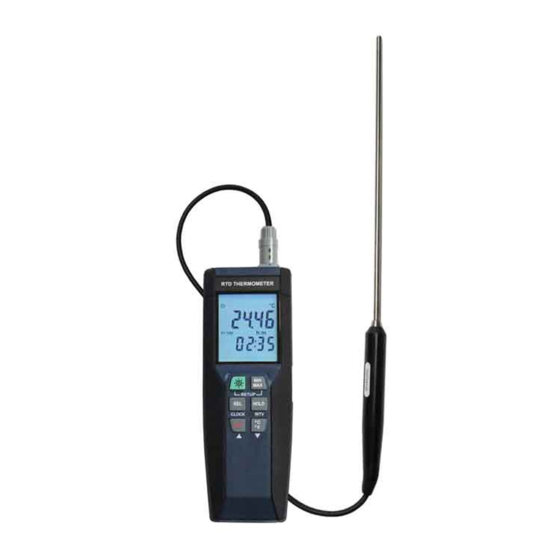
- Page 1 Datalogging Thermometer Certified 800118C Instruction Manual...
-
Page 2: Table Of Contents
TABLE OF CONTENTS INTRODUCTION..............3 PANEL DESCRIPTION............4 MEASUREMENT PROCEDURES........5 SETUP MODE..............7 DATALOGGING..............10 POWER MANAGEMENT............19 AUTO POWER OFF............19 BATTERY REPLACEMENT..........19 SPECIFICATIONS..............20 OPTIONAL ACCESSORIES..........21 WARRANTY................24... -
Page 3: Introduction
INTRODUCTION The platinum resistance temperature probe offers the highest accuracy and stability even at very low temperatures and under changing environmental conditions. Results are displayed in °C or °F on a large backlit LCD along with Max/Min readings. Automatically record up to 16,000 data points with time stamp that can be downloaded and analyzed with the included USB computer cable and software. -
Page 4: Panel Description
PANEL DESCRIPTION... -
Page 5: Measurement Procedures
MEASUREMENT PROCEDURES Temperature Measurement 1. Plug the probe into the top of the meter. 2. Press the power button . Temperature readings will appear on the large upper display with the time shown on the lower display. 3. The temperature sensor is located at the end of the metal temperature probe. - Page 6 MEASUREMENT PROCEDURES Maximum/Minimum Mode 1. Press MIN MAX to enter the min/max mode. “MAX” appears on the LCD and the meter will now begin storing the maximum and minimum values. The maximum temperature reading appears on the display updated each time a new maximum (peak) temperature is reached..
-
Page 7: Setup Mode
SETUP MODE Setting the Time Turn power off prior to advanced settings. Advanced settings mode will be cancelled if POWER is pressed. 1. Press and hold button and then power on the meter to enter setup mode. 2. Press button to enter Time setting mode. The right two digits blink. - Page 8 SETUP MODE Clearing Memory When the memory is full, REC appears and blinks on the display and logging stops. You can clear memory in next power on the meter to enter clear memory mode. Press and hold button and then power on the meter to enter clear memory mode to delete logged readings from memory.
- Page 9 SETUP MODE Recall Default factory settings Press and hold buttons and then power on the meter to enter setup mode. Press button to enter calibration mode. (in 3 seconds) Press button to enter recall mode. (in 3 seconds) Press button to confirm revert back to “Default factory setting value”.
-
Page 10: Datalogging
DATALOGGING Changing the Logging Interval The logging interval determines how often the thermometer stores logged readings in memory. 1. Press and hold button and then power on the meter to enter setup mode. 2. Press button to enter Interval setting mode. The right two digits blink. - Page 11 DATALOGGING Minimum Hardware Required: • PC or NoteBook with Pentium 800MHz or higher, 128 MB RAM • At least 50 MB hard disk space available to install SE376 • Recommended screen resolution 1024x768 or above Install SE376 and USB-120 connector driver: 1.
- Page 12 DATALOGGING 8. After you’ve finished installing the USB-120 connector driver, it will install SE376 software automatically. It will copy SE376.exe (executable file) and help the file to your hard disk (default is C:\program_files\SE376. 9. After you’ve finished installation, plug the USB-120 connector into PC USB port, execute.
- Page 13 DATALOGGING 11. Choose “Hardware” option and click “Device Manager” button, click “+” symbol on the left side of the Ports (COM & LPT), if the device “CP2101 USB to UART Bridge Controller (COMx)” is in the list, the connector is ready to work. Main menu and buttons: Open - Retrieve files from the disk.
- Page 14 DATALOGGING Sampling Rate - Time interval between each data to be recorded. If you want to change it, move your cursor to the digit you want to change and click, then input the new sampling rate. The change will be effective immediately. It will keep up to 5000 data points, when data points exceed this limit, the oldest 100 points will be replaced sequentially.
- Page 15 DATALOGGING To Undo the Zoom: Press the Alt+U keys or click Undo Zoom button. Note: Zooming method is not allowed in Real Time Graph Window. Table: The table window can be used to record real time data in a table format. The maximum number of records that the tabular window can keep will depend on the available memory and hard disk space on your computer.
- Page 16 DATALOGGING For example: It will transfer the first data set to the graph and tabular on the right side window once you finish loading recorded data from the thermometer. You can click on any data set to show its graph and table on the right side window.
- Page 17 DATALOGGING You can choose a rectangular area on the graph to zoom in for detail. The vertical dash line in the graph will match the highlight row in the table. When clicking on another row in the table, the vertical dash line will move to the corresponding position to match the time.
- Page 18 DATALOGGING Frequently Asked Questions: Q: I have connected the thermometer to the computer serial port and turned it on, but it still shows “NO CONNECTION”? A: This may be because all your serial ports are occupied by other applications. Close all applications, restart your computer, and run SE376 again.
-
Page 19: Power Management
POWER MANAGEMENT Auto Power Off The Meter automatically powers off after 30 minutes of inactivity. To override Auto Power Off press and hold the REL button while turning the meter on. Two beeps will sound to indicate that auto power off has been disabled. Batteries 1. -
Page 20: Specifications
SPECIFICATIONS... -
Page 21: Optional Accessories
OPTIONAL ACCESSORIES Waterproof Resistant Instrument Pouch - 840090 AC Adapter - 800003... - Page 22 NOTES...
- Page 23 NOTES...
-
Page 24: Warranty
If your model has since been discontinued, an equivalent Sper Scientific product will be substituted if available. This warranty does not cover batteries, battery leakage, or damage resulting from accident, tampering, misuse, or abuse of the product.
Need help?
Do you have a question about the 800118C and is the answer not in the manual?
Questions and answers