Table of Contents
Advertisement
Quick Links
Advertisement
Table of Contents

Related Manuals for SPX FLOW APV DELTA PR2


Summary of Contents for SPX FLOW APV DELTA PR2
- Page 1 I N S T R U C T I O N M A N U A L APV DELTA PR2 S A M P L I N G VA LV E F O R M N O . : H 1 7 0 7 8 7 R E V I S I O N : U K - 4 R E A D A N D U N D E R S TA N D T H I S M A N U A L P R I O R TO O P E R AT I N G O R S E RV I C I N G T H I S P R O D U C T.
- Page 3 Directives 2006/42/EC (superseding 89/392/EEC and 98/37/EC) and ProdSG (superseding GPSG - 9.GPSGV). For official inspections, SPX FLOW presents a technical documentation according to Appendix VII of the Machinery Directive, this documentation consisting of documents of the development and construction, description of measures taken to meet the conformity and to correspond with the basic requirements on safety and health, incl.
-
Page 5: Table Of Contents
APV_PR2_UK-4_082017.qxp Table of contents Page General Terms Safety Instructions Intended Use Mode of Operation 4.1. Manually operated design (PR2-HF) 4.2. Pneumatically operated design (PR2-FS-H) Auxiliary Equipment Cleaning Installation Welding instructions Maintenance Dimensions / Weights Materials Technical Data 11.1. General terms 11.2. -
Page 7: General Terms
- The valve must be assembled, disassembled and reassembled only by persons who have been trained in APV valves or by SPX FLOW service team members. If necessary, contact your local SPX FLOW representative. Intended Use The intended use as field of application of the PR valve is the sample taking of liquids from the respective line section. -
Page 8: Mode Of Operation
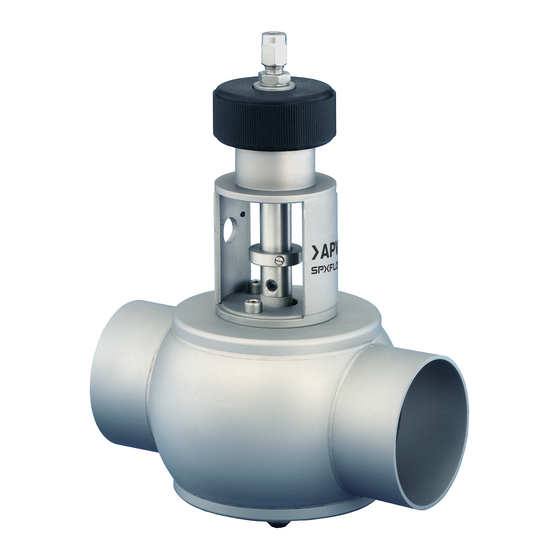
APV_PR2_UK-4_082017.qxp Mode of Operation 4.1. Manually operated design (PR2-HF) For sample taking the handle (B) is operated. turn left = open turn right = closed (until the spring force closes the valve again.) 4.2. Pneumatically operated design (PR2-FS-H) For sample taking the handle (B) is operated. turn left = open turn right... -
Page 9: Cleaning
APV_PR2_UK-4_082017.qxp Cleaning - In the standard designs, the valve is cleaned during the pipe cleaning process. - By short-term interval-opening of the valve, the contact surface between the valve shaft and the seat is cleaned, whereas liquid drains off the sampling nozzle (D). - The valve equipped with steam connection is cleaned and sterilized through the connecting tubes. -
Page 10: Maintenance
APV_PR2_UK-4_082017.qxp Maintenance - The maintenance intervals are different depending on the application and are to be determined by the operator himself carrying out temporary checks. - Complete seal kits for the valve service are available (see spare parts lists). - Exchange of seals according to Service Instructions. - Provide all seals with a thin layer of grease before their installation. -
Page 11: Dimensions / Weights
APV_PR2_UK-4_082017.qxp Dimensions / Weights PR2- FS-H pneumatically Ø 58 operated design PR2- HF manually operated design pneumatically operated design with steam-resistant housing DN 25 G ⅜" tank Ø 37,6 -0,1 dimensions in mm weights in kg Ø B Ø C Inch PR2 - HF PR2 - FS - H... -
Page 12: Materials
APV_PR2_UK-4_082017.qxp Materials housing, housing cover 1.4404 (DIN EN 10088) spring cylinder, yoke, upper part of shaft, operating cam, screws, air connection 1.4301 (DIN EN 10088) seals standard EPDM option HNBR, FPM, VMQ lower part of shaft PTFE / 25 % glass fiber handle Hostalen Technical Data... -
Page 13: Service Instructions
APV_PR2_UK-4_082017.qxp Service Instructions Manually operated design - PR2 HF (fig. 12.1.) The item numbers refer to the spare parts drawing RN 01.143.0 fig. 12.1. 12.1. Dismantling from the line system 1. Shut off line pressure in the product line. 2. Turn handle (8) to the left until the valve is in open position. 3. - Page 14 APV_PR2_UK-4_082017.qxp Service Instructions Pneumatically operated design PR2-FS-H (fig. 13.1.) The item numbers refer to the spare parts drawing RN 01.146-2. fig. 13.1. 13.1. Dismantling from the line system 1. Shut off line pressure in the product line. 2. Remove pneumatic air line. 3.
-
Page 15: Installation Of Seals And Assembly Of Valve
APV_PR2_UK-4_082017.qxp Service Instructions Pneumatically operated design (PR2-FS-H) 13.2. Installation of seals and assembly of valve (PR2-FS-H) 1. Slightly grease the shaft seal (3) and o-ring (9, 10, 15) and place them into the grooves. 2. Place the PTFE shaft tip (5.2) on the metal part (5.1) and lock it into place. -
Page 16: Trouble Shooting
APV_PR2_UK-4_082017.qxp Trouble Shooting Trouble Remedy Manually operated design The item numbers refer to the spare parts drawing RN 01.143.0 / 01.143.1 Failure removal see chapters 12.1. and 12.2. Service Instructions Turn handle (8) in position “OFF”. Leakage at sampling connection Replace tip of valve shaft (1.2). -
Page 17: Spare Parts Lists
APV_PR2_UK-4_082017.qxp Spare Parts Lists The reference numbers of the spare parts for the different valve designs and sizes are included in the attached spare parts drawings with corresponding lists. Please indicate the following data to place an order for spare parts: - required number of parts - reference number - designation. - Page 40 F: (+48) 52 525 99 09 SPX FLOW reserves the right to incorporate the latest design and material changes without notice or obligation. Design features, materials of construction and dimensional data, as described in this manual, are provided for your information only and should not be relied upon unless confirmed in writing.
Need help?
Do you have a question about the APV DELTA PR2 and is the answer not in the manual?
Questions and answers