
Subscribe to Our Youtube Channel
Related Manuals for Viega Advantix


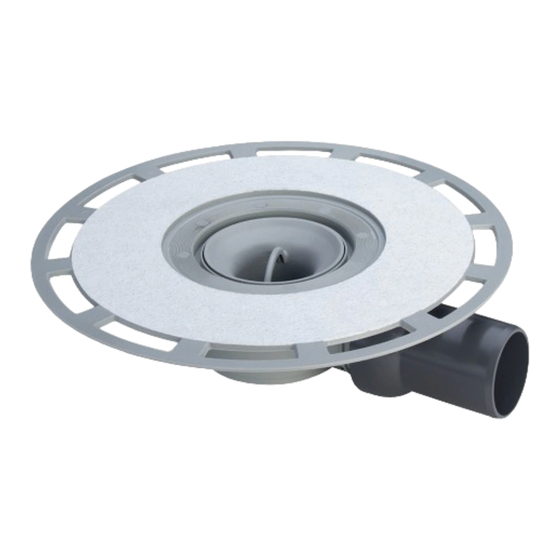
Summary of Contents for Viega Advantix
- Page 1 Advantix bath drain Instructions for Use for bonded sealing (tiled shower) with sealing mat Model Year built: 4938 from 01/2006 en_INT...
- Page 2 Advantix bath drain 2 from 21...
-
Page 3: Table Of Contents
3.1.2 Installation dimensions 3.1.3 Tools and materials Assembly 3.2.1 Connecting the drain 3.2.2 Preparing for subsequent work 3.2.3 Sealing the drain 3.2.4 Mounting the top Care 3.3.1 Care tips 3.3.2 Cleaning the drain Disposal Advantix bath drain 3 from 21... -
Page 4: About These Instructions For Use
This restriction does not extend to possible operating instructions. The installation of Viega products must take place in accordance with the general rules of engineering and the Viega instructions for use. -
Page 5: About This Translated Version
German/European directives specified in this manual: The information herein is not binding for other countries and regions; as said above, they should be understood as a recommendation. Advantix bath drain 5 from 21... -
Page 6: Product Information
Scope / Notice Regulations applicable in Ger‐ many Typical domestic wastewater DIN 1986-3 Intended use 2.2.1 Areas of use The drain is designed for small to medium volumes of water, which occur in e.g. residential building. Advantix bath drain 6 from 21... -
Page 7: Media
Drainage capacity at an accumulation height of 20 mm above the grate: 0.5 l/s Drainage capacity through the lateral inlet: 1.2 l/s The values are dependent on the total height of the drain unit. Advantix bath drain 7 from 21... -
Page 8: Product Description
Information for use 2.4.1 Installation variations Installing in a bare concrete floor The mounting of the drain in a bare concrete floor is as follows: Advantix bath drain 8 from 21... - Page 9 The creation of a floor recess must be agreed with the fol‐ lowing people: – a structural engineer – the on-site fire protection inspector or the specialist engineer for fire protection If necessary, proof of compliance with building code or an expert's report must exist. Advantix bath drain 9 from 21...
-
Page 10: Sealing
Ä „Regula‐ tions from section: Sealing“ on page 6. The bonded seal can be applied directly onto the drain flange. Fig. 3: Diagram of a bonded seal Advantix bath drain 10 from 21... - Page 11 See Ä „Regulations from section: Sealing“ on page 6. Information regarding the procedure can be found in the instructions for use of the corresponding product. Advantix bath drain 11 from 21...
-
Page 12: Fire Protection
2.4.3 Fire protection Advantix shower channels and drains can both be fitted to be fire proof. The R120 pipe lead-in can be used for this purpose in the floor con‐ struction. In this way, a fire resistance time of up to 120 minutes can be achieved. - Page 13 The drain can be fitted with a sieve insert (model 4958) to collect dirt. Odour barrier Advantix drains can be equipped with an additional odour barrier, which also closes the drain odour-tight, if the water seal in the odour trap has evaporated.
-
Page 14: Handling
If necessary, supply the required accessories Ä Chapter 2.5 „Required accessories“ on page 12. During assembly: Observe installation dimensions. After assembly: The drain flange must be fully lined with mortar. Advantix bath drain 14 from 21... -
Page 15: Installation Dimensions
Proceed as follows: Requirements: A pipe to the planned drainage position is already in place for the connection to the wastewater system. The drainpipe has an internal sealing lip. Advantix bath drain 15 from 21... - Page 16 The connection to the inlet must first be made to be able to mount the drain. Proceed as follows: Requirements: Inlet pipe has been mounted. Unscrew the union nut from the drain inlet. Remove protective plug. Remove sliding ring and sealing from the protective plug. Advantix bath drain 16 from 21...
-
Page 17: Preparing For Subsequent Work
Secure the drain in such a way that it cannot shift when the subse‐ quent works are applied. Most importantly, it must be ensured that the drain does not float when the concrete or screed is poured in. Advantix bath drain 17 from 21... -
Page 18: Sealing The Drain
Screed and floor tiles must be laid at an incline of 1–2 % in the direction of the drain. Bonded sealing Requirements: The flange is free of heavy soil. The complete surface of the flange is lined with material and undam‐ aged. Remove protective foil. Advantix bath drain 18 from 21... -
Page 19: Mounting The Top
Apply a second layer of bonded sealing onto the sealing collar and, if necessary, onto the floor. 3.2.4 Mounting the top The top with the grate must still be mounted to finish off the mounting of the drain. Proceed as follows: Advantix bath drain 19 from 21... -
Page 20: Care
There should be no residue on the components. 3.3.2 Cleaning the drain We recommend using a mild cleaning agent and a washing-up brush for cleaning. Advantix bath drain 20 from 21... -
Page 21: Disposal
Remove and clean immersion pipe. Clean drain. Replace immersion pipe. Re-insert grate. Disposal Separate the product and packaging materials (e. g. paper, metal, plastic or non-ferrous metals) and dispose of in accordance with valid national legal requirements. Advantix bath drain 21 from 21...
Need help?
Do you have a question about the Advantix and is the answer not in the manual?
Questions and answers