
Subscribe to Our Youtube Channel
Related Manuals for Viega 4914.11


Summary of Contents for Viega 4914.11
- Page 1 Advantix Top bathroom drain Instructions for Use Model Year built: 4914.11 from 01/2010 en_INT...
- Page 2 Advantix Top bathroom drain 2 from 26...
-
Page 3: Table Of Contents
Table of contents Table of contents About these instructions for use Target groups Labelling of notes About this translated version Product information Standards and regulations Intended use 2.2.1 Areas of use 2.2.2 Media 2.2.3 Drainage capacity Product description 2.3.1 Overview 2.3.2 Technical data Information for use... -
Page 4: About These Instructions For Use
This restriction does not extend to possible operating instructions. The installation of Viega products must take place in accordance with the general rules of engineering and the Viega instructions for use. -
Page 5: About This Translated Version
About these instructions for use About this translated version This instruction for use contains important information about the choice of product or system, assembly and commissioning as well as intended use and, if required, maintenance measures. The information about the products, their properties and application technology are based on the current standards in Europe (e. -
Page 6: Product Information
2 Product information Standards and regulations The following standards and regulations apply to Germany / Europe. National regulations can be found on the relevant web site of your viega.com/standards . country at Regulations from section: Sealing Scope / Notice Regulations applicable in Ger-... -
Page 7: Media
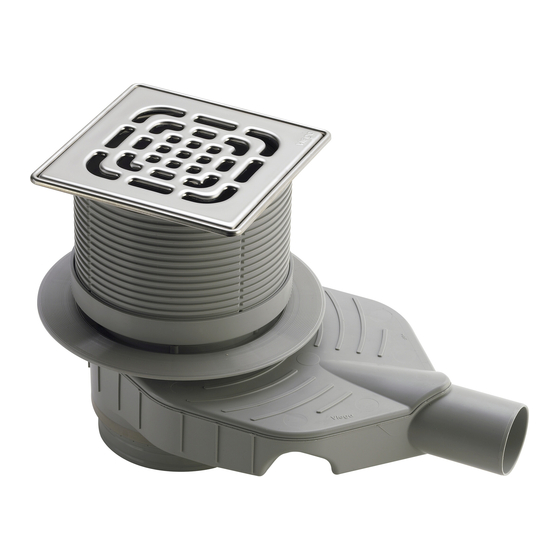
Product description 2.3.1 Overview Fig. 1: Scope of delivery model 4914.11 1 - top with grate, can be cut to length 2 - plug-in adapter for top 150 mm 3 - immersion pipe 4 - flange for the application of the conventional sealing... -
Page 8: Technical Data
Product information 5 - base unit 6 - floor piece 7 - clamping ring 2.3.2 Technical data Nominal width [DN] (drain support) Ä Chapter 2.2.3 „Drainage capacity“ Drainage capacity on page 7 Ä Chapter 3.1.2 „Installation dimen- Dimensions and installa- sions“... -
Page 9: Sealing
Product information Mounting on a floor During the mounting on the floor, the drain is integrated into the floor construction. At the same time, it can e. g. be integrated into the level- ling screed or heat insulation. If necessary, a vertical drainpipe can be led through a drill hole in the floor at the same time. - Page 10 Product information Conventional sealing The flange of the drain is intended for conventional sealing. To be able to seal the drain conventionally, you require a suitable sealing collar and Ä Chapter 2.5 „Required a clamping ring with which the cuff is secured accessories“...
- Page 11 Product information Bonded sealing To protect against moisture penetration, apply sealing foils, which are to be processed in liquid state, directly below the tiles on screed and walls. The determination of the stress class and the underground as well as the selection of the suitable bonded sealing must be carried out in compliance with the valid standards and regulations, see: linktarget [Normen EWT] doesn't exist but @y.link.required='true'...
- Page 12 Product information Important note Careful planning is required for professional sealing. In addition, depending on the individual dampness wear class and the type of foun- dation, a suitable BS system with a building regulations certificate of suitability must be chosen. Furthermore, the following factors should be taken into account: Drain or shower channel must be equipped with a special flange, which has an adhesive surface and a width of at least 30 mm.
-
Page 13: Fire Protection
Product information 2.4.3 Fire protection Advantix shower channels and drains can both be fitted to be fire proof. The R120 pipe lead-in can be used for this purpose in the floor con- struction. In this way, a fire resistance time of up to 120 minutes can be achieved. - Page 14 Product information Sieve insert The drain can be fitted with a sieve insert (model 4923.1) to collect dirt. Accessories for the conventional sealing If a conventional sealing is to be made, a suitable sealing collar and a clamping ring will be required. You will find a corresponding set in the catalogue (model 4998.3).
-
Page 15: Handling
After assembly: The drain flange must be fully lined with mortar. 3.1.2 Installation dimensions Fig. 8: Dimensional drawing model 4914.11 3.1.3 Tools and materials Required material if necessary, sealing collar, clamping ring, fitting screws Top with grate, if not included in scope of delivery... -
Page 16: Assembly
Handling Assembly 3.2.1 Construction and water seal level Determine screed height. At a desired installation height of ≥ 110 mm upper edge sealing flange the floor piece remains in the delivery condi- tion. The water seal level is 50 mm and the immersion pipe length 48 mm. - Page 17 Handling Align the floor in such a way that the arrows point towards the drain pipe. Secure floor with clamping ring. Tighten the screw of the clamping ring with max. 2.5 Nm ±0.2 Nm. Alternatively, tighten the end of the clamping ring up to or between the markings.
-
Page 18: Mount Base Unit
Handling Remove clamping ring and push floor piece in by two rings (2 x 10 mm). Align the floor in such a way that the arrows point towards the drain pipe. Secure floor with clamping ring. Tighten the screw of the clamping ring with max. 2.5 Nm ±0.2 Nm. Alternatively, tighten the end of the clamping ring up to or between the markings. - Page 19 Handling Installing in a bare concrete floor Requirements A pipe to the planned drainage position is already in place for the connection to the waste water system. The drain pipe has an internal sealing lip. Position the drain in the floor and align horizontally. Insert yellow protective plug.
- Page 20 Handling No building seal with sealing collar is possible with this installation method. Requirements A pipe to the planned drainage position is already in place for the connection to the waste water system. The drain pipe has an internal sealing lip. Position the drain on the floor and align horizontally.
- Page 21 Handling Secure the drain in such a way that it cannot shift when the subse- quent works are applied. Most importantly, it must be ensured that the drain does not float when the concrete or screed is poured in. NOTICE! Product damage due to improper installation If hollow spaces occur during the lining of the drain, leaks may occur when pressure is applied.
-
Page 22: Sealing The Drain
Handling Secure the drain in such a way that it cannot shift when the subse- quent works are applied. Most importantly, it must be ensured that the drain does not float when the concrete or screed is poured in. NOTICE! Product damage due to improper installation If hollow spaces occur during the lining of the drain, leaks may occur when pressure is applied. - Page 23 The sealing ring must lie in the groove between the flange and the screw holes. INFO! The Viega sealing collar has two differently coated sides. One side is coated with bitumen and the other side with EPDM. If the additional sealing takes place with bitumen sealing lanes, the sealing collar must be used with the bitumen side facing upwards.
-
Page 24: Mounting The Top
Handling 3.2.4 Mounting the top A top with the grate must still be mounted to finish off the mounting of the drain. Proceed as follows: If necessary, insert backflow seal in the lowest notch of the top. INFO! The backflow seal be must employed when no damp- ness is supposed to flow into the drain from outside of the top but water may seep in from below. -
Page 25: Care
Handling Care 3.3.1 Care tips Normal soap or a mild cleaning agent can be used for regular care and prevention of lime scale on the grate and frame. Under no circum- stances should scouring agent or scratching objects be used. Strong stains, even around the drain unit and the siphon, can be removed using typical household cleaner. -
Page 26: Disposal
Handling Clean drain. Replace immersion pipe. Re-insert grate. Disposal Separate the product and packaging materials (e. g. paper, metal, plastic or non-ferrous metals) and dispose of in accordance with valid national legal requirements. Advantix Top bathroom drain 26 from 26...
Need help?
Do you have a question about the 4914.11 and is the answer not in the manual?
Questions and answers