
Related Manuals for Viega Prevista Dry WC


Summary of Contents for Viega Prevista Dry WC
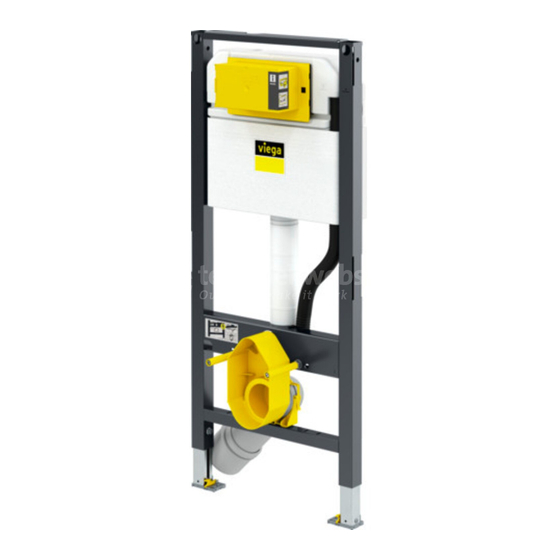
- Page 1 Prevista Dry WC element foot fastening at rear side 1120 mm Instructions for Use for WC flush plates for Prevista Model Year built: 8525.35 from 04/2019 en_INT...
- Page 2 Prevista Dry WC element foot fastening at rear side 1120 mm 2 from 24...
-
Page 3: Table Of Contents
Mounting the drain elbow 3.2.4 Establish power and water supply (optional) 3.2.5 Set and clad the WC element 3.2.6 Setting the flush volume Cleaning and maintenance Disposal Prevista Dry WC element foot fastening at rear side 1120 mm 3 from 24... -
Page 4: About These Instructions For Use
This symbol warns of possible serious injury. CAUTION! This symbol warns of possible injury. NOTICE! This symbol warns of possible damage to property. This symbol gives additional information and hints. Prevista Dry WC element foot fastening at rear side 1120 mm 4 from 24... -
Page 5: About This Translated Version
German/European directives specified in this manual: The information herein is not binding for other countries and regions; as said above, they should be understood as a recommendation. Prevista Dry WC element foot fastening at rear side 1120 mm 5 from 24... -
Page 6: Product Information
Intended use 2.3.1 Areas of use The Prevista Dry WC element is suitable for mounting on masonry wall constructions pursuant to the regulations in section Ä „Regulations from section: Fields of application / Mounting conditions“ on page 6. -
Page 7: Product Description
14 Protective plug for flushing pipe elbow 15 Revision shaft cover 16 Corner valve 2.4.2 Compatible components The WC element is compatible with all common WC ceramics, even with larger projection (barrier-free). Prevista Dry WC element foot fastening at rear side 1120 mm 7 from 24... -
Page 8: Technical Data
Factory setting approx. 6 l setting range approx. 3.5–7.5 l Water pressure Water pressure min. 15 kPa (0.15 bar) Water pressure max. 1000 kPa (10 bar) Prevista Dry WC element foot fastening at rear side 1120 mm 8 from 24... -
Page 9: Handling
The cables for these electrical actuation versions must be laid in front of the cladding. The corresponding empty pipe is required when preparing the remote flush actuation. Prevista Dry WC element foot fastening at rear side 1120 mm 9 from 24... -
Page 10: Installation Dimensions
> 500 mm, Viega recommends the use of a Prevista Dry support bracket (model 8570.48). Observe the instructions for use of the support bracket when mounting. Prevista Dry WC element foot fastening at rear side 1120 mm 10 from 24... - Page 11 Align and fix the wall brackets. Determine and mark the fixing points on the wall. X3: 388 mm X4: 50 mm Drill the holes. Insert the dowels. Prevista Dry WC element foot fastening at rear side 1120 mm 11 from 24...
- Page 12 X: 1000 mm Tighten the feet of the element using a fork spanner. Set the depth of the element and fasten. Prevista Dry WC element foot fastening at rear side 1120 mm 12 from 24...
- Page 13 Loosely insert the caps. INFO! Do not press on the caps to engage them. Re-adjust the alignment of the element using the threaded rods. Prevista Dry WC element foot fastening at rear side 1120 mm 13 from 24...
-
Page 14: Connecting Concealed Cistern
Push the caps down until they engage. ð The element is attached to the wall. 3.2.2 Connecting concealed cistern Turn the cover plate lock 90° in anti-clockwise direction. Prevista Dry WC element foot fastening at rear side 1120 mm 14 from 24... - Page 15 Handling Remove the cover plate. Remove the plug. Insert an empty pipe. Fasten the empty pipe in the cistern. Mount the screw fittings. Prevista Dry WC element foot fastening at rear side 1120 mm 15 from 24...
- Page 16 Handling Mount the corner valve. Fasten the corner valve. Connect the corner valve. Insert the cover plate into the cistern. Prevista Dry WC element foot fastening at rear side 1120 mm 16 from 24...
- Page 17 Turn the cover plate lock by 90° in a clockwise direction. Place the revision shaft on the cover plate. To remove the revision shaft, press in the fixing clips at the side. Prevista Dry WC element foot fastening at rear side 1120 mm 17 from 24...
-
Page 18: Mounting The Drain Elbow
Insert the mounting bracket for the drain elbow. Insert the drain elbow to the desired depth. Fasten the drain elbow using the bow. Fit the site protection. Prevista Dry WC element foot fastening at rear side 1120 mm 18 from 24... -
Page 19: Establish Power And Water Supply (Optional)
Lay the power pack cable for an electric flush plate through the empty pipe. Lay the water pipe for a shower WC through the empty pipe. Prevista Dry WC element foot fastening at rear side 1120 mm 19 from 24... -
Page 20: Set And Clad The Wc Element
Corn a suitable gypsum cladding panel at the revision shaft and at the site protection by applying gentle pressure. Cut out the recesses for the site protection, the revision shaft and the threaded rods. Prevista Dry WC element foot fastening at rear side 1120 mm 20 from 24... - Page 21 Handling Clad the element with suitable gypsum cardboard cladding panels. Prevista Dry WC element foot fastening at rear side 1120 mm 21 from 24...
-
Page 22: Setting The Flush Volume
The water supply has been shut off. The ceramic has been mounted. Fold the tabs forward. Lift the drain valve. Remove the drain valve through the revision opening. Prevista Dry WC element foot fastening at rear side 1120 mm 22 from 24... - Page 23 Handling Set the large flush volume at the drain valve. Set the small flush volume at the drain valve. Prevista Dry WC element foot fastening at rear side 1120 mm 23 from 24...
-
Page 24: Cleaning And Maintenance
Disposal Separate the product and packaging materials (e. g. paper, metal, plastic or non-ferrous metals) and dispose of in accordance with valid national legal requirements. Prevista Dry WC element foot fastening at rear side 1120 mm 24 from 24...
Need help?
Do you have a question about the Prevista Dry WC and is the answer not in the manual?
Questions and answers