
Subscribe to Our Youtube Channel
Related Manuals for Viega 4982.92


Summary of Contents for Viega 4982.92
- Page 1 Advantix odour trap Instructions for Use for Advantix shower channel, for installation height of 95 mm and up, reconstruction model can be cut to size subsequently Model Year built: 4982.92 from 04/2016 en_INT...
- Page 2 Advantix odour trap 2 from 16...
-
Page 3: Table Of Contents
Table of contents Table of contents About these instructions for use Target groups Labelling of notes About this translated version Product information Standards and regulations Intended use 2.2.1 Areas of use 2.2.2 Media 2.2.3 Drainage capacity Product description 2.3.1 Overview 2.3.2 Technical data Handling... -
Page 4: About These Instructions For Use
This restriction does not extend to possible operating instructions. The installation of Viega products must take place in accordance with the general rules of engineering and the Viega instructions for use. -
Page 5: About This Translated Version
About these instructions for use About this translated version This instruction for use contains important information about the choice of product or system, assembly and commissioning as well as intended use and, if required, maintenance measures. The information about the products, their properties and application technology are based on the current standards in Europe (e. -
Page 6: Product Information
2 Product information Standards and regulations The following standards and regulations apply to Germany / Europe. National regulations can be found on the relevant web site of your viega.com/standards . country at Regulations from section: Media Scope / Notice Regulations applicable in Ger-... -
Page 7: Drainage Capacity
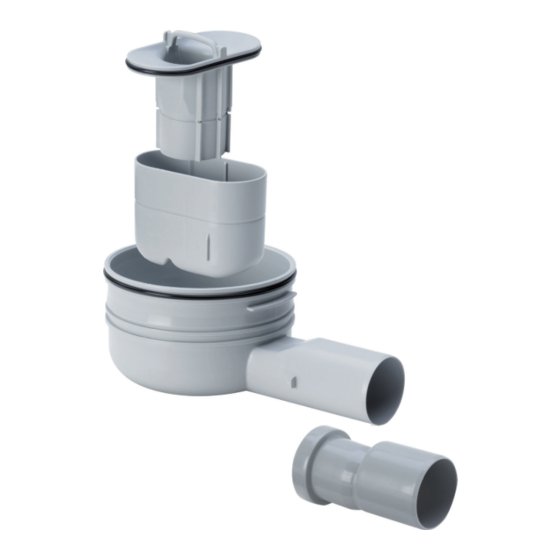
Product information 2.2.3 Drainage capacity The drainage capacity at an accumulation height of 10 mm above the grate is 0.5 l/s The drainage capacity at an accumulation height of 20 mm above the grate is 0.55 l/s Product description 2.3.1 Overview 1 - Odour trap immersion pipe 2 - Odour trap insert... -
Page 8: Technical Data
Product information 2.3.2 Technical data Nominal width [DN] (drain DN40 / DN50 socket) Ä Chapter 2.2.3 „Drainage capacity“ Drainage capacity on page 7 Dimensions and installa- Ä Chapter 3.1.2 „Installation dimen- sions“ on page 9 tion height Water seal level 50 mm Load class K = 300 kg... -
Page 9: Handling
Ensure that the required connection line is installed with the neces- sary incline to the planned installation location. During assembly: Observe installation dimensions. 3.1.2 Installation dimensions Dimensional drawing Fig. 1: Dimensional drawing for model 4982.92 Advantix odour trap 9 from 16... -
Page 10: Assembly
Handling Installation height 95-155 Fig. 2: Installation height for model 4982.92 Assembly 3.2.1 Cutting the drain to size Requirements: You want to cut the odour trap to the size of the reconstruction model. Cut the casing at the sawing groove provided for this purpose. -
Page 11: Mounting The Odour Trap
Handling Cut the odour trap immersion pipe at the sawing groove provided for this purpose. ð You have cut the odour trap to the size of the reconstruction model. 3.2.2 Mounting the odour trap Check the connection element for soiling, clean if necessary. Determine the screed height. - Page 12 Handling Mount the sealing element. Check the sealing element for firm seat. Press the drain into the connection element until it snaps home. With mounting heights of max. 70 mm, align the base unit in the mortar bed. Provide mortar bedding to secure the drain against slipping. Advantix odour trap 12 from 16...
- Page 13 Handling Check whether grounding is required. Set the base unit to the upper edge of the screed. Align it horizontally in all directions. INFO! The drain is 180° rotatable. Connect the drain DN40 or the adapter element DN50 to the drainage system.
- Page 14 Handling The odour trap in installed condition. Turn the odour trap 90° to the right. Mount and grease the sealing element. Insert the odour trap immersion pipe. ð The odour trap insert has been fastened. Check the base unit including the drain and the connection line for leak tightness.
- Page 15 Handling Insert the hard foam block. Mount the first part of the site protection. Remove the lower protective foil and stick the adhesive points on. Shorten the second part of the site protection if applicable, and mount it. Remove the top protective foil of the adhesive point. Advantix odour trap 15 from 16...
-
Page 16: Disposal
Handling Line the shower channel incl. the drain up to the upper edge of the flange with screed. Disposal Separate the product and packaging materials (e. g. paper, metal, plastic or non-ferrous metals) and dispose of in accordance with valid national legal requirements.
Need help?
Do you have a question about the 4982.92 and is the answer not in the manual?
Questions and answers