
Related Manuals for Viega 8330.2


Summary of Contents for Viega 8330.2
- Page 1 Viega Mono WC block Instructions for Use Model Year built: 8330.2 from 05/2014 en_INT...
- Page 2 Viega Mono WC block 2 from 26...
-
Page 3: Table Of Contents
Required tools and materials Assembly 3.2.1 Preparing mounting 3.2.2 Mounting the Viega Mono 3.2.3 Preparing optional actuation versions 3.2.4 Fixing the Viega Mono WC block 3.2.5 Setting the flush volume Cleaning and maintenance Disposal Viega Mono WC block 3 from 26... -
Page 4: About These Instructions For Use
This restriction does not extend to possible operating instructions. The installation of Viega products must take place in accordance with the general rules of engineering and the Viega instructions for use. -
Page 5: About This Translated Version
German/European directives specified in this manual: The information herein is not binding for other countries and regions; as said above, they should be understood as a recommendation. Viega Mono WC block 5 from 26... -
Page 6: Product Information
Intended use 2.1.1 Areas of use The Viega Mono WC block is suitable for walling in and around, for single mounting, for line mounting, and stand-alone mounting. The closed casing of the Viega Mono WC block is made of expanded poly- styrene (EPS), offers sound protection and serves as render base. -
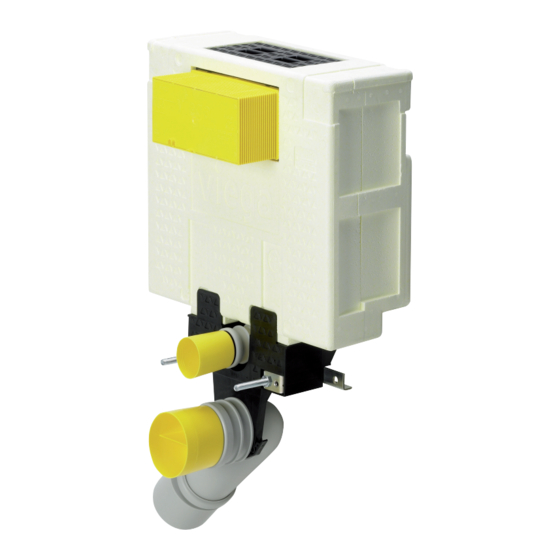
Page 7: Product Description
Fig. 1: Components Protective cover (flush actuation is possible from the top and the front) Viega Mono WC block with noise-insulating EPS casing and pre- mounted 2L concealed cistern Guide rail of the Viega Mono WC block Mounting bracket for drain elbow... - Page 8 Fixing material: threaded rods for fixing sanitary objects, and fixing screws Protective plug for flushing pipe and connection elbow WC connection socket with lip seal Flushing pipe with flushing pipe connector and mounting set Viega Mono WC block 8 from 26...
-
Page 9: Compatible Components
Product information 2.2.2 Compatible components Compatible flush plates The Viega Mono WC block can be supplemented with the following flush plates: flush plate Standard 1, model 8180.1 Visign for Style 10, model 8315.1 Visign for Style 11, model 8331.1 Visign for Style 12, model 8332.1 Visign for Style 12, model 8332.4... -
Page 10: Sound Protection
Product information Other compatible components The Viega Mono WC block is compatible with common WC ceramic types. All components required for wall mounting are comprised in the Ä Chapter 2.2.1 „Over- scope of delivery of a Viega Mono WC block ( view“... -
Page 11: Required Accessories
9 . Standing bracket for stand-alone mounting You require the Viega Mono standing bracket model 8310.45 to enable the stand-alone mounting of the Viega Mono WC block. Viega Mono WC block... -
Page 12: Handling
3.1.1 Mounting conditions Stand-alone mounting or wall mounting The Viega Mono WC block can be mounted with a Viega Mono standing bracket, model 8310.45, free-standing or on an even wall. Construction height The maximum construction height from the UEFFL is 820 mm. -
Page 13: Required Tools And Materials
Material for bricking in the block Flush plate for the WC Concrete lintel above the WC block, if the block is room-high or the block is mounted in a niche for a line mounting: mounting rail (model 8001) Viega Mono WC block 13 from 26... -
Page 14: Assembly
Press the bow of the drain valve backwards from the bracket of the mechanism. Turn the mechanism's lock by 90° in an anti-clockwise direction. ð The mechanism is unlocked and can be removed. Viega Mono WC block 14 from 26... - Page 15 In doing so, ensure that the tracks on the top and bottom edge of the mechanism are in the indentations in the revision shaft of the cistern. Turn the mechanism's lock by 90° in a clockwise direction. ð The mechanism is locked. Viega Mono WC block 15 from 26...
- Page 16 Handling Hang the bow of the mechanism in the bow of the drain valve. Insert cistern cover from above. Insert the revision frame and the cover in the front. Viega Mono WC block 16 from 26...
- Page 17 Note the required dimensions and minimum distances. Have the material required for line mounting ready (mounting rail, model 8001 and fixing material). Have the material required for stand-alone mounting ready (Viega Mono standing bracket, model 8310.45). Viega Mono WC block...
-
Page 18: Mounting The Viega Mono
WC ceramic is the drill hole height for rail mounting. Determine the drill hole height for rail mounting. Determine drill hole position. Line the mounted Viega Mono WC block with bricks 300 mm each at both sides. With the help of the mounting rail and a spirit level, mark two drill hole positions and drill holes. - Page 19 Attach the bottom part of the block. Guide the threaded rods through the guide rail of the Viega Mono WC block. Attach threaded rods. Place the upper part of the Viega Mono WC block onto the mounted bottom part of the block. Fit mounting angle.
- Page 20 Handling Fit and clip in drain elbow. click Fit revision frame with site protection at the front. Line mounting For line mounting, attach additional Viega Mono WC blocks as described above. Viega Mono WC block 20 from 26...
- Page 21 WC ceramic is the correct height for the fitting of the threaded rods. Fit threaded rods. Push on the bottom part of the Viega Mono WC block. The threaded rods are guided through the guide rail of the Viega Mono WC block. Viega Mono WC block...
-
Page 22: Preparing Optional Actuation Versions
Handling Place on the upper part of the Viega Mono WC block. Fit and clip in drain elbow. click Install revision frame. 3.2.3 Preparing optional actuation versions Prepare remote actuation The corresponding empty pipe (included in the scope of delivery of the remote actuation) is required when preparing the remote actuation Visign for Public 1 (model 8326.21). -
Page 23: Fixing The Viega Mono Wc Block
X3= max. 4.75 m with two extension cables, 2 x article number 628 3.2.4 Fixing the Viega Mono WC block Proceed as follows to prepare the Viega Mono WC block for mounting the subsequent work: INFO! When the flush actuation is installed at the top, a wall dis- min. -
Page 24: Setting The Flush Volume
Handling Wall the Viega Mono WC block in at both sides. The wall-in must have a minimum thickness of 300 mm on both sides. 30 0 30 0 3.2.5 Setting the flush volume Factory settings Immediate re-flushing is possible. The small flush volume is set to approx. 3 l. -
Page 25: Cleaning And Maintenance
Depending on the position of the flush plate, work on the concealed cis- tern can be carried out from the front or from above through the revision opening. Viega Mono WC block 25 from 26... -
Page 26: Disposal
Handling Disposal Separate the product and packaging materials (e. g. paper, metal, plastic or non-ferrous metals) and dispose of in accordance with valid national legal requirements. Viega Mono WC block 26 from 26...
Need help?
Do you have a question about the 8330.2 and is the answer not in the manual?
Questions and answers