Table of Contents
Advertisement
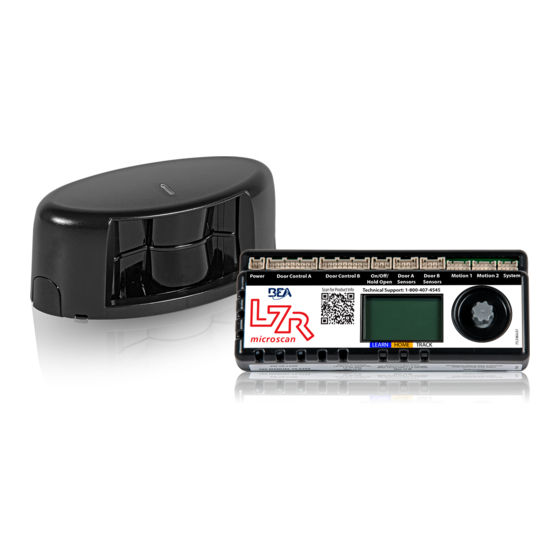
DESCRIPTION
2
1
1. tilt adjustment
2. sensor connection ports
3. sensor LED
INCLUDED KIT COMPONENTS
DESCRIPTION
Left LZR-microscan T Sensor
Right LZR-microscan T Sensor
LZR-microscan T Hub
Master Sensor Harness
Slave Sensor Harness
Door Control Harness
System Harness
Eagle Harness
Power Supply Harness
Home Switch (Surface Mount)
Door Loop / Cap Kit
On / Off / Hold Open Switch Jumper
Left Pass-Through Sensor Endcap
Right Pass-Through Sensor Endcap
Sensor Spacer
Spacer Mount Screws (Metal)
Spacer Mount Screws (Wood)
Sensor Mount Screws (Metal)
Sensor Mount Scews (Wood)
Endcap Screws
Velcro Tabs
LZR-microscan T Mounting Template
LZR-microscan T User's Guide
LZR-microscan T Wiring Tech Bulletin
Universal Kit
(Power Supply - 30.5558, On / Off /
Hold Open Switch - 10DOORSWITCH)
75.5753.15 LZR-MICROSCAN T 20180720
75.5753.15 LZR-MICROSCAN T 20180720
Stand-Alone, Door-Mounted, Safety Sensor System
3
5
4
4. endcaps
5. optical window
6. plug-n-play ports
PART NUMBER
SINGLE
10LZRMICROLEFTT
10LZRMICRORIGHTT
10LZRMICROSCANHUBT
35.1326
35.1327
20.5222
20.5304
20.5096
20.5095
50.5283
70.0202 / 50.0078
20.5310
41.7922
41.7923
70.5554
50.0048
50.5319
50.1818
50.5282
41.8632
50.0046
75.5754
75.5753
78.0053
10MICROSCAN-UKIT
1 (Universal Kit ONLY)
LZR-MICROSCAN T
for Automatic Swing Doors* (US version)
* LZR-microscan sensors are intended to be used
with pedestrian, swing-door systems.
8
PAIR/DE
1
2
1
2
1
1
1
2
1
2
1
2
1
1
2
2
1
1
1
2
1
2
1
1
1
2
1
2
1
2
2
4
2
4
4
8
4
8
4
4
2
2
1
1
1
1
1
1
1 (Universal Kit ONLY)
6
9
7. adjustment knob
8. LCD
9. hub LEDs
REQUIRED TOOLS
TOOL
Power Drill
Tape Measure
Magnetic Phillips #0
Phillips #2
⁄
" Drill Bit
1
8
⁄
" Drill Bit
5
16
⁄
" Drill Bit
3
8
⁄
" Drill Bit
1
2
Pencil
Center Punch / Hammer
Wire Nuts
Wire Snips
Wire Fish
KITS
DESCRIPTION
PART NUMBER
Single Door
10LZRMICROSCAN1T
Pair / Dual-Egress
10LZRMICROSCAN2T
Door
Universal Single
10LZRMICROSCAN1UT
Door
Universal Pair /
10LZRMICROSCAN2UT
Dual-Egress Door
Narrow-Frame Door
10MICROSCANMOUNTT
Glass/Fire Door
10MICROSCAN-Y
Universal Kit
10MICROSCAN-UKIT
7
Page 1 of 16
Page 1 of 16
Advertisement
Table of Contents

Subscribe to Our Youtube Channel
Related Manuals for BEA LZR-MICROSCAN T


Summary of Contents for BEA LZR-MICROSCAN T
- Page 1 Universal Pair / LZR-microscan T Mounting Template 75.5754 10LZRMICROSCAN2UT Dual-Egress Door LZR-microscan T User’s Guide 75.5753 Narrow-Frame Door 10MICROSCANMOUNTT LZR-microscan T Wiring Tech Bulletin 78.0053 Glass/Fire Door 10MICROSCAN-Y Universal Kit Universal Kit 10MICROSCAN-UKIT (Power Supply - 30.5558, On / Off / 10MICROSCAN-UKIT...
-
Page 2: Installation
‰ DO NOT attempt any internal repair of the components. All repairs and/or component replacements must be performed by BEA, Inc. Unauthorized disassembly or repair: 1. May jeopardize personal safety and may expose one to the risk of electrical shock. -
Page 3: Led Status
Sensor in detection / Sensor monitoring Orange* Error Sensor in error...reference hub LCD * see TROUBLESHOOTING section for descriptions of orange LED error indications 75.5753.15 LZR-MICROSCAN T 20180720 75.5753.15 LZR-MICROSCAN T 20180720 Page 3 of 16 Page 3 of 16... - Page 4 PREPARATION IMPORTANT: • Verify operation/functionality of door control and operator prior to system installation. • Proper functionality of LZR-microscan T system relies on proper installation and adjustment. Install hub in door header, Plug System Harness into hub port centered, and in an easily labeled System.
- Page 5 Door A Sensors second door leaf using hub port Door B Sensors. NOTES: 1. Spacer required for applications with door hardware extending across width of door. 75.5753.15 LZR-MICROSCAN T 20180720 75.5753.15 LZR-MICROSCAN T 20180720 Page 5 of 16 Page 5 of 16...
-
Page 6: Home Switch
On / Off / Hold Open and wire-nut red and hold open black jumped to white black wires together, or if desired, splice existing switch into jumper. none Page 6 of 16 Page 6 of 16 75.5753.15 LZR-MICROSCAN T 20180720 75.5753.15 LZR-MICROSCAN T 20180720... - Page 7 Install push plate(s). For complete Wire-nut push plate wires or installation instructions refer to wireless receiver (COM and NO) the appropriate BEA User’s Guide. to gray wires of System Harness plugged into hub. Door Control Harness If door system utilizes independent door controls, repeat steps 1 – 2 for the second control.
-
Page 8: External Monitoring
Supply Harness into hub port labeled Power. External Monitoring LZR-microscan T hub/sensors are intended to be monitored by the door system for proper operation (see Tech Bulletin #53). If the door control does not utilize monitoring, do not use monitoring wires. - Page 9 Home Switch should be set as Learn Complete orange solid green solid sensitive as possible and break within a few degrees of door movement. 75.5753.15 LZR-MICROSCAN T 20180720 75.5753.15 LZR-MICROSCAN T 20180720 Page 9 of 16 Page 9 of 16...
- Page 10 Page 10 of 16 Page 10 of 16 75.5753.15 LZR-MICROSCAN T 20180720 75.5753.15 LZR-MICROSCAN T 20180720...
- Page 11 75.5753.15 LZR-MICROSCAN T 20180720 75.5753.15 LZR-MICROSCAN T 20180720 Page 11 of 16 Page 11 of 16...
-
Page 12: Troubleshooting
Not using On / Off / Hold Open Wire existing On / Off / Hold Open switch “Hold Open” or Switch to jumper or plug BEA On / Off / Hold Open “Off” states Switch into hub. Hub Environment Voltage too high/low... -
Page 13: Set-Up Errors
The following LCD screenshots list potential set-up errors that could occur during a “teach-in” process. If the sensor causes the error, you’ll see an orange blinking LED on that sensor(s). This error will by displayed on the LZR-microscan T hub LCD screen as shown (see “Orange Sensor LED Errors”). most common... -
Page 14: Runtime Errors
Trim and adjust the transfer loop, and then Transfer loop is hanging under sensor(s) perform a new “learn”. Environ Voltage and/or temperature too high/low Install BEA power supply (PN 30.5558). (environmental) EDPS Door moved manually during closed door Automatic Recovery. -
Page 15: Error Description
The sensor reset due to Replace the sensor. BOTH unknown error The sensor is locked due to Cycle the power. BOTH several consectutive resets 75.5753.15 LZR-MICROSCAN T 20180720 75.5753.15 LZR-MICROSCAN T 20180720 Page 15 of 16 Page 15 of 16... -
Page 16: Technical Specifications
BEA strongly recommends that installation and service technicians be AAADM-certifi ed for pedestrian doors, IDA-certifi ed for doors/gates, and factory- trained for the type of door/gate system.
Need help?
Do you have a question about the LZR-MICROSCAN T and is the answer not in the manual?
Questions and answers