Rosco Dual-Vision XC4 Installation & Operating Instructions Manual
Hide thumbs
Also See for Dual-Vision XC4:
- Installation manual (16 pages) ,
- Install manual (13 pages) ,
- Quick start installation manual (2 pages)
Table of Contents
Advertisement
Dual-Vision™ XC4
Standard Version
Installation & Operating Instructions
19 DEC, 2017
th
90-21 144
Place, Jamaica, New York USA 11435
Phone: 800-227-2095
www.roscovision.com
Version 5.3
©2017 Rosco® Vision Systems, All Rights Reserved
Specifications and details are subject to change without prior notice.
Patent Pending
1
Advertisement
Table of Contents

Related Manuals for Rosco Dual-Vision XC4


Summary of Contents for Rosco Dual-Vision XC4
- Page 1 Standard Version Installation & Operating Instructions 19 DEC, 2017 90-21 144 Place, Jamaica, New York USA 11435 Phone: 800-227-2095 www.roscovision.com Version 5.3 ©2017 Rosco® Vision Systems, All Rights Reserved Specifications and details are subject to change without prior notice. Patent Pending...
-
Page 2: Table Of Contents
TABLE OF CONTENTS For the latest version of the User Manual please visit www.roscovision.com Safety Instructions ....................4 Introduction ......................5 Package Contents ....................6 Kit Part #: DV440 ......................6 Features ........................7 DVXC4 .......................... 7 DATA RETRIEVAL OPTIONS ................... 7 DV-Pro5 Player (See page 18) .................. - Page 3 Troubleshooting ....................37 AUX Cameras (Optional) ..................38 Spare Parts ......................39 Commercial Warranty ................... 40...
-
Page 4: Safety Instructions
Insert foreign materials into the Dual-Vision XC4 device Attempt to disassemble, repair or modify the product Use cables, SD cards or fuses that are not provided by or recommended by Rosco® NOTE The Dual-Vision XC4 Mounting Bracket must be mounted on the windshield in order to have direct line-of-sight to the sky for reliable GPS satellite signal acquisition. -
Page 5: Introduction
G-force data may ONLY be reviewed by accessing the contents of the SD card using Rosco’s proprietary D V - P r o 5 Player software. The software is provided at no additional cost to the end-user, and there are no follow-up fees for use or updating of the Player by authorized users. -
Page 6: Package Contents
Package Contents Kit Part #: DV440 DV443: HARDWARE KIT incl., Temporary & Permanent VHB Tapes with Primer Pen, Allen Wrench, Two Keys, Four Screws for PDC mounting, 64GB SD card (DV453) – changed from 32GB to 64GB since mfg. date code 1703 DV401: 2CH RECORDER UNIT DV402: WINDSHIELD MOUNTING BRACKET... -
Page 7: Features
Features DVXC4 • HD Quality Video Recording • 720p Forward View Camera, 960H Interior Camera • Optional Auxiliary Cameras • High accuracy built-in GPS confirms location several times per second • Built-in G-sensor accelerometer • Locking mounting bracket protects SD card •... -
Page 8: Dv-Pro5 Player
Video Playback and Data Management Dual-Vision XC4 captures video/audio/GPS/sensor data and creates proprietary files, which are only readable when viewed within Rosco DV-Pro5 program, included at no additional charge with each recorder. DV-Pro5 is provided in one of two versions, depending on the end-user’s data management scenario. -
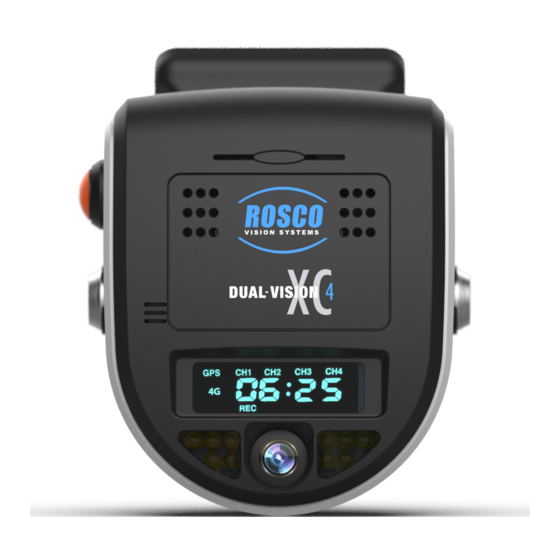
Page 9: Recorder Detail
Recorder Detail 1. SD Card Slot (Authorized access only) 6. LCD Display 2. Front Camera (Exterior View) 7. Rear Camera (Interior View) 3. Driver Event Button 8. Infrared Illuminators 4. Windshield Mount Push Locks 9. Microphone 5. Audible Alarm Signal... -
Page 10: Installation
Installation The complete installation requires a Recorder (equipped with cameras and microphone), a Recorder Windshield Mount (equipped w power/video/data harness), and a PDC module. The PDC (Power Data Distribution) Module is connected the vehicle’s power system. The PDC’s role is to provide regulated power and external video/data connections to the Dual-Vision™... -
Page 11: Pdc (Power/Data Control) Module Installation
PDC (Power/Data Control) Module Installation 1. Unpack the DVXC4 box and prepare all the parts & tools necessary for installation. 2. Find the location of the fuse box in the vehicle. Identify the fuses for connection of the RED POWER wire and the YELLOW IGNITION wire. -
Page 12: Installing Mounting Bracket (Dv402)
Installing Mounting Bracket (DV402) IMPORTANT: Installation should only be done when ambient temperature is within 50°F- 100°F (10°C-38°C) to allow proper curing of mounting adhesive pads. 2. Determine the proper Dual-Vision™ XC4 Recorder location on windshield. Typically, the Recorder is mounted behind and slightly below the mirror. 3. -
Page 13: Mounting The Recorder Unit (Dv401)
Mounting the Recorder Unit (DV401) 1. Install the SD Card as shown below. Hook the Recorder onto the top of the bracket and firmly push the bottom of the Recorder to engage it into the Mount, confirmed by an audible “click”: (See below) SD CARD Properly Assembled Recorder &... - Page 14 time of day. “GPS” might not display if the vehicle is not outdoors. For the first time, it may take up to 2 minutes for the Recorder to acquire a satellite signal and display “GPS”. (see below) 4. Allow Recorder to run for a few minutes. Turn the vehicle ignition off and confirm the LCD p.17 display dims/blinks slowly, indicating Parking Surveillance Mode.
-
Page 15: Dvxc4 Operation
DVXC4 Operation Drive Recording • Your DVXC4 is supplied with an SD card pre-configured with factory default settings (see page 22-25). Insert the SD card into a PC and add identifying information. Of course, you may also change the values of any configurable setting as desired. Make sure to “SAVE” as instructed on page 25. -
Page 16: Continuous And Event Recording
Continuous and Event Recording Continuous (Normal) Recording • When the ignition is OFF, Dual-Vision™ XC4 Recorder remains powered for an additional 5 seconds to finish recording. If Parking Surveillance is ON, LCD Display will show “PARK” icon on and count-down the parking time in minutes and the LCD will be blinking and dimming slowly and the recording will be continued until the parking time ends. -
Page 17: Recorder Removal & Sd Card Retrieval
Recorder Removal & SD Card Retrieval IMPORTANT: FOLLOW PROPER SHUTDOWN PROCEDURE. RECORDER MUST BE COMPLETELY POWERED OFF BEFORE DETACHING RECORDER OR REMOVING SD CARD. ALWAYS power off the vehicle prior to removal of SD Card from Dual-Vision™ XC4 Recorder. • If parking surveillance mode is OFF, turn ignition off. It is safe to remove the SD card after the Recorder’s LCD display turns off. -
Page 18: Dv-Pro5 Player Program
DV-Pro5 Player Program Introduction to DV-Pro5 (Standard Version) Note: This manual will only cover the Standard version of DV-Pro5. See the separate “DV-Pro5 Advanced User Manual” in order to use DV-Pro5 with advanced wireless features such as WIFI/ADS and cellular 4G LTE streaming/cloud services. -
Page 19: Install Dv-Pro5
Your SD card comes pre-loaded with the files required to install DV-Pro5 on your PC. If those files are not available, please contact Rosco Vision Systems and we will send you the required files. To install “DV-Pro5” from the SD card, insert the card into PC and click “open folder to view files”. -
Page 20: Dv-Pro5 Home Screen
DV-Pro5 Home Screen NAME DESCRIPTION Forward Camera Channel 1: Displays exterior video recorded through the windshield Interior Camera Channel 2: Displays interior video, typically driver and passengers AUX Camera 1 Channel 3: External camera video, typically a side or backup camera (Optional) AUX Camera 2 Channel 4: External camera video, typically a side or backup camera (Optional) Metadata... -
Page 21: Camera System Setup And Configuration
Camera System Setup and Configuration Introduction: Use the DV-Pro5 program to configure all recording settings on the Dual-Vision XC4 Recorder. The program will write a configuration to the SD card, and the DVXC4 recorder will automatically use the configuration from the SD card when the vehicle is powered on. -
Page 22: General Settings
General Settings LCD Backlight Setting Enable/Diable Speed on LCD Time Zone Setting CONFIGURATION ITEM DESCRIPTION ID Settings: Enter a vehicle number or nickname, and Driver name. These names will appear in the video file list in DV-Pro5 and will be automatically used to name video folders when importing video to your PC (see page System Settings: LCD Backlight Day/Night Mode: This adjusts the brightness of the numerical LCD display on... -
Page 23: Channel Settings
Channel Settings Prior to recording video for the first time, ensure the Channel Settings are configured on the SD card so that the proper frame rate and video quality is set. The below screen shot contains the factory default settings. Note 1: Changing FPS and Quality Settings on each channel will impact the video file size. -
Page 24: Event Settings
Event Settings This page configures the way videos are flagged as events. All videos flagged as events are saved to a separate portion of the SD card. This way, they are generally preserved much longer than regular video files (up to a year depending on how often they are generated). Care must be taken to adjust these settings for optimal incident or driver behavior reporting. -
Page 25: Server Settings
Server Settings This page is for configuring wireless video file download and streaming from the DVXC4 recorder to a server or cloud. For basic DVXC4 installation with SD-Card video file transfer only, leave all options on this page unchecked (see below screenshot). For advanced DVXC4 installation with WIFI or 4G streaming, see separate “Advanced DV-Pro5 User Manual”. -
Page 26: Remove Sd Card From Pc & Install Into Dvxc4
Remove SD Card from PC & Install into DVXC4 Upon completion of any of the following: • Reviewing/managing video files • Updating DVXC4 configuration • Adding “upgrade” folder to SD card • Reformatting SD card Exit DV-Pro5, and follow proper SD card ejection procedure. - Page 27 Video Playback Instructions 1. To playback video, turn off the vehicle and remove the SD card from the DVXC4 recorder unit according to the instructions on Page 17. Insert the SD card into your PC and open DV-Pro 5. 2. Select a video file from the file list. If no video files appear in the list, click the “change” button to choose a different video file source.
-
Page 28: Setting Up And Analyzing G-Sensor Data
*NOTE: Click menu bar to sort by file name, record time or event type Setting Up and Analyzing G-SENSOR Data The G-Force sensor detects changes in directional forces affecting the vehicle. The Dual-Vision XC4 Player displays G-force data in a graphical format, and creates Events when those forces exceed supervisor-set values. -
Page 29: G-Sensor Event Examples In Dv-Pro5
G-SENSOR Event Examples in DV-Pro5 Hard Braking Hard Turning... -
Page 30: Backing Up Video Files To Your Pc (Import)
Backing Up Video Files to Your PC (Import) DV-Pro has a built in “Import” function that creates and automatically organizes a database of video on your local machine/server, limited only by the data storage resources at your disposal. Step 1: Insert SD card into Reader slot or Device and open DV-Pro 5. Video file list will populate. You can choose to import the complete contents of the SD card to the PC or just to import files by Event type, date/time, or by individually selecting files of interest. -
Page 31: Conversion Of Video To Avi
Conversion of Video To AVI This function converts a portion of the recorded data into an .AVI file that can be viewed on universal video players such as Windows Media Player, VLC Player, etc. This feature allows sharing of video across multiple platforms via email or any other means of file transfer. In the main player Window, choose the video file(s) of interest using the Select Checkbox. -
Page 32: Vehicle Location Map
Vehicle Location Map The Dual-Vision™ XC4 records GPS data to enable historical review of vehicle location and route. The map coordinates are automatically synchronized with Google Maps®. You may manually re- sync the map by clicking the “Popout” button on the upper right corner of map. Additionally, one may select various video files using the check boxes, and then click the “Show Route”... -
Page 33: Format Sd Card Using Dv-Pro5
Format SD Card using DV-Pro5 IMPORTANT SD CARD FORMATTING MUST BE DONE USING DV-PRO5 ONLY. USING THE PC’s DEFAULT FORMATTER OR A THIRD PARTY TOOL WILL RENDER THE SD CARD UNUSABLE BY THE DVXC4 RECORDER. Open DV-Pro 5. Select the SD CARD using the “Change” button on the main screen. -
Page 34: Sd Card Maintenance
Consult Rosco or an Authorized Reseller for SD Card compatibility. Not all SD Cards work with the Dual- Vision XC4 Recorder. The following is a list of approved SD Cards which may be purchased from Rosco. -
Page 35: Dvcv4 Hardware Technical Specifications
DVCV4 Hardware Technical Specifications PRODUCT SPECIFICATIONS Built-in Cameras Two Cameras with CMOS Sensors Front Camera: D135°x H85⁰ x V55⁰ Camera Viewing Angles Interior Camera: D160° x H112⁰ x V80⁰ Video Compression H.264 with CBR (Constant Bit Rate) WDR (Wide Dynamic Range), Active anti- blooming and dark sun cancellation, Lens shading and pixel defect correction, Color Technologies used for... -
Page 36: Engineering Drawings
Engineering Drawings Application Notes • AN_DV440_STSS1000_STSC109R_STSC141.pdf • AN_DV440_STSK4530_STSC118.pdf • AN_DV440_STSM251_STSS1000.pdf • AN_DV440_STSK7965_STSH390_STSS1000.pdf • AN_DV440_STSK7965_STSW1001.pdf • AN_DV440_STSM205_STSW1001.pdf The above Application Notes are available for resellers & installers upon request. Call Rosco Customer Support or send email to techsupport@roscovision.com for more detail. -
Page 37: Troubleshooting
LCD display Error notices on Contact your dealer or Rosco for ErrX Message display Assistance Remove and properly insert SD Card error SD card OR... -
Page 38: Aux Cameras (Optional)
The Dual-Vision™ XC4 is capable of recording video from two extra auxiliary 4-pin (“AUX”) cameras which may be connected to the External Camera ports in the PDC module. Rosco has a full range of cameras available for selection including both rugged and compact, license plate cameras, integrated brake light, side view, bumper/flush mounted, rear hatch, and interior dome surveillance cameras. -
Page 39: Spare Parts
Spare Parts Rosco Sales Description Part Number DV440 KIT (Included) Dual-Vision™ XC4 2Ch Recorder Unit Only DV401 Dual-Vision™ XC4 Windshield Mount Bracket Only DV402 Dual-Vision™ XC4 PDC Only DV404 Dual-Vision™ XC4 External Driver Event Button DV441 Dual-Vision™ XC4 Adhesive Pads plus Primer DV442 Dual-Vision™... -
Page 40: Commercial Warranty
If the alleged defect is due to any of these causes, the customer will be advised of the findings and asked what action is to be taken. If ROSCO is requested to repair the product, a repair charge estimate will be prepared and the customer’s written permission (purchase order, repair, etc.) will be necessary to proceed with the repair of the product and/or...
Need help?
Do you have a question about the Dual-Vision XC4 and is the answer not in the manual?
Questions and answers