Table of Contents
Advertisement
Quick Links
SERVICE MANUAL
AH-08-02.6
January - 2013
MODEL: 79965 Solventborne RS70-AS
VECTOR SOLO
65 KV APPLICATOR
IMPORTANT:
carefully read SAFETY PRECAUTIONS, starting
on page 1, and all instructions in this manual.
Keep this Service Manual for future reference.
TM
Before using this equipment,
Service Manual Price:
Ransburg
$50.00 (U.S.)
Advertisement
Table of Contents

Related Manuals for Ransburg vector solo 79965 solventborne RS70-AS

Summary of Contents for Ransburg vector solo 79965 solventborne RS70-AS
- Page 1 SERVICE MANUAL Ransburg AH-08-02.6 January - 2013 VECTOR SOLO 65 KV APPLICATOR MODEL: 79965 Solventborne RS70-AS IMPORTANT: Before using this equipment, carefully read SAFETY PRECAUTIONS, starting on page 1, and all instructions in this manual. Keep this Service Manual for future reference.
- Page 2 Ransburg NOTE: This manual has been changed from revision AH-08-02.5 to revision AH-08-02.6. Reasons for this change are noted under “Manual Change Summary” inside the back cover of this manual. AH-08-02.6...
-
Page 3: Table Of Contents
Ransburg Vector Solo 65kV Applicator - Contents CONTENTS PAGE SAFETY: SAFETY PRECAUTIONS ......................1 HAZARDS / SAFEGUARDS ..................... 2-4 ATEX/FM: EUROPEAN ATEX DIRECTIVE ....................5 EUROPEAN ATEX LABELS ..................... 6 FM CONFIGURATION DRAWING ................... 7-8 INTRODUCTION: 9-12 GENERAL DESCRIPTION ....................... 9 79965 VECTOR SOLO 65KV SOLVENTBORNE SPECIFICATIONS ........ - Page 4 Ransburg Vector Solo 65kV Applicator - Contents CONTENTS (Cont.) PAGE PARTS IDENTIFICATION: 41-52 VECTOR SOLO 65KV APPLICATOR PARTS BREAKDOWN ..........41 VECTOR SOLO 65KV SOLVENTBORNE APPLICATOR PARTS LIST ........42-43 VECTOR SOLO RS70-AS MODEL IDENTIFICATION 4 ............3 AIR HOSE LENGTH AND AIR HOSE TYPE ................44 FLUID TUBE SELECTION .......................
-
Page 5: Safety
Safety Section in this manual and understand all of the technical and safety litera- the Ransburg safety literature therein iden- ture for your Ransburg products. This manual tified. contains information that is important for you to know and understand. This information relates to †... -
Page 6: Hazards / Safeguards
Ransburg Vector Solo 65kV Applicator - Safety HAZARD SAFEGUARDS AREA Tells what the hazard is. Tells how to avoid the hazard. Tells where hazards may occur. Spray Area Fire extinguishing equipment must be present in Fire Hazard the spray area and tested periodically. -
Page 7: Vector Solo Rs70-As Model Identification 4
Ransburg Vector Solo 65kV Applicator - Safety AREA HAZARD SAFEGUARDS Tells where hazards Tells what the hazard is. Tells how to avoid the hazard. may occur. Toxic Substances Certain material may be harmful Follow the requirements of the Material Safety Data if inhaled, or if there is contact Sheet supplied by coating material manufacturer. - Page 8 Ransburg Vector Solo 65kV Applicator - Safety AREA HAZARD SAFEGUARDS Tells where hazards Tells what the hazard is. Tells how to avoid the hazard. may occur. Electrostatic Arcing Never operate the applicator without properly Spray Area grounding the following. A. Operators Operators must be grounded.
-
Page 9: Atex/Fm
Ransburg Vector Solo 65kV Applicator - Atex/FM EUROPEAN ATEX DIRECTIVE 94/9/EC, ANNEX II, 1.0.6 The following instructions apply to equipment 8. The certification of this equipment relies upon covered by certificate number Sira 08ATEX5060X: the following materials used in its construction: 1. -
Page 10: European Atex Labels
Special conditions for safe use: The Vector Solo 79965 Applicators shall only be used with asso- ciated Ransburg 79727-XX Air Hose Assembly. It is the end users responsibility to insure the air hose is properly grounded to true earth ground. -
Page 11: Fm Configuration Drawing
Ransburg Vector Solo 65kV Applicator - Atex/FM AH-08-02.6... - Page 12 Ransburg Vector Solo 65kV Applicator - Atex/FM VECTOR SOLO RS70-AS SOLVENT BASED 79965 - ABCDE BASE OPTION DESIGNATIONS MODEL NO. (ORDERING INFORMATION ONLY) OPTION "A" DESIGNATIONS AIR HOSE TYPE AND LENGTH 1 FOR STANDARD AIR HOSE ASSEMBLY, 10 METER (33')-PART NUMBER: 79727-10...
-
Page 13: Introduction:
Ransburg Vector Solo 65kV Applicator - Introduction INTRODUCTION GENERAL DESCRIPTION NOTES The Vector Solo 65kV Applicator is an air at- omizing applicator powered only by a pressurized air source. Pressurized air creates rotation of a turbine generator that powers a cascade. The... -
Page 14: 79965 Vector Solo 65Kv Solventborne Specifications
Ransburg Vector Solo 65kV Applicator - Introduction 79965 VECTOR SOLO 65KV SOLVENTBORNE SPECIFICATIONS Environmental/Physical Mechanical Fluid Flow Applicator Length: 257mm (10.1-inches) Capacity: 1000 ml/minute** Weight: 834 grams (29.4 oz.) Wetted Parts: Stainless, polyethylene, nylon, acetal polymer Hose 79727-XX Lengths (Std):... -
Page 15: Vector Solo 65Kv Solventborne Electrostatic Spray Applicator
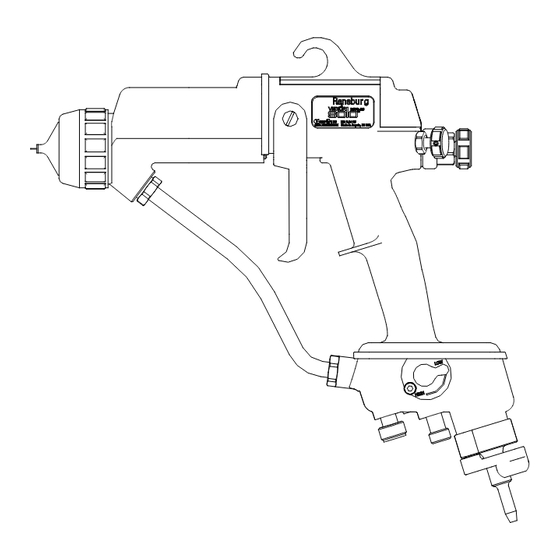
Ransburg Vector Solo 65kV Applicator - Introduction Figure 1: Vector Solo 65kV Solventborne Electrostatic Spray Applicator VECTOR SOLO 65KV SOLVENTBORNE ELECTROSTATIC SPRAY APPLICATOR Description Description Needle/Electrode kV Setpoint Switch Barrel Voltage On/Off Indicator Light Replaceable Hook Trigger Fan Air Adjustment... -
Page 16: Vector Solo 65Kv Typical Solventborne Installation
Ransburg Vector Solo 65kV Applicator - Introduction Figure 2: Vector Solo 65kV Solventborne Typical Installation VECTOR SOLO 65KV SOLVENTBORNE TYPICAL INSTALLATION Description Description Fluid Regulator Vector Solo Air Hose (79727-XX) Ball Valve Air Hose Ground Wire Air Regulator W/Pressure Gauge... -
Page 17: Installation
(Refer to the appropriate Filter Assembly manual for Installation Instructions.) 2. Ransburg recommends that a fluid filter be in- stalled at the output of the fluid supply (pressure pot, pump, circulating system, etc.). It is the end user's responsibility to install the proper filter that meets their system's requirements. -
Page 18: Installation
Ransburg Vector Solo 65kV Applicator - Installation Interlocks Required Interlock the solvent supply with the main supply air to the applicator. When solvent is On, main supply air to the applicator is Off. Interlocks are user supplied. C C W... - Page 19 Ransburg Vector Solo 65kV Applicator - Installation NOTES AH-08-02.6...
-
Page 20: Operation
Ransburg Vector Solo 65kV Applicator - Operation OPERATION APPLICATOR OPERATION 1. Ensure the On/Off switch is in the desired position for voltage. 1 - Fluid Supply 2 - Flow Regulator VOLTAGE ON VOLTAGE OFF Figure 8: Fluid Supply Pressure Adjustment Figure 6: Voltage On/Off Position 4. -
Page 21: Flushing / Color Change Procedure
Ransburg Vector Solo 65kV Applicator - Operation 8. The applicator is shipped standard with a plug Table I - Pressure at Regulator in the atomization air port. If lower atomization air pressures are desired, a compensation valve is included with each applicator and can be used... - Page 22 Ransburg Vector Solo 65kV Applicator - Operation NOTES 2. Turn off supply air. 1 - Main Air Supply 2 - Closed Ball Valve Figure 13: Applicator Supply Air - Off W A R N I N G † Supply air to the applicator must be in- terlocked with the solvent supply.
-
Page 23: Fluid Nozzle / Air Cap
Ransburg Vector Solo 65kV Applicator - Operation FLUID NOZZLE / AIR CAP The fluid nozzle and air cap must be selected according to the application. The following charts show the nozzles and air caps available for the Vector Solo. FLUID NOZZLE... -
Page 24: Maintenance
NEVER be used cator to be cleaned and the material that needs against the body. It can blind, deafen, and to be removed. Ransburg recommends that all may even penetrate the skin. If used for exterior cleaning be done with non-polar solvents... -
Page 25: Routine Schedule
Ransburg Vector Solo 65kV Applicator - Maintenance ROUTINE SCHEDULE Daily (or at start of each shift) • Verify that ALL solvent safety containers are grounded! Follow these maintenance steps to extend the life of the applicator and ensure efficient operation: •... -
Page 26: Applicator Repair
Ransburg Vector Solo 65kV Applicator - Maintenance APPLICATOR REPAIR 4. Using the meter set to kV, measure the output voltage of the applicator. Voltage output reading is between 52 and 60kV. C A U T I O N † DO NOT allow the fluid lines to stand... -
Page 27: Air Cap
Ransburg Vector Solo 65kV Applicator - Maintenance AIR CAP 1. Remove applicator from the worksite after fol- lowing the "Flush Procedure". Removal 1. While holding the barrel with one hand, loosen W A R N I N G the retaining nut using the other hand. -
Page 28: Fluid Nozzle
Ransburg Vector Solo 65kV Applicator - Maintenance FLUID NOZZLE NOTE (Refer to Figure 19) † To keep the needle/electrode from unscrewing from the needle shaft, the applicator's trigger should be actuated to Removal pull the needle/electrode away from the 1. Remove the air cap from the applicator (refer to fluid nozzle. -
Page 29: Needle / Electrode
Ransburg Vector Solo 65kV Applicator - Maintenance Reinstall NEEDLE / ELECTRODE 1. Check the electrode tightness on the needle shaft. If it is loose, tighten it (refer to "Needle/ Removal Electrode" in the "Maintenance" section). 1. Remove the air cap and fluid nozzle from the applicator assembly. -
Page 30: Needle / Electrode Resistance Testing
Ransburg Vector Solo 65kV Applicator - Maintenance NEEDLE / ELECTRODE BARREL REMOVAL RESISTANCE TESTING 1. Remove air cap and fluid nozzle. The electrical resistance of the needle/electrode 2. Remove two (2) screws with a 3mm Allen wrench should be tested periodically (typically on a weekly that hold the rear cover. - Page 31 Ransburg Vector Solo 65kV Applicator - Maintenance 4. Remove the trigger and fluid line. 6. Remove three (3) 5mm screws using a 4mm Allen wrench. Remove the hook. Figure 26: Fluid Line/Trigger Removal 5. Remove the two (2) jam nuts using the 79793-...
- Page 32 Ransburg Vector Solo 65kV Applicator - Maintenance Remove Cascade Reinstalling Barrel 1. Pull the cascade out of the barrel. 1. Replace the hook. Install the barrel against the handle and hand tighten two (2) long 5mm screws, in an alternating sequence with the 4mm Allen wrench.
- Page 33 Ransburg Vector Solo 65kV Applicator - Maintenance 3. Tighten second jam nut with raised center facing 5. Install trigger and fluid line and torque fluid out, while holding the needle shaft. tube fittings 40-45 lbs-in. Figure 34: Second Jam Nut Replacement Figure 36: Fluid Line/Trigger Installation 4.
-
Page 34: Needle Shaft Removal / Replacement
Ransburg Vector Solo 65kV Applicator - Maintenance NEEDLE SHAFT 4. Attach a jam nut to the assembly and pull straight out of the barrel. REMOVAL / REPLACEMENT 1. Remove barrel from the handle using previous steps. 2. Remove cascade. Figure 40: Needle Shaft Removal Clean cavity with non-metallic brush and non-polar solvent. -
Page 35: Power Module Removal
Ransburg Vector Solo 65kV Applicator - Maintenance 5. With your finger, wipe the excess grease from both ends of the packing tube. Using the excess grease, apply a thin film to the outer surface of the packing tube and to the external o-ring on the cartridge seal. -
Page 36: Handle Disassembly
Ransburg Vector Solo 65kV Applicator - Maintenance 3. Pull the module straight off the handle. 4. Remove the rear seal. Figure 48: Rear Seal Removal Figure 46: Power Module Removal 5. Using a dowel rod, push out the air valve cartridge. - Page 37 Ransburg Vector Solo 65kV Applicator - Maintenance Handle Rebuild 6. Remove air valve cartridge seal (black) (see Figure 48). 1. Install the front air valve seal using the Special Tool. 7. Remove front air valve seal (white). NOTE † Only remove the front air valve seal (item 3) if there is damage or wear to the seal causing leakage.
-
Page 38: Power Module-Fluid Fitting Removal
Vector Solo 65kV Applicator - Maintenance 3. Install the air valve cartridge. Align the cartridge with tab at 12 o'clock posiition. Power Module - Fluid Fitting Removal 1. Remove power module from handle. 2. Remove two (2) screws using a 2.5mm Allen wrench. Figure 53: Air Valve Cartridge Alignment 4. - Page 39 Ransburg Vector Solo 65kV Applicator - Maintenance 3. Remove the 1/4 module from the 3/4 module. 2. Install the fluid fitting. Pull the fluid fitting out. Figure 60: Fluid Fitting Replacement 3. Install the 1/4 module into the 3/4 module and tighten the two (2) screws.
-
Page 40: Test And Maintenance Kit Usage (79870-00)
Ransburg Vector Solo 65kV Applicator - Maintenance TEST AND 3. Connect the other end of the air hose to the regulated air supply. MAINTENANCE KIT 4. Turn on main air. Trigger the applicator with kV USAGE (79870-00) switch on high (down position). Read the pressure at the 100 psi pressure gauge. - Page 41 Ransburg Vector Solo 65kV Applicator - Maintenance The procedure to test the 79835 Power Module 3. Connect the left-hand fitting of the 79727 Air Assembly is as follows: Hose to the male inlet of the Test and Maintenance Kit. 1. Remove the 79835 Power Module Assembly from the handle.
- Page 42 Ransburg Vector Solo 65kV Applicator - Maintenance 7. Connect the 79727 Air Hose to main air. 3. Push the stem of the fitting all the way into the into the air hose. 8. Turn on main air and set the pressure so the pressure gauge [2] in the 79870 Test and Main- tenance Kit reads 25 psi (1.7 bar).
- Page 43 Ransburg Vector Solo 65kV Applicator - Maintenance 3. With the 79330 fitting, hold the hose in one hand and press a 6mm or 1/4" t-handle allen wrench into the hex in the part while turning clockwise. Tighten till cap is approximately .8 mm (1/32") from the swivel nut.
-
Page 44: Troubleshooting Guide
Ransburg Vector Solo 65kV Applicator - Maintenance TROUBLESHOOTING GUIDE General Problem Possible Cause Solution ELECTRICAL Ensure the On/Off lever is in the On No kV On-Off lever in wrong position position. Ensure 40 psig (2.75 bar) at the applicator Low pressure handle with applicator triggered. -
Page 45: Parts Identification
Ransburg Vector Solo 65kV Applicator - Parts Identification PARTS IDENTIFICATION Figure 77: Vector Solo 65kV Applicator Parts Breakdown AH-08-02.6... -
Page 46: Vector Solo 65Kv Solventborne Applicator Parts List
Ransburg Vector Solo 65kV Applicator - Parts Identification VECTOR SOLO 65kV SOLVENTBORNE APPLICATOR - PARTS LIST (Figure 77) Item # Part # Description Table D-"D2" Nozzle, Fluid 80099-00 Assembly, Barrel, Vector Solo 79907-00 Cascade Assembly 79832-00 Gasket, Barrel 79881-00 Gasket, Exhaust, Wrap-Around Table D-"D1"... -
Page 47: Vector Solo 65Kv Solventborne Applicator Parts List
Ransburg Vector Solo 65kV Applicator - Parts Identification VECTOR SOLO 65KV SOLVENTBORNE APPLICATOR - PARTS LIST (Cont.) (Figure 77) Description Item # Part # 79861-00 Hose, Exhaust 79793-00 Jam Nut Removal/Seal Install Tool 79854-00 Wrench, Vector Solo (Packing Adjust, Barrel Removal, Nozzle Removal) 79862-01, -02, -03 Hex Driver (2.5mm, 3mm, and 4mm) -
Page 48: Air Hose Length And Air Hose Type
Ransburg Vector Solo 65kV Applicator - Parts Identification TABLE A - AIR HOSE LENGTH AND AIR HOSE TYPE "A" "A" Description Dash # Description Air H ose/Stem 10m (33-ft.) Standard Air Hose 79727-10 / --------- 15m (49-ft.) Standard Air Hose 79727-15 / --------- 20m (66-ft.) -
Page 49: Fluid Hose Selection
Ransburg Vector Solo 65kV Applicator - Parts Identification TABLE E - FLUID HOSE SELECTION Description "E" Dash # No Fluid Hose Fluid Hose, 10m (33 ft.) 79548-10 Fluid Hose, 15m (49 ft.) 79548-15 Fluid Hose, 20m (60 ft.) 79548-20 Fluid Hose, 30m (99 ft.) -
Page 50: Power Module Replaceable Parts / Parts List
Ransburg Vector Solo 65kV Applicator - Parts Identification Figure 79: 79911-01 Needle Shaft With Non-Adjustable Packings, 1K 79911-01 NEEDLE SHAFT , NON-ADJUSTABLE PACKINGS, FOR 1K ONLY- PARTS LIST (Figure 79) Item # Description Part # 70430-01 Electrode, High Wear 78626-00... - Page 51 Ransburg Vector Solo 65kV Applicator - Parts Identification ACCESSORIES Figure 81: Fluid Hose - Optional FLUID HOSE - PARTS LIST (OPTIONAL) (Figure 81) Item # Part # Description 79548-10 Fluid Hose Assembly, 10m (33 ft.) 79548-15 Fluid Hose Assembly, 15m (49 ft.) 79548-20 Fluid Hose Assembly, 20m (66 ft.)
- Page 52 Ransburg Vector Solo 65kV Applicator - Parts Identification AIR HOSE ASSEMBLIES Part # Description 79727-10 Standard Air Hose Assembly, 10 meter (33 foot) 79727-11 QD Air Hose Assembly, 10 meter (33 foot) 79727-11-SS QD Air Hose Assembly with Stem, 10 meter (33 foot)
- Page 53 Ransburg Vector Solo 65kV Applicator - Parts Identification TEST AND MAINTENANCE KIT - (OPTIONAL) (Figure 84) Part # Description 79870-00 Test and Maintenance Kit Figure 84: Test and Maintenance Kit - Optional COILED FLUID TUBE - (OPTIONAL) (Figure 85) Part #...
-
Page 54: Accessories / Parts List
Ransburg Vector Solo 65kV Applicator - Parts Identification The 79651-00 Installation and Setup Kit is available for the Vector Solo. This kit includes all equipment necesary for the installation, setup, and maintenance of the Vector Solo applicator. This kit includes:... -
Page 55: Parts Comparison / Trans-Tech. Atomization Parts List
Ransburg Vector Solo 65kV Applicator - Parts Identification PARTS COMPARISON 79374-65 Standard Air Spray Air Cap 79374-122 Trans-Tech. Air Spray Air Cap Standard Air Spray Nozzles have a number between 44 and 148; Trans-Tech. Air Spray Nozzles have a number between 244 and 348. -
Page 56: Vector Solo Recommended Spare Parts
Ransburg Vector Solo 65kV Applicator - Parts Identification VECTOR SOLO RECOMMENDED SPARE PARTS (Quantities Per Applicator) Part # Description 80101-44 Nozzle, Fluid, 1.4mm 80099-00 Assembly, Barrel, Vector Solo 79907-00 Cascade Assembly 79832-00 Gasket, Barrel 79374-65 Cap, Air, 65R 79724-00 Nut, Retaining, Air Nozzle... - Page 57 Ransburg Vector Solo 65kV Applicator - Parts Identification NOTES AH-08-02.6...
-
Page 58: Warranty Policies
EXCLUSIONS: parts (any part number ending in “R”) for which the warranty period is ninety (90) days. If, in Ransburg’s opinion the warranty item in question, or other items damaged by this part EQUIPMENT: When purchased as a complete was improperly installed, operated or maintained, unit, (i.e., guns, power supplies, control units, etc.),... - Page 59 Ransburg Vector Solo 65kV Applicator - Warranty Policies MANUAL CHANGE SUMMARY This manual was published to supersede Service Manual AH-08-02.5 Vector Solo 65kV Applicator to make the following changes: 1. Updated manual due to nozzle thread change, addition of Air Stream one-way Valves and...
- Page 60 Telephone (toll free): 800-233-3366 Fax: 419-470-2233 Technical Support Representative will direct you to the appropriate telephone number for ordering Spare Parts. Form No. AH-08-02.6 © 2013 Ransburg. All rights reserved. Litho in U.S.A. Models and specifications subject to change without notice. 1/13...
Need help?
Do you have a question about the vector solo 79965 solventborne RS70-AS and is the answer not in the manual?
Questions and answers