Hilti DD 30-W Manual
Hide thumbs
Also See for DD 30-W:
- Original operating instructions (462 pages) ,
- Original operating instructions (632 pages) ,
- Manual (104 pages)
Table of Contents
Advertisement
Quick Links
Advertisement
Table of Contents

Related Manuals for Hilti DD 30-W


Summary of Contents for Hilti DD 30-W
- Page 1 DD 30-W English Printed: 06.07.2017 | Doc-Nr: PUB / 5283534 / 000 / 05...
- Page 2 Printed: 06.07.2017 | Doc-Nr: PUB / 5283534 / 000 / 05...
- Page 3 1 Information about the documentation 1.1 About this documentation • Read this documentation before initial operation or use. This is a prerequisite for safe, trouble-free handling and use of the product. • Observe the safety instructions and warnings in this documentation and on the product. •...
- Page 4 Drilling performance indicator 1.4 Product information Hilti products are designed for professional use and may be operated, serviced and maintained only by trained, authorized personnel. This personnel must be informed of any particular hazards that may be encountered. The product and its ancillary equipment can present hazards if used incorrectly by untrained personnel or if used not in accordance with the intended use.
- Page 5 ▶ Do not abuse the cord. Never use the cord for carrying, pulling or unplugging the power tool. Keep cord away from heat, oil, sharp edges or moving parts. Damaged or entangled cords increase the risk of electric shock. ▶ When operating a power tool outdoors, use an extension cord suitable for outdoor use. Use of a cord suitable for outdoor use reduces the risk of electric shock.
- Page 6 ▶ Use a dust removal system that is as effective as possible. To achieve a high level of dust collection, use a suitable vacuum cleaner of the type recommended by Hilti for wood dust and/or mineral dust and which is designed for use with this machine. Ensure that the workplace is well ventilated.
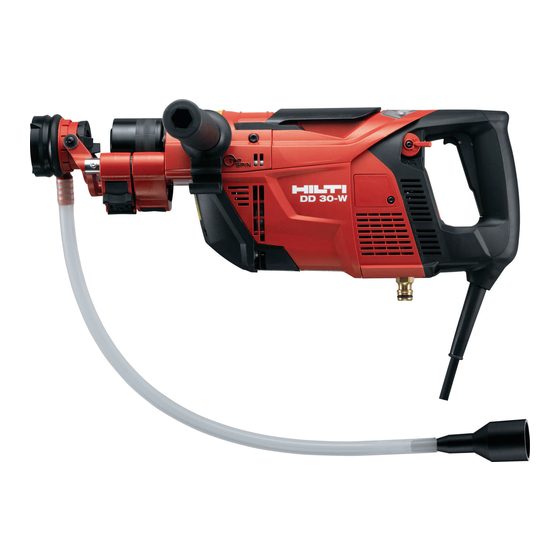
- Page 7 ▶ Suitable protective glasses, a hard hat, ear protection, protective gloves and safety footwear must be worn while the machine is in use. Other persons in the vicinity must also wear personal protective equipment. 3 Description 3.1 Overview of the product Chuck Switch lockbutton for operation on drill stand...
- Page 8 Supply cord with PRCD Depth gauge for hand-guided drilling Water connection Service indicator ∙ ¡ Carbon brush cover Drilling performance indicator Suction hose holder £ 3.2 Ground fault circuit interrupter (PRCD) PRCD in the supply cord Reset button on the PRCD LED on the PRCD TEST button on the PRCD 3.3 Water collection system...
- Page 9 3.4 Accessories Centering ring Water collector hose Ü Water collector Spray guard 3.5 DD-ST 30 drill stand accessories End stop screw Carriage lock Column Grip Æ Clamping piece Clamping lever º Locking screw Vacuum hose connector Retaining pin Pressure gauge Hand wheel Vacuum seal Carriage...
- Page 10 ▶ Depending on the application and drilling direction (see following table → page 8), the diamond core drilling machine’s water collection system must be connected to an all-purpose vacuum cleaner of a type recommended by Hilti and the necessary additional equipment selected accordingly. The water collection system and the correct combination of core bit and sealing ring, with the correct length set- ting, must be fitted and used for all drilling applications.
- Page 11 3.12 Items supplied machine with side handle, chuck and operating instructions You can find other system products approved for use with your product at your local Hilti Center or online at: www.hilti.group. 3.13 Accessory tools...
- Page 12 Note Switching other power tools, machines or appliances on and off may cause undervoltage and / or overvoltage peaks, resulting in damage to the machine or appliance. Never operate other power tools, machines or appliances from the generator or transformer at the same time. Weight in accordance with EPTA procedure 01 7.6 kg Dimensions (L x W x H)
- Page 13 ▶ Check that the rim (cutting edge) of the core bit has a height of at least 2 mm. If this is not the case, replace the core bit as it may otherwise get stuck in the hole drilled. ▶ To avoid injury, use only genuine Hilti DD-C core bits and DD 30-W accessories. 5.2 Preparing the drilling machine for hand-held use 5.2.1 Positioning the side handle...
- Page 14 4. Fasten the side handle securely by turning the grip until tight. 5.2.2 Fitting the depth gauge 1. Unplug the supply cord from the power outlet. 2. Release the side handle clamping band by turning the handle counterclockwise. 3. Slide the depth gauge from the front into the opening provided in the side handle. 4.
- Page 15 1. Unplug the supply cord from the power outlet. 2. Push the water collector holder into the opening provided at the front of the machine until it engages with a click. 3. Use the slider to set the correct length range for the core bit used. Set the slider to the 150 position for core bits with a length of up to 150 mm and set it to 300 for core bits with a length of 300 mm or 600 mm.
- Page 16 This generally is the case when the segments reach a height of less than 2 mm. Note Spraying the chuck with Hilti lubricant spray at regular intervals makes it easier to fit the core bit. 1. Unplug the supply cord from the power outlet.
- Page 17 WARNING Water running out presents a risk of electric shock! The spray guard cannot be used when the machine is mounted on the drill stand. The machine is therefore not protected against entry of water when mounted on the drill stand. ▶...
- Page 18 5.3.2.1 Positioning the vacuum base plate 1. Mark the center of the hole to be drilled with a cross. The lines of the cross should be longer than the diameter of the water collector. Note The water collector has four protruding marks that can be aligned with the cross. 2.
- Page 19 1. Unplug the supply cord from the power outlet. English Printed: 06.07.2017 | Doc-Nr: PUB / 5283534 / 000 / 05...
- Page 20 Note The water collector has four protruding marks that can be aligned with the cross. 2. Set the Hilti HKD-D M12x50 anchor for fastening the drill stand adapter plate at a distance of 12 cm from the hole center mark.
- Page 21 This generally is the case when the segments reach a height of less than 2 mm. Note Spraying the chuck with Hilti lubricant spray at regular intervals makes it easier to fit the core bit. 1. Unplug the supply cord from the power outlet.
- Page 22 2. Open the chuck by pulling the chuck locking lever upwards as far as it will go. Note Check that the core bit connection end and the chuck are clean and undamaged. 3. Tip the water collector about its mounting axis as far as it will go. 4.
- Page 23 ▶ If the indicator continues to light up, further operation of the diamond core drilling machine is not permissible. Have your diamond core drilling machine repaired by Hilti Service. 7. After the test, switch the ground fault circuit interrupter (PRCD) back on by pressing the 0 or TEST button.
- Page 24 WARNING Risk of injury. The machine and the drilling operation generate noise. Exposure to noise can lead to hearing loss. ▶ Wear ear protectors. 6.1 Hand-guided drilling WARNING Risk of electric shock! If the machine is used for hand-guided drilling in an upwards direction without the necessary safety precautions, water may enter the machine and present a risk of electric shock.
- Page 25 6. Position the water collector carefully at the position where the hole is to be drilled, without bringing the core bit into contact with the working surface. 7. Bring the four marks on the water collector into alignment with the lines marking the center of the hole to be drilled.
- Page 26 5. Press the machine’s control switch and hold it in this position. Set the water regulation lever to the desired water flow rate and then release the control switch. Note The water supply (water on/off) is controlled automatically by the machine’s control switch. The water flow rate can be preset by turning the water regulating lever before starting drilling or regulated while drilling is in progress (minimum water flow rate when the regulating lever is in the “closed”...
- Page 27 6.5 Removing and emptying the core bit 1. Unplug the supply cord from the power outlet. CAUTION Risk of injury The tool becomes hot as a result of use. It may have sharp edges. ▶ Wear protective gloves when changing the tool. WARNING Risk of injury.
- Page 28 Check all visible parts and controls for signs of damage at regular intervals and make sure that they all function correctly. • Do not operate the machine if damaged or if its parts malfunction. Have the machine repaired by Hilti Service immediately. •...
- Page 29 9. Insert the sight glass retaining screws (Torx screws) and tighten them securely. 8 Troubleshooting If the trouble you are experiencing is not listed in this table or you are unable to remedy the problem by yourself, please contact Hilti Service. 8.1 The diamond core drilling machine is in working order Malfunction...
- Page 30 Malfunction Possible cause Action to be taken The drilling speed is decreas- Maximum drilling depth has been ▶ Remove the core and use a ing. reached. longer core bit. The core is stuck in the diamond ▶ Remove the core. core bit.
- Page 31 Most of the materials from which Hilti tools and appliances are manufactured can be recycled. The materials must be correctly separated before they can be recycled. In many countries, your old tools, machines or appliances can be returned to Hilti for recycling. Ask Hilti Service or your Hilti representative for further information.
- Page 32 English Printed: 06.07.2017 | Doc-Nr: PUB / 5283534 / 000 / 05...
- Page 33 Printed: 06.07.2017 | Doc-Nr: PUB / 5283534 / 000 / 05...
- Page 34 Hilti = registered trademark of Hilti Corp., Schaan 20170628 Printed: 06.07.2017 | Doc-Nr: PUB / 5283534 / 000 / 05...
Need help?
Do you have a question about the DD 30-W and is the answer not in the manual?
Questions and answers