Table of Contents
Advertisement
Quick Links
Advertisement
Table of Contents

Related Manuals for SMITH SYSTEM Cascade


Summary of Contents for SMITH SYSTEM Cascade
- Page 1 Cascade Presentation Cart Assembly Instructions For assistance in assembling the product,, missing or damaged parts, or to place an order, please contact customer service at 1-800-328-1061. You may also place your order online at Form# 179974 www.smithsystem.com 5/2014...
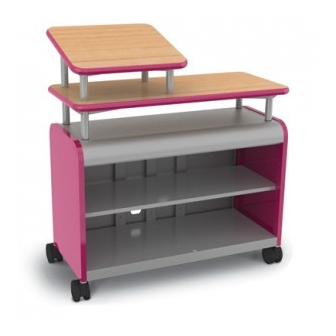
- Page 2 Lectern Top QTY. 1 QTY. 1 Mega Case Cascade Unit QTY. 1 For assistance in assembling the product,, missing or damaged parts, or to place an order, please contact customer service at 1-800-328-1061. You may also place your order online at Form# 179974 www.smithsystem.com...
- Page 3 Replacement Hardware 1. Replacement Hardware Pack 69725 ZINC-R includes: (16) #10X5/8” Wood Screws (4) 3/8-16X1.25” Hex Head Bolts (4) Steel Washers 2. Replacement Hardware Pack 17089 PLT includes: (4) Acorn Nuts (4) Presentation Steel Washer Bottom (4) Presentation Steel Washer Top (8) Countersunk ½”...
- Page 4 Step 3: Flip the top with pole handles attached into upright position, and align on cascade unit. Step 4: Using a Ratchet and socket or wrench, bolt in the top to the cascade with the washer underneath the cascade as shown.
- Page 5 Step 6: Align and attach the Lectern Poles to the top using the provided wood screws. Ensure that the poles are all slanted in the same direction and the two taller poles are on the back side of the top when flipped over, as seen in the picture. Step 7: Attach the Presentation Steel Washer Top onto the bottoms of the lectern riser poles using the (4) 3/-16 X 1”...
- Page 6 Step 8: Align the bottom washers to the predrilled holes on the riser shelf and attach to the riser shelf using the (8) ½” countersunk woodscrews. Ensure the bolts from the bottom washer are all towards the inside of the unit. Step 9: Place the lectern top onto the riser top, aligning the washers together.
- Page 7 Step 10: Using the provided Acorn Nuts, tighten the lectern top onto the riser top. For assistance in assembling the product,, missing or damaged parts, or to place an order, please contact customer service at 1-800-328-1061. You may also place your order online at Form# 179974 www.smithsystem.com 5/2014...
Need help?
Do you have a question about the Cascade and is the answer not in the manual?
Questions and answers