Rosslare AYC-E55 Installation And Programming Manual
Ayc-ex5 family ayc-t65 convertible 2x6 ultra-slim backlit pin & prox reader/controller
Hide thumbs
Also See for AYC-E55:
- Installation and programming manual (65 pages) ,
- Installation and programming manual (64 pages)

Related Manuals for Rosslare AYC-E55


Summary of Contents for Rosslare AYC-E55
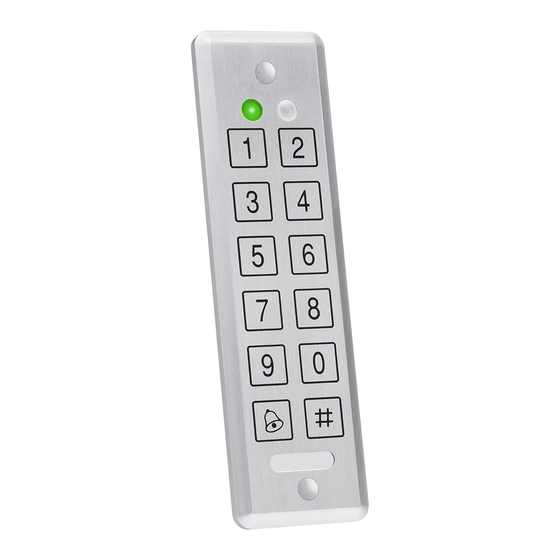
- Page 1 2013 January AYC-Ex5 Family AYC-T65 Convertible 2x6 Ultra-Slim Backlit PIN & Prox Reader/Controller Installation and Programming Manual Ex5 Models: AYC-E55 AYC-E65BB AYC-E65BG AYC-E65BW T65 Models: AYC-T65B AYC-T65N...
- Page 2 ROSSLARE. ROSSLARE reserves the right to revise and change this document at any time, without being obliged to announce such revisions or changes beforehand or after the fact.
-
Page 3: Table Of Contents
Table of Contents Table of Contents General Information ........... 9 Introduction ................9 Reader/Controller Types............10 Box Content ................. 10 Ancillary Equipment .............. 11 1.4.1 Reader ..................11 1.4.2 Controller ..................11 Technical Specifications ..........12 Key Features ................. 13 2.1.1 Reader .................. - Page 4 Table of Contents 5.3.1 Return to Factory Default Settings ..........33 5.3.2 Replacing a Lost Programming Code ..........33 Controller Functionality..........34 Normal, Secure, and Master Users .......... 34 Modes of Operation .............. 35 6.2.1 Normal Mode ................35 6.2.2 Bypass Mode ................
- Page 5 Table of Contents 6.9.12 Setting the Backlight Behavior ............54 6.9.13 Enrolling Primary and Secondary Codes ........54 6.9.14 Deleting Primary and Secondary Codes ......... 58 6.9.15 Relay Codes Assignment ............... 60 6.9.16 Relay Code Assignment using Standard Method ......60 6.9.17 Relay Code Assignment using Search Method ......
- Page 6 List of Figures List of Figures Figure 1: Drilling & Mounting Template for AYC-Ex5........15 Figure 2: Drilling & Mounting Template for AYC-T65 ........15 Figure 3: Controller Application Wiring Diagram #1 ........17 Figure 4: Controller Application Wiring Diagram #2 ........18 Figure 5: Controller Application Wiring Diagram #3 ........
- Page 7 List of Tables List of Tables Table 1: Wiring Colors ..................16 Table 2: Reader Programming Menus .............. 21 Table 3: Keypad Transmission Format Option Number ........23 Table 4: Controller Programming Menu ............40 Table 5: Quick Reference Guide for Auxiliary Mode Setting ......48 AYC-Ex5 and AYC-T65 Installation and Programming Manual...
- Page 8 ROSSLARE ENTERPRISES LIMITED and/or its related companies and/or subsidiaries’ (hereafter:"ROSSLARE") exclusive warranty and liability is limited to the warranty and liability statement provided in an appendix at the end of this document.
-
Page 9: General Information
If the unit is connected to a standard access control unit, then it functions as a reader. If the unit is connected to Rosslare's secure application appurtenances such as the PS-A25T, PS- C25T or PS-C25TU, it functions as a secured controller. -
Page 10: Reader/Controller Types
Upon power-on reset, the AYC-Ex5 and AYC-T65 units search for the presence of Rosslare's secure application appurtenances. If a secure application appurtenance is detected, then the unit is automatically configured as a secure access control unit. This is indicated by two short beeps. -
Page 11: Ancillary Equipment
(power to lock) or fail secure (power to open) functions. Request to Exit (REX) button – normally open type Switch is closed when pressed. Door monitor switch Rosslare accessories can be found on www.rosslaresecurity.com. AYC-Ex5 and AYC-T65 Installation and Programming Manual... -
Page 12: Technical Specifications
Technical Specifications Technical Specifications Specification AYC-E55 AYC-E65B, AYC-T65 AYC-E65BB Electrical Characteristics Power Supply Type Linear type – recommended Operating Voltage 5–16 VDC (when used as a controller, provided by the secure application appurtenance) Range Input Current 15 m A@12 VDC... -
Page 13: Key Features
120 g (0.265 lb) 143 g (0.315 lb) 121 g (0.27 lb) * Measured using Rosslare proximity card (AT-14) or equivalent. Range also depends on electrical environment and proximity to metal. Key Features The key features for the AYC-Ex5 and AYC-T65 series are: ... -
Page 14: Reader
Three modes of operation: Normal mode Bypass mode Secure mode REX signal from Rosslare’s secure application appurtenance Chime bell and siren features are available with secure application appurtenance Programmable Lock Strike Release, Siren, and Alarm Delay timers ... -
Page 15: Installation
When the unit is used as a reader, route the interface cable from the unit to the controller. When the unit is used as a secured controller, route the interface cable from the unit to Rosslare’s secure application appurtenance. A linear type power supply is recommended, when using the unit as a controller. -
Page 16: Wiring Instructions
Wiring Instructions Wiring Instructions The unit is supplied with a 60-inch (1.5 meter) pigtail, having a 6- conductor cable. To connect the unit to the controller, perform the following: Prepare the unit's cable by cutting the cable jacket back 1¼ inches and strip the wire ½... -
Page 17: Figure 3: Controller Application Wiring Diagram #1
Wiring Instructions • The individual wires from the unit are color-coded according the Wiegand standard. • When using a separate power supply for the reader, this power supply and that of the controller must have a common ground. • The reader’s cable shield wire should preferably be attached to an earth ground, or a signal ground connection at the panel, or power supply end of the cable. -
Page 18: Figure 4: Controller Application Wiring Diagram #2
Wiring Instructions Figure 4 shows the auxiliary output connection using the internal power. Figure 4: Controller Application Wiring Diagram #2 Figure 5 shows the auxiliary output connection using external power. Figure 5: Controller Application Wiring Diagram #3 AYC-Ex5 and AYC-T65 Installation and Programming Manual... -
Page 19: Figure 6: Reader Application Wiring Diagram #4
Wiring Instructions Figure 6 shows how to wire a reader to the access control panel. Figure 6: Reader Application Wiring Diagram #4 Standard access control system with Wiegand reader/keypad interface AYC-Ex5 AYC-Ex5 and AYC-T65 Installation and Programming Manual... -
Page 20: Reader Functionality
Reader Functionality Reader Functionality The AYC-Ex5 series and the AYC-T65 can function both as a reader and as a controller. If the unit is connected to standard access controller, it functions as a reader, indicated by one beep immediately after power-on reset. The following explains how the AYC-Ex5 and AYC-T65 function as a reader. -
Page 21: Entering Programming Mode
Table 2: Reader Programming Menus Menu Description Default Selecting Keypad Transmission Format Single Key, 6-Bit Wiegand (Rosslare Format) Single Key, 6-Bit Wiegand with Nibble + Parity Bits Single Key, 8-Bit Wiegand, Nibbles Complemented 4 Keys Binary + Facility Code, Wiegand 26-Bit... -
Page 22: Exiting Programming Mode
Reader Functionality 2. Enter your 4-digit Programming code. If the Programming code is valid, Mode/Transmit Door/Program the door LED turns green and the Green unit is in Programming mode. • The factory 4-digit Programming code is 1234. • If a Programming code is not entered within 30 seconds, the unit returns to Transmit mode. -
Page 23: Table 3: Keypad Transmission Format Option Number
Table 3: Keypad Transmission Format Option Number Keypad Transmission Format Option Number Single Key, 6-Bit Wiegand (Rosslare Format) Single Key, 6-Bit Wiegand with Nibble + Parity Bits Single Key, 8-Bit Wiegand, Nibbles Complemented 4 Keys Binary + Facility Code, Wiegand 26-Bit... - Page 24 5.2.3.2 Option 1: Single Key, 6-Bit Wiegand (Rosslare Format) Each key press immediately sends 4 bits with 2 parity bits added – even parity for the first 3 bits and odd parity for the last 3 bits.
-
Page 25: Keys Binary + Facility Code, Wiegand 26-Bit
Reader Functionality 0 = 11110000 6 = 10010110 1 = 11100001 7 = 10000111 2 = 11010010 8 = 01111000 3 = 11000011 9 = 01101001 4 = 10110100 = 01011010 = "A" in Hexadecimal 5 = 10100101 # = 01001011 = "B" in Hexadecimal 5.2.3.5 Option 4: 4 Keys Binary + Facility Code, Wiegand 26- This option buffers 4 keys and outputs keypad data with a 3-digit... -
Page 26: To 5 Keys + Facility Code, Wiegand 26-Bit
Reader Functionality 5.2.3.6 Option 5: 1 to 5 Keys + Facility Code, Wiegand 26-Bit Option 5 buffers up to 5 keys and outputs keypad data with a Facility code like a 26-Bit card output. The Facility code is set in Programming Menu number four and can be in the range 000 to 255. -
Page 27: Keys Bcd And Parity Bits, Wiegand 26-Bit
Reader Functionality 5.2.3.7 Option 6: 6 Keys BCD and Parity Bits, Wiegand 26-Bit Option 6 sends buffer of 6 keys, adds parity and sends a 26-Bit BCD message. Each key is a four bit equivalent of the decimal number. The keypad PIN code must be 6 key presses long. On the sixth key press of the 6-digit PIN code, the data is sent across the Wiegand Data lines as a BCD message. - Page 28 Reader Functionality The MD-P64 interface unit outputs the data received to 7 outputs emulating a keyboard. The interface unit does not affect any data that it receives from the proximity reader whether it is Wiegand 26-Bit or Clock & Data. Key pressed = ASCII Value 0 = '0' ( 0x30 hex ) 6 = '6' ( 0x36 hex )
-
Page 29: Selecting Proximity Card Transmission Format
Reader Functionality 5.2.4 Selecting Proximity Card Transmission Format The AYC-Ex5 and AYC-T65 has three different proximity card formats to select from. To select the prox imity card reader transmission format: Door/Program 1. Enter Programming mode. Mode/Transmit Green 2. Press “2” to enter Menu 2. Mode/Transmit Door/Program The Transmit LED turns red. - Page 30 Reader Functionality the card buffer and the PIN code entry buffer, generates a medium length beep, and be ready to receive a new card. The keypad PIN code can be one to five digits in length in the range of 0 to 99,999. When entering a keypad PIN code, the # key must be pressed to signify the end of the PIN entry.
-
Page 31: Changing The Programming Code
Reader Functionality 5.2.5 Changing the Programming Code 1. Enter Programming mode. Mode/Transmit Door/Program Green 2. Press “3” to enter Menu 3. Door/Program The Transmit LED turns red. Mode/Transmit Green 3. Enter the new 4-digit code you wish to set as the Programming code. -
Page 32: Setting The Backlight
Reader Functionality You hear three beeps. Mode/Transmit Door/Program The Program LED turns off and the Transmit LED turns red. • The Facility code can be in the range of 000 to 255. • The default Facility code is 0. Setting the Backlight 1. -
Page 33: Return To Factory Default Settings
Reader Functionality 5.3.1 Return to Factory Default Settings You must be very careful before using this command! This erases the entire memory and return all codes to their factory default setting. Door/Program 1. Enter Programming mode. Mode/Transmit Green 2. Press “0” to enter Menu 0. The Transmit and Program LEDs Mode/Transmit Door/Program... -
Page 34: Controller Functionality
Controller Functionality Controller Functionality The AYC-Ex5 and AYC-T65 can function both as a reader and as a controller. If the unit is connected to Rosslare’s secure application appurtenance, it functions as a controller indicated by two beeps immediately after power-on reset. -
Page 35: Modes Of Operation
Controller Functionality Secure user A Secure user must have a Primary and Secondary code programmed; the two codes must not be the same. The Secure user can gain access when the unit is in any of its three modes of operation. -
Page 36: Secure Mode
Controller Functionality When the Lock Strike is programmed for Fail Safe Operation, the door is constantly unlocked. 6.2.3 Secure Mode Mode/Transmit Door/Program The Mode LED is red. Only Secure and Master users can access the premises during the Secured mode. A Secure user must enter their Primary and Secondary codes to gain entry. -
Page 37: Auxiliary Input & Output
Controller Functionality 2. Press the “#” key to confirm the mode change. Mode LED turns green. Mode/Transmit Door/Program Green 6.2.4.3 Changing from Normal Mode to Bypass Mode See Section 6.9.7 to create/modify the Normal/Bypass code. 1. Enter the Normal/Secure code. Mode/Transmit Door/Program Green... -
Page 38: Door Alarms
Request to Exit (REX) Function The REX button is connected to Rosslare’s secure application appurtenance. The REX button must be located inside the premises to be secured and is used to open the door without the use of a PIN code. -
Page 39: Secure Application Appurtenances
Relay only begins its count down once the REX button is released. Secure Application Appurtenances Rosslare’s secure application appurtenances are designed for use with Rosslare's secured series standalone access control units, including the AYC-Ex5 series and the AYC-T65. These units are designed to operate indoors and installed within the secured premises. -
Page 40: Entering Programming Mode
Controller Functionality Table 4: Controller Programming Menu Menu Menu Description Default digits digits digits digits Changing Lock Strike Code 2580 25802 258025 25802580 Change Auxiliary Code 0852 08520 085208 08520852 Changing Program Code 1234 12341 123412 12341234 Changing Normal/Secure Code 3838 38383 383838 38383838... -
Page 41: Exiting Programming Mode
Controller Functionality 6.9.2 Exiting Programming Mode 1. Press the # key twice within 2 seconds. You hear 3 beeps. Mode/Transmit Door/Program The Door LED turns off and the Green Mode LED returns to Normal mode. Wrong entries reset the controller back to Normal mode. While in Programming mode, if no key is pressed for one minute, the unit exits Programming mode and returns to Normal mode. -
Page 42: Changing Auxiliary Code
Controller Functionality • Lock Strike Code 1 does not work in the Secure mode. • Wrong entries returns the controller to Normal mode. • Code 0000 erases the Lock Strike Code 1. • The factory default 4-digit Lock Strike code is 2580. 6.9.4 Changing Auxiliary Code The Auxiliary code is mainly used as a method to quickly test the... -
Page 43: Changing The Programming Code
Controller Functionality 6.9.5 Changing the Programming Code 1. Enter Programming mode. Mode/Transmit Door/Program Green 2. Press “3” to enter Menu 3. The Mode LED turns green. Mode/Transmit Door/Program Green Green 3. Enter the new code you wish to set as the Programming code. The system returns to Normal Door/Program Mode/Transmit... -
Page 44: Changing The Normal/Bypass Code And Door Chime Settings
Controller Functionality • Code 0000 erases the Normal/Secure code. • This code is disabled if the Auxiliary Input is set to toggle between Normal and Secure access modes. • Default Normal/Secure code is 3838. 6.9.7 C hanging the Normal/Bypass Code and Door 4 8 B Chime Settings Door/Program... -
Page 45: Setting Fail Safe/Secure Operation, Tamper Siren And Lock Strike Release Time
Controller Functionality The system returns to Normal mode. Mode/Transmit Door/Program You hear three beeps. Green The Door LED turns off and the Mode LED turns green. 6.9.8 Setting Fail Safe/Secure Operation, Tamper Siren and Lock Strike Release Time Door/Program Mode/Transmit 1. -
Page 46: Defining The Auxiliary Input And Output
Controller Functionality The system returns to Normal mode. Mode/Transmit Door/Program You hear three beeps. Green The Door LED turns off and the Mode LED turns green. The default value is 0004, which corresponds to Fail Secure operation, no siren, and 4-seconds Lock Strike release time. 6.9.9 Defining the Auxiliary Input and Output 1. - Page 47 Controller Functionality The system returns to Normal mode. Mode/Transmit Door/Program You hear three beeps. Green The Door LED turns off and the Mode LED turns green. AYC-Ex5 and AYC-T65 Installation and Programming Manual...
-
Page 48: Table 5: Quick Reference Guide For Auxiliary Mode Setting
Controller Functionality Table 5: Quick Reference Guide for Auxiliary Mode Setting Aux. Mode Aux. Input Aux. Output Aux. Relay Aux. Settings Function Activated by (in seconds) AUX REX Valid code or AUX N.O. 01 to 99 Aux. relay release time Normal/Secure switch Valid code N.O. -
Page 49: Detailed Reference Guide
Controller Functionality 6.9.10 Detailed Reference Guide The following are brief descriptions of each auxiliary mode. To implement the features of each mode, refer to Section 6.9.9. 6.9.10.1 Auxiliary Mode 0 Auxiliary input function: Activates the auxiliary output Auxiliary output activated by: Valid user code, Auxiliary code, and Auxiliary input For example, in Auxiliary Mode 0, the controller can function as a two-door controller. - Page 50 Controller Functionality 6.9.10.3 Auxiliary Mode 2 Auxiliary input function: Toggles Normal/Secure modes Auxiliary output activated by: Bell Button () For example, in Auxiliary Mode 2, the auxiliary relay can function as a general purpose time switch that can be activated when the Bell button () is pressed.
- Page 51 Controller Functionality 6.9.10.6 Auxiliary Mode 5 Auxiliary input function: Door Monitor Auxiliary output activated by: Shunt (explanation below) For example, in Auxiliary Mode 5, the controller is capable of shunting an alarm system. In this mode, the auxiliary input is to be wired to the magnetic contact switch on the door.
- Page 52 Controller Functionality if the door does not close prior to the end of this period, the controller activates the auxiliary relay. The auxiliary setting defines the door-ajar time. 6.9.10.9 Auxiliary Mode 8 Auxiliary input function: Green LED control Auxiliary output activated by: Valid user code, Auxiliary code For example, in Auxiliary Mode 8, the controller can function as a two-door controller and also provide indicator functionality control.
-
Page 53: Setting The Lockout Feature
Controller Functionality 6.9.11 Setting the Lockout Feature If the controller is presented with wrong codes several times consecutively, the unit goes into Lockout mode. When a lockout occurs, the controller keypad and reader are locked so no codes can be entered until the set lockout period expires. During Lockout, Mode LED is off, Door LED flashes red, and the controller beeps every two seconds The default setting for the Lockout Feature is 4000 (Lockout... -
Page 54: Setting The Backlight Behavior
Controller Functionality 6.9.12 Setting the Backlight Behavior The controller allows you to define the way the unit’s backlight works. Mode/Transmit Door/Program 1. Enter Programming mode. Green 2. Press “6” to enter Menu 6. The Mode LED flashes green. Mode/Transmit Door/Program Green Green 3. - Page 55 Controller Functionality Primary codes cannot be the same as any system codes, such as the Normal/Secure code or Lock Strike code. Users who hold a Primary code can gain entry only during Normal mode. 6.9.13.2 Secondary Codes Secondary codes can only be enrolled to a user slot that already ...
- Page 56 Controller Functionality 6.9.13.4 Enrolling Primary & Secondary Codes using Standard Method Door/Program 1. Enter Programming mode. Mode/Transmit Green 2. Press “7” to enter Menu 7. Mode/Transmit Door/Program The Door LED turns orange. Orange 3. Enter the 3-digit user slot number between 001and 500 that you wish to enroll a Primary or Secondary code to.
- Page 57 Controller Functionality 4. Enter the 4- to 8-digit PIN code that you want to assign as the Primary or Secondary code for this slot number. If the PIN that is entered is valid, the Mode LED stops flashing and then the controller is ready for you to enter the next 3-digit slot number (refer to Step 2) that you want to assign a code to.
-
Page 58: Deleting Primary And Secondary Codes
Controller Functionality If the Primary code entered is not valid, you hear a long beep and the unit continues to wait for a valid Primary code. 6. Enter the 4- to 8-digit code to be used as the Secondary code. If the Secondary code is valid, the controller beeps three times and returns to Normal mode. - Page 59 Controller Functionality 4. Enter your programming code to confirm the deletion. If the programming code is valid, three beeps are heard and the controller returns to Normal mode. If the programming code is invalid, a long beep is heard and the controller returns to Normal mode.
-
Page 60: Relay Codes Assignment
Controller Functionality 5. Enter your Programming code to confirm the deletion. If the Programming code is valid, you hear three beeps and the unit returns to Normal mode. If the Programming code is invalid, you hear a long beep and the unit returns to Normal mode. -
Page 61: Relay Code Assignment Using Search Method
Controller Functionality 4. Enter the assignment digit for the current user slot: “1” activates the Lock Strike relay only default “2” activates the Auxiliary relay only “3” activates the Lock Strike and Auxiliary relays If the assignment code is valid, the Mode indicator stops flashing. The controller is now waiting for another slot number. -
Page 62: Pin Code Length/Factory Default Settings
Controller Functionality 5. Enter the assignment digit for the current user slot: “1” activates the Lock Strike relay only default “2” activates the Auxiliary relay only “3” activates the Lock Strike and Auxiliary relays If the assignment digit is valid, three beeps are heard and the controller returns to Normal mode. -
Page 63: Replacing A Lost Programming Code
Controller Functionality If the Programming code is valid, all memory is erased. You hear three beeps and the controller returns to Normal mode. If the Programming code is invalid, you hear a long beep and the controller returns to Normal mode without erasing the memory contents. -
Page 64: Declaration Of Conformity
Declaration of Conformity Declaration of Conformity This declaration applies to the AYC-T65 model only. This device complies with Part 15 of the FCC Rules. Operation is subject to the following two conditions: This device may not cause harmful interference. ... -
Page 65: Limited Warranty
ARRANTY EMEDY OVERAGE In the event of a breach of warranty, ROSSLARE will credit Customer with the price of the Product paid by Customer, provided that the warranty claim is delivered to ROSSLARE by the Customer during the warranty period in accordance with the terms of this warranty. Unless otherwise requested by a ROSSLARE representative, return of the failed product(s) is not immediately required. - Page 66 ROSSLARE or a ROSSLARE authorized service center. XCLUSIONS AND IMITATIONS ROSSLARE shall not be responsible or liable for any damage or loss resulting from the operation or performance of any Product or any systems in which a Product is incorporated. This warranty shall not...
- Page 67 In no event shall ROSSLARE be liable for damages in excess of the purchase price of the product, or for any other incidental, consequential or special damages, including but not limited to loss of...
- Page 68 +86 755 8610 6842 Canada Fax: +86 755 8610 6101 support.cn@rosslaresecurity.com Rosslare Security Products, Inc. Southlake, TX, USA India Toll Free: +1-866-632-1101 Rosslare Electronics India Pvt Ltd. Local: +1-817-305-0006 Tel/Fax: +91 20 40147830 Fax: +1-817-305-0069 Mobile: +91 9975768824 support.na@rosslaresecurity.com sales.in@rosslaresecurity.com Europe Rosslare Israel Ltd.
Need help?
Do you have a question about the AYC-E55 and is the answer not in the manual?
Questions and answers