Table of Contents
Advertisement
Quick Links
Advertisement
Table of Contents

Related Manuals for Terasic DE5-Net


Summary of Contents for Terasic DE5-Net
- Page 1 DE5-Net User Manual www.terasic.com August 4, 2017...
-
Page 2: Table Of Contents
......................58 LASH ROGRAMMING WITH SERS ESIGN 4.4 R ..........................60 ESTORE ACTORY ETTINGS PROGRAMMABLE OSCILLATOR CHAPTER 5 ....................62 5.1 O ................................62 VERVIEW 5.2 S 570 E RTL ............................66 XAMPLE BY DE5-Net User Manual www.terasic.com August 4, 2017... - Page 3 2: I ......................110 XAMPLE MAGE ROCESS PPLICATION TRANSCEIVER VERIFICATION CHAPTER 8 ....................115 8.1 T ................................115 8.2 L ............................. 115 OOPBACK IXTURE 8.3 T ................................117 ESTING ADDITIONAL INFORMATION ........................... 119 DE5-Net User Manual www.terasic.com August 4, 2017...
-
Page 4: Chapter 1 Overview
The Stratix® V GX FPGA features integrated transceivers that transfer at a maximum of 12.5 Gbps, allowing the DE5-Net to be fully compliant with version 3.0 of the PCI Express standard, as well as allowing an ultra low-latency, straight connections to four external 10G SFP+ modules. Not relying on an external PHY will accelerate mainstream development of network applications enabling customers to deploy designs for a broad range of high-speed connectivity applications. -
Page 5: Key Features
The following hardware is implemented on the DE5-Net board: FPGA Altera Stratix® V GX FPGA (5SGXEA7N2F45C2) FPGA Configuration On-Board USB Blaster II or JTAG header for FPGA programming Fast passive parallel (FPPx32) configuration via MAX II CPLD and flash memory ... -
Page 6: Block Diagram
PCI Express full-height and 3/4-length Figure 1-1 shows the block diagram of the DE5-Net board. To provide maximum flexibility for the 94H94H users, all key components are connected with the Stratix V GX FPGA device. Thus, users can configure the FPGA to implement any system design. - Page 7 Figure 1-1 Block diagram of the DE5-Net board Below is more detailed information regarding the blocks in Figure 1-1. Stratix V GX FPGA 5SGXEA7N2F45C2 622,000 logic elements (LEs) 50-Mbits embedded memory 48 transceivers (12.5Gbps) 512 18-bit x 18-bit multipliers ...
-
Page 8: Port
50MHz oscillator Programming PLL providing clock for 10G SFP+ transceiver Programming PLL providing clock for SATA or 1G SFP+ transceiver Four Serial ATA ports SATA 3.0 standard at 6Gbps signaling rate DE5-Net User Manual www.terasic.com August 4, 2017... - Page 9 Support for PCIe Gen1/2/3 Edge connector for PC motherboard with x8 or x16 PCI Express slot Power Source PCI Express 6-pin DC 12V power PCI Express edge connector power DE5-Net User Manual www.terasic.com August 4, 2017...
-
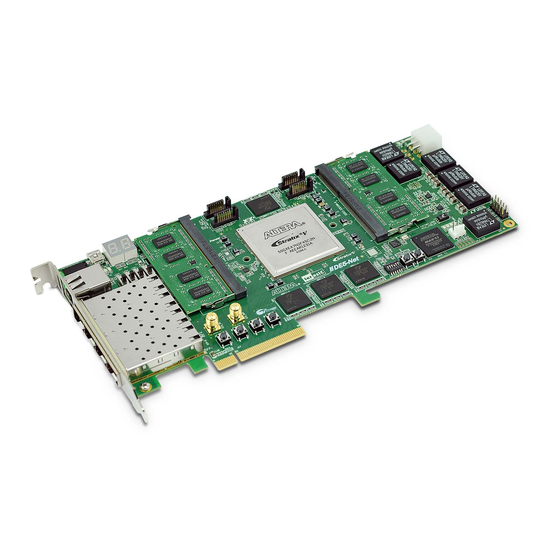
Page 10: Chapter 2 Board Components
This chapter introduces all the important components on the DE5-Net. Figure 2-1 is the top and bottom view of the DE5-Net development board. It depicts the layout of the board and indicates the location of the connectors and key components. Users can refer to this figure for relative location of the connectors and key components. -
Page 11: Configuration , Status And Setup
Launch Quartus II programmer and make sure the USB-Blaster II is detected. In Quartus II Programmer, add the configuration bit stream file (.sof), check the associated “Program/Configure” item, and click “Start” to start FPGA programming. DE5-Net User Manual www.terasic.com August 4, 2017... - Page 12 SW7.1 PCIE_PRSNT2n_x1 Off: Disable x1 presence detect On : Enable x4 presence detect SW7.2 PCIE_PRSNT2n_x4 Off: Disable x4 presence detect On : Enable x8 presence detect SW7.3 PCIE_PRSNT2n_x8 Off: Disable x8 presence detect DE5-Net User Manual www.terasic.com August 4, 2017...
- Page 13 Setting Position 2 of SW5 to high (right) specifies the default factory image to be loaded, as shown Figure 2-4. Setting Position 2 of SW5 to low (left) specifies the DE5-Net to load a user-defined image, as shown in Figure 2-5.
-
Page 14: General User Input /Output
DOWN position or the UPPER position, it provides a low logic level or a high logic level to the Stratix V GX FPGA, respectively, as shown in Figure 2-6. DE5-Net User Manual www.terasic.com August 4, 2017... - Page 15 A list of the pin names on the FPGA that are connected to the LEDs is given in Table 2-5. Table 2-5 User LEDs Pin Assignments, Schematic Signal Names, and Functions Board Schematic Stratix V GX Description Reference Signal Name Standard Pin Number DE5-Net User Manual www.terasic.com August 4, 2017...
- Page 16 2-8. In addition, the decimal point is identified as DP. Table 2-6 shows the mapping of the FPGA pin assignments to the 7-segment displays. Figure 2-7 Connection between 7-segment displays and Stratix V GX FPGA DE5-Net User Manual www.terasic.com August 4, 2017...
-
Page 17: Temperature Sensor And Fan Control
These functions are accomplished by connecting the temperature sensor to the internal temperature sensing diode of the Stratix V GX device. The temperature status and alarm threshold registers of the temperature sensor can be programmed by a DE5-Net User Manual www.terasic.com August 4, 2017... -
Page 18: Clock Circuit
Figure 2-9 shows the default frequencies of on-board all external clocks going to the Stratix V GX FPGA. The figures also show an off-board external clock from PCI Express Host to the FPGA. DE5-Net User Manual www.terasic.com August 4, 2017... - Page 19 SATA reference clocks respectively. The Si570 programmable clock generator is programmed via an I2C serial interface to generate the 10G Ethernet SFP+ reference clock. Two SMA connectors provide external clock input and clock output respectively. DE5-Net User Manual www.terasic.com August 4, 2017...
- Page 20 100.0 MHz LVDS PIN_AK7 10G SFP+ SFP1G_REFCLK_p 125.0 MHz LVDS PIN_AH6 1G SFP+ SATA_HOST_REFCLK_p 125.0 MHz LVDS PIN_V6 SATA HOST SATA_DEVICE_REFCLK_p 125.0 MHz LVDS PIN_V39 SATA DEVICE PCIE_REFCLK_p From Host LVDS PIN_AK38 PCI Express DE5-Net User Manual www.terasic.com August 4, 2017...
-
Page 21: Serial Port
RS-422 block diagram of the development board. The full-duplex LTC2855 is used to translate the RS-422 signal, and the RJ45 is used as an external connector for the RS-422 signal. Figure 2-11 Block Diagram of RS-422 DE5-Net User Manual www.terasic.com August 4, 2017... -
Page 22: Flash Memory
This device is part of the shared flash and MAX (FM) bus, which connects to the flash memory and MAX II CPLD (EPM2210) System Controller. Figure 2-12 shows the connections between the Flash, MAX and Stratix V GX FPGA. DE5-Net User Manual www.terasic.com August 4, 2017... - Page 23 Address bus 2.5-V PIN_AM32 FSM_A14 Address bus 2.5-V PIN_AM31 FSM_A15 Address bus 2.5-V PIN_AL31 FSM_A16 Address bus 2.5-V PIN_AN33 FSM_A17 Address bus 2.5-V PIN_AP33 FSM_A18 Address bus 2.5-V PIN_AT32 FSM_A19 Address bus 2.5-V PIN_AT29 DE5-Net User Manual www.terasic.com August 4, 2017...
- Page 24 Data bus 2.5-V PIN_AV31 FSM_D27 Data bus 2.5-V PIN_AV32 FSM_D28 Data bus 2.5-V PIN_BC31 FSM_D29 Data bus 2.5-V PIN_AW30 FSM_D30 Data bus 2.5-V PIN_BC32 FSM_D31 Data bus 2.5-V PIN_BD31 FLASH_CLK Clock 2.5-V PIN_AL29 DE5-Net User Manual www.terasic.com August 4, 2017...
-
Page 25: Ddr3 So-Dimm
Using differential DQS signaling for the DDR3 SDRAM interfaces, it is capable of running at up to 800MHz memory clock for a maximum theoretical bandwidth up to 102.4Gbps. Figure 2-13 shows the connections between the DDR3 SDRAM SO-DIMMs and Stratix V GX FPGA. DE5-Net User Manual www.terasic.com August 4, 2017... -
Page 26: Ddr3A_Dq11
Data [6] SSTL-15 Class I PIN_D33 DDR3A_DQ7 Data [7] SSTL-15 Class I PIN_E33 DDR3A_DQ8 Data [8] SSTL-15 Class I PIN_A32 DDR3A_DQ9 Data [9] SSTL-15 Class I PIN_A31 DDR3A_DQ10 Data [10] SSTL-15 Class I PIN_C30 DE5-Net User Manual www.terasic.com August 4, 2017... - Page 27 Data [50] SSTL-15 Class I PIN_L30 DDR3A_DQ51 Data [51] SSTL-15 Class I PIN_L29 DDR3A_DQ52 Data [52] SSTL-15 Class I PIN_F32 DDR3A_DQ53 Data [53] SSTL-15 Class I PIN_G32 DDR3A_DQ54 Data [54] SSTL-15 Class I PIN_M30 DE5-Net User Manual www.terasic.com August 4, 2017...
-
Page 28: Www.terasic.com August
Address [6] SSTL-15 Class I PIN_D37 DDR3A_A7 Address [7] SSTL-15 Class I PIN_K35 DDR3A_A8 Address [8] SSTL-15 Class I PIN_K32 DDR3A_A9 Address [9] SSTL-15 Class I PIN_K37 DDR3A_A10 Address [10] SSTL-15 Class I PIN_M38 DE5-Net User Manual www.terasic.com August 4, 2017... - Page 29 Data [6] SSTL-15 Class I PIN_W14 DDR3B_DQ7 Data [7] SSTL-15 Class I PIN_U15 DDR3B_DQ8 Data [8] SSTL-15 Class I PIN_T17 DDR3B_DQ9 Data [9] SSTL-15 Class I PIN_T16 DDR3B_DQ10 Data [10] SSTL-15 Class I PIN_R16 DE5-Net User Manual www.terasic.com August 4, 2017...
- Page 30 Data [50] SSTL-15 Class I PIN_H13 DDR3B_DQ51 Data [51] SSTL-15 Class I PIN_H14 DDR3B_DQ52 Data [52] SSTL-15 Class I PIN_J13 DDR3B_DQ53 Data [53] SSTL-15 Class I PIN_J16 DDR3B_DQ54 Data [54] SSTL-15 Class I PIN_G13 DE5-Net User Manual www.terasic.com August 4, 2017...
- Page 31 Address [6] SSTL-15 Class I PIN_M17 DDR3B_A7 Address [7] SSTL-15 Class I PIN_T18 DDR3B_A8 Address [8] SSTL-15 Class I PIN_H17 DDR3B_A9 Address [9] SSTL-15 Class I PIN_J19 DDR3B_A10 Address [10] SSTL-15 Class I PIN_C19 DE5-Net User Manual www.terasic.com August 4, 2017...
-
Page 32: Qdrii+ Sram
Stratix I GX device, in respectively. Table 2-14 QDRII+ SRAM A Pin Assignments, Schematic Signal Names, and Functions Schematic Stratix V GX Pin Description I/O Standard Signal Name Number QDRIIA_A0 Address bus[0] 1.8-V HSTL Class I PIN_AU29 DE5-Net User Manual www.terasic.com August 4, 2017... - Page 33 Read Data bus[2] 1.8-V HSTL Class I PIN_BD26 QDRIIA_Q3 Read Data bus[3] 1.8-V HSTL Class I PIN_BA24 QDRIIA_Q4 Read Data bus[4] 1.8-V HSTL Class I PIN_AL23 QDRIIA_Q5 Read Data bus[5] 1.8-V HSTL Class I PIN_AJ23 DE5-Net User Manual www.terasic.com August 4, 2017...
- Page 34 PIN_AV23 QDRIIB_A9 Address bus[9] 1.8-V HSTL Class I PIN_AM22 QDRIIB_A10 Address bus[10] 1.8-V HSTL Class I PIN_AJ20 QDRIIB_A11 Address bus[11] 1.8-V HSTL Class I PIN_AG20 QDRIIB_A12 Address bus[12] 1.8-V HSTL Class I PIN_AW23 DE5-Net User Manual www.terasic.com August 4, 2017...
- Page 35 Read Data bus[14] 1.8-V HSTL Class I PIN_AW19 QDRIIB_Q15 Read Data bus[15] 1.8-V HSTL Class I PIN_AV19 QDRIIB_Q16 Read Data bus[16] 1.8-V HSTL Class I PIN_AP19 QDRIIB_Q17 Read Data bus[17] 1.8-V HSTL Class I PIN_AN20 DE5-Net User Manual www.terasic.com August 4, 2017...
- Page 36 Write data bus[2] 1.8-V HSTL Class I PIN_AG12 QDRIIC_D3 Write data bus[3] 1.8-V HSTL Class I PIN_AG11 QDRIIC_D4 Write data bus[4] 1.8-V HSTL Class I PIN_AV10 QDRIIC_D5 Write data bus[5] 1.8-V HSTL Class I PIN_AH12 DE5-Net User Manual www.terasic.com August 4, 2017...
- Page 37 QDRIIC_RPS_n 1.8-V HSTL Class I PIN_AH10 Write Port Select QDRIIC_WPS_n 1.8-V HSTL Class I PIN_AL11 QDRIIC_DOFF_n PLL Turn Off 1.8-V HSTL Class I PIN_AE14 On-Die Termination QDRIIC_ODT 1.8-V HSTL Class I PIN_BD10 Input DE5-Net User Manual www.terasic.com August 4, 2017...
- Page 38 Write data bus[13] 1.8-V HSTL Class I PIN_R24 QDRIID_D14 Write data bus[14] 1.8-V HSTL Class I PIN_U23 QDRIID_D15 Write data bus[15] 1.8-V HSTL Class I PIN_U24 QDRIID_D16 Write data bus[16] 1.8-V HSTL Class I PIN_T24 DE5-Net User Manual www.terasic.com August 4, 2017...
-
Page 39: Spf+ Ports
The development board has four independent 10G SFP+ connectors that use one transceiver channel each from the Stratix V GX FPGA device. These modules take in serial data from the Stratix V GX FPGA device and transform them to optical signals. The board includes cage DE5-Net User Manual www.terasic.com August 4, 2017... - Page 40 SFPA_MOD2_SDA Serial 2-wire data 2.5V PIN_A20 SFPA_RATESEL0 Rate select 0 2.5V PIN_E20 SFPA_RATESEL1 Rate select 1 2.5V PIN_G22 SFPA_TXDISABLE Turns off and disables the transmitter output 2.5V PIN_B22 SFPA_TXFAULT Transmitter fault 2.5V PIN_A22 DE5-Net User Manual www.terasic.com August 4, 2017...
- Page 41 Transmitter data 1.4-V PCML PIN_AY5 SFPD_RX_p Receiver data 1.4-V PCML PIN_BB2 SFPD_RX_n Receiver data 1.4-V PCML PIN_BB1 SFPD_LOS Signal loss indicator 2.5V PIN_N22 SFPD_MOD0_PRSNT_n Module present 2.5V PIN_V20 SFPD_MOD1_SCL Serial 2-wire clock 2.5V PIN_U21 DE5-Net User Manual www.terasic.com August 4, 2017...
-
Page 42: Pci Express
PCIe edge connector. A DIP switch (SW7) is connected to the PCI Express to allow different configurations to enable a x1, x4, or x8 PCIe. Table 2-22 summarizes the PCI Express pin assignments of the signal names relative to the Stratix V GX FPGA. DE5-Net User Manual www.terasic.com August 4, 2017... - Page 43 PIN_BA41 PCIE_RX_n1 Add-in card receive bus 1.4-V PCML PIN_BA42 PCIE_RX_p2 Add-in card receive bus 1.4-V PCML PIN_AW41 PCIE_RX_n2 Add-in card receive bus 1.4-V PCML PIN_AW42 PCIE_RX_p3 Add-in card receive bus 1.4-V PCML PIN_AY43 DE5-Net User Manual www.terasic.com August 4, 2017...
-
Page 44: Sata
The four Serial ATA (SATA) ports include two available ports for device and two available ports for host capable of implementing SATA solution with a design that consists of both host and target (device side) functions. Figure 2-16 depicts the host and device design examples. DE5-Net User Manual www.terasic.com August 4, 2017... - Page 45 SATA host/device ports, a connection can be established between the two ports by using a SATA cable as Figure 2-17 depicts the associated signals connected. Figure 2-17 lists the SATA pin assignments, signal names and functions. DE5-Net User Manual www.terasic.com August 4, 2017...
- Page 46 Differential transmit data output SATA_DEVICE_TX_n1 1.4-V PCML PIN_H40 before DC blocking capacitor Differential transmit data output SATA_DEVICE_TX_p1 1.4-V PCML PIN_H39 before DC blocking capacitor SATA_DEVICE_REFCLK_p Reference Clock HCSL PIN_V39 SATA_DEVICE_REFCLK_n Reference Clock HCSL PIN_V40 DE5-Net User Manual www.terasic.com August 4, 2017...
- Page 47 Differential receive data input SATA_HOST_RX_n1 1.4-V PCML PIN_H1 after DC blocking capacitor Differential receive data input SATA_HOST_RX_p1 1.4-V PCML PIN_H2 after DC blocking capacitor SATA_HOST_REFCLK_ p Reference Clock HCSL PIN_V6 SATA_HOST_REFCLK_ n Reference Clock HCSL PIN_V5 DE5-Net User Manual www.terasic.com August 4, 2017...
-
Page 48: Chapter 3 System Builder
The common mistakes that users encounter are the following: Board damaged for wrong pin/bank voltage assignment. Board malfunction caused by wrong device connections or missing pin counts for connected ends. Performance dropped because of improper pin assignments DE5-Net User Manual www.terasic.com August 4, 2017... -
Page 49: General Design Flow
The Quartus II setting file contains information such as FPGA device type, top-level pin assignment, and I/O standard for each user-defined I/O pin. Finally, Quartus II programmer must be used to download SOF file to the FPGA board using JTAG interface. DE5-Net User Manual www.terasic.com August 4, 2017... -
Page 50: Using System Builder
The System Builder is located in the directory: "Tools\SystemBuilder" in the System CD. Users can copy the whole folder to a host computer without installing the utility. Before using the System Builder, execute the SystemBuilder.exe on the host computer as appears in Figure 3-2. DE5-Net User Manual www.terasic.com August 4, 2017... - Page 51 Project Name: Specify the project name as it is automatically assigned to the name of the top-level design entity. Figure 3-3 The Quartus Project Name System Configuration Under System Configuration users are given the flexibility of enabling their choice of components DE5-Net User Manual www.terasic.com August 4, 2017...
- Page 52 As the Quartus project is created, System Builder automatically generates the associated controller according to users’ desired frequency in Verilog which facilitates users’ implementation as no additional control code is required to configure the programmable oscillator. DE5-Net User Manual www.terasic.com August 4, 2017...
- Page 53 The System Builder also provides functions to restore default setting, loading a setting, and saving users’ board configuration file shown in Figure 3-6. Users can save the current board configuration information into a .cfg file and load it to the System Builder. Figure 3-6 Project Settings DE5-Net User Manual www.terasic.com August 4, 2017...
- Page 54 SRAM Object File (.sof). For Si570, the Controller will be instantiated in the Quartus II top-level file as listed below: For CDCM61001 and CDCM61004, the Controller will be instantiated in the Quartus II top-level DE5-Net User Manual www.terasic.com August 4, 2017...
- Page 55 DE5-Net User Manual www.terasic.com August 4, 2017...
- Page 56 If dynamic configuration for the oscillator is required, users need to modify the code according to users’ desired behavior. DE5-Net User Manual www.terasic.com August 4, 2017...
-
Page 57: Flash Programming
Before programming, users need to translate their Quartus .sof and NIOS II .elf files into the .flash which is used by the nios-2-flash-programmer. For .sof to .flash translation, NIOS II EDS tool sof2flsh can be used. DE5-Net User Manual www.terasic.com August 4, 2017... -
Page 58: Fpga Configure Operation
Software design file for Hello Demo To apply the batch file to users’ .sof and .elf file, users can change the .sof and .elf filename in the Figure 4-2. flash_program_bashrc_ub2 file as shown in DE5-Net User Manual www.terasic.com August 4, 2017... - Page 59 0x00, as shown in Figure 4-3. 2. In NIOS II processor options, select FLASH as reset vector memory and specify 0x04940000 as reset vector, as shown in Figure 4-4. DE5-Net User Manual www.terasic.com August 4, 2017...
-
Page 60: Restore Factory Settings
FPGA development board. Perform the following instructions: 1. Make sure the Nios II EDS and USB-Blaster II driver are installed. 2. Make sure the FPGA board and PC are connected with an UBS Cable. DE5-Net User Manual www.terasic.com August 4, 2017... - Page 61 The NIOS II EDS tool nios-2-flash-programmer programs the Flash based on the Parallel Flasher Loader design in the FPGA. The Parallel Flash Loader design is included in the default code PFL and the source code is available in the folder Demonstrations/ PFL in System CD. DE5-Net User Manual www.terasic.com August 4, 2017...
-
Page 62: Chapter 5 Programmable Oscillator
Chapter 5 Programmable Oscillator This chapter describes how to program the two programmable oscillators Si570 and CDCM61004 on the FPGA board. Also, RTL code based and Nios based reference design are explained in the chapter. The source codes of these examples are all available on the FPGA System CD. This section describes how to program Si570- and CDCM61004. - Page 63 400 kbps. Table 5-1 shows the register table for Si570. 148H148H Table 5-1 Si570 Register Table Register Name Bit 7 Bit 6 Bit 5 Bit 4 Bit 3 Bit 2 Bit 1 Bit 0 DE5-NET User Manual www.terasic.com August 4, 2017...
- Page 64 Table 5-2 Si570 Register Table Output HS_DIV HS_DIV REF_CLK Frequency Register Register Register (MHz) Setting Setting Setting 0000101 02F40135A9(hex) 0000011 0302013B65(hex) 156.25 0000011 0313814290(hex) 0000001 0302013B65(hex) 312.5 0000001 0313814290(hex) 322.265625 0000011 02D1E127AF(hex) 644.53125 0000001 02D1E127AF(hex) CDCM61004 DE5-NET User Manual www.terasic.com August 4, 2017...
- Page 65 12 GigE PCI Express GigE 312.5 XGMII 10 GigE The both values of PRESCALER DIVIDER and FEEDBACK DIVIDER can be specified by the PR0 and PR1 control pins according to the following table: DE5-NET User Manual www.terasic.com August 4, 2017...
-
Page 66: Xample By Rtl
Recalibration process. In the FPGA board, the required output type is LVDS, so always set OS0 and SO1 to 0 and 1, respectively. In this section we will demonstrate how to use the Terasic Si570 Controller implemented in Verilog to control the Si570 programmable oscillator on the FPGA board. This controller IP can configure the Si570 to output a clock with a specific frequency via I2C interface. - Page 67 I2C interface clock of i2c_bus_controller. Finally, the initial_config block will generate a control signal to drive i2c_reg_controller which allows the Si570 controller to configure Si570 based on default settings. Figure 5-3 Block Diagram of Si570 Controller IP DE5-NET User Manual www.terasic.com August 4, 2017...
- Page 68 “iStart” port to enable the Si570 Controller as shown in Figure 5-4. During Si570 configuring, the logic level of “oController_Ready” is low; when it rises to high again that means the user can configure another frequency value. DE5-NET User Manual www.terasic.com August 4, 2017...
- Page 69 3'h0 : //100Mhz begin new_hs_div = 4'b0101 ; new_n1 = 8'b0000_1010 ; fdco = 28'h004_E200 ; 3'h1 : //125Mhz begin new_hs_div = 4'b0101 ; new_n1 = 8'b0000_1000 ; fdco = 28'h004_E200 ; DE5-NET User Manual www.terasic.com August 4, 2017...
- Page 70 3'h6 : //644.53125Mhz begin new_hs_div = 4'b0100 ; new_n1 = 8'b0000_0010 ; fdco = 28'h005_0910 ; default : //100Mhz begin new_hs_div = 4'b0101 ; new_n1 = 8'b0000_1010 ; fdco = 28'h004_E200 ; endcase DE5-NET User Manual www.terasic.com August 4, 2017...
- Page 71 Users can refer to the Programmable Oscillator tool (See Figure 5-5) mentioned in below link to calculate the values of new_hs_div and new_n1, then, the fdco value can be calcuted with above ftdo equation. http://www.silabs.com/products/clocksoscillators/oscillators/Pages/oscillator-software-development -tools.aspx DE5-NET User Manual www.terasic.com August 4, 2017...
- Page 72 .iRST_n(iRST_n), // system reset .oINITIAL_START(initial_start), .iINITIAL_ENABLE(1'b1), Changing the setting from ".iINITIAL_ENABLE(1'b1) " to ".iINITIAL_ENABLE(1'b0)" will disable the initialization function of Si570 Controller. Design Tools Quartus II 13.1 Demonstration Source Code DE5-NET User Manual www.terasic.com August 4, 2017...
-
Page 73: Cdcm P Nii
Nios II through the PIO controller. The temperature sensor and external PLL Si570 are controlled through I2C interface. The Nios II program toggles the PIO controller to implement the I2C protocol. The CDCM 61004 is programmed through the PIO directly. The Nios DE5-NET User Manual www.terasic.com August 4, 2017... - Page 74 In the external PLL programming test, the program will program the PLL first, and subsequently will use TERASIC QSYS custom CLOCK_COUNTER IP to count the clock count in a specified period to check whether the output frequency is changed as configured. To avoid a Quartus II DE5-NET User Manual www.terasic.com...
- Page 75 Use the USB Cable to connect your PC and the FPGA board and install USB Blaster II driver if necessary. Execute demo batch file “test_ub2.bat” under batch file folder, Nios_BASIC_DEMO\demo_batch After the Nios II program is downloaded and executed successfully, a prompt message will be displayed in nios2-terminal. DE5-NET User Manual www.terasic.com August 4, 2017...
- Page 76 For programming PLL Si570 test, please input key ‘2’ and press ‘Enter’ in the nios-terminal first, then select the desired output frequency , as shown in 159H159H Figure 5-10. Figure 5-8 Temperature Demo DE5-NET User Manual www.terasic.com August 4, 2017...
- Page 77 Figure 5-9 CDCM 61004 Demo Figure 5-10 Si570 Demo DE5-NET User Manual www.terasic.com August 4, 2017...
-
Page 78: Memory Reference Design
Altera’s “QDRII and QDRII+ SRAM Controller with UniPHY” IP to implement a memory test function. In the design, the four QDRII controllers share the PLL/DLL/OCT due to limited DLL numbers in the FPGA. DE5-NET User Manual www.terasic.com August 4, 2017... - Page 79 DLL resources. The Avalon bus read/write test (RW_test) modules read and write the entire memory space of each QDRII+ SRAM through the Avalon interface of each controller. In this project, the RW_test module will first write the entire memory and then compare the read back data DE5-NET User Manual www.terasic.com August 4, 2017...
- Page 80 Power on the FPGA Board. Execute demo batch file “test_ub2.bat” under batch file folder, QDRIIx4_Test\demo_batch. Press BUTTON0 of the FPGA board to start the verification process. When BUTTON0 is held DE5-NET User Manual www.terasic.com August 4, 2017...
-
Page 81: Ddr3 Sdram Test
(DLLs), phase-locked loops (PLLs), and on-chip termination (OCT). The controller uses 50 MHz as a reference clock, generates one 800.0 MHz clock as memory clock, and generates one quarter-rate system clock 200.0 MHz for the controller itself. DE5-NET User Manual www.terasic.com August 4, 2017... - Page 82 4. Run the TCL files generated by DDR3 IP by selecting from the Quartus II menu: ToolsTCL Scripts… Design Tools 64-Bit Quartus 12.1 Demonstration Source Code Project directory: DDR3x2_Test Bit stream used: DDR3x2_Test.sof Demonstration Batch File DE5-NET User Manual www.terasic.com August 4, 2017...
-
Page 83: Ddr3 Sdram Test By Ios Ii
Table 6-2 LED Indicators NAME Description LED0 Reset LED1 DDR3 (A) test result LED2 DDR3 (B) test result LED3 Blinks Many applications use a high performance RAM, such as a DDR3 SDRAM, to provide temporary DE5-NET User Manual www.terasic.com August 4, 2017... - Page 84 1 GB of SDRAM. Then, it calls Nios II system function, alt_dache_flush_all, to make sure all data has been written to SDRAM. Finally, it reads data from SDRAM for data verification. The program will show progress in JTAG-Terminal when writing/reading data to/from DE5-NET User Manual www.terasic.com August 4, 2017...
- Page 85 Before you attempt to compile the reference design under Nios II Eclipse, make sure the project is cleaned first by clicking ‘Clean’ from the ‘Project’ menu of Nios II Eclipse. Demonstration Batch File DE5-NET User Manual www.terasic.com August 4, 2017...
- Page 86 The program will display progressing and result information, as shown in 164H164H Figure 6-4. Figure 6-4 Display Progress and Result Information for the DDR3 Demonstration DE5-NET User Manual www.terasic.com August 4, 2017...
-
Page 87: Pci Express Reference Design
Figure 7-1 shows the system infrastructure. The Terasic PCIe IP license is located in the FPGA System CD under the directory (/CDROM/License/Terasic_PCIe_TX_RX). This license is required in order to compile the PCIe design projects provided below. In case the license expires, please visit the FPGA website (DE5-Net.terasic.com) to acquire and download a new license. -
Page 88: Fpga Pci Express System Design
PCI Express Basic I/O Transaction Under read operation, the Terasic PCIe IP issues a read signal followed by the address of the data. Once the address is received, a 32-bit data will be sent along with a read valid signal. Under write operation, the PCIe IP issues a write signal accompany with the address to be written. - Page 89 Figure 7-3 Write transaction waveform of the PCIe basic I/O interface PCI Express DMA Transaction To support greater bandwidth and to improve latency, Terasic PCIe IP provides a high speed DMA channel with two modes of interfaces including memory mapping and FIFO link. The oFIFO_MEM_SEL signal determines the DMA channel used, memory mapping or FIFO link, which is enabled with the assertion of a low and high signal, respectively.
- Page 90 DMA transfer. As oDMARD_READ signal is asserted, the read data valid signal oDMARD_RDVALID is inserted high to indicate the data on the iDMARD_DATA data bus is valid to be read after two clock cycles. Table 7–2 DMA Channel Signals of Terasic PCIe IP Name Type...
- Page 91 Figure 7-4 Read transaction waveform of the PCIe DMA channel on memory mapping mode Figure 7-5 Write transaction waveform of the PCIe DMA channel on memory mapping mode DE5-NET User Manual www.terasic.com August 4, 2017...
- Page 92 Root Complex in response to a low-to-high transition. It also sends an INTA_Deassert message in response to a high-to-low transition. A pulse on oINT_ACK to user logic indicates that an INTA_Assert or INTA_ Deassert message has been sent. DE5-NET User Manual www.terasic.com August 4, 2017...
-
Page 93: Pc Pci Express System Design
Table 7–3 Interrupt Channel Signals of Terasic PCIe IP NAME Type Description iINT_STS output The user logic uses this signal to generate a legacy INT interrupt. oINT_ACK input A pulse on this output indicates that an INTx_Assert or INTX_ Deassert message has been sent. - Page 94 The PCI Express driver is incorporated in the DLL library called TERASIC_PCIE.dll. Users can develop their application based on this DLL. In 64-bits Windows, TERASIC_PCIE.dll is replaced by TERASIC_PCIEx64.dll, and wdapi921.dll is replaced by wdapi1100.dll. DE5-NET User Manual www.terasic.com August 4, 2017...
- Page 95 To install the PCI Express driver, execute the steps below: 1. From the FPGA system CD locate the PCIe driver folder in the directory \CDROM\demonstrations\PCIe_SW_KIT\PCIe_DriverInstall. 2. Double click the “PCIe_DriverInstall.exe” executable file to launch the installation program shown in Figure 7-9. DE5-NET User Manual www.terasic.com August 4, 2017...
- Page 96 Figure program. Figure 7-10 PCIe driver installed successfully 5. Once the driver is successfully installed, users can view the device under the device manager window shown in Figure 7-11. 170H170H DE5-NET User Manual www.terasic.com August 4, 2017...
- Page 97 To load the DLL, please refer to two examples below. Call the SDK API to implement the desired application. TERASIC_PCIE.DLL/TERASIC_PCIEx64.DLL Software API Using the TERASIC_PCIE.DLL/TERASIC_PCIEx64.DLL software API, users can easily DE5-NET User Manual www.terasic.com August 4, 2017...
- Page 98 Return TRUE if PCIe cards are successfully enumeated; otherwise, FALSE is return. PCIE_Open Function: Open a specified PCIe card with vendor ID, device ID, and matched card index. Prototype: PCIE_HANDLE PCIE_Open( WORD wVendorID, DE5-NET User Manual www.terasic.com August 4, 2017...
- Page 99 PCIE_HANDLE hPCIE); Parameters: hPCIE: A PCIe handle return by PCIE_Open function. Return Value: None. PCIE_Read32 Function: Read a 32-bits data from the FPGA board. Prototype: bool PCIE_Read32( PCIE_HANDLE hPCIE, PCIE_BAR PcieBar, PCIE_ADDRESS PcieAddress, DE5-NET User Manual www.terasic.com August 4, 2017...
- Page 100 Specify the target address in FPGA. dwData: Specify a 32-bits data which will be written to FPGA board. Return Value: Return TRUE if write data is successful; otherwise FALSE is returned. PCIE_DmaRead Function: DE5-NET User Manual www.terasic.com August 4, 2017...
- Page 101 Write data to the memory-mapped memory of FPGA board in DMA function. Prototype: bool PCIE_DmaWrite( PCIE_HANDLE hPCIE, PCIE_LOCAL_ADDRESS LocalAddress, void *pData, DWORD dwDataSize Parameters: hPCIE: A PCIe handle return by PCIE_Open function. LocalAddress: DE5-NET User Manual www.terasic.com August 4, 2017...
- Page 102 A pointer to a memory buffer to retrieved the data from FPGA. The size of buffer should be equal or larger the dwBufSize. dwBufSize: Specify the byte number of data retrieved from FPGA. Return Value: Return TRUE if read data is successful; otherwise FALSE is returned. PCIE_DmaFifoWrite DE5-NET User Manual www.terasic.com August 4, 2017...
- Page 103 Specify the byte number of data which will be written to FPGA. PCIE_IntEnable Function: Enable Interrupt function and given a user defined ISR(Interrupt Service Routine) while will be callback when an interrupt happens. Prototype: bool PCIE_IntEnable ( PCIE_HANDLE hPCIE, TERASIC_INT_HANDLER funcIntHandler Parameters: hPCIE: DE5-NET User Manual www.terasic.com August 4, 2017...
- Page 104 Routine) will not be callback when an interrupt happens. Prototype: bool PCIE_IntEnable ( PCIE_HANDLE hPCIE Parameters: hPCIE: A PCIe handle return by PCIE_Open function. Return Value: Return TRUE if interrupt is disabled successful; otherwise FALSE is returned. DE5-NET User Manual www.terasic.com August 4, 2017...
-
Page 105: Fundamental Communication
Download the PCIE_Fundamental.sof into the FPGA board using Quartus II Programmer. Restart Windows Install PCIe driver if necessary. The driver is located in the folder CDROM\demonstration \PCIe_SW_KIT\PCIe_DriverInstall. Launch the demo program PCIe_Fundamental_Demo.exe shown in Figure 7-12. DE5-NET User Manual www.terasic.com August 4, 2017... - Page 106 UI. Uncheck and Check the “Enable Interrupt” can reset the interrupt counter. Demonstration Setup Quartus II 12.0 Borland C++ Builder 6.0 Demonstration Source Code Location DE5-NET User Manual www.terasic.com August 4, 2017...
- Page 107 PCIe Fundamental demostrtion. The PCI Express demonstration uses the basic I/O interface and DMA channel on the Terasic PCIe IP to control I/O (Button/LED) and access two internal memories (RAM/FIFO) through the MUX block. Interrupt function also is included in this demonstration.
- Page 108 PID and DID which can use to specifiy the target PCIe card. To read the BUTTON status, the function is called: To set LED status, the function is called: DE5-NET User Manual www.terasic.com August 4, 2017...
- Page 109 To enable interrupt, call the function: (PCIE_ISR is interrupt service routine). The PCIE_ISR is user defined ISR (Interrupt Service Routine). In this demo, the routine is defined To disable interrupt, call the function: DE5-NET User Manual www.terasic.com August 4, 2017...
-
Page 110: Example 2: Image Process Application
0x1172 and 0xE001, respectively. The block diagram of FPGA PCIe design is shown in Figure 7-14. Figure 7-14 Block Diagram of Image Process in FPGA Demonstration Files Location The demo file is located in the folder: PCIE_ImageProcess\demo_batch DE5-NET User Manual www.terasic.com August 4, 2017... - Page 111 Click “Download Image” to download image raw data into the local memory of FPGA. Click “Process Image” to trigger ‘invert’ image process. Click “Upload Image” to upload image to PC from local memory of FPGA to be displayed on the window demo application. DE5-NET User Manual www.terasic.com August 4, 2017...
- Page 112 RAM of FPGA, and controls the user register that switches the function which inverts the image data from the internal RAM. PC Application Design The software design defines some constant based on FPGA design as shown below: DE5-NET User Manual www.terasic.com August 4, 2017...
- Page 113 The image process is started whenever the register is written with any value. To check whether the image process is finished, the control register is monitored by calling the function: When the image process is finished, the value of dwStatus becomes zero. DE5-NET User Manual www.terasic.com August 4, 2017...
- Page 114 To update the processed image from FPGA memory to PC, the function is called: DE5-NET User Manual www.terasic.com August 4, 2017...
-
Page 115: Chapter 8 Transceiver Verification
6.0 Gbps: SATA Host-0, SATA Host-1, SATA Device-0, and SATA Device-1 Gbps: PCIe Channel 0~7 To enable an external loopback of transceiver channels, specific loopback fixtures are required. Some fixtures may be proprietary to Terasic. For SFP+ loopback, optical SFP+ loopback fixtures are required. Figure 8-1... - Page 116 SATA loopback fixture. Figure 8-2 175H173 H Figure 8-2 SATA Loopback Fixture Figure 8-3 shows the Terasic PCIe loopback fixture. 176H174 H Figure 8-3 PCIe Loopback Fixture Figure 8-4 shows the FPGA board with all transceiver loopback fixtures installed.
-
Page 117: Testing
10. To terminate the test, press one of the BUTTON0~3 buttons on the FPGA board. The loopback test will terminate, and the test summary will be shown in the Nios-Terminal, as shown in Figure 8-6. 179H177H DE5-NET User Manual www.terasic.com August 4, 2017... - Page 118 Figure 8-5 Transceiver Loopback Test in Progress Figure 8-6 Transceiver Loopback Test Result Summary DE5-NET User Manual www.terasic.com August 4, 2017...
-
Page 119: Additional Information
Update section 5.2 for modifying si570 function 2015.12 V1.03 Add interrupt function for PCIe examples 2017.3 V1.04 Add Jungo PCIe driver 30 day trial version information. 2017.8 V1.05 Correct ddr3 data rate for 800MHz Remove Altera Logo DE5-NET User Manual www.terasic.com August 4, 2017...
Need help?
Do you have a question about the DE5-Net and is the answer not in the manual?
Questions and answers