Table of Contents
Advertisement
Quick Links
Advertisement
Table of Contents

Related Manuals for Aputure Light Storm LS 1/2


Summary of Contents for Aputure Light Storm LS 1/2
- Page 1 LS 1/2 Product Manual English...
-
Page 2: Intended Use
“Improper use” means using the products other than as described in these instructions or under operating conditions which di er from those described herein. Detailed product manual for Light Storm can be found on the movie solution page on www.aputure.com . -
Page 3: Item Checklist
Item check list Before starting, please check that all the following items have been included with the Light Storm LS 1/2. If anything is missing, contact your dealer immediately. Light Controller box Buckle Controller Button battery AC adapter Product manual... -
Page 4: Controller Box
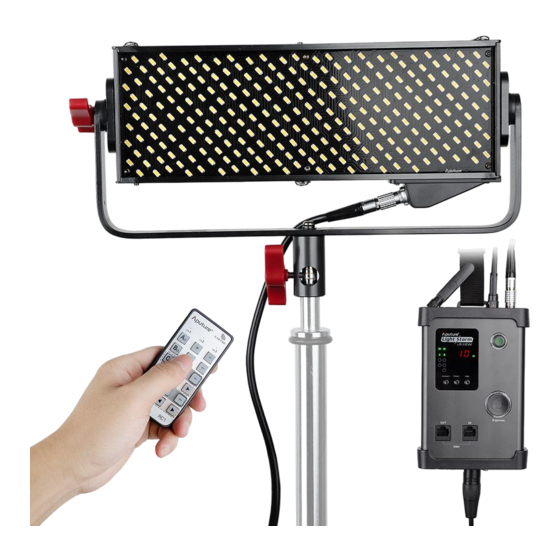
Nomenclature 1. Light NO.:6U001000 LED beads Clamp handle Supporting Cable box Clip Tilt knob Light label Cooling ns U-frame Hook tube 2. Controller box Antennas (*The signal strength is the best Eyelet bar when pulling the antennas as Socket the picture's show.) Power switch Display window Battery mount... -
Page 5: Display Window
4. Display window Groups indicator Channels indicator DMX indicator Brightness percent indicator Channel setting button DMX model setting button DMX channel setting button(+) Group setting button DMX channel setting button(-) Installations 1. Install the hook 2. Install the light 1) Turn around the clamp handle to install the light on the tripod. 2) Set the light at a speci c angle, and pull or turn around the tilt knob to fasten the light. - Page 6 3. Insert the connect cable dot to dot to power the light . *Tie the connect cable around the hook 4. Power the controller box 1) Powered by the adapter Locking spring AC 100V-240V Locking slot * Please pull the power adapter out by pushing the locking spring down on the controller box.
- Page 7 2) Powered by the battery V-Mount Battery Anton Bauer Battery * Battery output current ≥ 4A; * Please choose the model of the Light Storm by your battery need. 5. Clip the tracing paper by the clamps Tracing paper Cable box of the Light 6.
- Page 8 Operations 1. Press power switch to turn on the Light Storm. * “Channel 1 ,Group A” is by default. The brightness is 10% by default. 2. Manual controlled by the controller box Brightness adjustment and display 3. Remote controlled by the controller You can control the LS 1/2 of channel 2, group C according to the following directions.
- Page 9 *2) Group setting and display 2) The controller setting and display Press ( ) to set the channel 2 “ ” indicator lights The controller setting is nished. *The Light Storm has three channels (1/2/3) and four groups (A、B、C、D). 3) Brightness adjustment Press ( ) of group C to adjust the brightness .
- Page 10 4.The DMX control 1) Connect a standard DMX console OUTPUT DMX512 Only one Light Storm OUTPUT DMX512 One by one * See the interface de nition of the DMX as the picture shows: positive ground ground negative empty ground empty ground...
- Page 11 2) The DMX setting *1) Press DMX model setting button on the controller box to enter into the DMX model. *2) Press the DMX channel setting button (+/-) on the controller box to your needed DMX channel. 3) The standard DMX console control Control the Light Storm by the standard console within the same DMX channel setting as above.
-
Page 12: Specifications
Specifications LS 1/2w Model Operation Current Power Supply DC 15V Power Input Beam Angle 120° Color Temperature 5500K Average Life Span ≥100,000 hours Cooling Mode Natural convection heat transfer Radio Frequency 2.4GHz Channels 1/2/3 Groups A/B/C/D Remote Range ≤100m Light 360.5*217.2*25.4 mm Sizes Controller box...
Need help?
Do you have a question about the Light Storm LS 1/2 and is the answer not in the manual?
Questions and answers