Table of Contents
Advertisement
Quick Links
TRANSPOSE
MASTER EQ
VARIATION
-24
+15
ROTARY S/F
Hi
VOLUME
-24
MID
+15
1.4k
200Hz
FREQ
7k
KB3 DISTORTION
-24
LOW
+15
ON/OFF
Rev. B - Written for software release v2.0 and OS 3.69.28028
REAL - TIME CONTROL
ASSIGNABLE SWITCHES
1
2
3
4
5
6
7
8
9
KB3
ZONE 1
ZONE 2
ZONE 3
ZONE 4
FX1
FX2
DELAY
REVERB
BRAKE
ON/OFF
CHOR/VIB
DEPTH
ON/OFF
LOUD/SOFT
DECAY F/S
PITCH H/L
KEY CLICK
ARP ON/OFF
CHORUS / VIBRATO
PERCUSSION
KB3
A
B
C
D
E
F
G
H
I
SAVE
EDIT
1
FILT/EQ 1
FILT/EQ 2
ATTACK
DECAY/REL
REL/RATE
FX1
FX2
DELAY
REVERB
ZONE 1
ZONE 2
ZONE 3
ZONE 4
STORAGE
ACTIVE
CHANNEL
LAYER
ZONE
EXIT
FAVORITES
2
3
4
5
6
7
8
9
10
®
SE
SOUND SELECT
MODE
CATEGORY
PROGRAM
PIANO
E.PIANO
CLAV
ORGAN
LEADS
PADS
SYNTHS
SYNTH BASS
MULTI
STRINGS
BRASS/WINDS ENSEMBLE
HYBRID
GUITAR/BASS
VOICES/MISC
DRUMS
PERCUSSION
PROGRAM / MULTI
GLOBAL
1
2
3
4
5
6
7
8
1
2 ABC
3 DEF
4 GHI
5 JKL
6 MNO
7 PQRS
8 TUV
USER
PREVIOUS
NEXT
9
10
11
12
13
14
15
16
9 WXYZ
0
SPACE
INSERT
DELETE
+
-
CANCEL
ENTER
/
VALUE JUMP
PROGRAM
DEMO
PANIC
DEMO
Part Number 91580-002
i
Advertisement
Table of Contents

Related Manuals for Kurzweil FORTE SE


Summary of Contents for Kurzweil FORTE SE
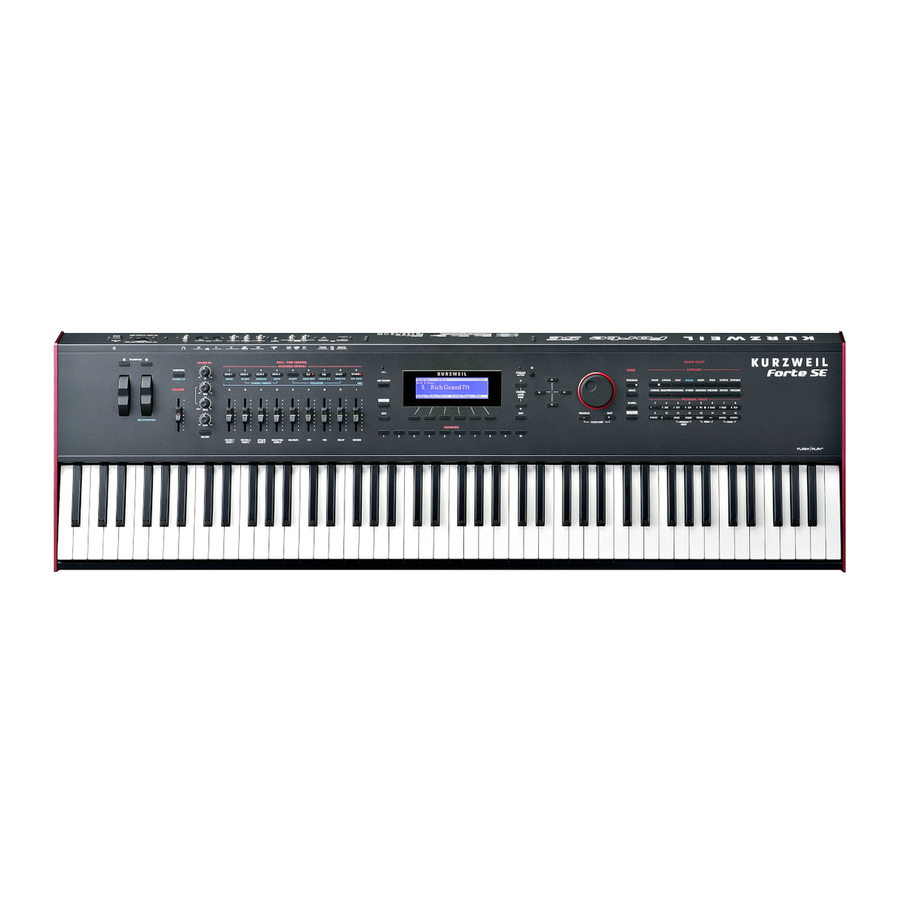
- Page 1 TRANSPOSE REAL - TIME CONTROL SOUND SELECT MASTER EQ ASSIGNABLE SWITCHES VARIATION MODE CATEGORY STORAGE ZONE 1 ZONE 2 ZONE 3 ZONE 4 DELAY REVERB ACTIVE ROTARY S/F BRAKE ON/OFF CHOR/VIB DEPTH ON/OFF LOUD/SOFT DECAY F/S PITCH H/L KEY CLICK ARP ON/OFF PROGRAM PIANO...
- Page 2 CAUTION The lightning flash with the arrowhead symbol, within an equilateral triangle is intended to alert the user to the presence of uninsulated RISK OF ELECTRIC SHOCK "dangerous voltage" within the product's enclosure that may be of sufficient magnitude to constitute a risk of electric shock to persons. DO NOT OPEN CAUTION: TO REDUCE THE RISK OF ELECTRIC SHOCK, The exclamation point within an equilateral triangle is intended...
-
Page 3: Important Safety Instructions
AC receptacle. ©2016 Young Chang Co., Ltd. All rights reserved. Kurzweil® is a product line of Young Chang Co., Ltd. Kurzweil®, Young Chang®, V. A. S. T.®, and Forte SE® are trademarks of Young Chang Co., Ltd. All other trademarks and copyrights are property of their respective companies. Product features and specifications are subject to change without notice. -
Page 4: Kurzweil International Contacts
Kurzweil International Contacts Contact the Kurzweil office listed below to locate your local Kurzweil representative. Customers outside the US: US Customers: Young Chang Co., LTD. American Music & Sound 178-55, Gajwa-Dong, Seo-Ku 925 Broadbeck Dr #220 Newbury Park, CA 91320... -
Page 5: Table Of Contents
Kurzweil International Contacts ..................iv Introducing Forte SE ............1-1 Main Features ....................... 1-1 Do You Have Everything? .................... 1-3 Keeping the Forte SE up to date ................. 1-3 Music Rack (Optional) ....................1-3 Getting Started ..............2-1 Before You Start… ......................2-1 Setting up the Forte SE .................... - Page 6 Table of Contents The Edit Button ......................3-12 The Save Button ......................3-12 Sound Select ....................... 3-13 Double Button Presses ....................3-14 Terminology ..............4-1 The Operating Modes ............5-1 Program Mode ......................5-1 Multi Mode ........................5-2 Global Mode ........................5-3 Functions ........................
- Page 7 Table of Contents The Layer FX (LYR_FX) Page ..................7-16 The COMMON Page ....................7-17 The KEYMAP Page ..................... 7-20 The LAYER Page ......................7-25 The PITCH Page ......................7-31 The AMP Page ......................7-31 The Algorithm (ALG) Page ..................7-31 The DSP Control (DSPCTL) Page ................
- Page 8 Table of Contents KB3 Editor: The LFO, ASR, FUN, and ARP Pages ........... 7-96 The Effects Chain Editor ..........8-1 The MAIN Page ......................8-1 The MOD Pages ......................8-2 FXLFO, FXASR, and FXFUN pages ................8-3 INFO page ........................8-3 The Utility Soft Buttons, HELP Soft Button and Favorites Buttons Functions Effects Parameters .......................
- Page 9 Table of Contents The Controller Destination List ................11-20 COMMON Page ......................11-27 ARP1 and ARP2 (Arpeggiator 1 & 2) Pages ............11-28 FX Page ........................11-29 AUXFX 1, AUXFX 2 ....................11-30 About Auxiliary Effects .....................11-32 Audio Input (AUD-IN) ....................11-32 The Utility Soft Buttons, HELP Soft Button and Favorites Buttons Functions 11-34 Save User Multis ......................11-35 Global Mode ..............
- Page 10 Song Editor: The TRACK Page ................13-19 Song Editor: Track Functions ................. 13-22 Song Editor: The EVENT Page ................13-29 System Mode ..............14-1 Run Forte SE ....................... 14-2 System Update......................14-2 Run Diagnostics ......................14-7 System Reset ......................14-8 System Utilities ......................
-
Page 11: Introducing Forte Se
Forte SE. Main Features Forte SE is Kurzweil’s latest entry in the Forte line of stage pianos. Some of the key specifications include: • FlashPlay technology with support for 2 GB of Sound ROM •... - Page 12 • 1 jack on the rear panel for an optional continuous controller pedal: CC (Volume) Pedals (Optional) As described above, the Forte SE has three jacks on the rear panel for optional pedal controllers. Two jacks for switch pedals, which are typically used to control two-state (i.e., on / off) parameters such as sustain, sostenuto, and mute Zone.
-
Page 13: Do You Have Everything
Don’t connect anything until you make sure the Forte SE is properly and safely situated. If your Forte SE keyboard has been out in the cold, give it time to warm up to room temperature before starting it, since condensation may have formed inside. -
Page 14: Getting Started
Don’t connect anything until you make sure the Forte SE is properly and safely situated. If your Forte SE keyboard has been out in the cold, give it time to warm up to room temperature before starting it, since condensation may have formed inside. -
Page 15: Updating The Forte Se
Balanced (“TRS” or “Stereo”) cables are recommended if your mixer or amp supports balanced inputs. Make sure your sound system is at a safe volume level. Also make sure that the Forte SE Master Volume slider (on the far left side of the front panel) is all the way down. -
Page 16: The Rear Panel
(a switch that decreases the input audio signal level, typically by 20dB) if it has one. To hear the capabilities of the Forte SE, you can play the demo songs. Press the 13 & 14 Program/Multi buttons simultaneously to listen to a demo song. -
Page 17: The Midi (In And Out) Ports
MIDI transmitting port, and the IN port is the MIDI receiving port. Basic MIDI Hookup To use the Forte SE as a MIDI controller for another sound module, use a MIDI cable to connect the MIDI port marked “Out” to the MIDI input port of the module that you want to control. - Page 18 Global Control Overrides page in Global Mode. Pedals are also independently assignable within each Program or each Zone of every Multi. Here are the default control settings for the five pedals used by Forte SE: SW 1a Pedal...
- Page 19 Getting Started The Pedal Jacks NOTE : Do not step on the switch pedals when powering up the Forte SE, as the state of the pedal is detected as part of the power up sequence. The Forte SE SW1 and SW2 jacks can support a single or dual switch pedal on each jack, or a single half-damper pedal on each jack.
- Page 20 SW1 and SW2 inputs on the rear panel. Some pedals have the wiper connected to the ring, and these pedals will require an adaptor to work with the Forte SE. When connected to the SW1 jack, a Half Damper pedal enables finer control of sustain than a standard switch pedal.
-
Page 21: The Audio (Left/Mono And Right) Jacks
PA system inputs, and connect the other end to the jacks marked Left (Mono) and Right on the rear panel of the Forte SE. If you have only one input available, use the Forte SE’s Left (Mono) output to get the full signal in mono. Use the jack marked Headphones to listen to Forte SE on headphones. - Page 22 Getting Started Connecting to Your Audio System AUDIO OUT Forte SE connected to a mixer, powered speakers and headphones...
-
Page 23: Connecting To A Computer
If you wish to use your own cable, make sure that it is a Type-A-to-Type-B USB cable (the USB port of Forte SE being Type B). By default, the Forte SE will act as a MIDI controller (rather than a hard drive) when connected to a computer. - Page 24 Forte SE Sounds Selecting Programs and Multis The Forte SE always powers up in Program Mode. If you wish to play a Multi, simply press the Multi Button. The Multi Button will light up to show that Multi Mode is selected. To return to Program Mode, from a different mode, simply press the Program button.
-
Page 25: Features Of The Forte Se
Power Up Defaults Powering up the Forte SE always resets the Transpose setting to 0 steps. (This is the transpose setting controlled by the Transpose buttons above the pitch and mod wheels, or with the “Octav-”... -
Page 26: The Front Panel
Features of the Forte SE The Front Panel The Front Panel All the controls for Forte SE, both musical and navigational, are on its front panel. Multi-Function Switches KB3 indicator light Master EQ LCD display Variation button Display contrast knob... -
Page 27: Real Time Controls
Features of the Forte SE Real Time Controls Real Time Controls Sliders In Program Mode, the sliders are used to control various Program parameters, typically assigned to the functions labeled in white below each slider. Moving a slider will briefly show the assignment name in the display. - Page 28 Features of the Forte SE Real Time Controls Assignable Switches These nine buttons perform various functions in real time, depending upon the current performance mode and assignment. The Switch Button LEDs illuminate when the switch is active. In Program Mode the switches generally control synthesis parameters and effects as labeled in white on each switch button.
- Page 29 Features of the Forte SE Real Time Controls Variation Button The Variation button is located on the left side of the front panel, just above the Volume slider. The Variation Button is a MIDI controller (default MIDI CC#29) that is programmed in most Programs to modify the sound, such as adding a pad sound, changing the effects or some other variation suited to changing with a switch.
-
Page 30: Transpose Buttons
Features of the Forte SE Real Time Controls Arp On/Off Button The Arp On/Off button is set by default to turn on and off the Forte SE’s Arpeggiator. It can also be assigned to control other parameters in Multi Edit mode. Transpose Buttons The Transpose buttons are located on the left side of the front panel, just above the Pitch &... -
Page 31: Pitch Wheel
When a KB3 Program is in use, the Modulation Wheel is assigned to control distortion. Foot Switches and Controllers The Forte SE has sophisticated Pedal controller options allowing up to 4 Switch Pedals or up to 2 Half Damper Pedals as well as a Continous Controller Pedal to be connected. By default the Switch Pedals control SW1a - Sustain, SW1b - Sostenuto, SW2a - Sostenuto and SW2b - Soft. -
Page 32: Master Eq
Features of the Forte SE Master EQ Pedal assignments can be changed in each Program and saved in a User Program. Each Zone in a factory Multi may have different pedal assignments, and pedals are all independently assignable within each Zone of a user Multi. You can also use Global Mode to set pedal overrides, which will change the assignment of each pedal for all Programs in Program Mode, and act as default pedal assignments for all Multis in Multi Mode. -
Page 33: Mode Buttons
This controls the audio output level to external speakers and headphones. Mode Buttons The Mode buttons are located on the right side of the Forte SE front panel. With these buttons you can instantly access the Program, Multi or Global Modes. If you are viewing an edit mode, you will have to press the Exit button before changing modes. -
Page 34: Navigation
(aftertouch) sensitivity. Additionally, you can save or load user Programs and Multis to and from a computer connected to the Forte SE via USB as well as perform a Reset. This button’s LED is illuminated when you are in Global Mode. - Page 35 Features of the Forte SE Navigation Display Contrast Knob You can adjust the display contrast by turning this small potentiometer knob. Previous (–) and Next (+) Value Buttons Use the Previous and Next buttons to scroll through the list of values for the currently selected parameter.
-
Page 36: The Edit Button
Features of the Forte SE The Edit Button The Edit Button In Program or Multi Mode, press the Edit button to enter the Program or Multi Editor for the currently selected Program or Multi. In the Program Editor, press the Edit button to enter an editor for the currently selected Effects Chain or FX Algorithm;... -
Page 37: Sound Select
Features of the Forte SE Sound Select Sound Select The Sound Select section allows you to quickly and easily get access to sounds in either Program or Multi Modes. Select the Category of sound you want, then via the Program/ Multi buttons select any of the 16 sounds in that Category. -
Page 38: Double Button Presses
Double Button Presses Several pairs of the buttons on the Forte SE have timesaving secondary functions when pressed simultaneously—think of them as keyboard shortcuts. For convenience of reference, descriptions of all of the double-button press functions appear below. - Page 39 Features of the Forte SE Double Button Presses In Program Mode, the Value Jump double button press selects the first Program of each Category, as well as the Category Default Program of each Category (if a Category Default Program has been set).
- Page 40 Features of the Forte SE Double Button Presses Reset Transposition Pressing both Transpose + and Transpose – , or Octave + and Octave - (Soft Buttons) simultaneously will restore the current Program or Multi to having no transposition. Program Demo In Program Mode only, pressing the 11 &...
- Page 41 Demo on page 3-17). With the Demo Function selected, you can hear a demonstration Song that showcases many of the features of Forte SE. A label below the 13 & 14 Program/Multi buttons indicates the Demo double button press. Panic Pressing the 15 &...
- Page 42 Enter button while moving Forte SE controllers (Sliders, Switch buttons, Keys, Mod Wheel, and Pedals). This is useful for quickly assigning physical controllers or setting key ranges in Program Edit Mode or Multi Edit Mode, as well as finding existing controller assignments on the Program Edit Parameters page.
-
Page 43: Terminology
Since there are no standard definitions for some of these terms, they are described here to avoid confusion. All of these terms appear with the first letter capitalized as proper nouns in this manual to make it easy to distinguish between the generic term and the Forte SE specific term. - Page 44 Layers. Forte SE Bank A Forte SE Bank is a group of 256 Programs or Multis that can be navigated with the Sound Select buttons. On the main Program Mode or Multi Mode select pages, press the current Mode button to view the Select Bank page for the current mode.
- Page 45 Terminology Reset A process that returns Forte SE back to a Factory state. All User Programs & User Multis are erased. All Global Mode parameters are reset back to their default settings as well. Object Anything that can be named, saved, deleted, or edited (i.e., a Program or a Multi).
-
Page 46: The Operating Modes
Program Mode Chapter 5 The Operating Modes This chapter will help familiarize you with the operating Modes of the Forte SE. Each of the five Modes (Program, Program Edit, Multi, Multi Edit, Global) has its own individual chapter. The four Functions (Split, Layer, Program Demo, and Song Demo) are described in this... -
Page 47: Multi Mode
The Operating Modes Multi Mode Multi Mode Multi Mode allows you to select and play Multis. A Multi allows up to 8 instrument sounds (Programs) to be played from the keyboard at once. A Multi has up to eight Zones, each with its own keyboard range, Program, MIDI channel, and controller assignments. -
Page 48: Global Mode
Global Mode allows you to edit global parameters and MIDI settings, load and save User Programs and Multis, use diagnostic tools, view system information, and restore the Forte SE back to factory default settings. To enter Global Mode from another Mode, press the Global... -
Page 49: Functions
The Operating Modes Functions Functions In addition to the four primary Modes, there are five Functions. Some Functions are available through dedicated buttons, others are available as Soft buttons accessed via the buttons under the LCD screen. These Functions are not as complex as the primary Modes and are described below. - Page 50 Pressing the 13 & 14 Program/Multi buttons simultaneously performs the Demo Function. Use the Demo Function to play built-in Demo Songs designed to demonstrate the capabilities of the Forte SE. While using the Demo Function, the top line of the display shows the text “Demo”, the Demo number, and the total number of available Demos.
-
Page 51: Program Edit Mode
The Operating Modes Program Edit Mode Program Demo Function Pressing the 11 & 12 Program/Multi buttons simultaneously performs the Program Demo Function. In Program Mode, use the Program Demo Function to play a built-in Demo Song that demonstrates the selected Program. The 11 & 12 Program/Multi button LEDs blink when using the Program Demo Function. -
Page 52: Multi Edit Mode
The Operating Modes Multi Edit Mode Multi Edit Mode Multi Edit Mode allows you to edit pre-existing Multis. To enter Multi Edit Mode press the Edit button while in Multi Mode. For more detailed information on Multi Edit Mode, see Ch. -
Page 53: Program Mode
About Program Mode Program Mode is the default Mode of the Forte SE. It will always boot up in this Mode. To enter Program Mode from another Mode, press the Program Mode button. While you are in Program Mode, the Program button’s LED is illuminated. -
Page 54: Selecting Programs
Banks A-D). Factory Banks B-D are reserved for future Forte SE program updates. When announced, free updates can be downloaded at kurzweil.com. Each Forte SE Bank has space for 256 Programs, for a total of 2048 possible programs. Each Bank is split into 16 categories of 16 Programs each. - Page 55 Program Mode Selecting Programs Program Demo If you want to quickly hear what a Program sounds like, try the Program Demo Function. In Program Mode only, pressing the 11 & 12 Program/Multi buttons performs the Program Demo Function. The Program Demo Function plays a Demo Song for the currently selected Program.
- Page 56 Program Mode Selecting Programs The Display In Program Mode, the top line of the display shows the current Mode, MIDI transposition, and MIDI Channel. The Program ID number and name are displayed in the center of the display. The current Bank and Category are displayed above the program ID and name. When a controller is moved, the controller assignment and value is briefly displayed below the program ID and name.
- Page 57 Program Mode Selecting Programs Alpha Wheel & Previous (–) and Next (+) Value Buttons Use the Alpha Wheel or the Previous (-) and Next (+) buttons, to the right of the display below the Alpha Wheel, to change the current Program. Turning the Alpha Wheel counter- clockwise or pressing the Previous button will select the previous Program and turning the Alpha Wheel clockwise or pressing the Next button will select the next Program.
- Page 58 Next button to advance to the next Program in the Category. When you reach the end of a Category, the Forte SE automatically advances to the beginning of the next Category. This will also work in reverse if you turn the Alpha Wheel counter-clockwise or press the Previous button.
-
Page 59: Transposition
Favorite button until the display shows the message “Favorite (#) saved.” Transposition The Transpose buttons can be used to change the tuning of notes played on the Forte SE keyboard in semitones (ST), also known as half steps. This is a convenient way to change the key of a song without learning to play it in a different key. -
Page 60: Controller Parameter Assignments
Program Mode Controller Parameter Assignments Press the Transpose - or + buttons to transpose the Forte SE keyboard down or up by one semitone. The top line of the display shows the current transposition value. Pressing both Transpose - and + simultaneously will reset the transposition to 0. To transpose up and down by octave intervals (12 ST), press the Octav- and Octav+ soft buttons underneath the display. -
Page 61: Controller Conventions
Program Mode Controller Conventions Controller Conventions Forte SE Controller Conventions ® Synthesis Effects (Variation 2 (Variation 3 (Amplitude (Release (Tremolo/Vibrato/ (FX1 (FX2 (Delay (Reverb Envelope Sample LFO Shape) Enable) Enable) Enable) Enable) Pad Octave Down) Pad Octave Up) Impact Enable) Enable) (Amplitude (Amplitude... -
Page 62: The Split And Layer Functions
Program Mode The Split and Layer Functions The Split and Layer Functions The Split and Layer soft buttons perform slightly different functions, but offer identical parameters. The Split Function allows you to quickly create a Multi such that keys in one region of the keyboard produce different sounds than another region. - Page 63 Program Mode The Split and Layer Functions Split Function When you create a Split in Program Mode, you are creating a Multi with two active Zones. The Program you were using in Program Mode is used in the right hand of the Split as the Program for Zone 1.
- Page 64 Selecting Split or Layer makes Zone 2 active. You can continue to add Zones to the Multi by activating additional Zones with the Stat parameter or the front panel Zone buttons. The Forte SE will display a message if you have already reached the maximum number of active Zones (see Chapter 10, for more information on Multis).
- Page 65 Program Mode The Split and Layer Functions Program (Split or Layer Program) The default Program will appear in Zone 2. Choose a different Program using the Category and Program/Multi buttons, the Alpha Wheel, or the Previous-/Next+ buttons. Low/Hi (Keyboard range) The Low and Hi parameters set the keyboard boundaries for each Zone.
-
Page 66: The Arp Pages
Program Mode Save User Programs The Arp Pages Selecting the Arp soft button will call up the Arpeggiator settings on the ARP1page, and put you into Program Edit Mode. See The Arpeggiator Function on page 7-56 for details on using the Arpeggiator function. Save User Programs If you make changes to the current Program using any of the controllers, the Save button’s LED lights to indicate that a change has been made to that Program. - Page 67 Program Mode Save User Programs To change the ID number, turn the Alpha Wheel or use the Previous-/Next+ buttons to select the new ID number. To organize Programs by Category, press a Category button to select the first ID of the Category, then press the Program/Multi 1-16 buttons to select an ID in the selected Category.
- Page 68 Program Mode Save User Programs Saving a User Program Press the Save button or Save soft button to complete the saving process, or press the Cancel soft button to exit without saving. The display will confirm a successful save by displaying a brief message. After successfully saving, the Program will be selected in Program Mode in the User Bank.
-
Page 69: Changing The Transmit Midi Channel
Program Mode Panic Changing the Transmit MIDI Channel The current MIDI Transmit channel is shown on the right side of the top line of the display. A different Program can be selected for each MIDI Channel. All channels can be triggered simultaneously from an external MIDI sequencer or computer. -
Page 70: Program Edit Mode
Program Edit Mode About Program Edit Mode Chapter 7 Program Edit Mode This chapter will help familiarize you with the features of Program Edit Mode. About Program Edit Mode Ch. 6 Program Mode NOTE: Before you read this chapter, be sure to read for a full description of Programs. -
Page 71: Selecting Parameters
Program Edit Mode Selecting Parameters Selecting Parameters The Display In Program Edit Mode, the top line of the display shows the current Mode, Page, and Layer. Current Page Current Parameter Soft button options for Program Edit mode Alpha Wheel & Previous (–) and Next (+) Value Buttons Use the Alpha Wheel or the Value buttons to the right of the display below the Alpha Wheel, to change the selected parameter value. - Page 72 Enter button while moving Forte SE controllers (Sliders, Switch buttons, Keys, Mod Wheel, and Pedals). Parameters that can use the Assign function are indicated by showing the Assign symbol in the top right corner of the display when selected.
-
Page 73: Vast And Kb3 Programs
The layer is the VAST program’s basic unit of polyphony, that is, each layer constitutes one of the 128 voice channels the Forte SE can activate at any time. If you have a program that consists of two layers covering the note range from A 0 to C 8, each key you strike triggers two voice channels. - Page 74 Program Edit Mode Program Mode VAST Program Structure VAST Program Structure Zone Zone Zone Zone Zone Zone Zone Zone 8 keyboard zones—each 16 keyboard zones— MULTI with independent each with independent program, MIDI channel, program, MIDI channel, and control assignments and control assignments PROGRAM Selected for performance...
-
Page 75: Editing Vast Programs
• Dynamic VAST lets you “wire” your own algorithms. You can combine different DSP functions in any order you like, including parallel and serial configurations. The Program Editor is where you begin to modify the Forte SE’s resident sounds, and to build your own sounds around sample keymaps or KVA oscillators (see... -
Page 76: The Soft Buttons In The Program Editor
Arpeggiator preset. Assigning VAST Parameters to Control Sources Many Forte SE program parameters can be assigned to be controlled by the Forte SE’s physical controllers or by MIDI CCs from an external MIDI device. For details on... - Page 77 Forte SE physical controller. See the PARAMETER CONTROLS on page 7-11 a list of CC numbers used by the Forte SE’s physical controllers. Some MIDI CCs are also hard wired to control certain program parameters or functions such as MIDI 5 (Portamento...
- Page 78 Program Edit Mode Editing VAST Programs VAST Sources and the Parameters Page When assigning a physical controller or CC number to a source field, a Parameter is automatically added to the Parameters Page with the name of the first assigned VAST parameter.
-
Page 79: The Parameters (Params) Page
The Parameter (left) column shows a list of every parameter in the current program that has been assigned to be controlled by one of the Forte SE’s physical controllers (or by an external MIDI CC number). Effect Chain parameters are named with prefixes based on their effect type, either “INS”... -
Page 80: Parameter Controls
CC numbers when using an external MIDI control source or else the parameter will also be controlled by a Forte SE physical controller. The list below shows the available choices for the Control column. MIDI CC numbers associated with the Forte SE’s physical controllers are highlighted in bold type. - Page 81 Program Edit Mode The Parameters (PARAMS) Page Important note about selecting a Control source When you change the control source for a parameter, the new control source immediately sets its current value for the MIDI value of the current parameter. If the MIDI value of the parameter was set to None before changing the control source, changing the control source will set a new MIDI value, but the Value column for the parameter will still display None (see Important note about values of “None”).
- Page 82 Program Edit Mode The Parameters (PARAMS) Page Important note about values of “None” For factory programs, standard parameters like Expression (program volume), Sustain, and Sostenuto are always set to None by default. If you change one of these values, either on the Parameters page in the Program Editor, or with a physical controller from Program Mode (or the Program Editor,) the same value will be used for any other program you select, if you select another program that uses a value of None for the same parameter.
-
Page 83: The Program Fx (Fx) Page
Control Source List On the Forte SE, a program can have up to 11 insert effects and 2 aux effects using up to 32 DSP “units.” An insert is essentially just an effect that you apply to a program or layer, while aux effects receive signal from all active programs’... - Page 84 The Pre/Post Insert parameter determines the point at which the auxiliary effect is applied to the signal. When this parameter is set to Post, the Forte SE applies the auxiliary effect to the signal post-insert, i.e., after the insert effect has been applied. When this parameter is set to Pre, the Forte SE applies the auxiliary effect to the signal pre-insert.
-
Page 85: The Layer Fx (Lyr_Fx) Page
The Aux Mod parameter gives you real-time control over the amount of program signal sent to the aux effects chain. You can set the Aux Mod parameter to any Forte SE control source. The amount that you specify for the Aux Send parameter is the maximum value that the Aux Mod control source can send—the minimum value is 0. -
Page 86: The Common Page
Program Edit Mode The COMMON Page All of the Layer-Specific FX mode parameters have the same functions and ranges of values as their corresponding parameters on the FX page. See The Program FX (FX) Page on page 7-14 for more information on these parameters. Use Another Layer’s FX Mode With Use Another Layer’s FX selected, you can put the current layer through the effects of another layer. - Page 87 The pitch glides toward the most recently triggered note, and remains at that pitch as long as the note remains on. The Forte SE gives you two ways to get portamento. See the Attack Portamento parameter below.
-
Page 88: Portamento Rate
When applying portamento to multi-sampled sounds (Acoustic Guitar, for example), the Forte SE will play more than one sample root as the pitch glides from the starting pitch to the ending pitch. This may cause a small click at each sample root transition. You can... -
Page 89: The Keymap Page
Program Edit Mode The KEYMAP Page You’ll use global control sources when you want to affect all notes in a program uniformly, and local control sources when you want to affect each note independently. For example, you’d use a global LFO controlling pitch to create a Leslie effect on an organ sound, since you want the effect applied to all the notes you play. - Page 90 Keymap1 and Keymap2 respectively. For keymaps beginning with “Stereo,” assign the same keymap to both Keymap1 and Keymap2. If you select the same keymap for Keymap1 and Keymap2, the Forte SE automatically uses the left side for Keymap1 and the right side for Keymap2.
- Page 91 Program Edit Mode The KEYMAP Page Keymap Assign a keymap from ROM to the current layer. Keymaps are collections of samples assigned to note and velocity ranges. With the Keymap parameter selected, press the Edit button to enter the Keymap editor (see Ch.
- Page 92 Alternative Switch (AltControl and AltMethod) Many, but not all, Forte SE sample roots have been pre-assigned a carefully chosen alternate sample start point that can be selected using the Alternate Switch feature (AltControl and AltMethod parameters). This feature allows you to control the sample playback start/end time triggered by any control source.
- Page 93 Most of the Forte SE’s ROM samples have their Alt points set for purposes of legato play. In most cases the difference in attacks is subtle, but for some sounds, like drums, the difference can be more noticeable.
-
Page 94: The Layer Page
Program Edit Mode The LAYER Page 6. When making your own Chain, the FX preset “600 String Resonance” should be used for the first box of the Program’s insert Chain. When a layer has the Pno.Resonanc parameter set to On, the FX preset “600 String Resonance”... - Page 95 Program Edit Mode The LAYER Page Parameter Range of Values Default Bend Off, Key, All Trig Normal, Reversed, Pedal Down, Pedal Up Normal Delay Control Control Source list Minimum Delay 0 to 25 seconds Maximum Delay 0 to 25 seconds Layer Enable Control Source list Enable Sense...
- Page 96 Program Edit Mode The LAYER Page Using LoVel and HiVel, you can set up velocity switching between up to eight layers. If you need even more, you can do it using the Enable Enable Sense (S) parameters on page 7-28. Pitch Bend Mode (Bend) This determines how Pitch bend control messages will affect the current layer.
- Page 97 Program Edit Mode The LAYER Page delay. This doesn’t change the note’s attack time, just the time interval between the Note On message and the start of the attack. The delay is measured in seconds. Enable This assigns a control source to activate or deactivate the layer. When the value of the assigned control source is between the minimum and maximum thresholds set by the Sense (S) parameter, the layer is active.
- Page 98 Program Edit Mode The LAYER Page Using this parameter in conjunction with the Enable parameter, you can easily create velocity-switching for as many layers as you have in your program. This is useful for drum programs, since you can define a different velocity-trigger level for each of the 32 layers available in drum programs.
- Page 99 Cancel and Enter buttons simultaneously to stop sustained notes). This parameter can come in handy when your Forte SE is slaved to a drum machine or sequencer, which sometimes generates Note Ons and Note Offs so close together that the envelope doesn’t have time to play before the note is released.
-
Page 100: The Pitch Page
(DSP) functions that you select. The Forte SE’s algorithms are the core of Variable Architecture Synthesis Technology. The DSP functions are synthesis tools (filters, oscillators, etc). that you assign to the various stages of the algorithm. -
Page 101: Algorithm Basics
DSP functions. Note: Changing a layer’s algorithm can affect the layer’s sound drastically. It’s a good idea to bring down the volume of your Forte SE or your sound system before changing algorithms. Algorithm Basics below for information on editing algorithms. -
Page 102: Common Dsp Control Parameters
Program Edit Mode The Algorithm (ALG) Page Each block of the algorithm represents a certain function in the signal path. In every non- cascaded algorithm (see Alt Input for Algorithms (Cascade Mode) on page 7-36 below), the signal flows first through a one-stage DSP function that controls the pitch of the samples in the keymap (this function is represented as a block labeled PITCH in the upper right-hand corner of the display). - Page 103 The Forte SE always uses real values of measurement, rather than just arbitrary numbers, for adjustable parameters. This means that you specify pitch in semitones (ST) and cents (ct), and amplitude in decibels (dB).
- Page 104 Middle C. In the case of pitch, for example, say you assign a value of 5 cents per key for the key tracking parameter. Triggering Middle C (C 4 on the Forte SE) will play a normal C 4. Triggering C 4 will play a note 5 cents higher than C 4.
- Page 105 Src1 to MWheel, and set Depth to 1200 ct, the pitch will rise as you push the Mod Wheel up on your Forte SE or MIDI controller, reaching a maximum of 1200 ct (12 semitones, or one octave).
- Page 106 Dynamic VAST The Dynamic VAST editor is yet another particularly powerful feature of the Forte SE that allows you to edit the wiring of an algorithm. With Dynamic VAST, literally thousands of wiring schemes are possible.
-
Page 107: The Dsp Control (Dspctl) Page
Program Edit Mode The DSP Control (DSPCTL) Page In addition to having a selectable function, each function block has three editable parameters: number of inputs, number of outputs, and block size (the Output Mode parameter is an editable parameter of the algorithm as a whole). When you first enter the EditAlg page, there will be a cursor in the parameter field, and the first block of the algorithm will be highlighted. -
Page 108: The Dsp Modulation (Dspmod) Page
Program Edit Mode The DSP Modulation (DSPMOD) Page Each field in the left-hand column of the page is a function-parameter of the current layer’s algorithm. You can coarsely adjust the function-parameter in these left-hand fields—as noted Common DSP Control Parameters on page 7-33, any adjustments made to the function- parameters on the DSPCTL page are reflected in the corresponding function-parameters on the DSPMOD page. -
Page 109: The Output Page
DptCtl parameter. You can then specify the range of Src2’s depth with the MinDepth and MaxDepth parameters. Note: The Forte SE features an easy shortcut for quickly assigning any of the Forte SE’s realtime controllers (sliders, wheels, buttons, etc). to a currently selected parameter (such as the Src1 and Src2 parameters above). - Page 110 Program Edit Mode The OUTPUT Page Regardless of the page’s configuration, there are parameters for adjusting the pan position, the pan mode, the pan table (if any), the crossfade control, and the crossfade sense. Layers that use stereo keymaps, or that use layer-specific FX, have additional parameters on their OUTPUT pages.
- Page 111 Program Edit Mode The OUTPUT Page Pan Mode When the mode is Fixed the pan position remains as defined with the Pan parameter, ignoring MIDI pan messages. When the mode is +MIDI, MIDI pan messages (MIDI 10) will shift the sound to the left or right of the Pan parameter setting. Message values below 64 shift it left, while those above 64 shift it right.
- Page 112 GM drum map. So, we designed the Forte SE such that you can remap drum programs to the GM drum map. You can set drum programs to remap to the GM drum map in Global Mode. On the Global Mode MAPS page set the drum remap parameter to GM.
-
Page 113: The Lfo Page
With the Forte SE, you can set upper and lower limits on each LFO’s rate, and assign a control source to change the LFO’s rate in realtime, if you wish. - Page 114 As previously mentioned, the values 1/4 note, 1/8 note, 1/8 triplet, and 1/16 note sync the Minimum Rate with the Forte SE’s system tempo. Of course, if you choose to tempo sync your LFO, then the LFO rate is fixed, and you can specify neither Maximum Rate nor Rate Control.
-
Page 115: The Asr Page
The ASR Page ASRs are three-section unipolar envelopes—attack, sustain, and release. The Forte SE’s ASRs can be triggered by a programmable control source, and can be delayed. ASR1 is always a local control. - Page 116 Program Edit Mode The ASR Page Trigger This defines the control source that starts the current layer’s ASRs. The ASR starts when the trigger switches from off to on. If the Trigger parameter is set to ON, a global ASR starts running immediately when you select a program that contains it.
-
Page 117: The Function (Fun) Page
The Function parameter determines what mathematical function is applied to the two inputs. When a FUN has been assigned as a control source, the Forte SE reads the values of the two control sources defined as Inputs a and b. It then processes them according to the setting for the Function parameter, and the resulting value is the FUN’s output. - Page 118 Program Edit Mode The Amplitude Envelope (AMPENV) Page If you want to build your own amplitude envelope, just turn the Alpha Wheel a click. The value Natural will change to User, and a set of AMPENV parameters will appear. The sound will change when you do this, because the settings for the User envelope take effect as soon as you leave Natural mode.
- Page 119 Program Edit Mode The Amplitude Envelope (AMPENV) Page Parameter Group Parameter Range of Values Time 0 to 60 seconds Attack Segment 1, 2, 3 Level 0 to 100% Time 0 to 60 seconds Decay Segment Level 0 to 100% Time 0 to 60 seconds Release Segment 1, 2, 3 0 to 150% (Release Segment...
- Page 120 Program Edit Mode The Amplitude Envelope (AMPENV) Page Release Segments Like the attack and decay sections, each of the three segments in the release section has values for time and level. Each segment reaches its assigned level in the time specified for that segment.
-
Page 121: The Envelope 2 (Env2) And Envelope 3 (Env3)
The Envelope 2 (ENV2) and Envelope 3 (ENV3) Pages The Forte SE offers two envelopes in addition to AMPENV. Like AMPENV, ENV2 and ENV3 can be assigned like any other control source. Unlike AMPENV, however, ENV2 and ENV3 can be bipolar. This means that you can set negative values for them. (Obviously, you can’t have an amplitude less than zero, so AMPENV is unipolar—the values range from... - Page 122 VelTrk, the resulting change on Attack would be affected by the combination of the values produced by KeyTrk and VelTrk. Also note that unlike previous Kurzweil models, ENVCTL does affect the attack sections of natural envelopes. Additionally, the bottom line of this page lets you make use of the Impact feature, which lets you boost or cut the amplitude of the first 20 milliseconds of a note’s attack.
-
Page 123: Key Tracking
Program Edit Mode The Envelope Control (ENVCTL) Page Adjust This is the familiar Coarse adjust found on many other pages. Use it here to change the rate of one of the envelope sections without reprogramming the envelope itself. This parameter doesn’t give you realtime control over the envelope. - Page 124 Program Edit Mode The Envelope Control (ENVCTL) Page Note: For each note triggered, you can only set the controller value that will scale the Depth parameter of an envelope section before that section of the envelope is triggered. For controllers assigned for Attack, the controller value used will be the last received before the note is triggered.
-
Page 125: The Arpeggiator Function
The arpeggiator can be toggled on and off with the front panel Arp On/Off switch. This changes the “State” parameter of the Program Arpeggiator. In Multi Mode, the arp state can also be assigned to a different Forte SE physical controller by using Controller destination number 147 (Arp). - Page 126 Program Edit Mode The Arpeggiator Function ARP1 Page Parameter Range of Values Default Arp Preset Preset List 0 (None) State On/Off Arp Mode Classic, StepSeq Classic Tempo System, 20-320 BPM System Latch Standard, Overplay, Arpeg, Add, Auto, AutoHold, 1NoteAuto, Standard 1NoteAutLo, 1NoteAutHi Limit Option Stop, Reset, Unipolar, Bipolar, Float Res, Float Uni, Float Bip...
- Page 127 Program Edit Mode The Arpeggiator Function State Use the State parameter to turn the Arpeggiator On or Off. The State parameter does the same thing as the front panel Arp On/Off switch. Arp Mode The two Arpeggiator modes, Classic and StepSeq, offer different means of shaping and editing Arpeggiator patterns.
- Page 128 Program Edit Mode The Arpeggiator Function Arpeg: Notes are arpeggiated only when the Latch switch is turned on while notes are held. Arpeg latches any keys that are being held when the Latch switch is turned on. Latched keys continue arpeggiating after they are released until the Latch switch is turned off. Additional notes that you play after the Latch switch has been turned on become part of the arpeggiation, and they drop out of the arpeggiation as soon as you release them.
- Page 129 Program Edit Mode The Arpeggiator Function Unipolar means that after playing up to the shift limit, the Arpeggiator begins shifting notes in the opposite direction, until it reaches the original pitch, where it reverses again. To determine the next note when it reaches the shift limit, the Arpeggiator calculates the interval between the shift limit and what the next note would be if the shift limit weren’t there.
- Page 130 Program Edit Mode The Arpeggiator Function one semitone. It adds that difference to the original starting note (C4) and plays that note next—C 4. The next note (F4) is within the shift limit, but the next note (A4) isn’t, so it gets translated into D4—and so on.
- Page 131 Program Edit Mode The Arpeggiator Function Shift (Shift Amount) When the Shift Mode is set to Alg, Shift appears. Shift (Shift Amount) determines how much transposition will occur for each cycle of notes. Try setting Shift (Shift Amount) to 12, and ShiftLimit to 12 or 24 to create an arpeggio that repeats the same pattern of notes in different octaves.
- Page 132 Program Edit Mode The Arpeggiator Function Use the chan up/down buttons to change the direction in which pattern steps are played (indicated by Up, Down, or Flat on the right of the top line.) With pattern direction set to Up, the pattern plays starting at step one and moving up through each step towards step 48.
- Page 133 Program Edit Mode The Arpeggiator Function The ARP2 Page The ARP2 page will allow you to set different parameters depending upon the Arp Mode selected. When set to “Classic” the ARP2 page will give access to these parameters: With Arp Mode set to Classic, the Velocity Mode and Duration Mode parameters include settings that use pattern sequencers for note and velocity shifting, allowing you to more precisely control the Arpeggiator output.
- Page 134 Program Edit Mode The Arpeggiator Function The Velocity Modes Chimp1 through Chimp4 function in a similar fashion to the Human settings (see above.) Like the Human settings, the Chimp settings randomly change played note velocity within a range, but the Chimp settings have larger randomization ranges. The Chimp settings use the velocity received from the first note played as the center of the randomization range.
- Page 135 Program Edit Mode The Arpeggiator Function VelocityPat When VelocityMode is set to Pattern, the VelocityPat parameter appears, which allows you to select a step sequence for arpeggiator velocity patterns. Each VelocityPat shifts the velocity of each arpeggiated note according to a sequenced pattern. There are many pre programed velocity patterns to choose from, some of which create rhythms by using velocity values of -127 or “none”...
- Page 136 Program Edit Mode The Arpeggiator Function The top line of the “EDIT:Velocity Patt” page displays the pattern’s name and total number of steps. Each pattern can have up to 48 steps, and each step can shift velocities by ± 127 steps.
- Page 137 Program Edit Mode The Arpeggiator Function navigation buttons to move between pattern steps, use the Alpha Wheel, alphanumeric pad, or Previous-/Next+ buttons to enter the note shift amount for each step. Press More to see a second page for patterns with more than 24 steps. Press Delete to delete the pattern from memory.
-
Page 138: The Utility Soft Buttons, Help Soft Button And Favorites Buttons Functions
Create a new layer, numbered one above the highest existing layer. When you press this button, the Forte SE will tell you that it is creating a new layer, then will return to the page you were on. The new layer becomes the current layer, and is the highest-numbered layer in the program. - Page 139 Program Edit Mode The Utility Soft Buttons, HELP Soft Button and Favorites Buttons Functions When you have selected the desired layer from the desired program, press the Import soft button, and the selected layer will be copied from the selected program, becoming the current layer.
- Page 140 Program Edit Mode The Utility Soft Buttons, HELP Soft Button and Favorites Buttons Functions Bypassing the FX is useful for checking the output level of a program with and without its FX Chains. If the output level of a program is the same with and without the FX being bypassed, it will prevent sudden jumps in volume that can occur when switching programs while notes are being held.
-
Page 141: Editing Vast Programs With Kva Oscillators
The Utility Soft Buttons, HELP Soft Button and Favorites Buttons Functions Editing VAST Programs With KVA Oscillators The Forte SE uses KVA oscillators as another way to generate sounds in VAST programs. Unlike keymaps, which play samples stored in ROM, KVA oscillators create DSP-generated waveforms every time they are triggered. - Page 142 Setting KVA Oscillator Type The Forte SE comes with 22 Different KVA oscillators. There are 11 high quality anti-aliased oscillators (free of digital artifacts) and 11 oscillators that exhibit some aliasing (digital artifacts) in the higher octaves.
- Page 143 Program Edit Mode The Utility Soft Buttons, HELP Soft Button and Favorites Buttons Functions Anti-Aliased Oscillators Aliased Oscillators Size Name/Type Size Name/Type 1 Block LPNOIZ (noise + low pass filter) 1 Block SINE 2 Blocks SINE SINE+ SQUARE RES NOISE (noise + low pass NOISE filter with resonance) SQUARE...
- Page 144 Program Edit Mode The Utility Soft Buttons, HELP Soft Button and Favorites Buttons Functions KVA Oscillators on page 7-75 below for some similar examples of how to set and control modulation for oscillator specific functions and other parameters. To add a DSP function to the Sync Square oscillator, you’ll need to use cascade mode. For example, to add a filter, duplicate one of the layers to create layer 3.
- Page 145 Program Edit Mode The Utility Soft Buttons, HELP Soft Button and Favorites Buttons Functions it is cut off frequency for the low pass filter. For this example, leave this initial value set to its default. With the LP Frq parameter selected, press right on the cursor button to get to this function’s sub page (the right half of the display).
- Page 146 Program Edit Mode The Utility Soft Buttons, HELP Soft Button and Favorites Buttons Functions 1 Block: LPNOIZ A noise generator combined with a low pass filter. Use the Noiz Frq parameter to control the cut off frequency of the filter. NOISE A simple noise generator.
- Page 147 Program Edit Mode The Utility Soft Buttons, HELP Soft Button and Favorites Buttons Functions PWM (Pulse Width Modulation) [Aliased (not recommended)] This oscillator’s distinctive parameter is PWM Wid, which adjusts pulse width from values of 1-99. With PWM Wid set to a value of 50, PWM produces a square wave. The further the PWM Wid parameter is set from 50, the narrower the pulse width becomes, changing the shape of the output waveform and thus altering the oscillator’s tonal quality.
- Page 148 The Forte SE also has the ability to apply natural amplitude envelopes to oscillators. With an amplitude envelope set to natural mode, each oscillator note takes on the amplitude qualities of each sample in a keymap (with each note relative to sample key placement).
-
Page 149: Kb3 Program Structure
The oscillators—we’ll call them tone wheels from here on—are divided into an upper and lower group. The upper tone wheels use the samples in the Forte SE’s keymaps to generate sound, while the lower tone wheels use sine waves. You can change the keymap of a KB3 program’s upper tone wheels to produce a large array of sounds. - Page 150 Moving the drawbars controls the amplitude of either the fundamentals or the harmonics of the notes. The Forte SE’s sliders serve as the nine drawbars found on most tone wheel organs. Pushing the sliders up is the equivalent of pushing the drawbars in (removing fundamentals or harmonics).
-
Page 151: Editing Kb3 Programs
KB3 programs, though you must start with an existing KB3 program to do this. A regular Forte SE program cannot be turned into a KB3 program. If you’re not sure whether the current program is a KB3 program, check the KB3 LED (located to the left of the display). -
Page 152: Kb3 Editor: The Program Fx (Fx) Page
Program Edit Mode KB3 Editor: The Program FX (FX) Page KB3 Editor: The Program FX (FX) Page This page is the same as the VAST Program editor FX page (see page 7-14) except for one important difference: there is no Pre/Post insert parameter for the auxiliary sends. KB3 Editor: The COMMON Page The COMMON page contains an assortment of control parameters, including Leslie speed control and vibrato/chorus selection. - Page 153 Program Edit Mode KB3 Editor: The COMMON Page PreampResp Set this parameter On or Off to enable or disable the preamp+expression pedal part of the KB3 model. Turning this On (the default) makes KB3 programs function like stock organs. The expression pedal in this case is more than a volume pedal; it actually functions like a “loudness control,”...
-
Page 154: Kb3 Editor: The Tone Wheels (Tonewl) Page
Program Edit Mode KB3 Editor: The Tone Wheels (TONEWL) Page VolAdjust Adjust the pre-FX volume of the KB3 signal. Use the Output page OutGain parameter to adjust the overall post-FX program volume (see "KB3 Editor: The OUTPUT Page" on page 7-95 for details). - Page 155 This would leave you 88 voices for other programs. You can specify up to 91 tone wheels. The number of Forte SE voices used by a KB3 program is (number of tone wheels + 1) / 2, rounded to the next highest whole number if the result is a fraction. So, for example, with 79 tone wheels specified you would use 40 voices.
-
Page 156: Kb3 Editor: The Drawbars (Drawbr) Page
Program Edit Mode KB3 Editor: The Drawbars (DRAWBR) Page Globals This parameter affects LFO2, ASR2, and FUNs 2 and 4. When off, these modulation sources are local; the sources affect each individual note in the the program separately and each per- note source is retriggered each time a note is triggered. - Page 157 Program Edit Mode KB3 Editor: The Drawbars (DRAWBR) Page In both modes, the drawbar volume settings will immediately change as soon as you move a corresponding slider. Steps This parameter lets you specify the increments by which drawbar volumes will change. Choose either 0–8, to approximate the drawbar settings on actual organs, or choose 0–127 for a finer degree of resolution.
-
Page 158: Kb3 Editor: The Pitch Page
Program Edit Mode KB3 Editor: The AMP Page KB3 Editor: The PITCH Page The PITCH page parameters for KB3 programs are much like the PITCH page parameters for VAST programs. In KB3 programs, use the "Coarse" and "Fine" parameters to transpose the entire program up or down in semitones or cents. -
Page 159: Kb3 Editor: The Keyclick Page
Program Edit Mode KB3 Editor: The KEYCLICK Page KB3 Editor: The KEYCLICK Page The Key Click feature adds a decaying burst of pitched noise to the attack of notes. Unlike the percussion, the key click is “multi-triggered,” which means that every new note will trigger it. - Page 160 Program Edit Mode KB3 Editor: The KEYCLICK Page Decay Sets the basic decay time of the noise envelope. Smaller values produce a shorter burst. VelTrk Controls the degree to which key velocity affects the key click volume. A value of zero means that the key velocity has no effect on the key click volume (which is like a real tone wheel organ).
-
Page 161: Kb3 Editor: The Perc1 Page
Program Edit Mode KB3 Editor: The PERC1 Page Key Track Amount (KTrkAmt) and Key KTrkAmt can be used to scale the key click volume, so that lower notes will have a quieter key click. The Key parameter determines the key at which the volume scaling will begin. (When the Key parameter is selected, you can select the desired key by holding the Enter button and striking a key). - Page 162 Program Edit Mode KB3 Editor: The PERC1 Page Percussion This is where you turn the percussion effect on or off. Percussion is created by a decaying envelope applied to one of the nine drawbars. The percussion effect is “single-triggered,” which means that once it’s triggered, it won’t trigger again until all keys (or whatever you’re using to trigger notes) go up.
-
Page 163: Kb3 Editor: The Perc2 Page
Program Edit Mode KB3 Editor: The PERC2 Page HighHarm Controls which drawbar is used as the basis for the percussion when Harmonic is set to High. On an actual tone wheel organ, this is Drawbar 5 (3rd harmonic). The actual pitch obtained depends on the drawbar tuning. -
Page 164: Kb3 Editor: The Output Page
Program Edit Mode KB3 Editor: The OUTPUT Page Parameter Group (Available for each EQ band) Range of Values Gain -24.0 to 24.0 dB, in 0.2-dB increments Frequency 16 to 25088 Hz, in varying increments Width -128 to 128 Semitones, in 2 semitone increments Each EQ section has Gain (G), Frequency (F), and Width (W) controls. -
Page 165: Kb3 Editor: The Lfo, Asr, Fun, And Arp Pages
Program Edit Mode KB3 Editor: The OUTPUT Page KB3 Editor: The LFO, ASR, FUN, and ARP Pages The rest of the pages—LFO, ASR, FUN, ARP1 and ARP2 — are the same for KB3 programs as they are for VAST programs, so we won’t describe them again here. For descriptions of these pages see: The LFO Page on page 7-44 The ASR Page on page 7-46... -
Page 166: The Effects Chain Editor
The Effects Chain Editor The MAIN Page Chapter 8 The Effects Chain Editor Pressing the Edit button while a Chain (other than 0 None) is highlighted—on any of the various effects pages—will call up the Chain editor. From the Program editor, the program’s Insert and Aux Chains can be edited from the PROGFX and LYRFX pages. -
Page 167: The Mod Pages
The Effects Chain Editor The MOD Pages Like all other representations of signal paths in the Forte SE display, the program signal moves from left to right through the Chain. Use the cursor buttons to select an effect-box or empty spot in the Chain. The effect loaded into the selected effect-box can be changed by numeric entry, with the Alpha Wheel, or with the +/–... -
Page 168: Fxlfo, Fxasr, And Fxfun Pages
The Effects Chain Editor FXLFO, FXASR, and FXFUN pages Source The Source parameter determines the Control source that will modulate the parameter (Param) in real-time. This can be any of the normal channel Control sources (sliders, mod wheel, pedals, etc.) or one of the Chain-specific Control sources (FXLFOs, FXASRs, and FXFUNs). -
Page 169: The Utility Soft Buttons, Help Soft Button And Favorites Buttons Functions
The Effects Chain Editor The Utility Soft Buttons, HELP Soft Button and Favorites Buttons Functions When an FX Chain is selected in a Program, the Chain Info entries appear on the Program Parameters page. Chain Info names are also shown on the main Program and Multi Mode Pages when moving an assigned controller. -
Page 170: Effects Parameters
Chain. Press the Favorites 5 button again to re-enable the selected box. Effects Parameters This section contains descriptions of the Forte SE’s many effects parameters, and instructions on how to use them. Read through this section to get a good general understanding of the parameters. - Page 171 The Effects Chain Editor Effects Parameters When an effect with the Wet/Dry parameter is used in Chain that has been selected as an Aux effect, Wet/Dry is automatically set to 100% wet and cannot be adjusted. This is because when using an Aux effect, the dry signal is already effectively at 100% on the main audio bus (not routed through the Aux effect.) In this case, turning up the Aux send level will blend the 100% wet signal (from the Aux bus) with the dry signal on the main audio bus.
- Page 172 The Effects Chain Editor Effects Parameters Rvrb Time is the RT60—the time it takes for the reverb to decay to 60 dB below its initial level—in seconds. It is accurate assuming that several other parameters (HF Damping, Diff Scale, Size Scale, and Density) are at their nominal levels. It is adjustable up to “Inf ”, which creates an infinitely-sustaining reverb.
- Page 173 DelayScale lets you change the lengths of all the taps together. Its range is 0 to 10x. Note: It is possible for the Forte SE to run out of delay memory with over-generous settings of DelayScale or very slow Tempos. Some Delay effects will simply go to a maximum value and stay there, while in some, a calculation is made that automatically cuts the delay times in half, thereby maintaining a relationship with tempo.
- Page 174 This one’s a big looping delay with lots of gain, distortion and filtering, and with a compressor to keep it all under control. Equalizers (EQ) The Forte SE has both Graphic and Parametric EQ effects. Parametric EQ sections are also found on a number of combination effects.
- Page 175 B filter #1, A filter #2 moves to B filter #2, and so on. Range is 0 to 100%. Compressors, Expanders, and Gates A wide range of Compression and Expansion effects is available in the Forte SE. The various effects include different combinations of:...
- Page 176 The Effects Chain Editor Effects Parameters • compressors with soft-knee characteristic—the compression action comes in gradually as the signal level approaches the threshold • compressors with hard-knee characteristic—the compression action comes in abruptly when the signal reaches the threshold • expanders •...
- Page 177 The Effects Chain Editor Effects Parameters Atk or Exp Atk (Attack), how fast the expander turns off when the input signal rises above the threshold level, adjustable from 0.0 to 228.0 ms. Rel or Exp Rel (Release), how fast the expander turns back on after the signal drops below the threshold level, adjustable from 0 to 3000 ms.
- Page 178 The Effects Chain Editor Effects Parameters Retrigger determines whether the gate timer will reset itself each time the sidechain signal goes above the threshold. If it is “On”, the timer resets itself, and therefore the gate stays open as long as the signal is above the threshold, or keeps going above the threshold, within the interval specified by Gate Time.
- Page 179 In the Forte SE, the flanger is a multi-tap delay line, all (but one) of whose taps can have their lengths modulated up and down by a low frequency oscillator (LFO). The rate of the LFO is expressed in Tempo.
-
Page 180: Resonant Filter
Envelope Filter is a resonant filter whose center frequency can be made to vary according to the level of the incoming signal. There are four types of Resonant Filter effects in the Forte SE. All of them have these parameters in common: Filter Type (or FiltType) can be Lowpass, Highpass, Bandpass, or Notch (band-cut). - Page 181 The Effects Chain Editor Effects Parameters Sweep determines how far the resonant frequency moves when the input level increases. At positive levels it moves up in pitch, and at negative levels it moves down. The highest possible resonant frequency is 8372 Hz, the lowest is 0 Hz. This parameter’s range is -100% to +100%.
- Page 182 Range is 0 to 100%. Distortion Distortion effects on the Forte SE may also include a parametric equalizer or a cabinet simulator. Dist Drive applies a boost to the input signal to overdrive the distortion effect into soft clipping.
- Page 183 The Effects Chain Editor Effects Parameters LP n Freq are shelving frequencies for one-pole lowpass filters on each of the distortion stages. LP0 Freq handles the initial low pass prior to the first distortion stage. The other low pass controls follow their respective distortion stages. Range is 16 to 25088 Hz. Rotating Speakers An effect that includes Rotating Speakers breaks the signal into two frequency bands, “rotates”...
- Page 184 The Effects Chain Editor Effects Parameters ResH/LPhs sets the relative phases of the high and low resonators. The angle value in degrees is somewhat arbitrary and you can expect the effect of this parameter to be rather subtle. The range is 0 to 360.0 degrees. Mic Angle is the angle of the virtual microphones in degrees from the “front”...
- Page 185 The Effects Chain Editor Effects Parameters Tremolo and AutoPan Tremolo is amplitude modulation using an LFO. AutoPan moves the signal between the left and right channels, using an LFO. They have several parameters in common and several unique ones. LFO Rate is the rate of the LFO. The range is 0 to 10.00 Hz, or 0 to 12.00 x the tempo. Rate Scale multiplies the speed of the LFO rate into the audio range.
-
Page 186: Ring Modulation
For more information and examples, see the KSP8 Algorithm Reference Guide available as a free download at www. kurzweil.com. Ring Modulation Ring modulation multiplies two signals (the “carrier” and the “modulator”) together to produce unusual, often non-harmonic, overtones. - Page 187 The Effects Chain Editor Effects Parameters Stereo Simulation The Mono to Stereo effect converts a monaural input to simulated stereo output. In Select selects the input signal to be “stereo-ized.” It can be Left, Right, or both: (L+R)/2. CenterGain is the level of the summed left and right channels. Range is Off/-79.0 to 24.0 Diff Gain is the level of the difference signal produced, which is the spatial component of the stereo signal.
-
Page 188: Keymap And Sample Editing
When you trigger a note, the Forte SE identifies the key range where the Note On event occurred. It also checks the attack velocity value of the note. It then addresses its memory, and retrieves the sample root that’s assigned to that key range and attack velocity value. - Page 189 20 voices (one for each layer). You would only hear one drum per note because all the other layers are triggering “Silence.” Because of the voice-stealing algorithms in the Forte SE, the voices would almost immediately become available again, since they have no amplitude. But for one brief instant, the voice would be triggered, which could cause other voices to be cut off.
- Page 190 Keymap and Sample Editing The Keymap Editor Parameter Range of Values Sample Sample Root list Key Range Variable from C0-G10 Low Key C 0 to G 10 High Key C 0 to G 10 Velocity Range (VelRange) Variable from ppp-fff Low Velocity (Lo) ppp-fff High Velocity (Hi)
- Page 191 With these parameters you can use any of the data entry methods to change the low and high notes of the current key range. You can extend a key range to the full capacity of the Forte SE (C 0 to G 10). If you extend the current key range into another, the boundaries of the other key range will become shortened to accommodate the key range you are extending.
-
Page 192: Fine Tune
Keymap and Sample Editing The Keymap Editor When the VelRange parameter is selected, you can scroll through available velocity ranges using the Alpha Wheel or the Previous-/Next+ buttons. Multiple velocity ranges are only shown if the current Keymap uses more than one velocity range. If the top line of the EditKeymap page displays VelRange, you can scroll through the available velocity ranges with any parameter on the page selected using the Channel/Layer/Zone buttons. - Page 193 Keymap and Sample Editing The Keymap Editor The Soft Buttons in the Keymap editor and Favorites Buttons Functions Toggle Pressing the Toggle soft button switches the function that the Channel/Layer/Zone buttons perform while on the EditKeymap page. Press the Toggle soft button to toggle the top line between displaying KeyRange or VelRange.
- Page 194 Just press NewRng, then play the note you want as the low note, then the high note. The Forte SE will prompt you for each note. When you trigger the high note, you’ll return to the Keymap-editor page, and the new keyrange you defined will be selected.
- Page 195 If the sample is assigned to one note, the Forte SE sets Coarse Tune so that the note plays the sample without transposition. If the sample is assigned to a range of notes, the Forte SE sets Coarse Tune so that the middle note of the range plays the sample without transposition.
-
Page 196: Building A Keymap
RootKey is important if you want your sample to play in tune with other Forte SE programs or other instruments. This is easy if your samples have the correct RootKey settings (as the included factory samples do). Generally you should set a keyrange so that the sample’s RootKey (displayed at the end of the sample name) is in the... -
Page 197: Editing Samples
Keymap-editor page reappeared, the current key range would not be F 4 to B 4, but A 3 to B 4! This is because the Forte SE automatically merges adjacent key ranges that are identical (this is done to save memory). Therefore, some parameter must be different in each adjacent key range you create if you want to build keymaps using the technique we just described. - Page 198 Keymap and Sample Editing Editing Samples If you want to select a different sample, use the cursor buttons to select the Sample parameter. Use the Alpha Wheel to select a sample. Press the Edit button once more, and you’ll enter the Sample Editor. The sample will play through the effects of the current program.
- Page 199 Keymap and Sample Editing Editing Samples Root Key The root key represents the keyboard key at which the sample will play back without transposition (that is, at the same pitch as the pitch of the original sample). Use the Previous-/Next+ buttons or Alpha Wheel to select a RootKey note, or use the alphanumeric pad followed by the Enter button to enter a RootKey by MIDI note number.
- Page 200 Keymap and Sample Editing Editing Samples Loop Switch This parameter activates or deactivates the looping of the currently selected sample. When set to On, the sample will loop according to the settings on the TRIM page. When set to Off, the sample will play through to its End point and stop.
- Page 201 Keymap and Sample Editing Editing Samples The TRIM Page The TRIM page lets you set the Start, Alternative Start, Loop, and End points of the current sample. The right side of the top line displays the root number of the sample. If the sample is part of a group of sample roots, you can use the Channel/Layer/Zone buttons to scroll through each sample in the group.
- Page 202 Keymap and Sample Editing Editing Samples The End parameter sets the point at which the current sample will stop playback. Typically you’ll use this parameter to trim unwanted silence off the end of a sample, although you can use it to shorten a sample as much as you want. Note On Saving Samples: Trimmed portions of a sample are not saved.
-
Page 203: Multi Mode
While you are in Multi Mode, the Multi button’s indicator LED is illuminated. When you enter Multi Mode after powering on the Forte SE, Multi 1 will be selected, or the Multi that was selected the last time Global Mode was exited. -
Page 204: Selecting Multis
The Forte SE features eight Multi Banks (Factory Banks A-D and User Banks A-D). Each Forte SE Bank has space for 256 Multis, for a total of 2048 possible Multis. Each Bank is split into 16 groups of 16 Multis each, selectable by using the Category buttons. Because each Multi can contain multiple instrument sounds, Multis are not organized by instrument category. - Page 205 Multi Mode Selecting Multis The Display In Multi Mode, the top of the display shows the current Mode and MIDI transposition. Bank Changing View The View soft button will toggle the display and allow you to see available Multis as a list. Buttons and controllers will behave as usual.
- Page 206 Multi Mode Selecting Multis Alpha Wheel & Previous– and Next+ Value Buttons Use the Alpha Wheel or the Value buttons, to the right of the display below the Alpha Wheel, to change the current Multi. Turning the Alpha Wheel counter-clockwise or pressing the Previous button will select the previous Multi and turning the Alpha Wheel clockwise or pressing the Next button will select the next Multi.
- Page 207 Multi Mode Selecting Multis Category & Program/Multi Buttons The Category buttons allow you to select Multis simply by pressing a button. You can select one Category button at a time and the current Category button’s LED is lit. In Multi mode each category button represents a group of 16 Multis (Multis are not organized by instrument category because each Multi can contain multiple instrument sounds).
-
Page 208: About Zones
MIDI notes sent to the USB and MIDI out ports. Press the Transpose - or + buttons to transpose the Forte SE keyboard down or up by one semitone. The top line of the display shows the current transposition value. Pressing both Transpose - and + simultaneously will reset the transposition to 0. -
Page 209: Parameter Assignments
Multi Mode Parameter Assignments The maximum transposition value possible is +/–36 semitones. The LEDs of the Transpose buttons indicate whether the current Multi is transposed up (Transpose + LED is lit) or transposed down (Transpose – LED is lit). When there is no transposition, neither Transpose button is lit. - Page 210 Multi Mode Parameter Assignments Controller Conventions In Multi Mode, the Zone Mute Switches above Sliders A through D control the Active/Muted status of Zones 1 through 4. In the Factory Multis, Sliders A through D generally control the volume for Zones 1 through 4. Sliders H and I generally control Delay and Reverb amount. The remaining Sliders and Switches generally control various effects and synthesis parameters.
-
Page 211: The Split And Layer Functions
Multi Mode The Split and Layer Functions The Split and Layer Functions The soft buttons Split and Layer perform slightly different functions, but offer identical parameters. The Split Function allows you to quickly create a Multi such that keys in one region of the keyboard produce different sounds than another region. - Page 212 Multi Mode Split Function When you create a Split in Multi Mode, you are in fact activating a new Zone within the current Multi. If the current Multi already has the maximum number of active Zones and you press the Split Function soft button, then a message will appear on the display indicating that you have reached the maximum number of Zones.
- Page 213 Selecting Split or Layer makes a new Zone active. You can continue to add Zones to the Multi by activating additional Zones with the Stat parameter or the front panel Zone buttons. The Forte SE will display a message if you have already reached the maximum About Zones on page 10-6 number of active Zones (see for more information on Zones).
-
Page 214: The Arp Function
Multi Mode The ARP Function A value of “None” will use the last volume value used by the Zone’s MIDI channel (often set by the expression pedal). A value of “None” can be entered by scrolling below 0, or by using the keypad function of the Category buttons to type negative 1 by pressing the small +/- button and then the 1 button, followed by the Enter button. -
Page 215: Save User Multis
Multi Mode The ARP Function Save User Multis Press the Save button to save a Split or Layer Multi as a User Multi, or to save a Multi with its current Zone Mute button status. (To save a changed switch/button state or slider state, you must set an entry value for each controller in Multi Edit mode). - Page 216 Multi Mode The ARP Function Changing ID Numbers The display shows the first available ID number and the current Multi name. You can save Multis with ID numbers from 1025 to 2048. If you are saving a Multi that has not been previously edited, the next available unused ID number will be selected.
- Page 217 Multi Mode The ARP Function Press the center soft buttons (<<< or >>>) or the navigation buttons to move the cursor. To enter the new Multi name you may use the letters and numbers printed on the Program/ Multi buttons, or use the Alpha wheel or Previous-/Next+ buttons to cycle through the alphabet.
- Page 218 Multi Mode The ARP Function Saving a User Multi Press the Save button or Save soft button to complete the saving process, or press the Cancel soft button to exit without saving. After successfully saving, the Multi will be selected in Multi Mode in the selected Bank. To find the Multi again later, make sure to press the User button under the Mode buttons.
-
Page 219: Multi Edit Mode
Multi Edit Mode About Multi Edit Mode Chapter 11 Multi Edit Mode About Multi Edit Mode NOTE : Before you read this chapter, be sure to read Ch. 10 Multi Mode for a full description of Multis. Multi Edit Mode allows you to edit and create Multis and gives you access to a Multi’s Common parameters and Zone specific parameters. -
Page 220: Selecting Parameters
Multi Edit Mode Selecting Parameters Differences Between Regular and Advanced User Type This chapter describes how Multi Edit Mode works when the Global Mode User Type parameter is set to Advanced. Multi Edit Mode works the same way when the Global Mode User Type parameter is set to Regular, except that the AUD-IN, NewZn, DupZn, ImpZn, and DelZn soft buttons are not shown, and some settings will be hidden when scrolling through Arpeggiator settings. - Page 221 Enter button while moving Forte SE controllers (Sliders, Switch buttons, Keys, Mod Wheel, and Pedals). Parameters that can use the Assign function are indicated by showing the Assign symbol in the top right corner of the display when selected.
-
Page 222: Zone Parameters
Multi Edit Mode Zone Parameters On the Multi CCs or Multi Switches page, when the Entry Pos, Exit Value, OnValue, or OffValue parameter is selected, you can change the value of the selected parameter by holding Enter and moving any Controller or Switch. Enter + Key In Multi Edit Mode, on the Overview page, with the Low Key Range or High Key Range parameter selected, hold the Enter button and strike a key to set the Low Key or High Key. -
Page 223: Overview Page
Multi Edit Mode OVERVIEW Page OVERVIEW Page The Overview Page shows basic settings for 4 of the available Zones. The current Program, Volume and Panning position of the Zone, along with the state and active keyboard region can be quickly set on this page. If a Multi has more than 4 Zones, the other Zones can be accessed by using the Channel/Layer/Zone Up/Down buttons to the right of the display. -
Page 224: Main Page
Multi Edit Mode MAIN Page You can also set the lowest key higher then the highest key and vice versa. This allows you to split a Zone into two areas where the lowest and highest keys now define the region that the Zone does not play on. - Page 225 MIDI. LOCAL When Destination is set to LOCAL, MIDI data from the Zone is sent only to the Forte SE Program. MIDI data from this Zone is not sent to the MIDI Out or USB ports. MIDI When Destination is set to MIDI, MIDI data from the Zone is sent only to the MIDI Out ports.
- Page 226 USB + MIDI When Destination is set to USB+MIDI, MIDI data from the Zone is sent to the USB & MIDI Out ports only. MIDI data is not sent to a Forte SE Program on this Zone. USB + LOCAL + MIDI When Destination is set to USB+LOCAL +MIDI, MIDI data from the Zone is sent to the USB &...
- Page 227 Zone sends when the Multi is loaded. You can set this parameter to a MIDI Bank change message from 0 to 16383. When using the Forte SE as a MIDI controller, sending a MIDI Bank change message (along with a MIDI Program change message) when a Multi is loaded ensures that the Program loaded on the other sound modules in your MIDI chain is the Program that you want.
-
Page 228: Keyvel (Keyvelocity) Page
Next are the alternating note maps, which let you divide the keyboard in some unique ways. If you are using two or more MIDI devices (including the Forte SE), you can expand polyphony by assigning each zone to a different alternating note map. For example, if you have two Forte SEs, you can assign two zones to each play the same program on a different Forte SE, thereby doubling polyphony. - Page 229 VelMode The Velocity Mode parameter determines the method that the Forte SE maps the keyboard’s strike velocity to MIDI velocity. Set to “Traditional” the keyboards velocity will translate to a MIDI velocity depending how hard you strike it.
- Page 230 Multi Edit Mode KEYVEL (KeyVelocity) Page actually, since a MIDI note-on with velocity zero is interpreted by some modules as a note- off message). So to get true inverse scaling (that is, minus 100%), you must set an offset of 127 to get the full range of velocities.
-
Page 231: Bend Page
Multi Edit Mode BEND Page The values can be anywhere from 1 to 127. As with other parameters, zones can overlap or be totally discrete, or be identical. Usually, LoVel will have a smaller value than HiVel, but as with LoKey and HiKey, you may also create a gap in velocity response, by setting HiVel to a lower value than LoVel. - Page 232 None, 0 to 127 Controller The Controller parameter allows you to assign any of the Forte SE’s continuous controllers (sliders, mod and pitch wheels, expression pedal and pressure) to control a program specific parameter or MIDI controller number for the currently selected Zone.
- Page 233 Other external MIDI gear (sound modules, computer software) may respond to standard MIDI CC messages as well. Standard MIDI CC’s range from 0-127 and can be received by the Forte SE from external devices, while destinations 128-146 are internal to the Forte SE only.
- Page 234 Exit Value The Exit Value tells the Forte SE to send a value for that controller whenever you leave the Multi, either by selecting another Multi or by selecting a different mode altogether. It can be very useful when a controller is doing something to the sound, and you don’t want that effect...
-
Page 235: Switch (Switches) Page
Exit State None, Off, On You can select any of the Forte SE’s switch controllers by moving the cursor to the “Switch” parameter, and using either the Alpha Wheel or Value buttons to scroll through the list. Alternatively, you can also position the cursor in the “Switch” parameter, hold down the Enter button and press the Switch you wish to edit. - Page 236 “Off”, the Key parameter appears. Use the Key parameter to select which of the Forte SE’s Keys you wish to use as a switch controller. With the Key parameter selected, you can set a key by holding the Enter button and striking the desired key.
- Page 237 11-21) shows the default assignments for each destination. Programs respond to some of these for standard MIDI functions. Standard MIDI CC’s range from 0-127 and can be received by the Forte SE from external devices, while destinations 128-146 are internal to the Forte SE only.
-
Page 238: Controlling Program Parameter Assignments From Multi Mode
The table below contains the available values for the MIDI CC (continuous controller) destinations. The Forte SE’s physical controllers can send MIDI values to these destinations in order to control the parameters of Forte SE Programs, Multis, Forte SE system parameters, or external MIDI equipment. - Page 239 Multi Edit Mode The Controller Destination List Controller Controller Description Number Destination By default, when you enter 0 or Clear for the Destination parameter, the destination OFF/Bank will be assigned to OFF. To select Bank as the destination, use the Value buttons. MWheel Default destination for the Modulation Wheel Breath...
- Page 240 Multi Edit Mode The Controller Destination List Controller Controller Description Number Destination MIDI 90 Default assignment for Assignable Switch 9 91–95 MIDI 91–95 MIDI Controllers 94–95 Data Inc Equivalent to pressing the Next Value button Data Dec Equivalent to pressing the Previous Value button NRegParL Non–Registered Parameter Least Significant Byte NRegParM...
- Page 241 Multi Edit Mode The Controller Destination List Controller Controller Description Number Destination The 60 Arpeggiator Shift Limit steps are scaled over the 128 MIDI controller values, ArpLimit so that 0 = 0 steps and 127 = 60 steps. (See ShiftLimit on page 7-61) Arpeggiator Shift Limit Option, each range of values selects one of seven options in ArpLmtOp...
- Page 242 Multi Edit Mode The Controller Destination List Shift Key Number, Shift Key (ShKeyNum, ShiftKey) These controller destinations allow you to play musical scales and single note patterns on any programmable continuous controller in a Multi, without the need of playing the physical keys of the keyboard.
- Page 243 Since the lowest octave of a program is often too low to be musically useful, the Forte SE will automatically start triggering notes from longer shift patterns in higher octaves. This saves room in the controller’s range of values for triggering more useful octaves.
- Page 244 With a shift pattern of 12 notes, the 128 different notes that the Forte SE can trigger are evenly spaced over the range of the controller. Patterns with less than 12 steps will trigger notes in every octave over a shorter range of the controller.
-
Page 245: Common Page
With the Clock Source parameter, you can set the Forte SE—within the current Multi—to generate its own tempo by setting Clock Source to Internal, or you can set the Forte SE to sync up with the tempo from another device—assuming the device is sending MIDI clock data to the Forte SE via MIDI or USB—by setting Clock Source to External. -
Page 246: Arp1 And Arp2 (Arpeggiator 1 & 2) Pages
Multi Edit Mode ARP1 and ARP2 (Arpeggiator 1 & 2) Pages ARP1 and ARP2 (Arpeggiator 1 & 2) Pages The Arpeggiator in Multi Mode is very similar to the Program Mode arpeggiator. See Arpeggiator Function on page 7-56 for a full description of each arpeggiator parameter. In Multi Mode, the Arpeggiator works the same as in Program Mode, with a few exceptions: •... -
Page 247: Fx Page
Mode it puts the power of an entire studio of audio effects at your fingertips. This section contains everything you’ll need to know in order to use the Forte SE’s effects in Multi Mode. Press the FX soft button to enter the FX page. -
Page 248: Auxfx 1, Auxfx 2
Multi Edit Mode ARP1 and ARP2 (Arpeggiator 1 & 2) Pages AUXFX 1, AUXFX 2 Parameter Range Of Values Default Value Override Yes, No Chain See Effects Chains, Appendix F 0 None Send Levels [p], 0-100% Pre/Post [p], pst, pre The AUXFX1 (Auxiliary Effects 1) &... - Page 249 Mod Override controller. When the Mod Override parameter is selected, you can quickly select one of the Forte SE’s physical controllers by holding the Enter button and moving the controller.
-
Page 250: About Auxiliary Effects
The following diagram illustrates the signal path of a sound through the auxiliary effect: On the Forte SE, the auxiliary effects are global to all channels and Zones, Programs and Multi’s. One effect chain can be loaded into each of Aux1 and Aux2, and these are used for any Program or Multi that has active Aux Sends. - Page 251 Effect Chain Mods. MODs Effect Chain Mods are modulation controls which can be assigned to the Forte SE’s physical controllers. Any Mods assigned within the selected Audio Input Chain can be controlled by controllers assigned within the Multi.
-
Page 252: The Utility Soft Buttons, Help Soft Button And Favorites Buttons Functions
Multi Edit Mode The Utility Soft Buttons, HELP Soft Button and Favorites Buttons Functions To control these Mods, assign a Multi controller to send these CC numbers using the Dest field on the Multi CCs or Multi Switches pages (see CCTLS (CCs/Continuous Controllers) Page on page 11-13 SWITCH (Switches) Page on page 11-17... -
Page 253: Save User Multis
Multi Edit Mode Save User Multis HELP Press the HELP soft button to view the Help page, where you can view a description of functions assigned to the Favorites buttons. Favorites 1: Help Press the Favorites 1 button to view the HELP page. Favorites 2: Set Mute Switches Press the Favorites 2 button to automatically set the Assignable switches to mute and enable each Zone. -
Page 254: Global Mode
Global Mode About Global Mode Global Mode gives you access to the global settings of the Forte SE, allowing you to adjust overall performance and navigation settings. Global Mode also gives you access to the Storage Page (for object management and sample loading), Song Mode, Audio Input FX and other tools. -
Page 255: Selecting And Editing Parameters
Global Mode MAIN Page Selecting and Editing Parameters Use the soft buttons underneath the display to select the page you need. To scroll through the parameters of Global Mode, use the Navigation buttons. To edit the currently selected parameter, use the Alpha Wheel or the Previous- and Next+ buttons. -
Page 256: Auto Power Off
User Type The User Type parameter allows you to show or hide advanced features of the Forte SE. By default, User Type is set to Regular. Setting User Type to Regular hides advanced features and makes some modes easier to navigate. Setting User Type to Advanced gives you access to additional features. - Page 257 MAIN Page Power Off Time If the Auto Power Off parameter is set to On, then the Forte SE will power off after the time selected by the Power Off Time parameter has elapsed. The Forte SE will display the following warnings before powering off.
- Page 258 Global Mode MAIN Page Sound Sel The Sound Sel parameter is shown when the User Type parameter is set to Advanced. The Sound Sel parameter determines the behavior of the Program/Multi Sound Select buttons when selecting Program or Multis. When the User Type parameter is set to “Regular”, category based sound selection will be will be used.
-
Page 259: Maps Page
Default Song 1 New Song Velocity Map The Velocity Map parameter determines the way the Forte SE generates MIDI velocity information. Different maps generate different MIDI velocity values for the same physical key strike velocity. The default map (Linear) provides the widest range of velocity expression, but you may want to choose a different map if the default does not suit your playing style. - Page 260 Though some may have historically been in a different key, all of the Forte SE’s factory intonation maps are set to root note C by default. You can change the root key of the current intonation map by using the Int.Key parameter (see the Intonation Key (Int.Key) section below).
- Page 261 Global Mode MAPS Page 0 None No intonation map is used, intonation is equal. 1 Equal No detuning of any intervals. The standard for modern western music. Tunings are defined based on the ratios of the frequencies between 2 Just intervals.
-
Page 262: Song (Song Mode)
However, the GM drum map is so commonplace that many players feel more comfortable playing drum programs with the GM drum map. Because of this, the Forte SE is designed such that you can remap drum programs to the GM drum map. -
Page 263: File (Storage Page)
Press the File soft button to view the Storage page, which lets you use a USB device (such as a thumb drive) or a computer to load, store, back up, and copy files between the Forte SE and the outside world. While using the Storage page, the playing of notes is disabled. - Page 264 When you need to choose a directory, you will see the Path field. The Path field shows the current directory on the current device. When you choose a storage function for a connected device, Forte SE automatically chooses the root (top-level) directory for the Path field. The root directory is displayed as a backslash:...
- Page 265 STORE Press the STORE soft button when you have a storage device plugged into a USB port. If no USB connection is detected by the Forte SE, you will see the error message “Error: No valid device inserted.” Store All Press the “All”...
- Page 266 (see the following section) and complete the storing process. The File Name / New Directory Dialogue When you create a new file using the Storage Page, or create a new directory, the Forte SE prompts you to enter the name. This File Name dialogue appears as shown below: New file names will default to either FILENAME (after a powerup), or the name of the most recent file stored or loaded.
- Page 267 Press the LOAD button when you have the hardware containing your User Programs/Multis plugged into the USB port. If no USB connection is detected by Forte SE, you will see the error message “Error: No valid device inserted.”. Use the navigation buttons, Previous-/Next+ buttons or the Alpha Wheel to browse the files in the currently selected storage device.
- Page 268 Forte SE even when the power is off, until they are manually deleted. Also, once samples are loaded to the Forte SE’s user sample flash memory, there is no load time for those user samples when turning on the Forte SE.
- Page 269 Compatible Files The Forte SE can load its own .FSE files, as well as file types from other Kurzweil products such as .FOR, .ASE, .ART, .P3A, .PC3, .P3K, .PLE, and .SPX files. When loading file types other than .FSE, the Forte SE will attempt a conversion of the objects in those files.
- Page 270 The following example shows how each loading method affects how programs are loaded into the User bank when it already contains programs. Example: Starting with the following objects already stored in the Forte SE User bank: Programs currently in Forte SE...
-
Page 271: Cntrls (Controller Overrides Page)
Favorite when you depress the pedal. If you are not playing any Favorites, FavoriteInc and FavoriteDec will select the first Favorite, or the last Favorite that was selected since turning on the Forte SE. Use the Arp On/Off and Arp Latch assignments to easily control arpeggiator functions. - Page 272 Global Mode SONG (Song Mode) In Multi Edit Mode, setting a Pedal Mode to “Off” will disable the override for that Pedal in the selected Zone. It can be useful in Multi Mode to disable the Pedal Override for some Zones.
-
Page 273: Midi Page
Multi Entry Value. This results in smooth changes to the sound. MIDI Page The Forte SE can transmit and receive MIDI via its MIDI ports and USB. The MIDI page in Global Mode allows you to configure how this will be handled. Parameter... - Page 274 If you want to use the Forte SE strictly as a MIDI controller for the other modules in your MIDI chain using the MIDI port, then select MIDI. If you want to make use of the Forte SE’s sounds as well as use it as a MIDI controller (MIDI port), then select MIDI+LOCAL.
- Page 275 The Local Keyboard Channel enables an external MIDI keyboard to function as if it is the Forte SE’s keyboard and physical controllers. This allows all Channels/Zones of a Multi to be played simultaneously from an external MIDI keyboard transmitting on a single MIDI channel (or a single MIDI channel of a sequencer), with split and layered Zones laid out across the external MIDI keyboard.
-
Page 276: Aud-In (Audio Input Page)
If you do have multiple Forte SEs receiving Sysex messages from a single source, make sure each Forte SE has a different Sysex ID. This will allow you to direct Sysex messages to the appropriate Forte SE by specifying which unit with the Sysex ID byte that’s included with every Sysex message. - Page 277 Chain. There are 32 FX unit resources shared by all MIDI channels in the Forte SE. When selecting an Audio Input Chain, the Chain may steal FX unit resources from other channels in order to load if more resources are needed to load the Chain.
- Page 278 AuxFXChan. See the MODs section below for more details. MODs Effect Chain Mods are modulation controls which can be assigned to the Forte SE’s physical controllers. For example, an Effect Chain Mod assigned to a slider can be used to adjust the dry/wet effect mix, or control other parameters like reverb or delay time.
-
Page 279: Tools Page
Press the “EXIT” button when finished using a Tool. MIDI MON Press the MIDMON soft button to view MIDI messages sent from the Forte SE. This is useful for making sure controls are assigned as you want them, checking note numbers and velocities, and checking controller values or other MIDI messages. - Page 280 KB3 program. When a KB3 program is loaded in any of the Forte SE’s 16 MIDI channels (In Program or Multi Mode), a solid rectangular block will be shown for every two tone wheels in the KB3 program, even if you’re not playing any notes.
- Page 281 The INFO page contains the system information indicating what version of operating system and objects is currently installed in your Forte SE keyboard. Go to the Kurzweil website at http://www.kurzweil.com and make sure that you have the latest operating system available.
-
Page 282: Sample (Samples Memory Map Page)
Channel and MIDI CC to view. ABOUT The ABOUT Page displays the Forte SE splash screen and automatically scrolls a list of credits and acknowledgments. SAMPLE (Samples Memory Map Page) Press the SAMPLE soft button to view the Samples Memory Map page. -
Page 283: Loader
CAUTION: Be aware that deleting user objects will permanently remove them from the Forte SE. If you wish to load the object back into the Forte SE in the future, ensure that you save the object to a USB device (such as a thumb drive) or computer/tablet before deleting them. -
Page 284: Reset
Press the Reset soft button to view the Global Reset page, where you can choose to reset the Forte SE to its original factory settings. This restores all Global mode settings to their factory defaults, and deletes all user Programs and Multis. -
Page 285: Song Mode And The Song Editor
To access Song Mode, press the SONG soft button in Global Mode. Song Mode gives you access to the Forte SE’s sequencer, a powerful and versatile tool for recording and playing songs sequenced by MIDI. Read through this section to learn about the features of the Forte SE’s sequencer. - Page 286 “0” in the tempo field, and press enter. “EXT” will appear in the tempo field. Any MIDI Time Clock (MTC) signal received at the Forte SE’s USB or MIDI in port will now set the Song playback tempo.
- Page 287 Song Mode and the Song Editor Song Mode: The MAIN Page Recording Track (RecTrk) The RecTrk parameter determines which track is record enabled. Set the record enabled track to Mult to record more than one channel simultaneously. When RecTrk is set to a single track (1–16), Record (R) is displayed for that track in the Track Status Indicator region (above the Track and Channels region).
- Page 288 Song Mode and the Song Editor Song Mode: The MAIN Page Volume (Vol) You can set a volume level for each track as a value between 0 and 127. If the channel of the RecTrk (or the control channel, if RecTrk is set to Multi or None) contains any recorded volume change (continuous controller 7), the change will be reflected as the Vol parameter’s value in real time, as well as on the MIXER page.
- Page 289 Song Mode and the Song Editor Song Mode: The MAIN Page You can set an initial pan position (the balance between the Left and Right audio channels) for the playback and recording of each track as a value between 0 and 127. A value of 64 is center. If the channel of the RecTrk or the control channel contains any panning data (continuous controller 10), the change will be reflected as the Pan parameter’s value in real time, as well as on the MIXER page.
- Page 290 Song Mode and the Song Editor Song Mode: The MAIN Page Mode If Mode is set to Merge you will be able to overdub when recording on a track containing previously recorded data. You’ll usually want to set Mode to Merge when RecMode (on the BIG page) is set to Loop.
-
Page 291: Soft Buttons On The Main Page
NOTE: These buttons are similar to the transport controls on a tape deck. Some of those decks require you to press Play and Record simultaneously to begin recording. The Forte SE’s transport buttons aren’t like that, however. It’s important that you press only one of these soft buttons at a time to insure proper recording start points, and to always be sure of the current sequencer status. - Page 292 Song Mode and the Song Editor Song Mode: The MAIN Page The New Soft Button The New soft button creates a new song with default settings. Pressing this button is the same as selecting 0*New Song*. The Save Changes Dialog The following dialog appears after you have recorded a track and pressed Stop, or if you have entered the Song Editor and made changes, then pressed Exit, or if you press Save in the Song Editor.
-
Page 293: Song Mode: The Big Page
Song Mode: The BIG Page On the BIG page, the Forte SE displays—in a large font, the page’s name—the current time/ location of the “playhead” of the sequencer in a Bar : Beat : Tick format. Also displayed is the current status of the sequencer, and the BIG page’s six parameters. - Page 294 Song Mode and the Song Editor Song Mode: The BIG Page Time In The Time In parameter determines the start time for Loop or Punch In recording (more on this below). Time Out The Time Out parameter determines the stop time for Loop or Punch In recording. Song End The Song End parameter determines the end point for the song.
-
Page 295: Song Mode: The Fx Pages
Song Mode and the Song Editor Song Mode: The MIXER Page Song Mode: The FX Pages The three Song mode FX pages—FX, AUX1, and AUX2—work the same way as the corresponding pages in Multi mode, with the following exception: Song Mode does not have an AuxFXChan parameter. -
Page 296: Song Mode: The Metronome Page
Song Mode and the Song Editor Song Mode: The METRONOME Page The Rec, Play, and Stop Soft Buttons These soft buttons function as described in “The Rec, Play, and Stop Soft Buttons” on page 13-12. The Keep Soft Button Pressing the Keep soft button captures the current settings for each track’s program, panning, and volume as the initial settings. - Page 297 This parameter determines the number of measures the Forte SE will count off before recording. With StartOnly selected, the Forte SE will only count off at the beginning of a sequence. With Always selected, the Forte SE will count off from any point in a sequence.
-
Page 298: Song Mode: The Filter Pages (Recflt And Plyflt)
Song Mode and the Song Editor Song Mode: The METRONOME Page Song Mode: The Filter Pages (RECFLT and PLYFLT) On the RECFLT and PLYFLT pages you can specify what event are ignored during, respectively, recording and playback. Both pages have the same parameters with the same ranges of values, but you would use the RECFLT page to configure recording event-filtering, and the PLYFLT page to configure playback event-filtering. - Page 299 Song Mode and the Song Editor Song Mode: The METRONOME Page Controllers With Controllers set to Off, all controllers are ignored during recording/playback. With Controllers set to On, controller data only of the specified controller and only within the specified value range are recorded/played.
-
Page 300: Song Mode: The Misc Page
Song Mode and the Song Editor Song Mode: The METRONOME Page Song Mode: The MISC Page The MISC page contains miscellaneous sequencer parameters. The MISC page appears below: Parameter Range of Values Default Control Chase On, Off Quantize Off, 1 to 100% Grid Resolution 1/1 to 1/480 Swing... -
Page 301: Song Mode: The Stats Page
The events in the Forte SE are similar to events of other sequencers with a single major difference: the Note events are stored as a single big event, i.e., one Forte SE Note event is comprised of the note-on and note-off events. All other events are stored as single events on the Forte SE. -
Page 302: Song Editor: The Common Page
Song Editor: The COMMON Page Press the Edit button on the front panel of the Forte SE to display the COMMON page and begin editing a song. This is where you will find parameters common to all tracks, such as tempo and time signature, control parameters for effects, and soft buttons for switching to other Song editor pages. -
Page 303: Song Editor: The Track Page
There are four possible indicators: L = Local. The track’s MIDI data will be transmitted locally only, to the Forte SE’s internal sound generator. None of the track’s MIDI data will be sent to the USB or MIDI Out port. - Page 304 Song Mode and the Song Editor Song Editor: The TRACK Page For each function, there is a set of parameters to control how the function operates, and on what region of the selected track(s). As usual, the top line of this page displays the selected track or tracks.
- Page 305 Song Mode and the Song Editor Song Editor: The TRACK Page Region/Criteria Box Parameters From and To From and To are available in most TRACK edit functions to define a range of time on the selected track(s). The From value defines the first bar, beat, and tick in a range of time selected for editing. The To value defines the final bar, beat, and tick in a range of time selected for editing.
-
Page 306: Song Editor: Track Functions
Locate parameter) at the time you press FromTo. If you press it while the Locate value is earlier in the song than the current To value, the Forte SE updates the From value. If you press FromTo again (without stopping playback) while the Locate value is later than the current From value, the Forte SE updates the To value. - Page 307 Song Mode and the Song Editor Song Editor: Track Functions If you do not want to copy all of the MIDI events in the defined range of time on the current track, use the Events parameter in the Region/Criteria box to select a specific MIDI event type you would like the edit function to affect.
- Page 308 Song Mode and the Song Editor Song Editor: Track Functions DstTrack: 1 to 16 Select a destination track for the events to be moved to with the DstTrack parameter. All selected events described in the Region/Criteria box will be placed in the destination track at the data’s original location.
- Page 309 Song Mode and the Song Editor Song Editor: Track Functions Delete The Delete function is used to remove a region of time from the current song. This function is different from the erase function because not only does it remove the events from the selected time, it will delete the entire selected range of time from the song, modifying the song’s End point appropriately (on all tracks).
- Page 310 Song Mode and the Song Editor Song Editor: Track Functions Release: Yes/No Set the Release parameter to Yes if you would like each quantized Note event’s Note Off message to be aligned to the grid location nearest to the time the key was originally released. Shift The Shift function allows you to offset the existing MIDI events forward or backward in time any number of bars, beats and ticks.
- Page 311 Song Mode and the Song Editor Song Editor: Track Functions Grab Grab is similar to the Copy function, except that the Grab function allows you to copy selected data from tracks that exist in other songs in memory. SrcSong: Song List The Source Song parameter is set to the ID and name of the song in memory that contains the desired track data you wish to grab in order to use it in the current song.
- Page 312 Song Mode and the Song Editor Song Editor: Track Functions Change The Change function is used to modify attack velocities, release velocities, or the values of any existing controller data on the current track. A static change of values can be made as well as having the change take place over a region of time.
-
Page 313: Song Editor: The Event Page
Song Mode and the Song Editor Song Editor: The EVENT Page Remap Use the Remap function to apply the values of any one type of controller data, already recorded on a track, to another controller type. The effect the real time changes of the “Old” controller had will be replaced by the effect the “New”... - Page 314 Song Mode and the Song Editor Song Editor: The EVENT Page To scroll through the events, make sure the location (Bar and Beat, in the first column) is highlighted. Use the Alpha Wheel, the Up and Down cursor buttons, or the Plus/Minus buttons. As you scroll through the events, each event is executed by the sequencer.
- Page 315 Song Mode and the Song Editor Song Editor: The EVENT Page Event Type Values Program Change (PCHG) 0 to 127 Pitch Bend (BEND) -8192 to 8191 Mono Pressure (MPRS) 0 to 127 Poly Pressure (PPRS) 0 to 127 C -1 to G 9 Note events have four editable values: Note Name, Attack Velocity (indicated by a “v”), Release Velocity (indicated by a “^”), and Note Duration.
-
Page 316: System Mode
This chapter will help you familiarize yourself with the functions of System Mode. System Mode allows you manage and upgrade the OS software of your Forte SE as well as perform diagnostic tests of the instrument’s various internal systems and processes. Note that the functions that you have access to in System Mode govern the operation of your Forte SE, so only use System Mode when you must perform essential maintenance tasks. -
Page 317: Run Forte Se
Run Forte SE This is the first System Mode menu item. Pressing the “Run Forte SE” soft button will load the OS and the Forte SE will start up as if you just switched on the unit. If the Forte SE operating system fails to load up, you will see an error message with an error code. - Page 318 System Mode System Update 2. Connect the flash drive to the USB STORAGE slot of Forte SE. 3. Follow the instructions specified on page 14-1 to enter System Mode. 4. In System Mode, select System Update. 5. Select USB Device as the storage type.
- Page 319 1. Download the System Update file from the Kurzweil website or another reliable source and save it in a known folder or directory on your flash drive. 2. Connect the Forte SE (powered off) to the computer/tablet with the USB cable provided into the USB COMPUTER slot.
- Page 320 System Mode System Update If the Forte SE cannot detect a connection to the computer it will display the message below. 7. If the connection was detected, you will be prompted with the above message. Copy the KUF file to the virtual drive that appears on the PC and press OK.
- Page 321 System Mode System Update 8. Select the file from the list displayed on the next screen and Press OK. You will see a progress bar indicating the progress. If update was successful you will see a confirmation message. If there was a failure you will see a self-explanatory failure message (with error code) to indicate the failure.
-
Page 322: Run Diagnostics
These operations are mostly used at the factory and service centers by technicians for troubleshooting hardware problems. But, in some cases you might be required to run these diagnostics for troubleshooting and diagnosing symptoms. In these cases, following the direction of Kurzweil Technical Support. FORTE SE System Mode v.3.44.25701... -
Page 323: System Reset
CAUTION: THIS OPERATION ERASES ALL USER OBJECTS (PROGRAMS/MULTIS ETC.). System Reset will restore the Forte SE back to a Factory State. In addition to all user objects (Programs/Multis etc.) being deleted, Global Mode settings will be restored to factory defaults. - Page 324 System Mode System Reset If you have completed the System Reset, select OK. 14-9...
-
Page 325: System Utilities
You will most likely not need to use the System Utilities. In some cases you might be required to use these utilities for troubleshooting and diagnosing symptoms. In these cases, following the direction of Kurzweil Technical Support. FORTE SE System Mode v.3.44.25695... - Page 326 Objects. Do not do this unless you think it is necessary in order to improve the performance of your Forte SE. Should you decide to do so, be sure to back up all of your files and software. After you do this, System Mode will still be available, so you can run updates and get your Forte SE up-and-running again.
- Page 327 System Mode System Utilities 3. Press Format Flash. 4. The next screen wants to make sure that formatting the flash and deleting everything is really what you want to do. Select OK to format the internal flash memory. Select CANCEL if you do not wish to proceed. 14-12...
- Page 328 5. When formatting of the internal flash memory is completed, the display will show the message “Done formatting flash.” Press OK. Update Module This option allows the installation of individual files. You may be guided by Kurzweil Technical Support to use this option if needed. Restore Older This option allows the restoration of a previously installed OS or Objects version.
-
Page 329: Troubleshooting
1. The display backlight turns on. 2. “Loading...” appears on the display for a few seconds. 3. The Forte SE enters Program Mode with Program 1 or the default boot up program selected. If nothing at all happens when you turn the power switch on, check if one of the following... - Page 330 NOTE: When diagnosing audio problems, set the Forte SE to play its Demo Song rather then intermittently pressing keys. This will prevent any unexpectedly loud volume changes. If there is no sound from your Forte SE, check if one of the following might be the issue: Slowly push the volume slider up.
- Page 331 12-20) Obtain and securely connect an audio cable The audio cable is of an incorrect type. of the correct type. The Forte SE accepts both balanced (TRS) and unbalanced (TS) 1/4- inch audio cables. If you can hear sound but it is low or distorted, check if one of the following might be the...
-
Page 332: Midi Problems
The MIDI connections are wrong. To send MIDI, plug the MIDI cable into the Forte SE’ MIDI Out port and into the module’s MIDI In port. The MIDI cable is defective. Obtain and securely connect a new MIDI cable. -
Page 333: Pedal Problems
Troubleshooting Pedal Problems Pedal Problems Before you consult this section, be sure to read The Pedal Jacks on page 2-4. Switch Pedal Problems If you are having problems with connecting or using a switch pedal, check if one of the following might be the issue: •... -
Page 334: If None Of The Above
5,000 and 100,000 ohms. An impedance less than 5,000 may overload the reference voltage source in the Forte SE and interfere with operation of other controls like the Master Volume slider or the other sliders. - Page 335 These operations are mostly used at the factory and service centers by engineers for troubleshooting hardware problems. But, in some cases you might be required to run these diagnostics for troubleshooting and diagnosing symptoms. In these cases, follow the direction of an authorized Kurzweil technician. 15-7...
-
Page 336: Midi Implementation
MIDI Implementation Appendix A MIDI Implementation Function Transmitted Recognized Remarks Default Basic Channel Memorized Changed 1–16 1–16 Default Mode 3 Mode 3 For multi-timbral applications, set the Global Mode Messages Mode “FX Mode” parameter to “Multitrack” (see page 12-3 for details) Altered 0–127 Note Number... -
Page 337: Physical Specifications
Physical Specifications Appendix B Physical Specifications 88-key, fully-weighted hammer-action with velocity and pressure (After Touch) sensitive Keyboard: adjustable keys. 88-key model uses Fatar TP100LR with pressure. Display: 240x64 pixel monochrome LCD with front-panel contrast adjust. Polyphony: 128 Voice Polyphony, dynamically allocated. Multitimbral: 16 parts (one per MIDI channel). -
Page 338: Programs
Programs Appendix C Programs Object Version : 2.00.10 BANK A: BANK A: BANK A: PIANO CLAV LEADS RecitalGrand 9ft Clavi BC AlaskanWild Lead Solo Grand 7ft Clav BC Env Filt 80's Lead Synth Fierce Rock 9ft Clavi AC Prophet Sync Studio Grand 7ft Clavi BC Phaser Cars Square Lead... - Page 339 Programs BANK A: BANK A: BANK A: SYNTHS STRINGS ENSEMBLE Quadra Comp Arco Strings Ens Epic Vox&Strings 80s Saws Adagio Strings LayeredStrgsWnds Super Saw Stabs Weeping Strings Full Fellowship Clone Bandit Punchy Strings Strings/ClarOboe Detuned Polysyn Power Trem Strgs Cello & Reeds OBX Filter Sweep OversizedQuartet Gothic Climax...
- Page 340 Programs BANK A: BANK A: GUITAR/BASS DRUMS Rob's Caster Full Room Kit Boutique 6 Str Copper Ring Kit Boutique 12 Str East Space Kit Real Nylon Birch Wood Kit SuperflyWahCast 25th Anniv Kit Chunky Comper Los Angeles Kit Twin Peaks Ring-tone Kit Noisy Feedbacker Superfly Kit...
- Page 341 Programs BANK B: BANK B: BANK B: PIANO CLAV LEADS Dynamic 9ftGrand StopMakingSense Micromoog Plus Concert Piano SailinShoes Clav Propht V Sync Ld Recital Piano Harpsi Rotovibe VA1 Saw Lead Indie Piano 2 Bi*Phaz Clav VA1 Sqr Lead Stadium Pop Pno 80s Flange Clav LegatoBrassyLead Blues Piano...
- Page 342 Programs BANK B: BANK B: BANK B: SYNTHS STRINGS ENSEMBLE AM Square Synth WheelBowFiddle RequiemMassEns Square Bell WheelBowCello HeroicFilmScore Radio Googoo WheelBowViola Poltergeist Trem Anesthesia WheelBowBass Pizz w/PercUpTop Plastic SoulSyn Electric Bow SloLineInterlude OB Preset #1 Slo Muted Strings Pastoral DblRds Wet as it Gets 2 AdagioTremSplit Pastoral w/ Pizz...
- Page 343 Programs BANK B: BANK B: BANK D: GUITAR/BASS DRUMS PERCUSSION Les Grit ElectroBeat Click Track 1021 ChunkyVintageGtr BeatBoxDist Silent Program 1022 Stompbox Les Rezo-King Editor Template 1023 New Beauty Rhythm Ring Clear Program 1024 ShredfestLead1 Gaddly Gruv Kinda Krunchy Ziga Funk TimeWarpCaster BrushStroke Steel Str Gtr...
-
Page 344: Kb3 Programs
KB3 Programs Introducing KB3 Programs Appendix D KB3 Programs Introducing KB3 Programs There’s nothing quite like the sound of the classic Hammond™ B-3 tone wheel organ, especially when played through a Leslie™ rotating speaker system. We’ve done extensive testing and analysis with several tone wheel organs, and created our own models to emulate the unique tone wheel sound. -
Page 345: Drawbars
Best of all, you can make radical changes to the tone dynamically as you play. The nine sliders of the Forte SE are set to control the drawbars. Pulling the slider towards the keyboard increases the amount of the drawbar that is heard. - Page 346 The KB3 engine in the Forte SE is capable of generating the Percussion effect without stealing any of the drawbars, and while not authentic, is occasionally used on Forte SE Programs.
-
Page 347: Multis
Multis Appendix E Multis Object Version : 2.00.10 MULTI MULTI MULTI Fuzzy Bottom Tribute 4-Piece Suit Sunset Mirage Yankee Doodle Nervous Eaters Bass EPiano Lead Coronation UnderGroundRails Vocal Pad Scape Organic Organ Mind Of It's Own Floating Spirits Pad Machine Chill Kit/Chords Flowing Orinico Gospel B3 &... - Page 348 Nile of Poodle Detache Bows Motion News Split Default Air on G String InsidePhil'sHead Layer Default Choral Strings LeadMeToMyFeed Forte SE Control Ugokukokoro Stranded Unicorn Clear Multi House Of 3 Inside of Time Organ-ic Voices Breath of Aura Evacuation Timed Divination...
-
Page 349: Effects Chains
Effects Chains Appendix F Effects Chains Object Version : 2.00.10 CHAIN CHAIN CHAIN Little Booth Soft Flange Reverse Reverb Soundboard Wetlip Flange Reverse Reverb 2 Small Dark Room Flanged Taps Oil Tank Reverb Sax Chamber Slow Deep Phaser Laser Reverb Small Hall Fast&Slow Phaser Gated Laserverb... - Page 350 Effects Chains CHAIN CHAIN CHAIN Fife Stage St CHDly II Warm Leslie K Live RecitalHall OmniStage NewLord 1 K AbbeyBrasHall2 OmniStage CrunchLesl122 K Smooth Long Hall gshot vrb HotLeslie122b K kickcmp3 deep part1 BostonLeslieK kickcmp4 DblSloFlangeCmp CrunchLesl122 K snarcmp4 alphacentauri1 Hot Leslie 122e kickcmp5 Timbered Taps 2...
- Page 351 Effects Chains CHAIN CHAIN CHAIN NewLord 1 12StWarmCrunch MyJacoART SystemTemp Tap Phaser EGT UprightBassRoom WaterDistSynth SnareComp1 Levin Chorus FlangeVoiceHall ASDrumComp1 Bright Room BrightFlangeHall KickComp1 Med Dark Room SoulLeslie122 K 60's BigDrumRoom BasicReverb FlngRecitalHall AS SynthDist2 Medium Hall 4U Med Drum Room AS CmpVerb4Drms KickComp2 Dual Filters +...
- Page 352 Effects Chains CHAIN CHAIN CHAIN PolyPitcher 2 DrumFattyDry2 StereoizerW/Verb LFO Pitcher DrumFattyDry3 DrmCMP4PrgFX2 Wet Hall for Pad AS Drum Room2a CmPhDiRe4Drms DrmCMP4PrgFX2 Gated Plate2144b CmPhDeRe4Drms Kick Compressor2 DrumFatty4 CmEqDeRe4Drms Snare Compresso2 DrumFattyRoom3 CmEqDeRe4DrmsST DrmCMP4PrgFX ASDrumComp1a DrmFatener/ Ech Kick Compressor2 AS Drum Room2a DrmPhaseVerb Snare Compresso3 DrumFatty3a...
- Page 353 Effects Chains CHAIN CHAIN CHAIN HOP Drum Reverb1 Double Leslie 12 Double Leslie15 HopKickcmp1 Double Leslie 5 Good Leslie1 NoQuarter PlainComp12 Good Leslie4 TechnoHHDly 1/8 Double Leslie 11 GoodLeslie 6 HOP Drum Reverb3 CDR Synth WhitrShadeLeslie HopKickcmp7 SynthFlangenDely Inagadadavita Roomverb1 QuantzEnhanceSyn GoodLordLeslie Kickcmp6...
- Page 354 Effects Chains CHAIN CHAIN CHAIN SynFatener& Ech4 Aux Chamber SynEnhancement Shredlead15 BowiePno1 CompKik11 PlainComp21 BluesPnoCmpRvb 1 VintChamber Garth New Gtr 31 SmallWurly2 BassFleaCompMu Soundboard 3 Deep FuzzPnt 1 Chr & Echo 2 OmniStage Comp70 BasicCDR2 Double Leslie FooldAgainVox ShaperFuzzLead 2 MedPlateJazFlute CompKik111 AM Big Band...
- Page 355 Effects Chains CHAIN CHAIN CHAIN kickcmp401 Kickcmp441 Comp501 Deep Fuzz 6 Upright3 RMIPhase1 1000 Joey Leslie 122 SynEnv4 HopKickcmp701 1001 SynChorusDlydw2 SmallComp9 Leslie Comp 2 1003 ECello2 KickComp201 Kickcmp301 1004 violin2 GoodLeslie 9 PnoRvb 1 1005 Small StringRoom Falgor Gtr PnoRvb2 1006 Viola2 KickComp701...
- Page 356 Effects Chains CHAIN CHAIN CHAIN 2201 BluesPnoCmpRvb 2 3220 Delay + Plate 3258 LesTrem 2202 BluesPnoCmpRvb 3 3221 Dist Booth Dly 3259 AS Laser Reverb 2203 ArtEQDW1 3222 Sonny More | ) 3260 as Laser Reverb 2204 ArtEQCMPDW5 3223 JSP Synth CDL 3261 NuBeautyDist 2205 ArtEQCMPDW6 3224 Synker1...
- Page 357 Effects Chains CHAIN CHAIN CHAIN 3296 EQVelMorph R 3334 3str Gtr Wah2 3457 Lil' Drum Booth 3297 HF Stim 3335 WorldMandolinCDR 3458 Small Drum Space 3298 InstantHillbilly 3336 Padme's lil' Pal 3459 Small Cmpsd Spce 3299 HoRnYFlAnGePaRtY 3337 Squeeze Cmp 3460 More Drum Air 3300 BRASS EQ/Comp 3338 Klockwork...
- Page 358 Effects Chains CHAIN CHAIN CHAIN 4001 Rich 9 Ft Grand 4039 Phasey 73 Rhds 4077 HeartbreakerWAH 4002 Rich 7 Ft Grand 4040 Mr. SparkleTop73 4078 Chameleon Wah 4003 Rock 9 Ft Grand 4041 Aged Tolex 77 4079 Stevie Fuzz Amp 4004 Bright 7ft Grand 4042 Smooth 70's 73 4080 OutOfPhasPickups...
- Page 359 Effects Chains CHAIN CHAIN CHAIN 4118 ParisCmboAccordn 4157 80's Heaven 4195 Session Hornz 4119 Mellow Accordion 4158 PolySynth Stack 4196 High-End Horns 4120 BrasilAccordion 4159 Chillwave Chords 4197 Split SectionSW 4121 Press Lead 4160 Classic Saws 4198 Mancini Brass 4122 Cars Square Lead 4161 Big Old Jupiter 4199 GB Hornz+Syn 4123 Keytar Hero(Wah)
- Page 360 Effects Chains CHAIN CHAIN CHAIN 4238 Boutique 12 Str 4291 Slo Orch Chorus 4352 Latch Bass 4239 Real Nylon 4292 Aaah Vocals 4353 APG-ish Bass 4240 Mandolin Plus 4293 Jazzy Ballad Vox 4501 ART2 Recital 587 4241 Banjo Plus 4294 Bright Syn Vox 4502 ART2 Solo 988 4242 Dulciere 4295 AntiqueAhhChorus...
- Page 361 Effects Chains CHAIN CHAIN CHAIN 4537 VAST Clav 4594 Water Buffalo 4654 Sylvan Dbl Reeds 4538 VAST Clav Autowa 4595 Pan Motion Pad 4655 Clarinet 4540 Harpsitar 4596 Deeper Water 4656 Fruity Floot 4544 Classic Harpsic 4597 NG 5th Synth 4658 SoloBassoon&Oboe 4545 Simple Harpsic 4598 80s Saws...
- Page 362 Effects Chains CHAIN CHAIN CHAIN 4711 Bummer Dudes 5012 Small Hall2 5050 Bullitt PDlyHall 4712 BaDaDah-Doop 5013 Medium Hall2 5051 7thHeaven Plate 4713 Choir Redux 5014 Tines Aux Rev 5052 Miami Gated Room 4714 EnvelopingVoices 5015 Little Booth 5053 Miami Plate Rvb 4715 OohDBopTouchEcho 5016 Clav Chamber 5054 Tenor Sax...
- Page 363 Effects Chains CHAIN CHAIN CHAIN 5088 jk AUX1 5126 PredelayHall2 J1 5219 Flaming Hohner 5089 Empty Stage 5127 Sax Room JK AUX 5220 Walrus EP 5090 DF OrganRoom 5128 PredelayHall2 J3 5221 StopMakingSense 5091 KB3 Aux2 Booth 5129 Subtle EP Verb 5222 Harpsi Rotovibe 5092 KB3 Aux2 Booth 2 5130 VinylDistImage2...
- Page 364 Effects Chains CHAIN CHAIN CHAIN 5257 Twilight AuxVerb 5295 WheelbowBass 5333 Dream On Aux 5258 Twilight Verb 5296 WheelBowViola 5334 Poltergeist Trem 5259 Deeper Water FX 5297 Electric Cello 5335 Pizz w/Perc 5260 Ancient Insert 5298 Slo Muted String 5336 SloLineInterlude 5261 Ancient Aux 5299 SymphonyHall Str 5337 PastoralDblRds...
- Page 365 Effects Chains CHAIN CHAIN CHAIN 5373 Sub Voice FX 5411 Chimes Pad 5449 Triumphant Brass 5374 Swept Voices FX 5412 Bell Orchetra 5450 Lucid Brass 5375 Swell Choir FX 5413 Soft Bell Keys 5451 Solo Trmbn/Trmpt 5376 Murmurs FX 5414 Washboard FX 5452 Brass Cmpr Hall 5377 Opera House 5415 Washboard Aux2...
- Page 366 Effects Chains CHAIN CHAIN CHAIN 6043 Y DW Rock EQ 6124 damperverb 2unit 6162 Vintage Squashed 6044 Y DW Rock EQ2 6125 7ft Solo 6163 House 9ft Grand 6045 Heartbreaker 6126 D TMP flat EQ 6164 Super Pop eq 6046 S DW AlbumEQ1 6127 7ft Squashed 6165 Scoop 9ft Grand 6047 DynoChor73...
- Page 367 Effects Chains CHAIN CHAIN CHAIN 6231 Heartbreaker 6424 73DWPHASDistWah 6555 DampersUp 6232 Relic Clav 6425 77DWPHASDstWah1 6556 Sweet PnoHall 6233 Steely Fuzz 6426 73DWPHASDistWah2 6557 Sweet PnoHall 2 6234 Stevie Fuzz 6427 73DWVintamp2 6558 Tines FX 6235 Trampler 6428 77DWVintAmpWah 6559 9-Ft Piano FX 6236 Trampler2 6429 DampersUp...
- Page 368 Effects Chains CHAIN CHAIN CHAIN 6669 Artis YHall 2 6715 Ezra II Les 01 6824 Cathedral Vx Aux 6670 Upright Room 6716 SoulPerc Les X 7000 GM Reverb 6671 ParlorPianoEQ 6717 FirstThree LesX 7001 GM Chorus 6672 ParlorVerb 6718 PerfectStrLes X 7002 Indie Piano 6673 PianoTmplateEQ1 6719 70s Drwbars LesX...
-
Page 369: Index
Index Index Select 10-2, 12-20, 12-22. Banks 10-2. factory 6-2. Shift Patterns 11-24. Bend 3-7, 11-22. Down Ct 11-13. Down ST 11-13. Up Ct 11-13. Add parameter 11-15, 11-16, 11-26. Up ST 11-13. Advanced 7-1, 7-13, 7-69, 10-6, 11-2, 12-3, 12-5. See Brake D-2. - Page 370 Index Common Parameters 11-1. Effects 7-13, 7-14, 11-32, F-1. Compatible Files 12-16. Aux 11-31, 11-32. Compress 11-12, 11-15. Insert 7-14. Compression 8-12. Layer-specific 7-16. Connecting Audio 2-2, 2-3, 2-8. parameters 8-5. Connecting MIDI 2-4, 2-9 to 2-10. Enable 7-28. Connecting Pedals 2-4. Enter.
- Page 371 Index Page 7-48. Mode 7-80, D-1, D-2. Functions 5-1, 5-4. See also Arpeggiator; See also Demo Programs 4-1, 6-4. Function; See also Layer: Function; See also Split: Key 9-4. Function. Key1-8 parameter 11-18. FX. See Effects. Keyboard 2-1, 2-2, 4-1, 4-2, 5-4, 6-13, 11-7, 12-28, D-1. Mod controller 8-3.
- Page 372 Index MIDI 12-26. Bank 4-2, 11-9. CC numbers 7-8 to 7-10, 11-14, 11-20. Objects 4-3. Deleting All 14-8. Channel 3-9, 4-1, 4-2, 6-1, 6-17. Importing 12-16. Channel Transmit 6-17, 12-20. Programs. See Program. Connecting. See Connecting MIDI. Implementation Chart A-1. Octave 3-16, 6-8, 10-6, 11-25.
- Page 373 Rotating Speakers 8-18. Switch Pedal 2-5, 4-3, 2-6, 3-7. See also Pedal. Rubber Feet. See Feet (Rubber). Sync Square 7-74. Run Forte SE 14-2. Sysex ID 12-23. Rvrs (Reverse) 11-12, 11-16. See also VelCurve. System Mode 14-1. System Update 14-10.
- Page 374 Index definition 11-17. VelMode 11-11. soft button 9-4, 9-5, 9-6. VelOffset 11-11. TOOLS Page 12-26. VelScale 11-11. Transpose Vibrato 8-19. Buttons 3-6, 6-8, 10-6. View 3-10, 6-4, 10-3, 10-7. LEDs 6-8, 10-7. VOICES 12-27. Reset 3-6, 3-15. Volume 6-13, 12-29. See also Level: audio volume. Transpose Parameter 11-10, 12-3.
Need help?
Do you have a question about the FORTE SE and is the answer not in the manual?
Questions and answers