Table of Contents
Advertisement
Quick Links
Thank you for purchasing this product.
Be sure to read this manual before use.
This manual includes important safety precautions and instructions on
how to operate the unit. Be sure to read this manual to ensure proper
operation, and store it safely for future use.
© 2016 JAI
User Manual
GO-5100M-PGE
GO-5100C-PGE
5.1M Digital Progressive Scan
Monochrome and Color Camera
Document Version: 1.0
GO-5100-PGE_Ver.1.0_June.2016
Advertisement
Table of Contents

Related Manuals for JAI GO-5100C-PGE


Summary of Contents for JAI GO-5100C-PGE
-
Page 1: User Manual
Be sure to read this manual before use. This manual includes important safety precautions and instructions on how to operate the unit. Be sure to read this manual to ensure proper operation, and store it safely for future use. © 2016 JAI... -
Page 2: Table Of Contents
Line Status ..............35 Warning ................3 Shading Correction .............35 Flat Shading ............35 Usage Precautions ............6 Features ................7 Color Shading (GO-5100C-PGE only) ....36 To use the shading correction function ....36 Parts Identification ............8 Binning Function ............36 Preparation............12 ROI (Regional Scanning Function) ......37 ROI Settings ............37... -
Page 3: Notice
The material contained in this manual consists of information that is proprietary to JAI Ltd., Japan and may only be used by the purchasers of the product. JAI Ltd., Japan makes no warranty for the use of its product and assumes no responsibility for any errors which may appear or for damages resulting from the use of the information contained herein. - Page 4 GO-5100M-PGE / GO-5100C-PGE Supplement The following statement is related to the regulation on “ Measures for the Administration of the control of Pollution by Electronic Information Products “ , known as “ China RoHS “. The table shows contained Hazardous Substances in this camera.
- Page 5 GO-5100M-PGE / GO-5100C-PGE Supplement The following statement is related to the regulation on “ Measures for the Administration of the control of Pollution by Electronic Information Products “ , known as “ China RoHS “. The table shows contained Hazardous Substances in this camera.
-
Page 6: Usage Precautions
GO-5100M-PGE / GO-5100C-PGE Usage Precautions Notes on cable configurations The presence of lighting equipment and television receivers nearby may result in video and audio noise. In such cases, change the cable configurations or placement. Notes on LAN cable connection Secure the locking screws on the connector manually, and do not use a driver. -
Page 7: Features
High frame rate The GO-5100M-PGE and GO-5100C-PGE are both capable of frame rates of up to 22.7 fps (8-bit format) for full 5.1-megapixel output. Even faster frame rates can be achieved when binning is utilized (GO-5100M-PGE only) or when a smaller ROI (region of interest) is specified. -
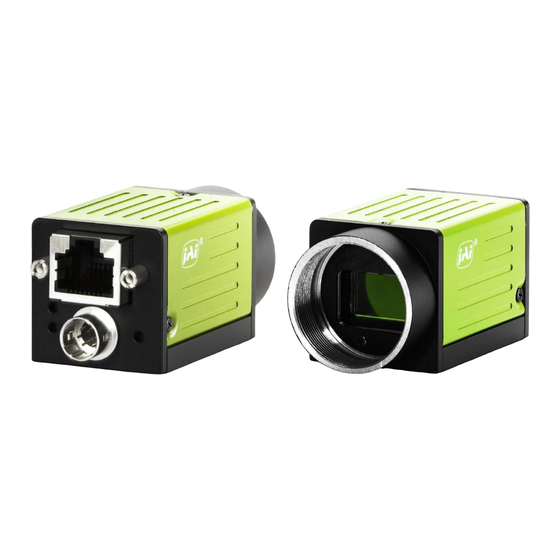
Page 8: Parts Identification
GO-5100M-PGE / GO-5100C-PGE Connection example: Camera PoE-compatible switching hub AC adapter External trigger Computer Parts Identification ② ⑤ ④ ③ ① ⑥ ⑦ 1 Lens mount (C-mount) Mount a C-mount lens, microscope adapter, etc. here. Before mounting a lens, be sure to refer to “Step 2: Connecting Devices” (page 13) and confirm the ™... - Page 9 GO-5100M-PGE / GO-5100C-PGE 2 RJ-45 connector Connect a Gigabit Ethernet compatible LAN cable (Category 5e or higher, Category 6 recommended) here. Input/ Pin No. Description output In/Out MX1+ (DA+) In/Out MX1– (DA–) In/Out MX2+ (DB+) In/Out MX3+ (DC+) In/Out MX3– (DC–) In/Out MX2–...
- Page 10 GO-5100M-PGE / GO-5100C-PGE 6 DC IN / trigger IN connector (6-pin round) Connect the cable for a power supply (optional) or for DC IN / trigger IN here. HR-10A-7R-6PB (73) (Hirose Electric or equivalent) Input/ Pin No. Signal Description output...
- Page 11 GO-5100M-PGE / GO-5100C-PGE Recommended external output circuit diagram (reference example) Standard circuit diagram example JAI camera User side Userload User GO Series CAMERA (resistor/lamp/relay/etc) side side OUT f rom camera 330~ TLP109(TPR,E) HIROSE_6Pin_NO.3 or 4 2SC6033 180BS USER POWER2 220BS...
-
Page 12: Preparation
Note When the JAI SDK is installed, a camera driver for the GigE interface is also part of the default installation. This GigE Vision Filter Driver is added to every NIC/port on the host computer. As the driver is also added to the NIC/ port for Internet connection, it may, on some systems, affect Internet access speed. -
Page 13: Step 2: Connecting Devices
GO-5100M-PGE / GO-5100C-PGE v Clear the [JAI GigE Vision Filter Driver] checkbox, and save. Step 2: Connecting Devices Connect the lens, LAN cable, AC adapter, and other devices. Attach the lens in a clean environment to prevent dust from adhering to the unit. - Page 14 GO-5100M-PGE / GO-5100C-PGE Caution • The maximum performance of the camera may not be realized depending on the lens. • Attaching a lens with a mount protrusion of 9.1 mm or longer may damage the lens or camera. Note The following formula can be used to estimate the focal length.
-
Page 15: Step 3: Verifying The Camera's Network Connection Status
GO-5100M-PGE / GO-5100C-PGE Step 3: Verifying the Camera’s Network Connection Status When power is supplied to the camera while the necessary equipment is connected, the power / trigger LED and ACT LED at the rear of the camera light amber, and initialization of the camera starts. -
Page 16: Configuring The Output Format
GO-5100M-PGE / GO-5100C-PGE Configuring the Output Format Configure the size, position, and pixel format of the images to be acquired. The factory settings are as follows. Change the settings as necessary. Factory default values Item Default value Image Format Control... -
Page 17: Configuring Exposure And External Trigger Settings
GigE NIC or switch. To correct the problem, you can either reduce the [Packet Size] setting to a value less than 1500 in the JAI Control Tool (under [Transport Layer Control] / [Stream Channel Selector], or set your NIC or switch to support “Jumbo... -
Page 18: Control Via External Triggers
GO-5100M-PGE / GO-5100C-PGE Configure the settings by expanding [Acquisition Control] and configuring the following items. Caution Settings can only be configured when image acquisition on the camera is stopped. If an item is grayed out and the setting cannot be changed, stop image acquisition beforehand. -
Page 19: When Controlling The Exposure Time Using The Pulse Width Of The Trigger Input Signal
GO-5100M-PGE / GO-5100C-PGE Set [Trigger Mode] to [On]. If necessary, change the [Trigger Source], [Trigger Activation], and [Exposure Auto] settings. When Controlling the Exposure Time using the Pulse Width of the Trigger Input Signal Configure the settings as follows. Item... -
Page 20: Control Without External Triggers
GO-5100M-PGE / GO-5100C-PGE Control Without External Triggers When Controlling the Exposure Time Using Specified Exposure Times Configure the settings as follows. Item Setting value / selectable range Trigger Selector (trigger operation) Frame Start Trigger Mode Exposure Mode Timed (control via exposure time) Exposure Time 8 bit: 14 to 7999812 (µs)*... -
Page 21: Step 5: Adjusting The Image Quality
100 and 1600 respectively. • For the GO-5100C-PGE, the [Digital Red] (digital R gain) and [Digital Blue] (digital B gain) can be set to a value from x0.45 to x5.62 (–7 dB to +15 dB) the [Digital All] (master gain) value. -
Page 22: Automatic White Balance Adjustment
Expand [Analog Control], and select the black level you want to configure in [Black Level Selector]. For the GO-5100M-PGE, only [Digital All] (master black) can be configured. For the GO-5100C-PGE, [Digital All] (master black), [Digital Red] (digital R), and [Digital Blue] (digital B) can be configured individually. Specify the adjustment value in [Black Level]. -
Page 23: To Save User Settings
GO-5100M-PGE / GO-5100C-PGE Note Changes to settings are not saved to the computer (Control Tool). ■ To save user settings Stop image acquisition. Expand [User Set Control], and select the save destination ([User Set1] to [User Set3]) in [User Set Selector]. -
Page 24: Basic Function Matrix
2 × 1 × × × 2 × 2 × × × *1 Operates only on the GO-5100M-PGE *2 Operates only on the GO-5100C-PGE — 24 —... -
Page 25: Main Functions
GO-5100M-PGE / GO-5100C-PGE Main Functions GPIO (Digital Input/Output Settings) The camera is equipped with GPIO (general-purpose input/output) functions for generating and using combinations of triggers and other necessary signals within the camera and of signals output from the camera to the system such as those used for lighting equipment control. -
Page 26: Acquisition Control (Image Acquisition Controls)
GO-5100M-PGE / GO-5100C-PGE Acquisition Control (Image Acquisition Controls) Perform operations and configure settings related to image acquisition in [Acquisition Control]. The following acquisition modes are available on the camera. Acquisition Mode Description Single Frame Acquire a single frame when the [Acquisition Start] command is executed. -
Page 27: Maximum Frame Rate Period Formula
GO-5100M-PGE / GO-5100C-PGE ■ Maximum frame rate period formula During continuous operation ([Frame Start] trigger is [Off] or [Exposure Mode] is [Off]) • Maximum frame rate of sensor Sensor FR = 1 / {H Period × (Height + 40)} • Maximum frame rate by interface Interface FR = 920 ×... -
Page 28: Exposure Mode
GO-5100M-PGE / GO-5100C-PGE Pixel Format Binning settings Output area H period Pack value Frame rate (fps) Height Width 8-bit B.V&B.H 1 2056 2464 22.7 BV 2/BH 1 (Mono) 1028 2464 45.4 13.414 µs BV 1/BH 2 (Mono) 2056 1232 35.6 B.V &... -
Page 29: Shortest Repetition Period For Triggers
GO-5100M-PGE / GO-5100C-PGE Shortest Repetition Period for Triggers The reciprocal of the maximum frame rate is the time required to output one frame. The shortest repetition periods for triggers cannot be lower than that value. Shortest period Scanning range 8-bit (at 14 μs) 10-bit packed (at 27 μs) -
Page 30: When [Exposure Mode] Is [Trigger Width]
GO-5100M-PGE / GO-5100C-PGE • Trigger overlap: Readout Next trigger input enabled Next trigger disabled Trigger Sensor Exposure Readout duration (= Height x Line Period) FVAL 8-bit 10 µs (minimum) 52 µs 464 µs 16.0 ms - Exposure Time 10-bit packed 91 µs... -
Page 31: Event Control
GO-5100M-PGE / GO-5100C-PGE 8-bit 14 µs 52 µs 49 µs 464 µs 188 µs 10-bit packed 27 µs 91 µs 89 µs 903 µs 432 µs 10-bit Event Control “Event control” is a function that uses GVCP (GigE Vision Control Protocol) to output points of change in the camera’s internal signal as event occurrence information or “event messages.”... -
Page 32: To Use The Event Control Function
Analog gain is used for lower gain, and analog gain + digital gain is used when the gain becomes high. R and B can be configured individually as digital gain on the GO-5100C-PGE. ™ For details on how to configure the settings, see “Adjusting the Gain” (page 21). -
Page 33: Lut (Lookup Table)
LUT Value 0 to 4095 Set the LUT output value for the selected index. * GO-5100C-PGE only Note For the GO-5100C-PGE, the same characteristic curve is configured for R, G, and B. — 33 —... -
Page 34: Lut Values
GO-5100M-PGE / GO-5100C-PGE ■ LUT values LUT values range from 0 at the lowest to 4095 at the highest. Linear interpolation is used to calculate LUT values between the index points. 4095 Linear interpolation using data to LUT Value [1] the left and right is used to determine values between points. -
Page 35: Line Status
GO-5100M-PGE / GO-5100C-PGE Line Status The line status function allows you to verify the status of external input/output signals. You can verify the status of the following signals. • Opt Out 1, Opt Out 2, Opt In 1 • Time Stamp Reset •... -
Page 36: Color Shading (Go-5100C-Pge Only)
GO-5100M-PGE / GO-5100C-PGE ■ Color Shading (GO-5100C-PGE only) R-channel and B-channel properties are adjusted by using the G-channel shading properties as a reference. Pre-correction Post-correction Caution Proper correction is not possible under the following conditions. • If an area with a brightness level that is more than 30% less than the reference level exists within the screen •... -
Page 37: Roi (Regional Scanning Function)
GO-5100M-PGE / GO-5100C-PGE ROI (Regional Scanning Function) The ROI (region of interest) function allows you to output images by specifying the areas to scan. ROI Settings Specify the area to scan by specifying width, height, and horizontal/vertical offset values under [Image Format Control]. -
Page 38: Sensor Multi Roi Function
GO-5100M-PGE / GO-5100C-PGE Sensor Multi ROI Function Sensor Multi ROI is an ROI function that is configured and functions inside the sensor. You can configure up to 64 scanning regions (8 horizontal and 8 vertical). By skipping areas that are not specified as regions of interest when scanning a frame, the sensor's ROI function outputs the specified regions in a compressed state. -
Page 39: Sequencer Function
GO-5100M-PGE / GO-5100C-PGE When [False] is specified, the settings within the index are disabled. OffsetH, Width: 16 pixels/step OffsetV, Height: 2 lines/step Total sensor area (2464 × 2056) ROI 1-1 ROI 1-2 ROI 1-8 Index 1 ROI 2-1 ROI 2-2... - Page 40 GO-5100M-PGE / GO-5100C-PGE [Sequencer LUT Mode] defines whether Gamma or LUT is to be applied to the sequence. If Gamma is selected, the Gamma setting defined in the camera’s Analog Control section will be applied to all exposures in the sequence. If LUT is selected, the LUT characteristics defined in Analog Control will be applied to any index where [Sequencer LUT enable] has been set to ON.
- Page 41 GO-5100M-PGE / GO-5100C-PGE In this mode, the user can define up to 128 different “indexes” each incorporating a combination of: • ROI (width, height, offset X, and offset Y) • Exposure Time • Gain Level (R/B Gain can also be configured on the color model) •...
-
Page 42: Delayed Readout [Acquisition Transfer Start]
GO-5100M-PGE / GO-5100C-PGE Index structure for Command Sequencer Index Selector Gain1 Black Binning1 Index1 ROI1 Exposure1 (MUX) Enable1 (M/Red/Blue) Level1 (H/V) Binning2 Gain2 Black Index2 ROI2 Exposure2 (M/Red/Blue) Level2 (H/V) Enable2 Current Index Exposure Gain128 Black Binning128 Index128 ROI128 Enable128... -
Page 43: To Use The Alc Function
Set [Gain Auto] or [Exposure Auto] or both to [Continuous] mode. Configure the minimum value, maximum value, etc. for AGC and ASC under [JAI Custom Control ALC]. The target video levels for AGC and ASC are configured in [ALC Reference]. For example, when [ALC Reference] is set to 100%, video levels will be maintained at 100% for AGC and ASC. -
Page 44: Counter And Timer Control Function (Counter Support Only)
GO-5100M-PGE / GO-5100C-PGE Counter and Timer Control Function (counter support only) The counter function counts up change points in the camera’s internal signals using the camera’s internal counter, and reads that information from the host side. This function is useful for verifying error conditions via the count value using internal camera operations. -
Page 45: To Use The Counter Function
GO-5100M-PGE / GO-5100C-PGE ■ To use the counter function Configure the settings as follows. Three counters can be configured (Counter 0 to 2). Item Setting value / selectable range Description Counter 0 to 2 Counter 0 to 2 Select the counter. -
Page 46: Settings List
GO-5100M-PGE: 2056 Set the image height. Binning Vertical 1: 1 to 2056 Binning Vertical 2: 1 to 1028 GO-5100C-PGE: 2 to 2056 ❖ The minimum value for Monochrome varies depending on the [Binning Vertical] setting. Offset X Binning Horizontal 1: Set the horizontal offset. - Page 47 GO-5100M-PGE / GO-5100C-PGE Item Setting range Default value Description Pixel Format GO-5100M-PGE: GO-5100M-PGE: Set the pixel format. Mono8, Mono8 [Mono12] and [BayerRG12] are enabled GO-5100C-PGE : Mono10, when [Video Process Bypass] is set to Mono10 Packed, BayerRG8 [On]. Mono12, Mono12 Packed...
- Page 48 Preset 5600K, Preset 6500K Gamma 0.45, 0.60, 1.0 Set the gamma value. JAI LUT Mode Off, Gamma, LUT Select the JAI LUT mode. f) LUT Control Configure LUT settings. LUT Selector GO-5100M-PGE: GO-5100M-PGE: Select the LUT channel to control. Mono...
- Page 49 GO-5100M-PGE / GO-5100C-PGE Item Setting range Default value Description Sequencer Gain 100 to 1600 Set the gain for the selected Sequencer Index. Sequencer Gain Red -4533 to 37876 Set the red gain for the selected Sequencer Index. Sequencer Gain Blue...
- Page 50 GO-5100M-PGE / GO-5100C-PGE Item Setting range Default value Description Pulse Generator Selector Pulse Generator 0 Pulse Generator 0 Select the pulse generator. Pulse Generator Length 1 to 1048575 30000 Set the maximum count-up value as a clock count. Pulse Generator Length 0.000013468 to 14.1222...
- Page 51 GO-5100M-PGE / GO-5100C-PGE Item Setting range Default value Description Character Set — UTF8 Display the character set. Interface Selector — Set the interface. Mac Address — XX-XX-XX-XX- Display the MAC address. XX-XX Current IP Configuration True, False True Display whether the current IP configuration is calibrated by LLA (link- local address).
- Page 52 DeviceUserID, DeviceTemperature Chunk Enable True, False False Select whether to output Chunk Data. Configure JAI ALC settings. These n) JAI Custom Control ALC settings are also used for AGC (auto gain control). ALC Reference 10 to 95 Set the target level for ALC. (unit: %)
- Page 53 Set the maximum value for the Gain Auto (ASC) control range. AGC/ASC Control Speed 1 (slow) to 8 (fast) Set the reaction speed for AGC/ASC. (8 is the fastest.) Configure settings for JAI white blemish o) JAI Custom Control Blemish correction. Blemish Enable True, False True Enable/disable blemish correction.
- Page 54 Item Setting range Default value Description Shading Detect Result — — Display the shading correction results. Configure settings for JAI sensor multi q) JAI Custom Control Sensor ROI. MultiROI Sensor Multi Roi Enable True, False False Enable/disable sensor Multi Roi.
-
Page 55: Settings
Normal Mode Set the [Video Send Mode]. Trigger Sequencer Mode, Command Sequencer Mode Settings ™ For details on the setting items, refer to the JAI Control Tool User’s Guide Item Setting range Default value 32-bit Factory Transport Layers Available 32-bit Transport Layers —... - Page 56 GO-5100M-PGE / GO-5100C-PGE Item Setting range Default value Refresh Property Grid After Editing True, False False Override TrackBar Floating-point display precision True, False False settings Make the control tool appear on top of images True, False False Timestamp display format...
-
Page 57: Miscellaneous
GO-5100M-PGE / GO-5100C-PGE Miscellaneous Troubleshooting Check the following before requesting help. If the problem persists, contact your local JAI distributor. ■ Power supply and connections Problem Cause and solution The power / trigger LED remains lit amber and Camera initialization may not be complete due to lack of a does not turn green, even after power is network connection. -
Page 58: Specifications
GO-5100M-PGE / GO-5100C-PGE Specifications Item GO-5100M-PGE GO-5100C-PGE Scanning system Progressive scan, 1 tap Synchronization Internal Interface 1000BASE-T Ethernet (GigE Vision 1.1), IEEE 802.3af Image sensor Monochrome CMOS Bayer color CMOS Image size (effective image) 8.5 (H) × 7.09 (V), 11.1 mm diagonal Pixel size 3.45 (H) ×... -
Page 59: Package Contents
GO-5100M-PGE / GO-5100C-PGE Item GO-5100M-PGE GO-5100C-PGE Black level Default level 33LSB (during 10-bit output) adjustment Video level adjustment range 0 to 100 (during 10-bit output) Adjustment range –33LSB to +64LSB against reference level (during 10-bit output) Resolution adjustment 1 STEP = 0.25LSB... -
Page 60: Frame Rate Reference
GO-5100M-PGE / GO-5100C-PGE Frame Rate Reference (Theoretical value: decimal values are dropped, during Unpacked) Resolution Frame rate Pixel count ROI/Binning Pixel size(μm) Image size (screen size) 8 / 10 / 12 bit 5.1 MP 2464 × 2056 Full pixel 3.45 × 3.45 2/3"... -
Page 61: Dimensions
GO-5100M-PGE / GO-5100C-PGE GO-5100C Sensitivity GO-5100C-PGE 1000 wave length (nm) Dimensions 41.5 C Mount 12.5 23.7 4-M2 Depth3 3-M3 Depth3 Dimensional tolerance: ±0.3 mm Unit: mm — 61 —... -
Page 62: User's Record
Serial No. …………….. Firmware version. …………….. For camera revision history, please contact your local JAI distributor. Trademarks • GigE Vision is a registered trademark of AIA (Automated Imaging Association). • Microsoft and Windows are trademarks or registered trademarks of Microsoft Corporation in the United States and other countries. -
Page 63: Index
GO-5100M-PGE / GO-5100C-PGE Index 6-pin round 10 JAI Camera Control Tool 12 JAI SDK 12 AC adapter 14 Acquisition Control 26 acquisition modes 26 LAN cable 14 ACT LED 9 LED 9 Adjusting the Black Level 22 Lens 13 Adjusting the Gain 21...
Need help?
Do you have a question about the GO-5100C-PGE and is the answer not in the manual?
Questions and answers