Winmate W10IB3S-PCH2AC-PoE Quick Start Manual
10.1” s-series hmi
Hide thumbs
Also See for W10IB3S-PCH2AC-PoE:
- User manual (100 pages) ,
- Quick start manual (49 pages) ,
- User manual (92 pages)

Related Manuals for Winmate W10IB3S-PCH2AC-PoE


Summary of Contents for Winmate W10IB3S-PCH2AC-PoE
- Page 1 10.1” S-Series HMI W10IB3S-PCH2AC-PoE W10IB3S-PCH2-PoE Quick Start Guide V1.1 Document Part Number: 9154111I100A Please read these instructions carefully before using this product, and save this manual for future use.
-
Page 2: Table Of Contents
Contents Getting Started Unpacking Description Of Parts Dimensions Mounting VESA Mount Flush/ Panel Mount Connector Description DC Input Terminal Block Connector Serial Port Connector PoE/ LAN Connector USB 2.0/ USB 3.0 Connector HDMI Connector Digital I/O Connector Turning On or Off Turning ON Turning OFF Operating the HMI Device... - Page 3 Software Developer Support Winmate Software Development Kit Winmate Download Center Winmate File Share Technical Specifications HMI Device Specifications HF RFID Reader...
-
Page 4: Getting Started
Congratulations on purchasing Winmate® 10.1” S-Series HMI. Interactive and smart automation systems of intelligent buildings are in a fast growing phase. Winmate multi-touch S-Series HMI is suitable for home automation and room management systems. Flat surface is easy-to-clean and delivers aesthetically pleasing look for any interior. -
Page 5: Unpacking
Unpacking Carefully remove the box and unpack your device. Please check if all the items listed below are inside your package. If any of these items are missing or damaged contact us immediately. Standard factory shipment list: Quick Start Guide Driver CD &... -
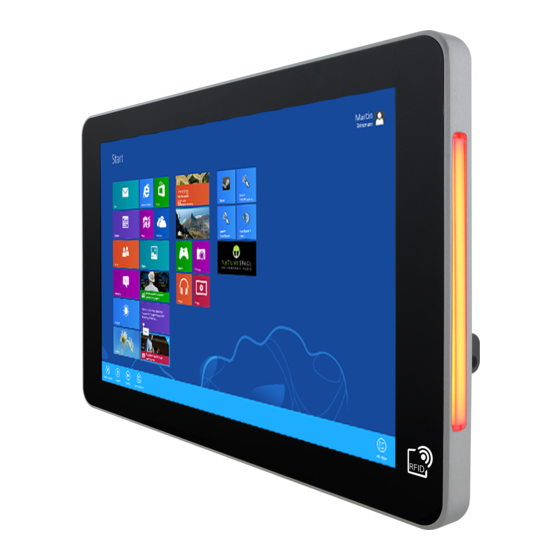
Page 6: Description Of Parts
Description Of Parts W10IB3S-PCH2AC-PoE W10IB3S-PCH2-PoE *Digital I/O is an optional connector and may not be present in your model. -
Page 7: Dimensions
Dimensions Dimensions (W x L x H): 263.28 x 171 x 35.7 mm *Note: Measurements shown in mm. **Note: this is a simplified drawing and some components are not marked in detail. Please read these instructions carefully before using this product, and save this guide for future use. -
Page 8: Mounting
Mounting S-series HMI devices come with different mounting options suitable for most of the industrial and commercial applications. VESA Mount Dimensions Screw hole diameter Compatibility 75 x 75 mm VESA M4x5 mm Swing arm mounting kits Flush/ Panel Mount Wall cutout Screw hole diameter 157.6 x 249 mm M3x4 mm... -
Page 9: Connector Description
Connector Description This section explains how to connect external interfaces to the HMI device. DC Input Terminal Block Connector DC power source input is a 3 pin terminal block connector. Minimum Voltage 11.4V Maximum Voltage 12.6V Maximum Current 4.2A Voltage Serial Port Connector Use COM1 serial port connector to connect your HMI to external devices such as mouse, modem or printer. -
Page 10: Poe/ Lan Connector
PoE/ LAN Connector The 10.1” S-Series HMI supports one RJ45 10/100/1000 Mbps Ethernet interface for connecting to the internet. Support IEEE 802.3at PoE. Pin № Pin № Name Name TX1+ TX1- TX2+ TX2- TX3+ TX3- TX4+ TX4- USB 2.0/ USB 3.0 Connector Use USB 2.0/ USB 3.0 connector to connect your HMI device to other USB 2.0/ USB 3.0 compatible devices. -
Page 11: Digital I/O Connector
Digital I/O Connector Pin № Pin № Name Name Digital output: Open drain to 40V ; Maximum load 2.0A Digital input: Voltage Level 0: close to GND; Level 1: 2.5~12V Please read these instructions carefully before using this product, and save this guide for future use. -
Page 12: Turning On Or Off
Turning On or Off Turning ON Follow the following steps to turn on your device: 1. Connect HMI device to a thermal block (3-pin). 2. Connect the other side of the thermal block to the AC adapter. 3. Connect the AC adapter to the power cord. 4. -
Page 13: Turning Off
Turning OFF To shut down the device: 1. Tap Start >Shut down. 2. Wait for your HMI device to completely turn off before disconnecting the power cord (if necessary). Please read these instructions carefully before using this product, and save this guide for future use. -
Page 14: Operating The Hmi Device
Operating the HMI Device Winmate® 10.1” S-Series HMI support several versions of Windows OS: Windows 10 IoT, Windows Embedded 8.1 Industry Pro, Windows Embedded 8 Standard, Windows 7 Pro for Embedded Systems, and Windows Embedded Standard 7– WS7P. IMPORTANT: The device is shipped with the OS System according to your order. -
Page 15: Utilities
Utilities Utilities category allows automatically changing orientation from landscape to portrait mode or rotating the desktop to a different degree as 0°, 90°, 180°, and 270°. Brightness Tap Brightness button to show current brightness level. To reduce the brightness, drag by touch to the left. -
Page 16: Led Light Bar (Easy-Testing)
LED Light Bar (Easy-Testing) Notice that LED Light Bar is an optional feature for 10.1” S-Series HMI and may not be present in your device. Tap Light Bar to access the LED light bar control panel, and select Red / Green / Blue/ Orange color to be displayed on the LED Bar. -
Page 17: Using Hf Rfid Reader
Using HF RFID Reader Notice that HF RFID Reader is an optional feature for 10.1” S-Series HMI and may not be present in your device. HF RFID is commonly used for ticketing, payment, and data transfer applications. The RFID Reader is located on the bottom right front side of the HMI device. The COM Port setting in RFID Reader is “COM 14”... -
Page 18: Reading Mode
Reader Demo Version 1.04 Reading Mode Select the default RFID Reader COM14or press Search on the upper left corner of the screen. The system will automatically find RFID COM port, show the Version. Item № Key button Function E1- Version Displays the current version of RFID Reader system E2- Reset... -
Page 19: Writing Mode
A1- Once Read The RFID Reader will perform a single scanning operation during the card is near A9- Type Read The RFID Reader will perform a scanning operation of IC type tag To scan the card, bring it close to the right bottom front side of device with RFID icon. -
Page 20: Using Front Camera
Using Front Camera Notice that 2MP Front Camera is an optional feature for 10.1” S-Series HMI and may not be present in your device. NOTE: You camera screen may differ from the pictures in thus user manual. Opening the Camera Perform one of the following to open the camera: 1. -
Page 21: Shooting Photos
Tap to select the destination folder to save captured photos and videos, enable preview, and select picture Settings resolution and quality Tap to close the camera Close Capture Shows the object to capture Screen Shooting Photos 1. Open the Camera. 2. -
Page 22: Recording Videos
Recording Videos 1. Open the Camera 2. Focus on the object 3. Tap to record the video. The video recording screen appears 4. Tap to stop recording and return to the camera screen 5. To playback the video, browse for the video file and play using a media player application on your device Camera Settings 1. - Page 23 Item Description Check one of the check boxes to show the preview screen right after capturing a photo. • Show Preview: Check this box and enter the preview duration on Close preview after. When the Preview duration ends, the preview screen will automatically Setting close.
-
Page 24: How To Enable Watchdog
How to Enable Watchdog To enable Watchdog, you need to download Winmate Watchdog utility. Find more information on Watchdog in “Watchdog Guide” that you can download from Winmate Download Center or File Share. To enable watchdog in Watchdog AP follow the instructions below: 1. - Page 25 Example: Every 10 min watchdog will monitor the system, in case any error occurs the system will restart automatically when the countdown time reaches 0. Every 9 min watchdog timer will be reset to 10 min. Settings Description The system automaticity restarts when this countdown time Watchdog reaches zero.
-
Page 26: Software Developer Support
Software Developer Support Winmate Software Development Kit Winmate® provides Software Development Kit (SDK). The table below lists SDK provided by Winmate for 10.1” S-Series HMI with Intel ® Celeron ® Bay Trail-M N2930 processor: Item File Type Description Digital I/O SDK... -
Page 27: Technical Specifications
Technical Specifications HMI Device Specifications Model Name W10IB3S-PCH2AC-PoE / W10IB3S-PCH2-PoE Size 10.1" TFT (Widescreen) Resolution 1280 x 800 Brightness ( 300 cd/m (typ.) Display Specifications Contrast Ratio 800:1 (typ.) Viewing Angle -89~89 (H); -89~89 (V) Max Colors 262K (6bit) Touch Projective-capacitive touch Intel ®... - Page 28 HF RFID Reader HF RFID Reader 13.56MHz Peripheral Front Camera 2MP Front Camera (W10IB3S-PCH2AC-PoE) (Optional) LED Light Bar RGB LED Light Bar (W10IB3S-PCH2AC-PoE) Power Input 12 DC in 3-Pin Terminal Block (Phoenix type) Power Power over Support PoE, requires IEEE 802.3at 25W power...
-
Page 30: Hf Rfid Reader
HF RFID Reader The RFID Reader can read and write data according to different HF RFID standards. HF RFID Standard Purpose ISO-14443 A Standard for MIFARE technology, which used in smart cards and proximity cards ISO-15693 Standard for tracking items ISO-18092 Standard for Near Field Communication (NFC), a short range technology that is commonly used for data... - Page 31 Winmate Inc. 9F, No.111-6, Shing-De Rd., San-Chung District, Taipei 241, Taiwan, R.O.C Tel: 886-2-8511-0288 Fax: 886-2-8511-0211 Email: sales@winmate.com.tw Official website: www.winmate.com...
Need help?
Do you have a question about the W10IB3S-PCH2AC-PoE and is the answer not in the manual?
Questions and answers