
Related Manuals for ACME MP-12FC


Summary of Contents for ACME MP-12FC
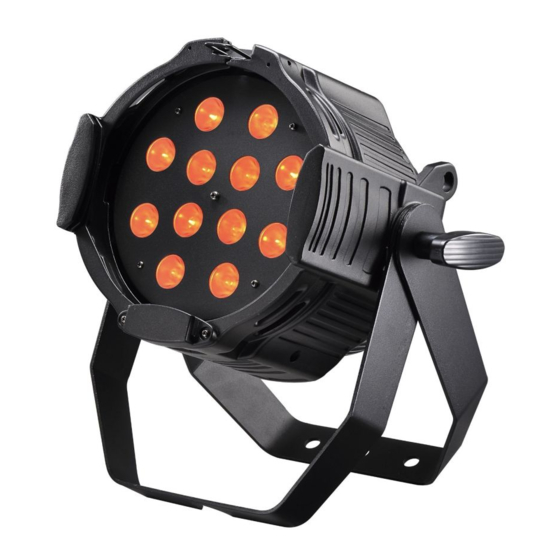
- Page 1 STAGE TRI-PAR 12FC MP-12FC User Manual Please read the instructions carefully before use...
-
Page 2: Table Of Contents
TABLE OF CONTENTS 1. Safety Instructions 2. Technical Specifications 3. How To Set The Fixture 4. How To Control The Fixture 5. DMX 512 Configuration 6. DMX 512 Connections 7. Troubleshooting 8. Fixture Cleaning... - Page 3 1. Safety Introductions Please read the instructions carefully which includes important information about the installation, operation and maintenance. WARNING Please keep this User Guide for future consultation. If you sell the unit to another user, be sure that they also receive this instruction booklet. ...
-
Page 4: Technical Specifications
Do not touch any wire during operation as there might be a hazard of electric shock. Avoid power wires together arounding other cables. Disconnect mains power before fuse/lamp replacement or servicing. Replace fuse only with the same type. ... -
Page 5: How To Set The Fixture
Dimension:250 x 327 x 215 mm Weight:6kg How To Set The Fixture 3.1 Control Panel ○ Display: To show the various menus and the selected functions ○ LED: DMX input present MASTER Master Mode Slave Mode SLAVE SOUND Flashing Sound activation... - Page 6 ○ Button: MENU To select the programming functions To go backward in the selected functions DOWN To go forward in the selected functions To confirm the selected functions ENTER ○ DMX output: For DMX512 link, use 3-pin XLR plug cable to link the next unit. ○...
- Page 7 DMX512 Address Setting Channels Mode Master/Slave mode Show mode Dimmer mode 1 Dimmer mode 4 MENU Sound Mode on Sound Mode off Blackout Mode " Yes Blackout " Blackout Mode " No Blackout " LED on LED off Normal Inversion White balance Manual mode Self-Test...
- Page 8 DMX 512 Address Setting Press the MENU button up to when the is shown on the display. Pressing ENTER button and the display will blink. Use DOWN and UP button to change the DMX 512 address. Once the address has been selected, press ENTER button to setup or automatically exit menu mode without any change after 7seconds.
- Page 9 change press the MENU button. Dimmer Mode Press the MENU button up to when is showing on the display. Pressing the ENTER button and the display will blink. Use the DOWN and UP buttons to select the (Dimmer Mode 1: Optically Linear) or (Dimmer mode 2: Square Law) or (Dimmer mode 3: Inverse Square Law) or (Dimmer mode 4: S-cure) mode.
- Page 10 Blackout mode Press the MENU button up to when the is shown on the display. Pressing ENTER button, Use DOWN and UP button to select the (blackout) or (normal). Once select, press ENTER button to setup or automatically exit menu mode without any change after 7seconds.
- Page 11 or … or button, and use DOWN and UP button to select (strobe), press ENTER button to confirm and use DOWN and UP button to adjust the value, once select press ENTER button to setup or automatically exit menu mode without any change after 7seconds.
- Page 12 4. How To Control The Unit You can operate the unit in two ways: 1. By master/slave built-in preprogram function 2. By DMX controller No need to turn the unit off when you change the DMX address, as new DMX address setting will be effected at once.
-
Page 13: Dmx512 Configuration
following diagram to address your DMX512 channel for the first 4 units. 4 channels: 5 channels: 8 channels: 5.DMX512 Configuration 4 channels mode: CHANNEL VALUE FUNCTION RED: 0% 100% 0 – 255 GREEN: 0% 100% 0 – 255 BLUE: 0% ... - Page 14 8 channels mode: CHANNEL VALUE FUNCTION RED: 0% 100% 0 – 255 GREEN: 0% 100% 0 – 255 BLUE: 0% 100% 0 – 255 WHITE: 0% 100% 0 – 255 COLOR 000-007 008-015 Color 1 016-023 Color 2 024-030 Color 3...
- Page 15 171-178 Color 22 179-185 Color 23 186-193 Color 24 194-201 Color 25 202-209 Color 26 210-216 Color 27 217-224 Color 28 225-232 Color 29 233-240 Color 30 241-247 Color 31 248-255 Color 32 DIMMER: 0% 100% 0 – 255 DIMMER Fine: 0% ...
-
Page 16: Dmx512 Connections
6. DMX512 Connections The DMX512 is widely used in intelligent lighting control, with a maximum of 512 channels. Connect the fixture together in a “daisy chain” by XLR plug cable from the output of the fixture to the input of the next fixture. The cable cannot be branched or split to a “Y” cable. -
Page 17: Troubleshooting
7. Troubleshooting Following are a few common problems that may occur during operation. Here are some suggestions for easy troubleshooting: A. The fixture does not work, no light 1. Check the connection of power and main fuse. 2. Measure the mains voltage on the main connector. B. - Page 20 Innovation, Quality, Performance...
Need help?
Do you have a question about the MP-12FC and is the answer not in the manual?
Questions and answers