Advertisement
Available languages
Available languages
Quick Links
INSTALLATION INSTRUCTIONS FOR PART 99-7329
KIT FEATURES
• Recessed DIN mount radio provision with pocket
• ISO mount radio provision with pocket
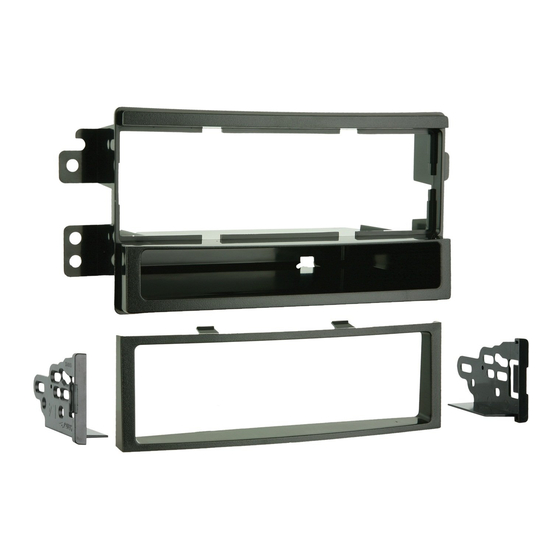
KIT COMPONENTS
• A) Radio housing • B) ISO brackets • C) ISO trim plate
A
WIRING & ANTENNA CONNECTIONS (sold separately)
Wiring Harness:
• 70-1004 Hyundai/Kia harness 2004-up
• 70-7303 Hyundai/Kia harness 2009-up
Antenna Adapter:
• 40-KI11 Hyundai/Kia antenna adapter
• Small flat blade screwdriver • Panel removal tool • Phillips screwdriver
APPLICATIONS
Kia Rondo 2007-2010
99-7329
B
TOOLS REQUIRED
METRA. THE WORLD'S BEST KITS.™
1-800-221-0932
© COPYRIGHT 2004-2011 METRA ELECTRONICS CORPORATION
C
metraonline.com
Advertisement

Related Manuals for Metra Electronics 99-7329


Summary of Contents for Metra Electronics 99-7329
- Page 1 INSTALLATION INSTRUCTIONS FOR PART 99-7329 APPLICATIONS Kia Rondo 2007-2010 99-7329 KIT FEATURES • Recessed DIN mount radio provision with pocket • ISO mount radio provision with pocket KIT COMPONENTS • A) Radio housing • B) ISO brackets • C) ISO trim plate WIRING &...
- Page 2 99-7329 Table of Contents Dash Disassembly – Kia Rondo 2007-2010 .....................3 Kit Assembly – Recessed DIN mount radio provision with pocket .............4 – ISO mount radio provision with pocket ................5 CAUTION: Metra recommends disconnecting the negative battery terminal before beginning any installation. All accessories, switches, and especially air bag indicator lights must be plugged in before reconnecting the battery or cycling the ignition.
- Page 3 Dash Disassembly 99-7329 Kia Rondo 2007-2010 1. Unclip and remove the panel surrounding the shifter. (Figure A) 2. Remove (2) Phillips head screws securing the radio trim panel. Unplug and remove panel. (Figure B) 3. Remove (4) Phillips screws securing the radio.
- Page 4 Kit Assembly 99-7329 Recessed DIN mount radio provision with pocket 1. Slide the DIN cage into the radio housing and secure by bending the metal locking tabs outward. (Figure A) 2 Slide the radio into the DIN cage/ housing assembly until it snaps into place.
- Page 5 Kit Assembly 99-7329 Stacked ISO mount radio provision with pocket 1. Align the holes from the ISO snap in brackets with the holes in the side of the radio and mount the brackets to the radio using screws supplied with the radio.
- Page 6 Notes...
- Page 7 Notes...
- Page 8 INSTALLATION INSTRUCTIONS FOR PART 99-7329 METRA. THE WORLD’S BEST KITS.™ metraonline.com 1-800-221-0932 © COPYRIGHT 2004-2011 METRA ELECTRONICS CORPORATION...
- Page 9 INSTRUCCIONES DE INSTALACIÓN PARA LA PIEZA 99-7329 APLICACIONES Kia Rondo 2007-2010 99-7329 CARACTERÍSTICAS DEL KIT • Provisión de radio de montaje DIN empotrada con bolsillo • Provisión de radio de montaje ISO con bolsillo COMPONENTES DEL KIT • A) Alojamiento del radio • B) Soportes ISO • C) Placa de moldura ISO...
- Page 10 99-7329 Indice Desmontaje del tablero – Kia Rondo 2007-2010 .....................3 Ensamble del kit – Provisión de radio de montaje DIN empotrada con bolsillo ..........4 – Provisión de radio de montaje ISO con bolsillo ..............5 PRECAUCIÓN: Metra recomienda desconectar el terminal negativo de la batería antes de comenzar cualquier instalación.
- Page 11 Desmontaje del tablero 99-7329 Kia Rondo 2007-2010 1. Desenganche y quite el panel que rodea la palanca de velocidades. (Figura A) 2. Quite los (2) tornillos de cabeza Phillips que sujetan el panel de la moldura del radio. Desconecte y retire el panel.
- Page 12 Ensamble del kit 99-7329 Provisión de radio de montaje DIN empotrada con bolsillo 1. Deslice la reja DIN en la carcasa del radio y sujétela doblando hacia afuera las pestañas de metal. (Figura A) 2 Deslice el radio en la reja DIN/el ensamble de carcasa hasta que entre a presión.
- Page 13 Ensamble del kit 99-7329 Provisión de radio de montaje ISO con bolsillo 1. Alinee los agujeros de los soportes ISO que entran a presión con los agujeros del lado del radio y monte los soportes en el radio con los tornillos que vienen con el radio.
- Page 14 Notas...
- Page 15 Notas...
- Page 16 INSTRUCCIONES DE INSTALACIÓN PARA LA PIEZA 99-7329 METRA. THE WORLD’S BEST KITS.™ metraonline.com 1-800-221-0932 © COPYRIGHT 2004-2011 METRA ELECTRONICS CORPORATION...
Need help?
Do you have a question about the 99-7329 and is the answer not in the manual?
Questions and answers