Table of Contents
Advertisement
Advertisement
Table of Contents

Subscribe to Our Youtube Channel
Related Manuals for Pro-Ject Audio Systems VT-E BT L


Summary of Contents for Pro-Ject Audio Systems VT-E BT L
- Page 1 INSTRUCTIONS FOR USE VT-E BT L...
-
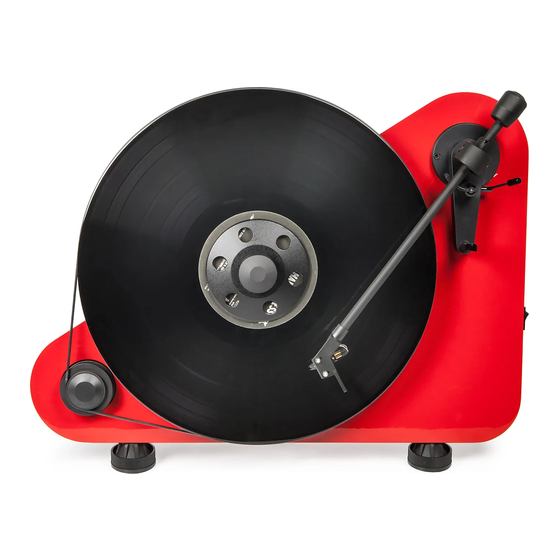
Page 2: Turntable And Accessories Overview
© Pro-Ject Audio Systems · Pro-Ject VT-E BT L · Revision 2016.07.27... - Page 3 (16) Grounding screw (17) Bluetooth module (18) Rear support (19) Power supply socket Universal power supply (not shown) * Single adapter (not shown)* Allen key (not shown) * © Pro-Ject Audio Systems · Pro-Ject VT-E BT L · Revision 2016.07.27...
-
Page 4: Mounting Kit And Packaging Overview
The main wall holder Bottom support 2x M6 nut 2x M6 washer 2x M6 x 35 screw for rear support or main wall holder Pro-Ject DAMP IT Packaging overview © Pro-Ject Audio Systems · Pro-Ject VT-E BT L · Revision 2016.07.27... -
Page 5: Table Of Contents
11. ASSEMBLING THE MAIN WALL HOLDER 12. ASSEMBLING THE BOTTOM SUPPORT 13. MOUNTING ON THE WALL 14. MOUNTING THE PLATTER, DRIVE BELT AND RECORD CLAMP TECHNICAL SPECIFICATIONS WARRANTY, SERVICE 12 - 13 © Pro-Ject Audio Systems · Pro-Ject VT-E BT L · Revision 2016.07.27... -
Page 6: Safety Instructions
The turntable was shipped partially disassembled in order to avoid damage to sensitive parts. Please check immediately to make sure that neither the packaging nor the device was damaged in transit. © Pro-Ject Audio Systems · Pro-Ject VT-E BT L · Revision 2016.07.27... -
Page 7: Setup And Installation
(4) as shown in following illustration. After placing the record on the platter, it is necessary to tighten the screw-able record clamp (6) onto the platter spindle. © Pro-Ject Audio Systems · Pro-Ject VT-E BT L · Revision 2016.07.27... -
Page 8: Cartridge, Vertical Tracking Force (Vtf)
For restart of the Bluetooth transmitter, please disconnect the record player from mains. Restart is needed only when there is a change of the Bluetooth receiver. For detailed product information regarding Pro-Ject Audio Systems Bluetooth audio receivers, please visit our website: www.project-audio.com... -
Page 9: Changing Replay Speed
Always disconnect the record player from the mains power supply as a precaution before maintenance! PART 2 – WALL MOUNT DISASSEMBLING THE REAR SUPPORT Remove two M6 screws which holds the rear support (18) in the back of the turntable. © Pro-Ject Audio Systems · Pro-Ject VT-E BT L · Revision 2016.07.27... -
Page 10: Assembling The Main Wall Holder
With the main wall holder mounted on the turntable, unscrew both feet (13) from the bottom and instead of the feet screw the bottom support (2 – mounting kit) as shown in the following illustration. Now the VT-E is ready for mounting on the wall. © Pro-Ject Audio Systems · Pro-Ject VT-E BT L · Revision 2016.07.27... -
Page 11: Mounting On The Wall
With the turntable mounted on the wall, install the platter (3) and the drive belt (4) as shown in following illustration. After the placing the record on the platter, it is necessary to tighten the screw-able record clamp (6) onto the platter spindle. © Pro-Ject Audio Systems · Pro-Ject VT-E BT L · Revision 2016.07.27... -
Page 12: Technical Specifications
Guarantee repairs will only be affected if the unit is returned correctly packaged. For this reason we recommend keeping the original packaging. © Pro-Ject Audio Systems · Pro-Ject VT-E BT L · Revision 2016.07.27... - Page 13 This guide was produced by: Pro-Ject Audio Systems necessary to uphold the ongoing process of technical © Copyright 2016. All rights reserved. development. © Pro-Ject Audio Systems · Pro-Ject VT-E BT L · Revision 2016.07.27...
Need help?
Do you have a question about the VT-E BT L and is the answer not in the manual?
Questions and answers