
Related Manuals for JUKI HZL-E80


Summary of Contents for JUKI HZL-E80
-
Page 1: Instruction Manual
COMPUTER SEWING MACHINE MACHINEA COUDRE ELECTRONIQUE MAQUINA DE COSER ELECTRONICA COMPUTER NAAIMACHINE HZL-E80 INSTRUCTION MANUAL MANUEL D’INSTRUCTIONS MANUAL DE INSTRUCCIONES GEBRUIKSAANWIJZING... -
Page 3: Important Safety Instructions
15. “Do not unplug by pulling on cord. To unplug, grasp the plug, not the cord.” “SAVE THESE INSTRUCTIONS” “This sewing machine is intended for household use only.” Use only foot controller YC-485 with your HZL-E80. Be sure to turn power switch OFF and disconnect When not in use, be sure to turn power switch the plug from the wall outlet before replacing the OFF and unplug the machine. - Page 4 “NOTES DE SECURITE IMPORTANTES” “Lorsque vous utilisez un appareil électrique, des précautions élémentaires doivent toujours être suivies, comme celles-ci.” “Lisez attentivement ces instructions avant d’utiliser cette machine à coudre.” “DANGER _____Pour réduire le risque d’électrocution.” 1. “Un appareil ne doit jamais être laissé sans surveillance lorsqu’il est branché. Toujours débrancher cet appareil du secteur immédiatement après utilisation et avant de le nettoyer.”...
-
Page 5: Normas De Seguridad
“NORMAS DE SEGURIDAD” Cuando utilice la máquina deberá observar todas las normas de seguridad, especialmente las que se detallan a continuación. Antes de utilizar la máquina, lea las instrucciones. PELIGRO ____Para reducir el riesgo de descarga eléctrica. 1. Nunca deje desatendida la máquina cuando esté enchufada. Desconéctela de la red eléctrica cuando haya finalizado su trabajo. -
Page 6: Belangrijke Veiligheidsinstructies
BELANGRIJKE VEILIGHEIDSINSTRUCTIES Als u een elektrisch apparaat gebruikt, moet u altijd de basis veiligheidseisen in het oog houden, inclusief deze: Lees alle instructies voordat u deze naaimachine gaat gebruiken. GEVAAR! Voorkom een elektrische schok. 1. Laat het apparaat nooit allen met de stekker in het stopcontact. 2. -
Page 7: Table Of Contents
CONTENTS / TABLE DES MATIERES CONTENTS Important safety instructions ........1 How to adjust stitch width (manually) ..... 36,37 Principal parts ............. 7,8 Overcasting ..............38 Accessories ..............9 Reinforced stretch stitch ..........39 Major functions ............ 10-14 Automatic buttonholes ......... 40-43 Winding bobbin ............ - Page 8 ÍNDICE / INHOUD ÍNDICE Normas de seguridad ..........3 Modo de ajustar la anchura de puntada Principales piezas ............7,8 (manualmente) ........... 36,37 Sobrehilado ..............38 Accesorios ..............9 Funciones principales .......... 10-14 Puntada de refuerzo en tejido tipo punto ....39 Hacer canilla ............
-
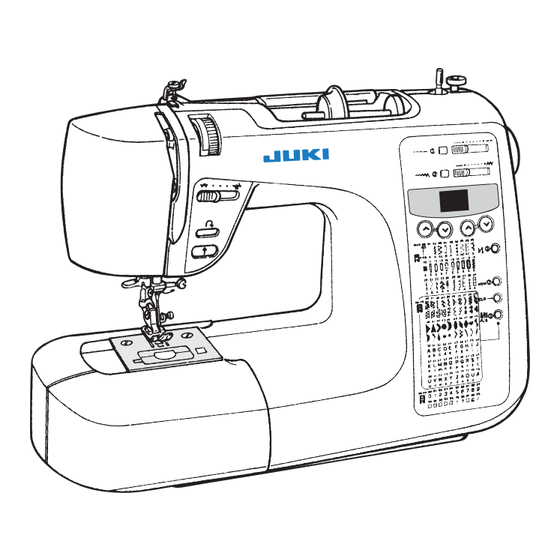
Page 9: Principal Parts
Principal Parts / Principaux éléments / Principales piezas / Onderdelen van de machine 1. Spool pin 12. Drop feed lever 13. Automatic lock stitch 2. Bobbin thread guide 3. Thread tension dial button 4. Thread spool cap 14. Stitch selection panel 5. - Page 10 1. Thread Cutter 8. Bobbin case 2. Needle threader 9. Needle clamp 3. Buttonholing lever 10. Needle 4. Presser foot release 11. Presser foot 12. Hook cover release lever 5. Presser foot shank button 6. Feed dog 13. Hook cover 7.
-
Page 11: Accessories
· You can keep instruction manual at hard case. · Vous pouvez ranger votre manuel d’instructions dans le capot rigide. · Le sugerimos guardar el manual de instrucciones en la maleta rígida. - U kunt de handleiding bewaren in de beschermkap van de machine. Accessories /Accessoires Accesorios /Accessoires Auxiliary Bed... -
Page 12: Major Functions
Major Functions / Fonctions principales Funciones principales / Voornaamste functies Type of Stitch patterns and operation (Operation/indication panel) Types de point et sélection (touches de sélection) Tipos de puntada y funciones (panel indicativo / operativo) Steeksoorten en werkwijze (Steekkeuze paneel) Stitch length manual adjustment button Stitch length adjusting lever Touche de réglage manuel de la longueur du point... - Page 13 Example: When you want to choose the lower pattern of the pattern No. 43. Exemple: Pour choisir la confi guration inférieure du numéro de confi guration 43. Ejemplo: Cuando usted quiera elegir el patrón inferior del patrón No. 43. Voorbeeld: Wanneer u steek 43 wilt kiezen van het onderste steken paneel.
-
Page 14: Major Functions
Major functions / Fonctions principales Funciones principales / De voornaamste functies Speed controller To run the machine, press foot speed controller. The Push speed controller plug harder you press, the faster into lower receptacle at right machine will sew. To stop end of machine. - Page 15 Start / Stop button Speed controller Slower Faster Press the button for start. You can adjust Maximum Lent Rapide Push it again to stop sew- sewing speed. Más lento Más rápido ing. Needle will stop at its Langzaam Snel Curseur de vitesse lowest position.
- Page 16 Stitch length adjustment Free arm Adjusting lever In order to change stitch Draw the auxiliary bed to the Touche manuelle length of each stitch pattern: left side. Palanca de ajuste Push manual button (light Schuifregelaar Bras-libre will be on) and move the le- Manual button ver to the desired position.
-
Page 17: Winding Bobbin
Winding Bobbin / Bobinage de la canette Hacer Canilla / Opspoelen van de spoel Winding a bobbin * When you turn on the power to the machine under the bobbin winding state, the machine will peep. Enfilage pour le remplissage de canette * Lorsque vous allumez la machine en mode de Enhebrar para hacer canilla remplissage de canette, eile émet un bip sonore. -
Page 18: Winding Bobbin
Set the bobbin on the bobbin winder. Small spool Petite coiffe Press the bobbin against the Bobina de hilo bobbin winding regulator. Thread spool cap (Small) Kleine klos Petite bobine Tapa de la bobina (pequeña) Placez la canette sur Garenklos- l’axe du dévidoir. - Page 19 Put the bobbin in the Thread the bobbin case. bobbin case. Put the thread [1], place thread on groove [2] and Place the bobbin so that draw the thread to rear of thread winds counterclock- machine. wise. Enfilez le boîtier à Placez la canette dans canette.
-
Page 20: Threading The Machine
Threading The Machine / Enfilage de la machine Enhebrado de la máquina / Inrijgen van de machine CAUTION: * Be sure to raise the presser foot before threading the Be sure to turn off the machine before machine head. threading. ATTENTION: Assurez-vous d’avoir éteint la * Le pied presseur doit toujours être relevé... -
Page 21: Automatic Needle Threader
Thread the thread to Thread the hook. take-up [4], then pull it Push threading lever all the downward. way down and a hook will go through eye of needle. Pass thread in front of Enfilez le levier Hook needle and below hook. tendeur de fil [4], puis Crochet redescendez. -
Page 22: Pulling Up The Bobbin Thread
Pulling Up The Bobbin Thread Faire remonter le fil de canette Subir el hilo de la canilla Ophalen van de onderdraad Lightly hold the needle thread with fingers. Tenez légèrement le fil avec les doigts. Sostenga ligeramente el hilo con los dedos. Hou de bovendraad losjes tussen de vingers. -
Page 23: Changing The Presser Foot
Changing The Presser Foot / Changement du pied presseur Cambio del prensatelas / Verwisselen van de naaivoet CAUTION: Make sure to disconnect the plug from the wall outlet before changing the presser foot. ATTENTION: Assurez-vous d’avoir débranché la machine avant de changer le pied. PRECAUCIÓN: Antes de cambiar el prensatelas, asegúrese de desconectar la máquina de la red eléctrica. -
Page 24: Attaching The Needle
Attaching The Needle / Pose de l’aiguille Colocación de la Aguja / Bevestigen van de naald CAUTION: Make sure to disconnect plug from wall outlet before inserting needle. ATTENTION: Assurez-vous d’avoir débranché Vis serre-aiguille. Asegúrese de desconectar el enchufe de la red eléctrica antes de colocar la aguja. PRECAUCIÓN: VOORZICHTIG: Verwijder de stekker uit het stopcontact voor u de naald verwisselt. -
Page 25: Types Of Feet And Their Application
Types of feet and their application / Types de pieds et leurs applications Tipos de prensatelas y sus aplicaciones / Verschillende naaivoeten en hun toepassing Stitch pattern Typical applications Programme Applications types Tipo de costura Aplicaciones Steek Toepassingen Straight stitch Pattern stitch Assemblage Point droit... -
Page 26: How To Adjust Thread Tension
How To Adjust Thread Tension Comment régler la tension du fil Ajuste de las tensiones del hilo Aanpassen van de draadspanning * Adjust the thread tension as described below when special type of fabric is used or the thread tension has changed from the adequate setting. * Les réglages de tension ci-dessous sont utiles lorsque l’on coud une matière spéciale ou que les réglages initiaux ont été... -
Page 27: Fabric, Thread And Needle Table
Fabric, Thread And Needle Table Fabric Thread Needles HA x 1 (130/705H) Light-weight Silk (No.9) Synthetic thread/ Georgette # 90, 100 No.11 Fine thread Tricot Synthetic # 60~100 Knitting needle No.11 Silk # 80 Wool and synthetic fiber cloth No.11 Synthetic # 60~100 Cotton... -
Page 28: Tabla De Tejido, Hilo Y Aguja
Tabla de Tejidos, Hilo y Agujas Tejido Hilo Agujas HA x 1 (130/705H) Fino Hilo de algodón # 80~100 Lino (No.9) Hilo sintético / # 90, 100 Crespón No.11 Hilo fino Sintético Malla tricot Agujas para punto No.11 # 60~100 Seda # 80 Lana y fibra sintética... -
Page 29: How To Adjust Stitch Length (Manually)
How to adjust stitch length (manually) Réglage de la longueur du point (manuel) Ajuste de la longitud de puntada (manual) Aanpassen van de steeklengte (handmatig) * When machine is turned on again or a pattern is re-selected, the stitch length will be automatically set to a preset one. Stitch length manual override indicator lamp * To adjust the stitch length to a desired one, press the manual Indicateur de modification manuelle de longueur de point... - Page 30 Examples of automatically/manually determined straight stitch lengths Exemples de longueur de point automatique/manuelle Ejemplos de longitudes de pespunte recto determinadas automáticamente/manualmente Voorbeelden van automatische en handgekozen rechtstik steeklengtes Automatic /Automatique /Automático /Automatisch For automatically-determined stitch length: The best-suited stitch length for selected pattern is automatically established regard- less of the position of the adjusting lever.
-
Page 31: Straight Stitch
Straight Stitch / Point droit Pespunte Recto / Rechte steek The straight stitch is the basic stitch. Le point droit est le point de base. El pespunte recto es el tipo de puntada más básica. De rechte steek is de basissteek. CAUTION: Turn off the machine before changing the presser foot. -
Page 32: Straight Stitch
Lightly hold the fabric Trim the threads. with your hands. Pull out the needle and bob- bin threads by approximately Be careful not to apply ex- 10 cm and cut them with the cessive pulling force to the “thread cutter” mounted on fabric while sewing. -
Page 33: Automatic Lock Stitch
Automatic lock stitch Points d’arrêt programmables Puntada de seguridad automática Automatische afwerksteek To prevent stitches from coming apart: Select a pattern to be sewn, then press button. Then, the indicator lamp will light up and the machine will perform lock stitch by three stitches both at the beginning and end of sewing. - Page 34 Example: Straight stitch Exemple: Point droit Fabric Tissu Ejemplo: Tejido Pespunte recto Stof Voorbeeld: Rechte steek Select first stitch pattern Press the reverse stitch to be sewn. button. Press button. Press the reverse stitch but- ton at the predetermined po- sition, and the machine will The machine produces lock perform lock stitches and...
- Page 35 Lock stitch (Reverse stitch) Couture arrière Puntada de seguridad (Puntada inversa) Afwerksteek (retoursteek) Use this function to produce lock stitches of more than three stitches. Utilisez cette fonction pour faire plus de trois points en couture arrière. Utilice esta función para obtener más de tres puntadas de seguridad. Gebruik deze functie voor afwerksteken van meer dan drie steken.
- Page 36 Beginning of sewing heavy-weight fabric Démarrer la couture sur des matières épaisses Inicio de costura en tejidos gruesos Naaien met dikke stoffen. Het begin. To start sewing from the multi-layer material edge, use the button mounted on the presser foot to make the presser foot parallel to the fabric, thereby ensuring smooth sewing.
-
Page 37: Manual Lock Stitch And Sewing Start On Heavy Fabric Zigzag Stitch
Zigzag Stitch / Point zig zag Puntada zig zag / Zig zag steek Automatic lock stitch CAUTION: Make sure to turn off the machine Point d’arrêt automatique before changing the presser foot. Puntada de seguridad automática Automatische afwerksteek ATTENTION: Assurez-vous d’éteindre la machine avant de changer le pied presseur. -
Page 38: How To Adjust Stitch Width (Manually)
How to adjust stitch width (manually) Comment régler la largeur des points (manuellement) Modo de ajustar la anchura de puntada (manualmente) Steekbreedte kiezen * To adjust the stitch width, press the manual button (manual button will light up) and move the adjusting lever to left or right. Stitch width manual override indicator lamp * To cancel the manual adjustment mode, select a pattern or press Témoin de correction manuelle de largeur des points... - Page 39 Stitch patterns which are possible to adjust stitch width Configurations de points dont la largeur des points peut être réglée Patrones de puntada que se pueden ajustar a anchura de puntada Steken waarbij het mogelijk is de breedte aan te passen Stitch pattern Programme Tipo de puntada...
-
Page 40: Overcasting
Overcasting Surfilarge Sobrehilado Overlock This stitch style is used to prevent the cut edge of fabric from fraying. Ce point est utilisé pour éviter que les bords ne s’effilochent par frottement. Este tipo de costura se utiliza para evitar que el tejido se deshilache. -
Page 41: Reinforced Stretch Stitch
Reinforcing stretch (elastic) stitch Point triple élastique Puntada de refuerzo elástica Versterkte rechte stretchsteek The reinforcing stretch stitch helps reinforce seams when used for sewing of elastic fabric or the force-exerted part of fabric that is likely to fray. Le point triple élastique aide à renforcer les coutures pour les matières extensibles ou demandant un renfort dans le sens d’élongation. -
Page 42: Automatic Buttonholes
Automatic buttonholes Boutonnières automatiques en 1 temps Ojales aut omáticos Automatisch knoopsgat Select a pattern according to type of fabric and size of button CAUTION: Make sure to turn off the machine to be used. before changing the presser foot. Sélectionner une configuration en fonction du type de tissu ATTENTION: Assurez-vous d’éteindre la machine... - Page 43 Lower the buttonhole foot Pattern Typical application Sliding part once to place a button on Programme Application type Partie glissière Tipo Aplicación Pieza corredera Verstelbaar Knoopsgat Toepassing The buttonhole length is au- gedeelte tomatically determined only For sewing large buttonholes on medium by placing a button on the to heavy weight fabric.
- Page 44 Mark the buttonhole Lower the buttonholing positions. lever. Draw marker lines on the fab- Lower the lever until it will ric at the buttonhole positions go no further. Mark with an assistant marker. * If you start the sewing ma- Marque chine without lower the le- Marca...
- Page 45 Sewing sequence Cycle de couture Secuencia de costura Opeenvolging van steken The machine will automatically stop sewing after producing back tack stitches. The machine will stop with its needle up. La machine s’arrête automatiquement après avoir effectué les points d’arrêt. Elle stoppe l’aiguille en haut.
-
Page 46: Bartacking
Bartacking / Couture d’arrêt Presillado /Cordon steek Bartacking is used to reinforce part of seam that is likely to ravel. La couture d’arrêt permet de renforcer une partie de la cou- ture susceptible de s’effilocher. El presellado se usa para reforzar la parte de la costura que es susceptible de destejerse. - Page 47 Press the reverse stitch To continuously sew bartacks of the same length two or more button at predetermined times, follow the procedure described below: position [A]. Pour coudre des points d’extrémité de longueur identiques 2 Once the needle returns to fois ou plus, suivez la pracédure décrite ci-dessous: the start position, the ma- chine automatically starts...
-
Page 48: Darning Stitch
Darning stitch / Point de reprise Punto para zurcido / Stopsteek CAUTION: Make sure to turn off the machine before changing the presser foot. ATTENTION: Assurez-vous d’éteindre la machine avant de changer le pied presseur. PRECAUCIÓN: Asegúrese de apagar la máquina antes de cambiar el prensatelas. -
Page 49: Quilting Stitch
Quilting stitch / Point de courtepointe Puntada acolchada / Quiltsteek The works of quilting and patch work can be finished as though they were hand-sewn by using inconspicuous bob- bin thread. Les travaux de courtepointe et de patchwork peuvent avoir une finition “cousu main”... -
Page 50: Patch Work
Patch Work / Patchwork Patchwork / Patchwork Select stitch pattern. 1 cm Sélectionnez le programme. Runstitch Seleccione el tipo de Surpiqûre puntada. Costura Stiksteek Kies uw steek. Fabric (wrong side) Seam allowance Tissu (dessous) Tolérance de couture Tejido (del revés) Margen de la costura Stof (achterkant) Zoom overlap... -
Page 51: Inserting Zippers
Inserting Zippers / Fermetures à glissière Colocación de cremalleras / Ritsen inzetten Zippers are set in two different ways such as by inserting in side seam of the garment and by centering in opening. Les fermetures à gllissière sont placées de deux façons différents : recouverte sur le côté... -
Page 52: Lapped Insertion
Attach the zipper foot (B) to the machine. To sew the left part of the zipper, place the zipper under the right Zipper foot (B) portion of the zipper foot. To sew the right part of the zipper, place the Pied fermeture éclair (B) zipper under the left portion of the foot. - Page 53 Sew the zipper tape on the seam allowance from bottom to top. Fitting the edge of the zipper foot at the edge of the zipper teeth, sew the zipper tape on the seam allowance. At the slider part of the zipper, stop the machine at a position about 5 cm before the slider, move the Attach the right side slide to the far side of the presser foot, then sew the zipper until its top...
-
Page 54: Centered Insertion
Centered Insertion / Fermetures centrées CoIocación centrada / Rits in het midden Baste zipper and garment body. Open the seam allowance. Fitting the teeth of zipper at the end of the Slider Seamline seam line, perform basting. Glisseur Couture Carro Línea de la costura Centrées: La fermeture est centrée dans l’ouverture et Trekker... -
Page 55: Blind Stitch
Blindstitch / Point invisible Puntada invisible / Blindzomen Blindstitching provides a durable way to finish a hem and is presented as an instantly selectable pattern as a convenience. It needs practice, so a test sewing is suggested. L’ourlet invisible procure une finition durable pour les ourlets et est facilité... - Page 56 Position the folded edge against the guide. Fabric Fabric Place the folded edge (wrong side) (right side) against the presser foot Tissu Tissu guide, and sew the fabric. (dessous) (dessus) Fabric Tejido Tejido (wrong side) Positionnez le bord plié (del revés) (del derecho) Tissu le long du guide.
-
Page 57: Quilting Attachment
Quilting attachment / Ensemble pour quilting Mecanismo para acolchar / Quiltvoet CAUTION: Make sure to turn off the machine Pattern to be used before changing the presser foot. Programme Tipo de costura a utilizar Assurez-vous d’éteindre la machine ATTENTION: Te gebruiken steken avant de changer le pied presseur. -
Page 58: Optional Parts
Optional parts /Accessoires optionnels Piezas opcionales / Optionele accessoires Invisible zipper foot Pied fermeture invisible Prensatelas de puntada invisible Onzichtbare rits-voet CAUTION: Make sure to turn off the machine Pattern to be used before changing the presser foot. Programme Tipo de costura a utilizar Assurez-vous d’éteindre la machine ATTENTION: Te gebruiken steek... - Page 59 Put the invisible zipper on the fabric so that its center meets the seam line. Place a cardboard between the seam allowance and front fabric. Manually baste both sides of seam allowances and zipper tapes. Upon completion of basting, remove the cardboard. Basting Bâti Mettez la fermeture invisible sur le tissu afin que son centre...
- Page 60 Sew the remaining zipper tape on the other side of seam allow- Invisible zipper foot ance in the same procedure. Tape Pied fermeture invisible Bande (The lower portion of zipper tape located below the bottom of the Prensatelas de Cinta de la cremallera invisible opening will remain loose without sewn on the seam allowance.) cremallera...
-
Page 61: Pied Boutonnière Manuelle
Manual buttonhole foot Pied boutonnière manuelle Prensatelas de ojales manual Handmatig knoopsgat-voet CAUTION: Make sure to turn off the machine Pattern to be used before changing the presser foot. Programme Tipo de costura a utilizar ATTENTION: Assurez-vous d’éteindre la machine Te gebruiken steken avant de changer le pied presseur. - Page 62 When needle reaches be- When needle reaches be- ginning of mark, slightly pull ginning of mark, slightly pull lever towards front of ma- lever towards front of ma- chine. chine and sewing machine * Machine starts straight will start bartacking,perform stitching on right-hand par- fastening stitching and stop.
-
Page 63: Rolzoomvoet
Rolled hemming foot Pied ourlet roulé Prensatelas de dobladillo de caracolillo Rolzoomvoet CAUTION: Make sure to turn off the machine Pattern to be used Programme before changing the presser foot. Tipo de costura a utilizar ATTENTION: Assurez-vous d’éteindre la machine Kies de juiste steek avant de changer le pied presseur. -
Page 64: Boventransportvoet
Even feed foot Pied double entraînement Prensatelas para alimentar el tejido de forma uniforme Boventransportvoet CAUTION: Make sure to turn off the machine Pattern to be used before changing the presser foot. Programme Tipo de costura a utilizar ATTENTION: Assurez-vous d’éteindre la machine Kies de juiste steek avant de changer le pied presseur. -
Page 65: Pied À Semelle Lisse
Smooth foot Pied à semelle lisse Pata deslizante Teflonvoet CAUTION: Make sure to turn off the machine before changing the presser foot. ATTENTION: Assurez-vous d’éteindre la machine avant de changer le pied presseur. PRECAUCIÓN: Asegúrese de apagar la máquina antes de cambiar el prensatelas. VOORZICHTIG: Verwijder de stekker uit het stop- contact voor u de voet verwisselt. -
Page 66: Invisible Zipper Foot / Manual Buttonhole Foot Rolled Hemming Foot / Even Feed Foot Smooth Foot Replacing Lamp
* Purchase correct lamp bulb from JUKI distributor in your area from which you have bought your machine. * La puissance de l’ampoule est de 15 watts. * Se procurer l’ampoule de lampe correcte auprès du distributeur JUKI local chez qui la machine a été achetée. * El consumo de la bombilla es de 15 W. -
Page 67: Maintenance (Cleaning)
Maintenance (cleaning) Nettoyage de la machine Mantenimiento (Limpieza) Onderhoud (schoonmaken) Be sure to disconnect the plug from wall outlet before cleaning and lubricating machine. CAUTION: Assurez vous débrancher la prise du secteur avant de nettoyer la machine. ATTENTION: Asegúrese de desconectar la máquina de la red eléctrica antes de limpiar o lubricar la máquina. PRECAUCIÓN: VOORZICHTIG: Verwijder de stekker uit het stopcontact voor u de machine schoonmaakt of smeert. -
Page 68: Performance Checklist
Performance checklist If sewing difficulties occur, make sure the instructions are correctly followed. If a problem still exists, the reminders below may help solve it. o i t Page Machine fails to * Machine runs idle. * Return bobbin winder to the left. 15-17 feed fabric. -
Page 69: Problèmes Éventuels Et Remèdes Simples
Problèmes éventuels et remèdes simples Si vous recontrez des difficultés,vérifiez d’abord que vous avez bien suivi les instructions. L’expérience démontre que la plupart des problèmes sont dus à des détails d’utilisation. Sinon, essayez de résoudre vorte problème à l’aide du tableau ci-dessous. En cas de persistance, ramenez la machine auprès de votre vendeur spécialisé. -
Page 70: Lista De Problemas Y Soluciones
Lista de problemas y soluciones Si tiene problemas con el funcionamiento de la máquina compruebe que ha seguido las instrucciones detalladas en este manual. Si tiene algún problema, consulte esta tabla para intentar solucionarlo. Ó Ó PAG. La máquina no * La máquina no funciona bien * Gira el bobinador a la izquierda. -
Page 71: Verhelpen Van Storingen
Verhelpen van storingen Als er zich problemen voordoen tijdens het naaien, kijk dan of u de instrucies van deze handleiding correct uitvoert. Als uw probleem blijft bestaan, kan onderstaande tabel u helpen met uw probleem. PROBLEEM OORZAAK OPLOSSING BLZ. *De machine draait loos. *Doe de garenwinder naar links. - Page 72 8-2-1, KOKURYO-CHO, CHOFU-SHI, TOKYO 182-8655, JAPAN PHONE : 03(3480)5034 FAX : 03(3480)5037 http : //www.juki.co.jp E-mail : hsm@juki.co.jp Copyright © 2005 JUKI CORPORATION. All rights reserved throughout the world. AJE800S0B0A A9250E71Z00 000105 (T)
Need help?
Do you have a question about the HZL-E80 and is the answer not in the manual?
Questions and answers