
Related Manuals for corob Tatocolor


Summary of Contents for corob Tatocolor
- Page 1 COROB™ TATOCOLOR Automatic Dispenser User's Manual 207163 - ENGLISH V1.0 – R2 (05/2014)
- Page 2 (hereinafter “COROB”). A failure of a trademark to appear hereunder does not mean that COROB does not use the trademark in question nor does it constitute a waiver by COROB of any related intellectual property rights.
-
Page 3: Table Of Contents
3.2.2 Dispensing section .................. 3-3 3.2.3 Shelf for can positioning ................3-4 3.2.4 Humidifier cap ..................3-5 3.2.5 Punch & plugger - TATOCOLOR TA only ............3-6 3.3 Technical specifications ..................3-7 3.4 Performance and characteristics of the machine ........... 3-8 3.5 Cans to be handled.................. - Page 4 USING THE DISPENSER ..................7-1 7.1 General warnings .................... 7-1 7.1.1 Warnings on the use of colorants .............. 7-1 7.2 Running COROB™ TATOCOLOR TB ..............7-1 7.2.1 Positioning/loading cans ................7-1 7.2.2 Dispensing .................... 7-2 7.3 Running COROB™ TATOCOLOR TA ..............7-3 7.3.1 Positioning/loading cans ................
-
Page 5: Introduction
This manual, inserted in the product packing, contains instructions on the installation, use, and routine maintenance of the following equipment: Automatic dispenser, model COROB™ TATOCOLOR This manual provides instructions on the routine maintenance needed to uphold the machine's performance over time. - Page 6 This symbol indicates those operations that must be carried out solely by qualified or appropriately trained personnel. This symbol indicates situations and/or operations that involve the management application program installed on the computer. Boldface type is used to highlight notes or information of particular importance to a topic. COROB™ TATOCOLOR...
-
Page 7: General Information
2 GENERAL INFORMATION 2.1 General safety warnings This COROB™ dispenser has been designed and manufactured in observance of essential safety requirements; the CE marking certifies its compliance. All measures and precautions were taken during its design, manufacture, testing and installation to ensure the highest possible level of safety considering rational use of the machine. -
Page 8: Residual Risks
– Wear appropriate personal protective equipment (gloves) – Appropriate personnel training Crushing during the cans loading and – Wear appropriate personal protective chapter 7 unloading operations equipment (shoes and gloves) – Appropriate personnel training COROB™ TATOCOLOR... - Page 9 – Only trained personnel should carry out these operations Injuries during assembly/disassembly – Wear appropriate personal protective chapter 8 operations of the punch tool equipment (cut-proof gloves) – Appropriate personnel training – Only trained personnel should carry out these operations COROB™ TATOCOLOR...
-
Page 10: Position Of Labels
Label “Serial ports” Indicates the connection point for the machine management computer (symbol on the right) and the service computer (symbol on the left). COROB™ TATOCOLOR... -
Page 11: Identifying Information And Reference Standards
Indicates the dangerous area during the following phases: punching and plastic plug insertion. Figure 2-2 2.4 Identifying information and reference standards COROB S.p.A. designs, manufactures, and subjects its machines to tests to ensure compliance with safety and electromagnetic compatibility regulations. Any changes not authorized by COROB S.p.A. may jeopardize this compliance. -
Page 12: Warranty
making or having changes and/or repairs made using non-original spare parts In the event of serious breakdowns, or if the user does not feel it appropriate to intervene directly, contact a service center authorized by the manufacturer. COROB™ TATOCOLOR... -
Page 13: Definitions
If the machine catches fire, you must use dry powder or carbon dioxide fire extinguishers. Never use water. Carefully follow the instructions and warnings indicated by the manufacturer and listed on the extinguisher. 2.8 Declaration of conformity See Declaration of conformity attached. COROB™ TATOCOLOR... -
Page 15: Features
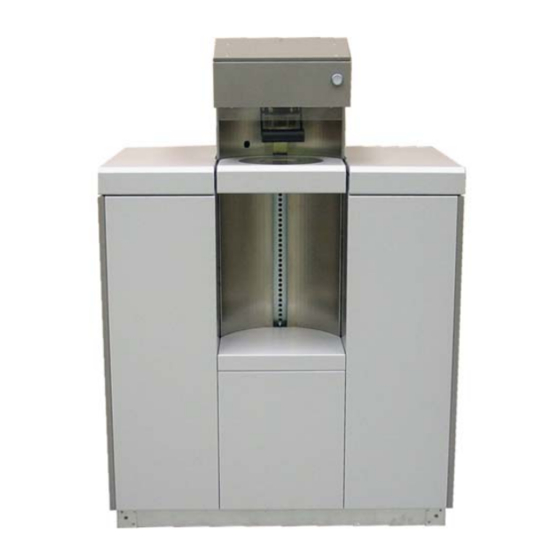
COROB™ TATOCOLOR TA 3.1.1 COROB™ TATOCOLOR TB COROB™ TATOCOLOR model TB is equipped with manual shelf and humidifier cap (sliding cap or automatic sliding cap). The machine is made up of (Figure 3-1): Central dispensing section Right side canister section Left side canister section Figure 3-1 - COROB™... -
Page 16: Corob™ Tatocolor Ta
3.1.2 COROB™ TATOCOLOR TA COROB™ TATOCOLOR model TA is equipped with manual shelf and automatic sliding cap. It also features a manual punch with the possibility to add a manual plugger, to perforate and apply a plastic plug on the can lids;... -
Page 17: Dispensing Section
(4). The canister sections house the COROB™ pumps (5), made of wear-resistant materials that maintain their characteristics over time. All pumps are driven by a single gear-motor (6) located in the dispensing section. -
Page 18: Shelf For Can Positioning
Figure 3-4 3.2.3 Shelf for can positioning COROB™ TATOCOLOR features an internal dispensing center, which includes the dispensing area and can handling system built into the machine chassis. The shelf is a system that allows to raise the can and place it correctly in correspondence with the dispensing nozzles. -
Page 19: Humidifier Cap
This is an automatically activated cap (Autocap) which opens automatically when the can placed on the shelf obscures the photocell, and closes automatically when the shelf is lowered and the photocell disengaged or when the can is removed from the shelf. COROB™ TATOCOLOR... -
Page 20: Punch & Plugger - Tatocolor Ta Only
3-FEATURES Figure 3-7 Figure 3-8 3.2.5 Punch & plugger - TATOCOLOR TA only The punch & plugger is a device that perforates the can lid, then (after dispensing) inserts a plastic plug in the hole made. On the machine accessorized with the punch, a can centering device (custom-made) can be... -
Page 21: Technical Specifications
3-FEATURES 3-7 Figure 3-9 3.3 Technical specifications COROB™ TATOCOLOR TB COROB™ TATOCOLOR TA ELECTRICAL SPECIFICATIONS Single-phase 220 - 240 V~ Power supply* Single-phase 100 - 110 V~ Other power supplies available upon request Frequency 50/60 Hz Fuses** F 10 A... -
Page 22: Performance And Characteristics Of The Machine
* If the cans are pre-punched, the hole diameter must be as follows: flow diameter + 15 mm. 3.5 Cans to be handled The particular structure and ergonomics of the COROB™ TATOCOLOR automatic dispenser make it suitable for handling small, medium-sized, and occasionally large cans. -
Page 23: Corob™ Tatocolor Tb
The minimum and maximum dimensions of usable cans depend entirely on the type of accessories with which the dispenser is equipped (humidifier cap, punch, plugger, etc.); the overall dimensions of usable cans therefore depend on the machine configuration. 3.5.1 COROB™ TATOCOLOR TB with sliding cap with sliding autocap... -
Page 24: Safety Devices
Only the lever returns to its original position when the button is released. If pressed when the sliding autocap is closed, this will cause the autocap to open. It will close back when the button is released. COROB™ TATOCOLOR... -
Page 25: Shipping, Handling And Unpacking
When using colorants containing volatile solvents the room in which the machine is installed must be spacious, with good ventilation (air exchange) and no type of parts must be leant against or stocked close to the machine. The environment working conditions of the machine must meet the following requirements: COROB™ TATOCOLOR... -
Page 26: Unpacking And Placement
Any accessories ordered may be inserted in the packing and packed separately, such as: computer and monitor in their original packing, etc.. Remove all individually packed accessories and set them aside for installation. Remove the bubble plastic and/or cellophane wrapped around the machine. COROB™ TATOCOLOR... - Page 27 (Figure 4-2). Figure 4-2 Slightly loosen the two screws (1) that fix the front bracket to the base of the pallet (Figure 4-3). Remove the side panels of the canister sections. COROB™ TATOCOLOR...
- Page 28 (Figure 4-5). Figure 4-5 11. Place the machine in its working position; the machine support surface must be stable and level. The ideal placement surface is always the floor. COROB™ TATOCOLOR...
-
Page 29: Moving And Handling The Unpacked Machine
(this must be done by at least two people) then slide it slowly along the platforms on its wheels, making sure they remain centered on the platforms. 4.6 Storage If stored, the machine must be kept in a protected, dry environment, not subjected to harsh weather, to avoid damaging the electrical components. COROB™ TATOCOLOR... -
Page 30: Product Disposal And Recycling
13th of August 2005, shall be carried out in compliance with the national measures of each EU-Member State implementing the WEEE Directive. For more information about proper disposal and recycling of your COROB™ product, please contact info.it@corob.com. -
Page 31: Installation (By Qualified Personnel)
The line must be protected from overloads, short-circuits and direct contacts according to current regulations. Check the grounding of the power supply system as required by local regulations before installing or powering the machine. Installing a COROB™ dispenser involves: installing any accessories ... -
Page 32: Canister Filling And First Machine Startup
Fill the canisters (chapter 7.5). Power up and start the machine as described in chapter 6.2. Load an empty can. COROB™ TATOCOLOR with sliding cap Position the manual shelf at such height that the can -- which will be lately placed -- will –... -
Page 33: Colorant Recirculation Procedure
5-INSTALLATION 5-3 COROB™ TATOCOLOR with sliding Autocap Position the manual shelf at the right height so as to bring the can, to be lately placed on – the shelf surface, at the proper position in relation to the nozzles (chapter 7.2.1 or 7.3.1). - Page 34 (Figure 5-4). Figure 5-4 USB connection Connect the USB interface cable to the dispenser USB port, marked with the symbol – (Figure 5-5). Connect the other end to one of the USB ports of the computer. – COROB™ TATOCOLOR...
-
Page 35: Installing The Keyboard (Only Model Tb, With Sheet Metal Panels)
Installation now requires that you insert the sponge in the humidifier cap and moisten it for the first time. The sponge is available among the material supplied. The sponge serves to keep the dispensing nozzle center at a moisture level to prevent the colorant from drying out. COROB™ TATOCOLOR... -
Page 36: Calibration
The actual specific weights of the colorants present in the machine must be entered into the calibration program. The instructions for automatically calibrating the dispensing circuits of the machine are described in detail in the program user's manual. COROB™ TATOCOLOR... -
Page 37: Start-Up
Machine main switch (1) position (O), the power is cut off to the machine. The two fuses protect the line and neutral in the Fuse compartment (2) electrical socket; the value is shown in the technical specifications table. COROB™ TATOCOLOR... - Page 38 Set the main switch to the ON position (I) (Figure 6-4). At this point, the ON lamp will light to indicate that the machine is on. Turn on the computer and monitor. COROB™ TATOCOLOR...
-
Page 39: Initialization
(based on the configuration of the application software). Once the start-up phase is complete, the application program is set to a logical, pre-defined state awaiting commands from the keyboard. The timed process of Stirring begins after a few seconds of machine inactivity (chapter 7.4). COROB™ TATOCOLOR... -
Page 40: Shut-Down
For occasional and temporary needs to shut off the machine, press the ON-OFF button. Pressing the ON-OFF button does not cause all the electrical circuits to be isolated from the mains voltage, but only isolates the electronic control devices (power supply unit, inverter, etc.). The auxiliary sockets still remain powered. COROB™ TATOCOLOR... -
Page 41: Using The Dispenser
The operator is guided in running the machine by the COROB™ management application program, which displays the instructions to be carried out and the actions performed by the machine. -
Page 42: Dispensing
7-USING THE DISPENSER COROB™ TATOCOLOR with sliding cap According to the position of the humidifier cap, the management computer checks for the can presence. Only after the can is placed on the shelf, thus causing the cap to open, it will be possible to start dispensing. -
Page 43: Running Corob™ Tatocolor Ta
After dispensing, you may remove the can from the shelf and proceed with the next dispensing process. 7.3 Running COROB™ TATOCOLOR TA The punch tool is a very sharp instrument. The can-holding plate is installed for safety purposes as well. Never push the plate upward. -
Page 44: Dispensing
Release the button and return the lever to its original position. Grasp the plugger grip again and raise it, to turn the plugger upward into its resting position. At this point, you may remove the can from the shelf and proceed with the next dispensing process. COROB™ TATOCOLOR... -
Page 45: Automatic Timed Processes
The stirring and recirculation times set via the application program are sent to the machine during initialization; the timed processes are active even if the machine is turned on without the computer. COROB™ TATOCOLOR... -
Page 46: Refilling The Canisters
It is essential to avoid letting the level of colorant fall too low or, worse yet, allowing the machine canisters to empty completely. Using the COROB™ management programs, a reserve level is set for each canister in proportion to its capacity, to prevent it from emptying; when the colorant in a canister reaches the reserve level, the program prevents all formulas involving the colorant in reserve from being dispensed. - Page 47 After topping up, it is advisable to carry out the recirculation and stirring processes using the functions provided in the management application program, to eliminate any air that may be emulsified and incorporated into the colorant. COROB™ TATOCOLOR...
- Page 48 7-USING THE DISPENSER BLANK PAGE COROB™ TATOCOLOR...
-
Page 49: Ordinary Maintenance (By The User)
Mixed systems development laboratory or, alternatively, by the COROB S.p.A. laboratory after examining the formulas and a few samples of the products used. -
Page 50: Maintenance Table
If necessary, clean the nozzles carefully with a damp cloth. The type of product to use depends on the type of colorants used on the machine; follow the table given in chapter 8.1 for the type of solution to be used. COROB™ TATOCOLOR... -
Page 51: Moistening The Humidifier Cap Sponge
For this purpose, the humidifier cap installed on the machine contains a sponge or piece of felt that must be kept moist at all times. Every 20 hours (approximately every two days) moisten the sponge. COROB™ TATOCOLOR... - Page 52 – Unscrew the sponge holding lid and remove it. – Release the lever of the sliding cap to bring it back in its closed position. TATOCOLOR TB with sliding cap – Wash the holding lid and perform maintenance on the sponge.
-
Page 53: Checking And Replacing The Punch Tool (Model Ta)
The punch is threaded to the left (the reverse of normal screws). SCREWING/UNSCREWING PLUGGER Figure 8-2 Carefully follow the procedure described below to remove the punch tool: At least 2 people must work together to remove the punch tool. RISK OF CUTS. COROB™ TATOCOLOR... -
Page 54: Filter Maintenance
The flow rate and precision of the machine could be jeopardized by excess residue in the colorant, trapped in the pump filters (1) (Figure 8-3). Filter clogging could reduce the machine flow rate, leading to imprecise dispensing (Figure 8-3). COROB™ TATOCOLOR... - Page 55 When no more colorant enters the canisters through the recirculation connectors, the circuits are empty (Figure 8-5). If the recirculation caused by initialization is not sufficient, send an additional colorant recirculation command from the application program. COROB™ TATOCOLOR...
- Page 56 The filtering net must be replaced if it cannot be cleaned properly. Clean the filter cap. – Insert the filtering net in the filter body and screw the cap back on. – Figure 8-6 COROB™ TATOCOLOR...
- Page 57 Recirculate the colorant until it flows continuously into the canisters. 12. Close the canisters with their corresponding lids, and close the covers of the canister sections. COROB™ TATOCOLOR...
- Page 58 8-10 8-ORDINARY MAINTENANCE BLANK PAGE COROB™ TATOCOLOR...
-
Page 59: Service Computer (For Qualified Personnel Only)
Proceed as follows: Position the computer. If the computer is complete with monitor and keyboard, connect as needed. Connect the computer power supply cord to the auxiliary sockets on the rear door (Figure 9-1). Figure 9-1 COROB™ TATOCOLOR... - Page 60 Connect the other end to one of the USB ports of the computer. – Do not use an USB interface cable longer than 2 meters. USB not supported in Microsoft Windows 95 or Microsoft Windows NT 4.0. Figure 9-3 Turn on the machine (chapter 6.2). COROB™ TATOCOLOR...
- Page 61 Turn on the computer and start the CorobSERVICE program (refer to the corresponding user’s manual). Even if the auxiliary sockets are not used to power the computer, always make sure the serial cable is connected when the computer is OFF, to prevent damaging the serial line of the machine. COROB™ TATOCOLOR...
- Page 62 9-SERVICE COMPUTER BLANK PAGE COROB™ TATOCOLOR...
-
Page 63: Guidelines For Using Voc-Free Colorants
(VOC). As a part of this development, also the colorants used for colouring these paint products are more commonly VOC-free. This information chapter is meant as a practical guide for a flawless operation of COROB™ tinting machines with VOC-free colorants. -
Page 64: Used Dispenser By Solvent-Free Colorants
Re-circulate the solution and let it sit in the circuit and canister for about 1 hour. Dispense out all biocide solution. 10. Fill the canister with fresh colorant and dispense approximately 200 ml. COROB™ TATOCOLOR... -
Page 65: Bung Hole Locator Laser Warnings
Rectangular information label with black edging and writing on a yellow background. It indicates the maximum laser radiation power emitted, the wave length emitted and the name and publishing date of the standard used to classify the equipment. COROB™ TATOCOLOR... - Page 66 11-2 11-BUNG HOLE LOCATOR LASER WARNINGS BLANK PAGE COROB™ TATOCOLOR...
Need help?
Do you have a question about the Tatocolor and is the answer not in the manual?
Questions and answers