Sign In
Upload
Download
Table of Contents
Contents
Add to my manuals
Delete from my manuals
Share
URL of this page:
HTML Link:
Bookmark this page
Add
Manual will be automatically added to "My Manuals"
Print this page
×
Bookmark added
×
Added to my manuals
Manuals
Brands
corob Manuals
Dispenser
D600 extra
User manual
corob D600 User Manual
Automatic dispenser
Hide thumbs
Also See for D600
:
User manual
(51 pages)
1
2
3
4
Table Of Contents
5
6
7
8
9
10
11
12
13
14
15
16
17
18
19
20
21
22
23
24
25
26
27
28
29
30
31
32
33
34
35
36
37
38
39
40
41
42
43
44
45
46
47
48
49
50
page
of
50
Go
/
50
Contents
Table of Contents
Troubleshooting
Bookmarks
Table of Contents
Table of Contents
1 General Information
Purpose and Use of this Manual
Conventionally Used Graphics
Definitions
2 Features
Description of the Machine
Description of Units
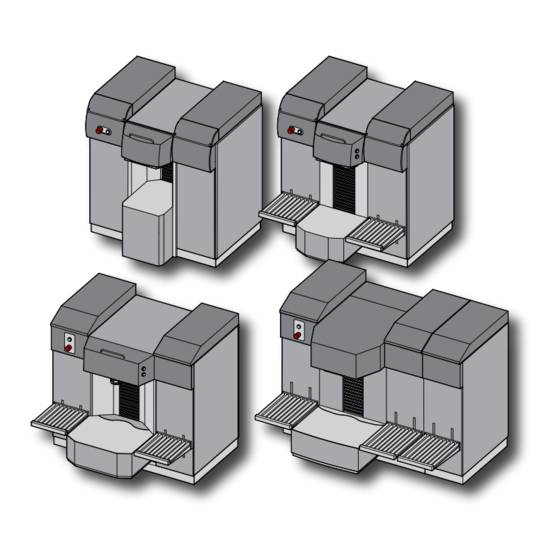
Standard and Optional Configurations
Usable Cans
Intended Use
Identifying Information
3 Safety
Safety Warnings and Unauthorized Use
Warnings on the Use of Colorants
Residual Risks
Position of Labels
Safety Devices
Requirements of the Installation Site
4 Shipping and Handling
General Warnings
Unpacking and Placement
Adjusting the Support Feet
Standard Material Supplied
Installation
Storage
Disposal and Recycling
5 Start-Up
General Warnings
Control Devices and Connections
Electrical Connection and Start-Up
Initialization
Emergency Stop
Shut-Down
6 Using the Dispenser
General Warnings
At the Beginning of the Working Day
Running the Machine
Loading the Can - Semiautomatic Shelf
Loading the Can - Automatic Shelf
Loading the Can - Panel Roll Conveyor
Use of the Can Centering Device
Use of the Bung Hole Locator
Punching the Can
Dispensing
Automatic Processes
Refilling the Canisters
Troubleshooting
7 Ordinary Maintenance
General Warnings
Maintenance Table
Products to be Used
External Cleaning
Cleaning the Nozzle Center
Cleaning and Moistening the Humidifier Cap Sponge
Checking and Replacing the Puncher
Refilling the Humidifier System Bottle
8 Technical Specifications
Technical Data
Dimensions
Declaration of Conformity
Warranty
Advertisement
Quick Links
1
Description of the Machine
2
Troubleshooting
3
Maintenance Table
4
Technical Data
Download this manual
See also:
User Manual
COROB™ D600 - D700 - D800TX
Automatic dispenser
User's Manual
207119 - ENGLISH
V3.0 - R1
(04/2014)
Table of
Contents
Previous
Page
Next
Page
1
2
3
4
5
Advertisement
Table of Contents
Need help?
Do you have a question about the D600 and is the answer not in the manual?
Ask a question
Questions and answers
Related Manuals for corob D600
Dispenser corob D600 extra User Manual
Automatic (51 pages)
Dispenser Corob D800 HD User Manual
Automatic (40 pages)
Dispenser Corob D800TX User Manual
Automatic dispenser (50 pages)
Dispenser corob D180 User Manual
Automatic (40 pages)
Dispenser corob D180 User Manual
Automatic (40 pages)
Dispenser corob D410x User Manual
Automatic dispenser (48 pages)
Dispenser corob D200 User Manual
Automatic dispenser (45 pages)
Dispenser corob PROsample 200 User Manual
Automatic dispenser (45 pages)
Dispenser corob D300 Manual
Automatic dispensing machine (122 pages)
Dispenser corob D50 User Manual
Manual dispenser (234 pages)
Dispenser corob FIRST 70 User Manual
Automatic (41 pages)
Dispenser corob FIRST1-TX User Manual
Automatic dispenser (36 pages)
Dispenser corob FLEX 200 User Manual
Automatic dispenser (33 pages)
Dispenser corob EVOTURN User Manual
Automatic dispenser (42 pages)
Dispenser corob EVOPWR CX User Manual
Automatic dispenser (64 pages)
Dispenser corob MoonWalk User Manual
(44 pages)
This manual is also suitable for:
D700
D800tx
Table of Contents
Save PDF
Print
Rename the bookmark
Delete bookmark?
Delete from my manuals?
Login
Sign In
OR
Sign in with Facebook
Sign in with Google
Upload manual
Upload from disk
Upload from URL


Need help?
Do you have a question about the D600 and is the answer not in the manual?
Questions and answers