
Related Manuals for mothercare my4


Summary of Contents for mothercare my4
- Page 1 Important. Keep for Importante. Retenga para future reference referencia futura...
-
Page 2: Introduction / Introducción
introduction • introducción IMPORTANT: Read these instructions carefully before use and keep them for future reference. Your child’s safety may be affected if you do not follow these instructions. This vehicle is intended to carry a single child in an upright or reclined position from birth and up to a maximum weight of 15kg. - Page 3 parts check list • cátalogo de piezas Head hugger Chassis Reposacabezas Chasis Cot liner Hood Funda para la tapicería Capota Harness pads 2 Front wheels Fundas para arnés 2 Ruedas delanteras Pram apron 2 Rear wheels 2 Ruedas traseras Protector de cuco Bumper bar Tyre pump Barra de seguridad...
- Page 4 parts check list • cátalogo de piezas Infant carrier Fabric seat canopy. Asiento de tela Cubierta para portabebé Seat frame Infant carrier apron Armazón del asiento Saco para portabebé Infant carrier Portabebé Seat cover for infant carrier Tapizado para portabebé Harness pads for infant carrier Fundas de arnés...
-
Page 5: Opening The Chassis
preparation for use • preparación para el uso opening the chassis cómo abrir el chasis Flatten the pushchair carton to protect the floor and place the chassis on the cardboard. Release the folding catch by lifting the end of the catch away from the retaining pin on the front leg of the pushchair. -
Page 6: Fitting The Front Wheels
preparation for use • preparación para el uso fitting the front wheels cómo colocar las ruedas delanteras Remove the packaging from the front area of the pushchair. Slide the front wheel pins into the housing on the pushchair. Each wheel will ‘click’... - Page 7 preparation for use • preparación para el uso attaching the seat unit in the cómo fijar el conjunto del asiento forward position en posición hacia delante Ensure the adaptors on the chassis frame are in the upright position as shown in the diagram and indicated as on the adaptors.
-
Page 8: Attaching The Bumper Bar
preparation for use • preparación para el uso To remove the seat unit, press the two buttons located behind the adjuster housing on either side and lift the seat unit away from the frame. Para retirar el conjunto del asiento, presione los dos botones situados detrás y a ambos lados de la estructura del medidor, y retire el conjunto del asiento de la estructura. -
Page 9: Attaching The Hood
Además, hay una zona con malla opcional, sólo tiene que tirar de la cremallera situada en la parte inferior de la capota para aumentar la cantidad de aire que corre a través de my4, manteniendo así a su hijo aireado.. - Page 10 preparation for use • preparación para el uso adjusting the handlebar height cómo ajustar la altura del manillar To adjust the handlebar height push the grey button situated on the underside of the middle of the handle and pull the handlebar towards you.
-
Page 11: Securing Your Child
in use • durante su utilización You can adjust the seat unit further by pushing in the black buttons on either side of the seat unit and reclining the seat backwards. Puede seguir ajustando el conjunto del asiento presionando los botones negros situados a cada uno de los lados y reclinando el asiento hacia atrás. -
Page 12: Using The Brake
in use • durante su utilización To release your child from the harness, squeeze the prongs, as shown. D-rings are fitted (D) should you wish to attach a separate harness complying with BS 6684 Para quitar el arnés al niño, retire los ajustes como se muestra en el dibujo. - Page 13 There is also a storage compartment designed to fit a tyre pump. El cochecito my4 incorpora una cesta en la parte inferior del chasis. Puede aguantar hasta 4,5 kg de artículos de bebé o de la compra, distribuidos de manera uniforme.
- Page 14 in use • durante su utilización attaching the cosy toe cómo colocar el saco Unclip the shoulder and waist straps, then undo the clasp so that all harness straps are free. Unzip and remove the front cover of the cosy toe and place the liner of the cosy toe on the seat.
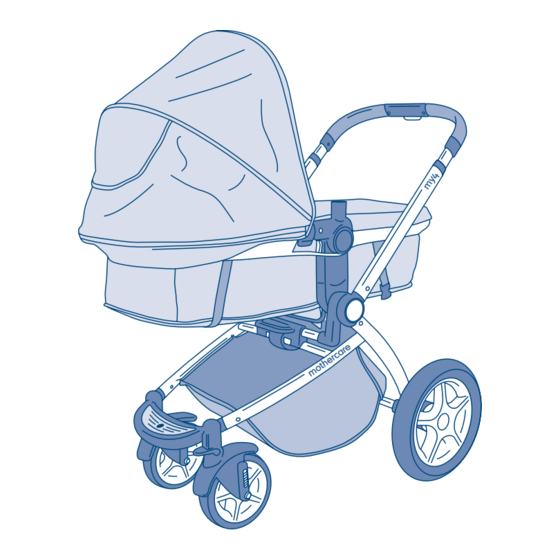
- Page 15 in use • durante su utilización using the seat unit in cochecito en pram mode modo cuco Warning! Never change the seat unit into pram position with your child in the seat unit. Note: We recommend that your child should lie flat in the pram body from birth to 6 months (up to 9kg).
- Page 16 in use • durante su utilización Squeeze the clasp at the back of the seat unit and pull along the webbing to recline the backrest. Lower the backrest into the desired position and release the clasp. Agarre el ajuste situado en la parte posterior de la unidad del asiento y tire de la cinta para reclinar el respaldo.
- Page 17 With the my4 in pram mode, undo the four harness clips and move these to the edge of the pram unit. Remove the hood from the frame by gently releasing the black plastic tabs located on the underside of the hood clips.
- Page 18 in use • durante su utilización Nota: en el caso de que quiera asegurar a su hijo cuando utilice el cochecito en el modo cuco, le recomendamos que utilice los orificios con ranuras de la funda para deslizar a través de ellos las anillas D y unir un arnés adicional que cumpla con BS 6684 o con BS EN 13210.
-
Page 19: Reversing The Seat Unit
in use • durante su utilización Clip all four buckles of the harness back together, then replace the bumper bar and hood. Push the black adjuster buttons on the sides of the seat frame and move the seat unit into an upright position. Abroche de nuevo los cuatro ajustes del arnés y cambie la barra de seguridad y la capota Presione los botones negros de ajuste... - Page 20 in use • durante su utilización Note: Pull gently on the seat unit to check that it is attached securely. Nota: presione con firmeza sobre el conjunto del asiento para asegurarse de que está insertado correctamente attaching the cómo fijar la silla de traveltot car seat auto travel tot Push down on the button in the middle of the...
- Page 21 in use • durante su utilización Mueva el adaptador por el manillar después deje que se deslice hacia delante y que encaje en su nueva posición, asegurándose de que la etiqueta de la silla de auto queda alineada como se indica en el adaptador. Position the car seat so that it faces the handlebar.
-
Page 22: Using The Raincover
in use • durante su utilización removing the cómo retirar la silla de traveltot car seat auto travel tot Press the release buttons on either side of the car seat and lift it away from the adaptors. Presione los botones de desbloqueo situados a cada lado de la silla de auto y retírela de los adaptadores. - Page 23 after use • después del uso Antes de ajustarlo, compruebe que se ha desplegado completamente. Coloque la capota en la posición más vertical posible, coloque el Weathershield™ sobre la capota y póngalo de manera que cubra el cuco o la silla de paseo, como se muestra en el dibujo.
-
Page 24: Folding The Pushchair
after use • después del uso To remove the basket from the chassis frame, slide the sides of the basket along the runners until it comes free. Para quitar la cesta de la estructura del chasis, deslícela por los railes hasta que esté... - Page 25 after use • después del uso Move the handlebar into the lowest position, then push in the large grey button on the left hand side of the pushchair whilst sliding down the black secondary lock located on the right hand side of the pushchair. The handlebar will then rotate downwards.
- Page 26 after use • después del uso carrying the pushchair transporte del cochecito Fasten the folding catch to hold the folded pushchair together, then use the handle in the centre of the chassis frame to carry the unit. Ajuste el amarre de plegado para mantener unido el cochecito plegado y después utilice el mango del centro de la estructura del chasis para transportar la unidad.
- Page 27 < Brakes, wheels and tyres are subject to wear and should be replaced if necessary. This can be arranged through your local mothercare store. < Wheels should be checked and cleaned regularly. Remove any mud or other detritus that has collected as this may prevent the locking system from working properly.
- Page 28 18 meses, lo que ocurra antes. Esto puede llevarse a cabo en el establecimiento Mothercare más cercano. < Asegúrese de que la presión de todas las ruedas es la adecuada. Esto se traduce en un transporte más fácil del cochecito y previene posibles daños de las piezas...
- Page 29 safety notes • medidas de seguridad raincover impermeable < To prevent damage, remove the raincover before folding the pushchair. < Do not place anything on top of the raincover. < To prevent your child overheating, always fold or remove the raincover when indoors or in warm environments.
- Page 30 < The seat unit in Pram mode is designed to carry one child only. < Do not use replacement parts or accessories, e.g. child seats, bag hooks, rain covers etc other than those approved by Mothercare. They may make the pushchair unsafe.
- Page 31 < No utilice ninguna pieza de repuesto o accesorio, por ejemplo, asientos de niños, enganches para bolsos, impermeables, etc., que no haya sido aprobada por Mothercare. Pueden afectar a la seguridad del cochecito. < No deje nunca a su hijo desatendido en ningún momento.
- Page 32 En caso de necesitar alguna de estas pieza de repuesto, póngase en contacto con la tienda o con el servicio de atención al cliente de Mothercare en el número 08453 30 40 30. Para reparar determinadas piezas, puede llevar el producto a la tienda de Mothercare más próxima.
- Page 33 replacement parts • piezas de repuesto Cosytoe Shopping basket Saco Cesta de la compra Raincover Infant carrier canopy. Impermeable Cubierta para portabebé Fabric seat Infant carrier apron Asiento de tela Saco para portabebé Seat frame Seat cover for infant carrier Armazón del asiento Tapizado para portabebé...
-
Page 34: Notes • Notas
notes • notas... - Page 35 notes • notas...
- Page 36 Si surgiera algun problema con este producto o si necesita piezas de recambio sirvase ponerse en contacto con el almacen Mothercare mas proximo o llamar a la linea de Atencion al cliente de Mothercare numero (+44) 1923 210 210 tambien puede escribir a:...
Need help?
Do you have a question about the my4 and is the answer not in the manual?
Questions and answers