Seagull Models Yak 54 Assembly Manual
Hide thumbs
Also See for Yak 54:
- Assembly manual (24 pages) ,
- Assembly manual (37 pages) ,
- Assembly manual (39 pages)
Table of Contents
Advertisement
Quick Links
Specifications
Wingspan---------------------------------------- 57 in---------------------------- 145cm.
Wing area---------------------------------------- 697 sq.in------------------- 45 sq.dm.
Approximate flying weight------------------ 6.4-7.5lbs------------------- 2.9-3.4kg.
Length-------------------------------------------- 52.8 in--------------------------- 134cm.
Recommended engine size---------------- .61 cu.in---------------------- 2-stroke.
Radio System required 4 channels with 6 digital servos.
Flying skill level Intermediate/advanced.
Kit features.
•
Ready-made—minimal assembly & finishing required.
•
Ready-covered covering.
•
Photo-illustrated step-by-step Assembly Manual.
Made in Vietnam.
ASSEMBLY MANUAL
.72-.82 cu.in------------------ 4-stroke.
MS: 65
Advertisement
Table of Contents

Related Manuals for Seagull Models Yak 54


Summary of Contents for Seagull Models Yak 54
- Page 1 MS: 65 ASSEMBLY MANUAL Specifications Wingspan---------------------------------------- 57 in---------------------------- 145cm. Wing area---------------------------------------- 697 sq.in------------------- 45 sq.dm. Approximate flying weight------------------ 6.4-7.5lbs------------------- 2.9-3.4kg. Length-------------------------------------------- 52.8 in--------------------------- 134cm. Recommended engine size---------------- .61 cu.in---------------------- 2-stroke. .72-.82 cu.in------------------ 4-stroke. Radio System required 4 channels with 6 digital servos. Flying skill level Intermediate/advanced.
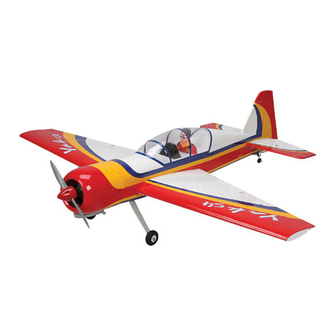
- Page 2 Instruction Manual INTRODUCTION. Thank you for choosing the YAK 54 ARTF by SEAGULL MODELS. The YAK 54 was designed with the intermediate/advanced sport flyer in mind. It is a scale airplane which is easy to fly and quick to assemble. The airframe is conventionally built using balsa, plywood to make it stronger than the average ARTF , yet the design allows the aeroplane to be kept light.
- Page 3 This will ensure proper as- sembly as the YAK 54 is made from natural materials and minor adjust- ments may have to be made. The paint and plastic parts used in this kit are fuel proof.
-
Page 4: Hinging The Ailerons
YAK 54. Instruction Manual HINGING THE AILERONS. Note: The control surfaces, including the ailerons, elevators, and rudder, are prehinged with hinges installed, but the T-pin. hinges are not glued in place. It is imperative that you properly adhere the hinges in place per the steps that follow using a high-quality thin C/A glue. -
Page 5: Hinging The Rudder
www.seagullmodels.com 6) Using C/A remover/debonder and a Installing the turnbuckle for tail strut of hori- paper towel, remove any excess C/A glue that zontal fin as same as pictures below. may have accumulated on the wing or in the aileron hinge area. 7) Repeat this process with the other wing panel, securely hinging the aileron in place. -
Page 6: Fuel Tank Installation
YAK 54. Instruction Manual Vent tube. FUEL TANK INSTALLATION. Fuel pick up tube. INSTALLING THE STOPPER ASSEMBLY. 1) Using a modeling knife, carefully cut Fuel fill tube. off the rear portion of one of the 3 nylon tubes leaving 1/2” protruding from the rear of the stopper. -
Page 7: Wheel Installation
www.seagullmodels.com Plastic tape. You should mark which tube is the vent and which is the fuel pickup when you attach fuel tubing to the tubes in the stopper. Once the tank is installed inside the fuselage, it may be difficult to determine which is which. 2) Follow diagram below for wheel installation: Fuel tank. -
Page 8: Installing The Main Landing Gear
YAK 54. Instruction Manual INSTALLING THE MAIN LANDING GEAR. 1) The blind nuts for securing the landing gear are already mounted inside the fuselage. 2) Using the hardware provided, mount the main landing gear to the fuselage. 4x20mm. (2) Washer. -
Page 9: Cowling Installation
www.seagullmodels.com COWLING INSTALLATION. 1) Slide the fiberglass cowl over the en- gine and line up the back edge of the cowl with the marks you made on the fuselage then trim and cut. 4.2mm. 5) Bolt the engine to the engine mount using Trim and cut. -
Page 10: Installing The Switch
YAK 54. Instruction Manual INSTALLING THE FUSELAGE SERVO. 3x10mm. Because the size of servos differ, you may need to adjust the size of the precut open- ing in the mount. The notch in the sides of the mount allow the servo lead to pass through. -
Page 11: Horizontal Stabilizer
www.seagullmodels.com Remove covering. Switch. 3) Slide the stabilizer into place in the pre- cut slot in the rear of the fuselage. The stabi- lizer should be pushed firmly against the front THROTTLE SERVO ARM INSTALLATION. of the slot. ) Install adjustable servo connector in the servo arm as same as picture below: Adjustable Servo connector. -
Page 12: Vertical Stabilizer Installation
YAK 54. Instruction Manual When cutting through the covering to re- VERTICAL STABILIZER INSTALLATION. move it, cut with only enough pressure to only cut through the covering itself. Cutting into the balsa structure may weaken it. 6) Using a modeling knife, carefully re- move the covering that overlaps the stabilizer mounting platform sides in the fuselage. -
Page 13: Installing The Aileron Servos
www.seagullmodels.com 6) When you are sure that everything is 3) While holding the vertical stabilizer aligned correctly, mix up a generous amount of firmly in place, use a pen and draw a line on 30 Minute Epoxy. Apply a thin layer to the mount- each side of the vertical stabilizer where it ing slot in the top of the fuselage and to the sides meets the top of the fuselage. - Page 14 YAK 54. Instruction Manual Secure the servos with the screws pro- Because the size of servos differ, you vided with your radio system. may need to adjust the size of the precut open- ing in the mount. The notch in the sides of the mount allow the servo lead to pass through.
-
Page 15: Aileron Control Horn Installation
www.seagullmodels.com AILERON CONTROL HORN INSTALLATION M3 lock nut. M3 control horn. 2 sets. M3 nut. 3x40mm. Aluminium washer. Wing bottom. Aileron control horn: Mix a small amount of 30 minute epoxy and lightly coat the inside of the hole in the aileron and the control horn screw. - Page 16 YAK 54. Instruction Manual Left side. M2 lock nut. Elevator control horn. Rudder control Repeat the procedure for the other wing. ELEVATOR - RUDDER CONTROL HORN INSTALLATION. 1) Install the elevator control horn using the same method as with the aileron control horns.
- Page 17 www.seagullmodels.com Rudder pushrod. Turnbuckle. Elevator pushrod. M2 clevis. 42mm. M2 lock nut. Snap keeper. Alumium 3x10mm. trap. Rudder. Throttle. Elevator. Plastic clip. INSTALLING TAIL STRUT SYSTEM. The tail strut system assembly follow pictures below. Alumium trap. 3x10cm(2pcs).
-
Page 18: Mounting The Tail Wheel
YAK 54. Instruction Manual INSTALLING THE BATTERY-RECEIVER. 1) Plug the six servo leads and the switch lead into the receiver. Plug the battery pack lead into the switch also. 2) Wrap the receiver and battery pack in the protective foam rubber to protect them from vibration. -
Page 19: Control Throws
Wing bolt. CG=6.5 - 7.5cm. CONTROL THROWS. We highly recommend setting up the YAK 54 using the control throws listed at right. We have listed control throws for both Low Rate (initial test flying/sport flying) and High Rate (aerobatic flying). - Page 20 Moving the adjustable con- 2) Check every bolt and every glue joint trol horn toward the control surface will in- in the YAK 54 to ensure that everything is tight crease the amount of throw. and well bonded.
Need help?
Do you have a question about the Yak 54 and is the answer not in the manual?
Questions and answers