Sam4s SPS-500 SERIES Service Manual
Pos system
Hide thumbs
Also See for SPS-500 SERIES:
- Program reference manual (183 pages) ,
- Operation manual (180 pages) ,
- Operator's manual (150 pages)
Table of Contents
Advertisement
Quick Links
SERVICE
SPS-500 Series
POS SYSTEM
SPS-500 SERIES
Manual
1.
2.
3.
4.
5.
6.
7.
8.
9.
10. Bock Diagram
11. Schematic Diagrams
C O N T E N T S
Precaution Statements
Product Specifications
Installation and Operation
Disassembly and Assembly
Maintenance and Adjustment
Troubleshooting
Exploded Views and Parts List
PCB Layout and Parts List
Wiring Diagram
Advertisement
Table of Contents

Related Manuals for Sam4s SPS-500 SERIES


Summary of Contents for Sam4s SPS-500 SERIES
- Page 1 POS SYSTEM SPS-500 SERIES SERVICE Manual SPS-500 Series C O N T E N T S Precaution Statements Product Specifications Installation and Operation Disassembly and Assembly Maintenance and Adjustment Troubleshooting Exploded Views and Parts List PCB Layout and Parts List Wiring Diagram 10.
- Page 2 Overview of this POS System This service manual provides the technical information for many individual component systems and circuits and gives an analysis of the operations performed by the circuits. Schematics and specifications provide the needed information for the accurate troubleshooting. All information in this manual is subject to change without prior notice.
- Page 3 About this Manual This service manual describes how to perform hardware service maintenance for the SAM4S SPS-500 Series POS System Notes Notes may appear anywhere in the manual. They describe additional information about the item. Precaution symbols . Indicates a Safety Precaution that applies to this part component.
- Page 4 This manual may not, in whole or in part, be copied, photocopied, reproduced, translated or converted to any electronic or machine readable from without prior written permission of Shin Heung Precision . SAM4S SPS-500 SERIES Aug. 2009. V1.1 Printed in KOREA...
-
Page 5: Precaution Statements
Remplacer uniquement avec une batterie du même recommended by the manufacturer. type ou d’un type équivalent recommandé par le Dispose used batteries according to the constructeur. manufacturer’s instructions. Mettre au rebut les batteries usagées conformément aux instructions du fabricant. SAM4S SPS-500 SERIES... -
Page 6: Servicing Precautions
5. Use only a grounded-tip soldering iron when soldering or unsoldering ESDs. 6. Use only an anti-static solder removal device. Many solder removal devices are not rated as anti-static; these can accumulate sufficient electrical charge to damage ESDs. SAM4S SPS-500 SERIES... -
Page 7: Product Specifications
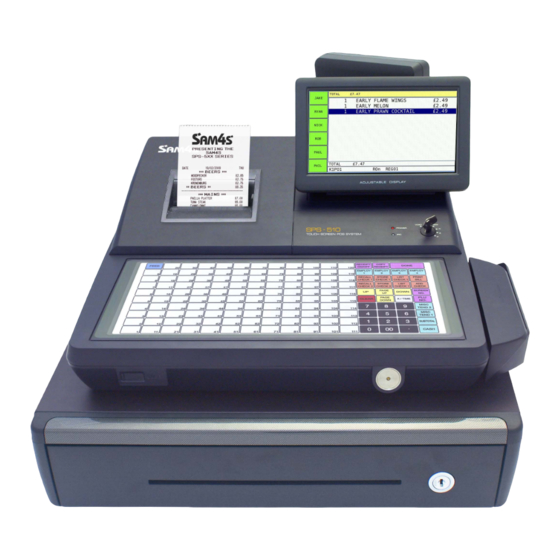
: 30% ~ 80% RH Approximately 12Kg (Net) Weight 430(W) × 468(L) × 344(H) : With A+ Drawer Dimensions(mm) Set Size 400(W) × 468(L) × 344(H) : With G Drawer Table2-1 General Specifications (SPS-520) SAM4S SPS-500 SERIES... - Page 8 ① Printer Cover ② SD Card ③ Key Board ④ USB ⑤ Drawer ⑥ Customer LCD Display (16char*2line LCD) ⑦ Operator LCD Display(7” TFT-LCD(800*480)) ⑧ Mode Key ⑨ MSR ⑩ Dallas Key (i-BUTTON) Figure2-2 Location Features (SPS-520) SAM4S SPS-500 SERIES...
- Page 9 Guillotine Type Auto Cutter Type Shin Heung Precision 30,000,000 Lines MCBF Reliability 1,000,000 Cuts Auto-cutter 82.5 (W) ×147.3 (D) ×101.4 (H) Dimension (mm) Approx. 365 g Weight Table2-2 Thermal Printer Specifications (SPS-520) SAM4S SPS-500 SERIES...
-
Page 10: Paper Specification
12(W) × 24(H) Font (Including a Horizontal) Character Structure 1.25 mm(W) ×3.0 mm(H) Character Size 1.5 mm Column Pitch 3.75 mm (Including 6-dot Line Spacing) Line Pitch 32 (12×24 Dots/Character) Number of Column Table2-4 Character Specification (SPS-520) SAM4S SPS-500 SERIES... - Page 11 : 30% ~ 80% RH Weight Approximately 12Kg (Net) 430(W) × 468(L) × 344(H) : With A+ Drawer Dimensions(mm) Set Size 400(W) × 468(L) × 344(H) : With G Drawer Table2-5 General Specifications (SPS-530) SAM4S SPS-500 SERIES...
- Page 12 ① Printer Cover ② SD Card ③ Key Board ④ USB ⑤ Drawer ⑥ Customer LCD Display (16char*2line LCD) ⑦ Operator LCD Display(7” TFT-LCD(800*480)) ⑧ Mode Key ⑨ MSR ⑩ Dallas Key (i-BUTTON) Figure2-5 Location Features (SPS-530) SAM4S SPS-500 SERIES...
- Page 13 Auto Cutter Type 100Km , 1×10 Pulses Reliability Paper : PD-160R-N 1,000,000 Cuts Auto-cutter (Oji paper co.,Ltd) 110.2 (W) ×54 (D) ×25.8 (H) Dimension (mm) Approx. 175 g Weight Table2-6 Thermal Printer Specifications (SPS-530) SAM4S SPS-500 SERIES...
- Page 14 12(W) × 24(H) Font (Including a Horizontal) Character Structure 1.25 mm(W) ×3.0 mm(H) Character Size 1.5 mm Column Pitch 3.75 mm (Including 6-dot Line Spacing) Line Pitch 32 (12×24 Dots/Character) Number of Column Table2-8 Character Specification (SPS-530) SAM4S SPS-500 SERIES...
-
Page 15: Power Specification
If the Total Power Consumption exceeds specification (1A), the system cuts “VCC” of COM#1~COM#4. “VCC “ is supplied for the USB Device. Supply current 1A is total value including USB1#~USB#2. If the total Power Consumption exceeds specification 1A, the system cuts “VCC” of USB#1~USB#2. SAM4S SPS-500 SERIES... - Page 16 Function DSUB9(CN1) RJ45(CN3) Carrier Detect Receive Data Transmit Data Data Set Ready Data Terminal Ready Request To Send Clear To Send Ring Indicator Total Power : 1A (COM#1,#2 : Pin9, COM#3 ,#4 : Pin1 ) +5V/500mA 2-10 SAM4S SPS-500 SERIES...
-
Page 17: Rs-232C Interface Cable
(DSUB25 MALE) (+5V) (COM1, COM2 I/F CABLE PIN CONNECTION ) SPS-500 SIDE USER SIDE (DSUB9 FEMALE) (DSUB9 MALE) (+5V) ( COM1, COM2 I/F CABLE PIN CONNECTION ) CAUTION : COM#1~COM#2 supplies “+5V” to DSUB9 “Pin Num 9”. SAM4S SPS-500 SERIES 2-11... - Page 18 USER SIDE SPS-500 SIDE 3(TXD) 2(TXD) (DSUB25 MALE) 2(DSR) 20(DTR) 7(S.GND) 7(S.GND) 8(DTR) 6(DSR) 5(RTS) 4(RTS) 6(CTS) 5(CTS) ( COM3, COM4 I/F CABLE PIN CONNECTION ) CAUTION : COM#3~COM#4 supplies “+5V” to RJ45 “Pin Num 1”. 2-12 SAM4S SPS-500 SERIES...
- Page 19 Frame GND VBUS Host Power : DC5[V] / 500[mA] White Differential Data Line Green Differential Data Line Black Signal GND 2-5-6 USB Interface Cable SPS-500 SIDE USER SIDE "B" TYPE PLUG "A" TYPE PLUG (USB I/F CABLE) SAM4S SPS-500 SERIES 2-13...
- Page 20 ( POS to POS IRC I/F CABLE ) 1(ENET TX+) 1(ENET TX+) 2(ENET TX-) 2(ENET TX-) 3(ENET RX+) 3(ENET RX+) 4(N.C) 4(N.C) 5(N.C) 5(N.C) 6(ENET RX-) 6(ENET RX-) 7(N.C) 7(N.C) 8(N.C) 8(N.C) (POS to HUB IRC I/F CABLE) 2-14 SAM4S SPS-500 SERIES...
-
Page 21: Drawer Signal Description
Make sure that installed “+24V Cash Drawer”. Make sure that the Cash Drawer Solenoid Resistance is more than 20[Ohm] 2-5-10 DRAWER Interface Cable DRAWER COMPULSORY RJ11 6P (DRAWER I/F CABLE) SPS-500 SIDE USER SIDE ( DRAWER CONNECTOR ) SAM4S SPS-500 SERIES 2-15... - Page 22 2 Product Specifications MEMO 2-16 SAM4S SPS-500 SERIES...
- Page 23 2 Product Specifications MEMO 2-16 SAM4S SPS-500 SERIES...
- Page 24 3 Installation and Operation 3-1 OS and Application Update from PC 3-1-1 Setup the TFTP32 Setup Method Remark Download or copy the “tftpd32.300.zip” file from the FTP server. Unpack the file. Execute the “tftpd32.exe” file SAM4S SPS-500 SERIES...
- Page 25 3 Installation and Operation 3-1 OS and Application Update from PC 3-1-1 Setup the TFTP32 Setup Method Remark Press “Settings” button on the bottom of the window. Change the Base Directory and press the “OK” button SAM4S SPS-500 SERIES...
- Page 26 (nb_500.bin, zImg500, rdisk500.gz, xlib500.bin, app500.bin) Set up network settings. IP Address (I) 192 . 168 . 0 . 2 Subnet Mask (U) 255 . 255 . 255 . 0 Gateway (D) 192 . 168 . 0 . 1 SAM4S SPS-500 SERIES...
- Page 27 Press and hold this key position during power-up in S-mode. CAS H Press the upper left key of the keyboard, then the lower left key, then the upper right key, and finally press the lower right key. SAM4S SPS-500 SERIES...
- Page 28 3 Installation and Operation 3-1 OS and Application Update from PC 3-1-3 OS and Application Update Update Method Remark Enter the system password : 1 2 8 7 Select “Update” from the menu on LCD. SAM4S SPS-500 SERIES...
- Page 29 3 Installation and Operation 3-1 OS and Application Update from PC 3-1-3 OS and Application Update Update Method Remark Select “Copy All” from the menu on LCD. Select “YES” from the menu on LCD. SAM4S SPS-500 SERIES...
- Page 30 3 Installation and Operation 3-2 OS and Application Update from SD card. 3-2-1 Format the SD card with FAT-32 file system Format Method Remark Format the SD card with FAT-32 file system. SAM4S SPS-500 SERIES...
- Page 31 3-2 OS and Application Update from SD card. 3-2-2 Program Update Preparation Update Method Remark Create a directory named “Update\sps500” on root of the SD card. Copy following files to “Update” directory of the SD card. (nb_500.bin, zImg500, rdisk500.gz, xlib500.bin, app500.bin) SAM4S SPS-500 SERIES...
- Page 32 Press and hold this key position during power-up in S-mode. CAS H Press the upper left key of the keyboard, then the lower left key, then the upper right key, and finally press the lower right key. SAM4S SPS-500 SERIES...
- Page 33 3 Installation and Operation 3-2 OS and Application Update from SD card. 3-2-3 OS and Application Update Enter the system password : 1 2 8 7 Select “Update” from the menu on LCD. 3-10 SAM4S SPS-500 SERIES...
- Page 34 3 Installation and Operation 3-2 OS and Application Update from SD card. 3-2-3 OS and Application Update Select “Copy All - SD” from the menu on LCD. Select “YES” from the menu on LCD. SAM4S SPS-500 SERIES 3-11...
- Page 35 Press and hold this key position during power-up in S-mode. CAS H Press the upper left key of the keyboard, then the lower left key, then the upper right key, and finally press the lower right key. 3-12 SAM4S SPS-500 SERIES...
- Page 36 3 Installation and Operation 3-3 Boot Area Update (Nor Flash A29l800UV) From PC Update Method Remark Enter the system password : 1 2 8 7 Select “Update” from the menu on LCD. SAM4S SPS-500 SERIES 3-13...
- Page 37 3 Installation and Operation 3-3 Boot Area Update (Nor Flash A29l800UV) From PC Update Method Remark Select “BOOT Update” from the menu on LCD. Select “YES” from the menu on LCD. 3-14 SAM4S SPS-500 SERIES...
- Page 38 Press and hold this key position during power-up in S-mode. CAS H Press the upper left key of the keyboard, then the lower left key, then the upper right key, and finally press the lower right key. SAM4S SPS-500 SERIES 3-15...
- Page 39 3 Installation and Operation 3-4 Boot Area Update (Nor Flash A29l800UV) From SD card Update Method Remark Enter the system password : 1 2 8 7 Select “Update” from the menu on LCD. 3-16 SAM4S SPS-500 SERIES...
- Page 40 3 Installation and Operation 3-4 Boot Area Update (Nor Flash A29l800UV) From SD card Update Method Remark Select “Boot Update SD” from the menu on LCD. Select “YES” from the menu on LCD. SAM4S SPS-500 SERIES 3-17...
- Page 41 Press and hold this key position during power-up in S-mode. S UB- TOTL CAS H Press the upper left key of the keyboard, then the lower left key, then the upper right key, and finally press the lower right key. 3-18 SAM4S SPS-500 SERIES...
- Page 42 3 Installation and Operation 3-5 IO Board CPU Update From PC Update Method Remark Select one of three buttons marked in red. Select “YES” from the menu on LCD. SAM4S SPS-500 SERIES 3-19...
- Page 43 Press and hold this key position during power-up in S-mode. S UB- TOTL CAS H Press the upper left key of the keyboard, then the lower left key, then the upper right key, and finally press the lower right key. 3-20 SAM4S SPS-500 SERIES...
- Page 44 3 Installation and Operation 3-6 IO Board CPU Update From SD card Update Method Remark Select one of three button marked in red. Select “YES” from the menu on LCD. SAM4S SPS-500 SERIES 3-21...
- Page 45 Press and hold this key position during power-up in S-mode. S UB- TOTL CAS H Press the upper left key of the keyboard, then the lower left key, then the upper right key, and finally press the lower right key. 3-22 SAM4S SPS-500 SERIES...
- Page 46 3 Installation and Operation 3-7 LCD Board CPU Update From PC Update Method Remark Select one of three button marked in red. Select “YES” from the menu on LCD. SAM4S SPS-500 SERIES 3-23...
- Page 47 Press and hold this key position during power-up in S-mode. S UB- TOTL CAS H Press the upper left key of the keyboard, then the lower left key, then the upper right key, and finally press the lower right key. 3-24 SAM4S SPS-500 SERIES...
- Page 48 3 Installation and Operation 3-8 LCD Board CPU Update From SD card Update Method Remark Select one of three button marked in red. Select “YES” from the menu on LCD. SAM4S SPS-500 SERIES 3-25...
- Page 49 Turn the Power Switch to “ON Position”. After finishing update procedure, the front LEDs blink Return DIP Switch (SW2) state as follows. (Refer to Chapter 11) SW No STATE Note] For more detailed information, Please contact our R&D Institute. 3-26 SAM4S SPS-500 SERIES...
-
Page 50: Hardware Self Test
Press and hold this key position during power-up in S-mode. CAS H Press the upper left key of the keyboard, then the lower left key, then the upper right key, and finally press the lower right key. SAM4S SPS-500 SERIES 3-27... - Page 51 3 Installation and Operation 3-10 Hardware Self Test Test Method Remark Press “Display/Touch” from the main menu in the Touch Screen. Display / Press one of following buttons. Touch 3-28 SAM4S SPS-500 SERIES...
- Page 52 3 Installation and Operation 3-10 Hardware Self Test Test Method Remark Press “SRAM” from the main menu in the Touch Screen. SRAM ** This test will clear all memory. SAM4S SPS-500 SERIES 3-29...
- Page 53 8(CTS) 7(N.C) 9(RI) 8(N.C) ( CONNECTOR CIRCUIT ) LAN (RJ-45) (CONNECTOR CIRCUIT ) COM1,2 (MALE) (IRC Test Connector) (RS-232C Test Connector) Loop Back (RS-232C Test Connector) Press “Loopback” from the main menu in the Touch Screen. 3-30 SAM4S SPS-500 SERIES...
- Page 54 3 Installation and Operation 3-10 Hardware Self Test Test Method Remark Press “Etc” from the main menu in the Touch Screen. This will test flash memory, SD card, Dallas key, MSR, Drawer and Printer. SAM4S SPS-500 SERIES 3-31...
- Page 55 3 Installation and Operation 3-10 Hardware Self Test Test Method Remark Press “RTC” from the main menu in the Touch Screen. Press ”RTC Write” and enter date and time then press “RTC Read” to check the clock. 3-32 SAM4S SPS-500 SERIES...
- Page 56 3 Installation and Operation 3-10 Hardware Self Test Test Method Remark Press “Keyboard” from the main menu in the Touch Screen. Keyboard Test keyboard and mode key. SAM4S SPS-500 SERIES 3-33...
- Page 57 3 Installation and Operation 3-10 Hardware Self Test Test Method Remark Press “Printer” from the main menu in the Touch Screen. Select one of following buttons. Printer 3-34 SAM4S SPS-500 SERIES...
- Page 58 3 Installation and Operation 3-10 Hardware Self Test Test Method Remark Press “SD” from the main menu in the Touch Screen. SD card Press “Check SMC Bad” from the main menu in the Touch Screen. NAND flash block SAM4S SPS-500 SERIES 3-35...
- Page 59 Press and hold this key position during power-up in S-mode. CAS H Press the upper left key of the keyboard, then the lower left key, then the upper right key, and finally press the lower right key. 3-36 SAM4S SPS-500 SERIES...
- Page 60 3 Installation and Operation 3-11 Setup Test Method Remark Press “Setup” from the main menu in the Touch Screen. Press “Write MAC Addr” from the Touch Screen. Write Addr SAM4S SPS-500 SERIES 3-37...
- Page 61 3 Installation and Operation 3-11 Setup Test Method Remark Press “MCR” from the Touch Screen. track info. Press “Printer Density” from the Touch Screen. Printer Density 3-38 SAM4S SPS-500 SERIES...
- Page 62 3 Installation and Operation 3-11 Setup Test Method Remark Press “Select KBD” from the Touch Screen. Keyboard type Press “Power output” from the Touch Screen. Serial Port Power output SAM4S SPS-500 SERIES 3-39...
- Page 63 3 Installation and Operation 3-11 Setup Test Method Remark Press “LCD B-Light Adj” from the Touch Screen. Backlit Adjust 3-40 SAM4S SPS-500 SERIES...
-
Page 64: System Configuration
3 Installation and Operation 3-12 System Configuration 3-12-1 Configuration Figure 3-1 System Configuration SAM4S SPS-500 Series 3-41... -
Page 65: Installation
SRAM 6MByte (2Mbyte * 3) 1Slot Table 3-1 Option 3-13-2 Supplies Item Description Remark SPS-520 : 2 EA Paper Roll SPS-530 : 1EA Mode Key VD, REG, X, Z, P, C User Manual 1 EA Table 3-2 Supplies 3-42 SAM4S SPS-500 Series... - Page 66 3. Ensure that the paper is being fed from the bottom of the roll. Place the roll into the concave bottom of the printer. And put the leading edge of the paper over the printer in Figure3-2-②. 4. Close the printer cover slowly until it locks firmly. 5. Tear off the excess paper. Figure 3-2 Paper Installation (SPS-530) SAM4S SPS-500 Series 3-43...
- Page 67 10. Place the TAKE-UP SPOOL into the HOLDER SPOOL behind the PRINTER(JOURNAL) above the roll paper as illustrated Figure3-3-④. 11. If the paper is loose, rewind the TAKE-UP SPOOL to tighten the paper. Figure 3-3 Paper & Spool Installation 3-44 SAM4S SPS-500 Series...
- Page 68 · Be careful not to bind interface cables and AC power cord together. 1. Cut off the area (MSR assembly area) shown in the Figure 3-4-○ by using a (-) shaped screw driver. 2. Figure 3-4-○ shows the difference before and after. Figure 3-4 MSR Installation (1) SAM4S SPS-500 Series 3-45...
- Page 69 3. Insert MSR Assembly into the main set bracket holes as in Figure 3-5-○ , Figure 3-5-○ 4. Tighten MSR Assembly by moving it to the direction shown in Figure 3-5-○ Figure 3-5 MSR Installation (2) 3-46 SAM4S SPS-500 Series...
- Page 70 3 Installation and Operation 3-13 Installation 3-13-8 Installation of MSR Assembly 1. Figure 3-6 shows the MSR Assembly is in position Figure 3-6 MSR Installation (3) SAM4S SPS-500 Series 3-47...
-
Page 71: Installation Of Memory Card
Turn off the system mains power before attempting to install Memory Card. If Memory Card is installed while power is on, the system will seriously be damaged. 1. Unscrew Memory Card Cover by using a (+) shaped screw driver, Figure 3-7. Figure 3-7 Memory Card Installation (1) 3-48 SAM4S SPS-500 Series... - Page 72 (1) If no Memory inserted: 200000 will be shown. (2) If 2MB Memory inserted: 400000 will be shown. (3) If 6MB Memory inserted: 800000 will be shown Figure 3-8 Memory Card Installation (2) SAM4S SPS-500 Series 3-49...
- Page 73 Turn off the system mains power before attempting to uninstall Memory Card. If Memory Card is uninstalled while power is on, the system will seriously be damaged. 1. Unscrew Memory Card Cover by using a (+) shaped screw driver, Figure 3-9. Figure 3-9 Memory Card Uninstallation (1) 3-50 SAM4S SPS-500 Series...
- Page 74 2. Push the rounded area as shown in the Figure 3-10-○ by using a sharp object, i.e. pin or paper clip, Memory Card will be ejected. 3. Take Memory Card as shown in Figure 3-10-○ Figure 3-10 Memory Card Uninstallation (2) SAM4S SPS-500 Series 3-51...
-
Page 75: Operation
Off, Register, Manager, Clear Totals Void, Off, Register, Manager, Clear Totals, Program Void, Off, Register, Manager, Clear Totals, Program, Service Mode Table3-4 Key Function Note : Key can be removed from the key lock in the OFF or REG position. 3-52 SAM4S SPS-500 Series... -
Page 76: All Clear
5. When the buzzer beeps, press the upper left key of the keyboard, then the lower left key, then the upper right key, and finally press the lower right key. 6. Press REG NO(1-32) and ‘ENTER’ SAM4S SPS-500 Series 3-53... - Page 77 3 Installation and Operation Memo 3-54 SAM4S SPS-500 Series...
-
Page 78: Disassembly And Assembly
2. Remove the four screws(C-15 and C-20) on the ASS'Y COVER MODE S/W and separate the ASS'Y SWITCH ROTARY (Reference:C-16), LED BOARD(C-19) from the COVER MODE S/W(C-12). (Page7-5) 3. Remove the two screws(C-13) on the ASS'Y SWITCH ROTARY(Reference:C-16) and separate the BRKT MODE SWITCH(C-14) and the SWITCH ROTARY (C-16). (Page7-5) SAM4S SPS-500 SERIES... - Page 79 2. Lift up the ASS'Y DALLAS KEY. 3. If don’t use it, only lift up COVER FRONT(G-57) from the ASS'Y CASE LOWER(G).(Page7-15,Page7-18) Note There are three types in DALLAS KEY; ADDIMAT KEY, DALLAS KEY or ADDIMAT KEY SAM4S SPS-500 SERIES...
- Page 80 5-3. Remove the screw (E-10) and separate the SWITCH MICRO(E-11) from the BOTTOM CUTTER(E-15). 5-4. Remove the two screws (E-14). Move the MOTOR ASS'Y(E-16) right slow and Put it down vertically not to touch the PINION GEAR of the MOTOR ASS'Y(E-16) to the BOTTOM CUTTER(E-15). SAM4S SPS-500 SERIES...
- Page 81 4 Assembly and Disassembly MEMO SAM4S SPS-500 SERIES...
-
Page 82: Maintenance And Adjustment
Caution: Note that the thermal head(Thermal Element and Radiation Plate) becomes very hot during normal operation. To prevent the danger of burn injury from thermal, be sure to wait for about 10 minutes after turning power off before beginning the cleaning. SAM4S SPS-500 SERIES... - Page 83 1. Turn the ORANGE KNOB clockwise until the buzzer beep stops as illustrated Figure5-2. 2. Push the ORANGE CAP LEVER towards the rear of the PRINTER and lift up to open the PRINTER COVER. 3. Remove the jammed paper at the PRINTER. Figure 5-2 Removing Paper Jam (SPS-520) SAM4S SPS-500 SERIES...
- Page 84 1. Lift it off COVER. (Figure 5-3-①) 2. Turn the KNOB(Orange color) forward or backward until the buzzer beep stops as illustrated Figure5-3-②. 3. Remove the jammed paper from the PRINTER. Figure 5-3 Removing Paper Jam (SPS-530) SAM4S SPS-500 SERIES...
- Page 85 5 Maintenance and Adjustment MEMO SAM4S SPS-500 SERIES...
-
Page 86: Troubleshooting
6-1-3 LCD B’D power-up sequence The micom (ATMEGA8) is reset. The power(5V) LED are light on LCD B’D The Rear 2Line LCD are displayed And than, LED B’D is waiting for communication with main B’D. SAM4S SPS-500 SERIES... -
Page 87: Power Problem
Measure other voltage.(Ex : VLCD3.3V,VDD3.3V, VLVOLT4.2V) If these voltages above mentioned do not go out, check the appropriate regulator or component. And check power line is short or open. NOTE : During servicing & repairing, Be careful against receiving an electric-shock. SAM4S SPS-500 SERIES... - Page 88 → If the program is erased or broken during program upgrade, boot error is occurred. → In this case, Perform are-download use to the sd-card or lan → For program download or upgrade, refer the chapter 3. SAM4S SPS-500 SERIES...
-
Page 89: Battery Problem
Never short circuit the battery. It is caused that back-up data is gone. Do not use CR2032 battery. The CR2032 is not rechargeable battery. Charging problem → Check relate component & circuit. Battery change → Before changing the battery, make sure save the data on SRAM. SAM4S SPS-500 SERIES... - Page 90 → Performs the SDCARD test at H/W test mode. → Check the harness between SD B’D and MAIN B’D, if it is connected or not. → Check the 10-Pin harness, it is OK or not. → Check related circuit & component whether short or not. SAM4S SPS-500 SERIES...
- Page 91 → Check related circuit & component whether short or not. 6-6-5 LED B’D problem Operation Fail → Performs the LED test at H/W test mode. → Check the harness between LED B’D to LCD B’D. → Check related circuit & component whether short or not. SAM4S SPS-500 SERIES...
- Page 92 → Check the harness between PRINTER and IO B’D, if it is connected or not. → Check the Driver (TEA3718, U24) enable signal. → Check the sensor’s input. → Check related circuit & component whether short or not. SAM4S SPS-500 SERIES...
-
Page 93: Exploded Views And Parts List
7 Exploded Views and Parts List 7-1 Main Set 7-1-1 Exploded View Figure7-1 Total Disassembly (SPS-520 / SPS-530) SAM4S SPS-500 SERIES... - Page 94 RMO-RUBBER TAPE LCD(L) JK07-00017B DISPLAY-LCD;7" TFT,40P,CPT,0.5mm, JK70-60047A RMO-RUBBER LCD(C) ORANGE JK70-60040A RMO-RUBBER LCD(L) GRAY 6001-000665 SCREW-MACHINE:PWH,+,M3,L4 JK70-20124A IPR-BRKT LCD JK72-20326A PMO-LCD_REAR,BLACK JK70-50044A SCREW-TAPTITE;PWH,+,M3,L10,BLACK 6001-000665 SCREW-MACHINE:PWH,+,M3,L4 JK75-20069A MEC-HINGE ASS'Y LCD JK70-60044A RMO-CAP RUBBER,BLK JK70-50044A SCREW-TAPTITE;PWH,+,M3,L10,BLK JK72-20325A PMO-LCD_HOLDER,BLACK JK70-50091A SCREW-MACHINE;PWH,+,M4,L8 SAM4S SPS-500 SERIES...
- Page 95 7-1 Main Set 7-1-2 B. ASS’Y-COVER PRINTER (SPS-520) Figure7-3 ASS’Y-COVER PRINTER (SPS-520) 7-1-2 B. ASS’Y-COVER PRINTER(SPS-520) Parts No. Description / Specification Q`ty Design-Location Serviceable Remark JK72-20026A PMO-WINDOW JOURNAL JK97-20089A ASSY-COVER PRINTER 2INCH SAM4S JK72-20038B PMO-GUIDE CUTTER JK70-50096A SCREW-TAPPING:PWH,+,2,M3,L5,BLACK SAM4S SPS-500 SERIES...
- Page 96 7 Exploded View and Parts List 7-1 Main Set 7-1-2 B. ASS’Y-COVER PRINTER (SPS-530) Figure7-4 ASS’Y-COVER PRINTER (SPS-530) 7-1-2 B. ASS’Y-COVER PRINTER(SPS-530) Parts No. Description / Specification Q`ty Design-Location Serviceable Remark JK96-10360A ELA-COVER PRINTER 3INCH;SPS-500 SAM4S JK72-20315A PMO-COVER_PRINTER (3INCH) JK97-20087A ASSY-JOURNAL 3INCH SAM4S SPS-500 SERIES...
- Page 97 7 Exploded View and Parts List 7-1 Main Set 7-1-2 C. ASS’Y-CASE UPPER Figure7-5 ASS’Y-CASE UPPER SAM4S SPS-500 SERIES...
- Page 98 JK92-01614D PBA SUB:SPS-500,LED B'D 6002-000319 SCREW-TAPPING:PH,+,2,M3,L8 JK72-20308A PMO-CASE_UPPER,BLACK JK70-20122A IPR-BRKT SD JK92-01614B PBA SUB:SPS-500,SD B'D 6002-000174 SCREW-TAPPING:PWH,+,2,M3,L10 6001-000665 SCREW-MACHINE:PWH,+,M3,L4 JK39-40756A HARNESS-SD JK39-40750B HARNESS-LCD,30P JK39-40750A HARNESS-LCD,20P JK70-60050A RMO-LCD PROTECT: JK70-50095A SCREW-MACHINE:FH,+,M4,L10 JK70-50086A SCREW-TAPPING:PH,+,2S,M4,L10 JK70-50044A SCREW-TAPTITE;PWH,+,M3,L10 JK92-01613A PBA LCD:SPS-500 SAM4S SPS-500 SERIES...
- Page 99 7 Exploded View and Parts List 7-1 Main Set 7-1-2 D. ASS’Y-PRINTER (SPS-520) Figure7-6 ASS’Y-PRINTER (SPS-520) SAM4S SPS-500 SERIES...
- Page 100 JK96-01231ALF ELA P/END SENSOR JK70-50009A SCREW-MACHINE:RH,+,M2,L4,ZPC(WHITE) JK96-10301A ASSY-TPH:ELLIX10P,STM-210(H) 31-1 JK70-20005A IPR-BRACKET-REAR 31-2 6001-000665 SCREW-MACHINE:PWH,+,M3,L4 31-3 JK70-30002A SPRING-TPH:STM-210,SWP-B,Φ0.7 31-4 JK97-10004C ASSY-TPH,HEAT SINK:ELLIX10P,STM-210(H) JK72-20330A PMO-PAPER SUPPLY;STM-210II JK92-01224BLF PBA SUB-PRT CONN BOARD 6002-000175 SCREW-TAPPING:PWH,+,2,M3,L8 6002-000147 SCREW TAPPING: PH,+,2,M3,L10,ZPC(YEL) JK72-20009B PMO-COVER-FRONT,BLK SAM4S SPS-500 SERIES...
- Page 101 7 Exploded View and Parts List 7-1 Main Set 7-1-2 D. ASS’Y-PRINTER(SPS-530) Figure7-7 ASS’Y-PRINTER (SPS-530) SAM4S SPS-500 SERIES...
- Page 102 6002-000174 SCREW-TAPPING:PWH,+,2,M3,L10 JK72-20312A PMO-COVER_MECHA:HIPS(HB),BLACK JK70-50087A SCREW-TAPPING;PWH,+,M2.6,L6 JK72-20327A PMO-LEVER LOCK:HIPS(HB),ORANGE 6001-000485 SCREW-MACHINE:PH,+,M2.6,L4 JK70-50044A SCREW-TAPTITE;PWH,+,M3,L10,BLK 6001-000665 SCREW-MACHINE:PWH,+,M3,L4 JK72-40330A PMO-ROLLER PAPER/END JK72-20331A PMO-PAPER SUPPLY (3 INCH) JK92-01617A PBA SUB:SPS-530,JOINT B'D 6002-000175 SCREW-TAPPING:PWH,+,2,M3,L8 JK39-50004A CABLE-FFC:28P,1.25mm,80mm,TPH CABLE JK39-40564A CBF SIGNAL-PRINTER FFC:SMP-2000,27P,250M 7-10 SAM4S SPS-500 SERIES...
- Page 103 7 Exploded View and Parts List 7-1 Main Set 7-1-2 E. ASS’Y-CUTTER(SAC-70) Figure7-8 ASS’Y-CUTTER (SAC-70) SAM4S SPS-500 SERIES 7-11...
- Page 104 7 Exploded View and Parts List 7-1 Main Set 7-1-2 E. ASS’Y-CUTTER(SAC-70) Figure7-9 Lubrication Points of the Auto-Cutter (SAC-70) Code No. Description / Specification Q`ty Serviceable Remark 0201-002006 GREASE:KANTOKASEI,KG-397M Minimum Serviceable Packing Weight : 40g 7-12 SAM4S SPS-500 SERIES...
- Page 105 SCREW-MACHINE*PWH,+,M2.6,L5.5 JK72-20033A PMO-GEAR CAM,NATURAL JK70-50074A SCREW-MACHINE:RH,+,M1.7,L6 3405-001019 SWITCH-MICRO JK72-20032A PMO-GEAR REDUCTION JK72-20031A PMO-GEAR KNOB JK70-50030A SCREW-MACHINE:RH,+,M2,L3 JK97-20001A BOTTOM CUTTER ASS'Y JK97-10011B ASSY-MOTOR DC JK39-40558A CBF HARNESS-AUTO CUTTER JK72-20218A PMO-COVER DUST JK70-50030A SCREW-MACHINE:RH,+,M2,L3 6003-000198 SCREW-TAPPING:PWH,+,2,M3,L12 JK72-20320A PMO-HOLDER_CUTTER SAM4S SPS-500 SERIES 7-13...
- Page 106 7 Exploded View and Parts List 7-1 Main Set 7-1-2 F. ASS’Y-KEYBOARD (90KEY) Figure7-10 ASS’Y KEYBAORD (90 Key) 7-14 SAM4S SPS-500 SERIES...
- Page 107 KEY TOP_1X1:BLACK JK81-20061A RETURN-SPRING JK81-20057C KEY CAP_2X1 JK81-20057E KEY TOP_1X2:BLACK JK81-20057B KEY TOP_2X1:BLACK JK81-20054A PMO-KBD FRAME_90,RAISED 6002-000175 SCREW-TAPPING:PWH,+,2,M3,L8 JK81-20054D CONTACT-RUBBER_90,RAISED JK81-20054C ASSY-FPC,90KEY,RAISED JK81-20054B IPR-BOTTOM PLATE_90,RAISED 6002-000175 SCREW-TAPPING:PWH,+,2,M3,L8 JK72-20263AB PMO-KBD HOUSING(90):BLACK JK72-20239AB PMO-BLANK KEY_5X1:BLACK JK72-20238AB PMO-BLANK KEY_1X1:BLACK SAM4S SPS-500 SERIES 7-15...
- Page 108 7 Exploded View and Parts List 7-1 Main Set 7-1-2 F. ASS’Y-KEYBOARD (160KEY) Figure7-11 ASS’Y KEYBAORD (160 Key) 7-16 SAM4S SPS-500 SERIES...
- Page 109 7-1 Main Set 7-1-2 F. ASS’Y-KEYBOARD (160KEY) Parts No. Description / Specification Q`ty Design-Location Serviceable Remark JK59-30016AB UNIT-KEYBOARD:SPS-500(STD),R-FLAT JK73-20218A RMO-WATER PROOF JK68-40012U LABEL(P)-KBD SHEET: SER-7000(CRS) JK81-20018AB PMO-KBD FRAME;160KEY,FLAT,BLACK JK81-20019A CONTACT RUBBER:160KEY,FLAT JK81-20072A ASSY-FPC,160KEY,FLAT JK81-20022A IPR-BOTTOM PLATE:160KEY,FLAT JK81-20058A AS-SCREW-TAPPING(BH)2.6X6 SAM4S SPS-500 SERIES 7-17...
- Page 110 7 Exploded View and Parts List 7-1 Main Set 7-1-2 G. ASS’Y-CASE LOWER Figure7-12 ASS’Y-CASE LOWER 7-18 SAM4S SPS-500 SERIES...
- Page 111 JK70-20123A IPR-BRKT SMPS:SECC T1.0 JK44-40008A POWER-SMPS 6002-000174 SCREW-TAPPING:PWH,+,2,M3,L10 JK60-00001A SCREW-ASSY TAPTITE JK70-20121A IPR-BRKT INTERFACE JK70-70047A ICT-SHAFT DOOR 6002-000171 SCREW-TAPPING:PH,+,2S,M4,L10 JK70-10002A IPR-BRKT CASING JK72-20307A PMO-CASE LOWER JK72-20318A PMO-DOOR_INTERFACE JK39-40688A HARNESS-POWER S/W JK39-20006B POWER CORD:USA JK70-50052A SCREW-DELTA PT SAM4S SPS-500 SERIES 7-19...
- Page 112 DALLAS JK96-20090A ELA UNIT-HOLDER DALLAS JK72-20311A PMO-COVER_DUMMY W/O DALLAS JK39-40754A HARNESS-DRAWER JK75-20083BN MEC-DRAWER G85YPB-24M(CRS) :5B8C JK96-10047D ELA HOU-KEYBOARD;BLK FLAT JK70-50014A SCREW-MACHINE:BH,+,M2.6,L3 SPS-520 JK75-20002A MEC-BRKT SPOOL JK96-10361A ELA-UNIT PRINTER JK39-40761A HARNESS-GND SPS-530 6003-000198 SCREW-TAPPING:PWH,+,2,M3,L12 JK39-40564A CBF SIGNAL-PRINTER 7-20 SAM4S SPS-500 SERIES...
- Page 113 Figure7-13 ASS’Y MSR 7-1-2 H. ASS’Y-MSR Parts No. Description / Specification Q`ty Design-Location Serviceable Remark JK70-50044A SCREW-TAPTITE;PWH,+,M3,L10 JK72-20328A PMO-MSR_LOWER 6002-000174 SCREW-TAPPING:PWH,+,2,M3,L10 6001-000665 SCREW-MACHINE:PWH,+,M3,L4 JK39-40758A HARNESS-GND JK70-20126A IPR-HOLDER MSR JK39-40757A HARNESS-MSR:8P JK48-00004B MSR:MSR-1250-SH-4B,TRACK1-2 JK48-00003B MSR:MSR-1260-SH-3B,TRACK2-3 JK72-20329A PMO-MSR UPPER SAM4S SPS-500 SERIES 7-21...
- Page 114 7 Exploded View and Parts List 7-2 DRAWER 7-2-1. I. ASS’Y-DRAWER (Aplus DRAWER) Figure7-14 ASS’Y Drawer (Aplus) 7-22 SAM4S SPS-500 SERIES...
- Page 115 7-2-1. I. ASS’Y-DRAWER (Aplus DRAWER) Figure 7-15. Lubrication Points of the Aplus Drawer Code No. Description / Specification Q`ty Serviceable Remark 0201-002010 GREASE-N2 Minimum Serviceable Packing Weight : 40g 0201-002009 GREASE-N1 Minimum Serviceable Packing Weight : 40g SAM4S SPS-500 SERIES 7-23...
- Page 116 JK97-20062H MEA-UNIT HOUSING : NONE HOLE BLACK JK72-20256A PMO-COVER DECO JK72-20257A PMO-COVER FRONT WHITE JK72-20257B PMO-COVER FRONT BLACK JK70-20062G IPR-HOUSING DRAWER : NONE HOLE WHITE JK70-20062H IPR-HOUSING DRAWER : NONE HOLE BLACK JK70-50070A SCREW-TAPTITE : BLACK 7-24 SAM4S SPS-500 SERIES...
- Page 117 JK72-20255D PMO-COVER BOTTOM : NO LOGO BLACK JK61-40201A FOOT JK81-20064B AS-RAIL OUTER RH 5B6C 6003-000267 SCREW-TAPTITE Jk70-50073A SCREW-DELTA PT WHITE Jk70-50073B SCREW-DELTA PT BLACK JK39-60071A CABLE-DRAWER : RJ-11, 1M WHITE JK39-60071B CABLE-DRAWER : RJ-11, 1M BLACK SAM4S SPS-500 SERIES 7-25...
- Page 118 1SET JK70-20075D IPR-KEY DRAWER : KEY NO.3355 1SET JK70-20075E IPR-KEY DRAWER : KEY NO.4224 1SET JK70-20075F IPR-KEY DRAWER : KEY NO.4242 1SET JK70-20075G IPR-KEY DRAWER : KEY NO.5355 1SET JK70-20075H IPR-KEY DRAWER : KEY NO.5535 1SET 7-26 SAM4S SPS-500 SERIES...
- Page 119 7 Exploded View and Parts List 7-2 DRAWER 7-2-2. I. ASS’Y-DRAWER (G-DRAWER:4B8C,5B6C) A.ASS’Y BILL- COIN (4B8C) A.ASS’Y B.ASS’Y BILL- HOU- COIN SING (5B6C) C.ASS’Y LOCK E.ASS’Y TRAY D.ASS’Y BOT- Figure7-16 ASS’Y-DRAWER (G-DRAWER:4B8C,5B6C) SAM4S SPS-500 SERIES 7-27...
- Page 120 7-2 DRAWER 7-2-2. I. ASS’Y-DRAWER (G-DRAWER:4B8C,5B6C) Figure 7-17 Lubrication Points of the G-Drawer(4B8C,5B6C) Code No. Description / Specification Q`ty Serviceable Remark 0201-002010 GREASE-N2 Minimum Serviceable Packing Weight : 40g 0201-002009 GREASE-N1 Minimum Serviceable Packing Weight : 40g 7-28 SAM4S SPS-500 SERIES...
- Page 121 MEA-UNIT LOCK(12V,COM) JK97-20093D MEA-UNIT LOCK(24V,COM) JK33-10500A SOLENOID-DC: 24V JK33-10500D SOLENOID-DC: 12V 6001-000525 SCREW-TAPTITE: M3,L14 JK70-50079A SCREW-TAPTITE: M3,L5 JK39-40301R CBF HARNESS : MICRO S/W 6107-001041 SPRING-LOCK LEVER JK97-01080B MEC-SUB LOCK JK70-30019A SPRING-PUSH JK70-50090A PLAIN-WASHER JK70-50092A SCREW-TAPTITE: M5,L10 SAM4S SPS-500 SERIES 7-29...
- Page 122 JK70-20108C IPR-FRONT PANEL(4B8C,WHT) JK70-20108D IPR-FRONT PANEL(4B8C,BLK) Jk75-20067A MEC-KEY LOCK JK75-20041A MEC-KEY LOCK: #2424 OPTION JK70-20025B IPR-KEY DRAWER 1SET JK70-20075A IPR-KEY DRAWER: #2424 1SET OPTION 6044-000231 RING-E: ID5 JK70-20074A IPR-LEVER LOCK JK70-20120A IPR-DUMMY KEY JK70-50094A SCREW-TAPTITE: M3,L8 7-30 SAM4S SPS-500 SERIES...
- Page 123 7 Exploded View and Parts List 7-2 DRAWER 7-2-2. I. ASS’Y-DRAWER (G-DRAWER:5B8C) A.ASS’Y BILL- COIN (5B8C) B.ASS’Y HOU- SING C.ASS’Y LOCK E.ASS’Y TRAY D.ASS’Y BOT- Figure7-18 ASS’Y-DRAWER (G-DRAWER:5B8C) SAM4S SPS-500 SERIES 7-31...
- Page 124 7-2 DRAWER 7-2-2. I. ASS’Y-DRAWER (G-DRAWER:5B8C) Figure 7-19 Lubrication Points of the G-Drawer(5B8C) Code No. Description / Specification Q`ty Serviceable Remark 0201-002010 GREASE-N2 Minimum Serviceable Packing Weight : 40g 0201-002009 GREASE-N1 Minimum Serviceable Packing Weight : 40g 7-32 SAM4S SPS-500 SERIES...
- Page 125 MEA-UNIT LOCK(12V,COM) JK97-20093D MEA-UNIT LOCK(24V,COM) JK33-10500A SOLENOID-DC: 24V JK33-10500D SOLENOID-DC: 12V 6001-000525 SCREW-TAPTITE: M3,L14 JK70-50079A SCREW-TAPTITE: M3,L5 JK39-40301R CBF HARNESS : MICRO S/W 6107-001041 SPRING-LOCK LEVER JK97-01080B MEC-SUB LOCK JK70-30019A SPRING-PUSH JK70-50090A PLAIN-WASHER JK70-50092A SCREW-TAPTITE: M5,L10 SAM4S SPS-500 SERIES 7-33...
- Page 126 ICT-SHAFT LEVER PUSH JK70-20116A IPR-LEVER PUSH JK70-10323A IPR-PLATE CLIP 6003-000266 SCREW-TAPTITE: M3,L6 JK70-20108D IPR-FRONT PANEL 6044-000231 RING-E: ID5 JK70-20074A IPR-LEVER LOCK JK70-20120A IPR-DUMMY KEY JK75-20041A MEC-KEY LOCK: #2424 JK70-20075A IPR-KEY DRAWER: #2424 1SET JK70-50094A SCREW-TAPTITE: M3,L8 7-34 SAM4S SPS-500 SERIES...
- Page 127 8 PCB Layout and Parts List 8-1 Main PCB SAM4S SPS-500 SERIES...
- Page 128 IC-FLASH MEMORY;A29L800UV-70,TSOP,48P 1107-001140 IC-FLASH:K9F1208U0A-PCB0,TSOP1,NAND 1203-000500 IC-RESET;AME8500AEETAE29Z,SOT-23,3P 1203-001764 IC-REGULATOR;AME88051EGTZ,1.3V,SOT-223 1203-001765 IC-REGULATOR;AME8807AEHAZ,SOP,8P 1203-001766 IC-REGULATOR;AME8816AEDV-3.3V,TO-263-5 2008-000001 R-CHIP:0 OHM,5%,1/10W,1608 R9,R31,R37,R40 2008-000008 R-CHIP:100 OHM,5%,1/10W,1608 R35,R52 2008-000020 R-CHIP:470 OHM,5%,1/10W,1608 2008-000026 R-CHIP:1KOHM,1%,1/10W,1608,1% R6,R7,R53 2008-000028 R-CHIP:1.5KOHM,1%,1/10W,1608,1% 2008-000030 R-CHIP:2KOHM,5%,1/10W,1608 R2-R5,R8,R11-R16,R18, R25,R27,R28,R32-R34, 2008-000037 R-CHIP:4.7KOHM,1%,1/10W,1608,1% R41,R45,R54,R56,R58, R59,R60 2008-000041 R-CHIP:6.8KOHM,1%,1/10W,1608,1% SAM4S SPS-500 SERIES...
- Page 129 2204-000018 C-CERAMIC,CHIP:1nF,10%,50V,X7R,1608 C1,C26,C27 C2-C18,C20-C23,C30-C32 2204-000028 C-CERAMIC,CHIP:100nF,+80-20%,25V,Y5V,160 C34-C44,C46-C52,C56, C58,C60-C66 2204-000035 C-CERAMIC,CHIP:1.2nF,10%,50V,X7R,1608 2205-000002 C-TANTAL:10uF,16V,3528 CE4,CE5,CE7-CE9 2402-000168 C-AL,SMD:100uF,20%,16V,GP,TP,8.3x8.3x6.3 CE1-CE3,CE6 2801-000111 CRYSTAL-SMD:32.768KHz,20ppm,28-AAW,20pF 2801-003383 CRYSTAL-SMD:16.9344MHz,SX-1,20pF 2801-003384 CRYSTAL-SMD:SX-1,22.1184MHZ,30ppm,18pF 2801-003389 CRYSTAL-SMD:25MHz,SX-1,20pF 3711-004119 WAFER;BOX-HEADER,1R, 4P,1.25mm,SMD,IVY 3711-004125 WAFER;BOX-HEADER,1R,10P,1.25mm,SMD 3712-000027 CONN-BOX;RECEPTACLE,51P,1MM,ST,HRS CN4,CN5 3712-000062 CONN-CF:HEADER,50P,RIGHT BUTTON,HRS JK41-10730A PCB-MAIN:SPS-500,FR-4,6L,T1.6 SAM4S SPS-500 SERIES...
- Page 130 8 PCB Layout and Parts List 8-2 I/O PCB SAM4S SPS-500 SERIES...
- Page 131 3711-004100 WAFER;BOX-HEADER,1R,2P,2.5mm,ST,WHITE CN10,CN11 3711-004105 WAFER;BOX-HEADER,1R,4P,2.5mm,ST,WHITE 3712-000047 CONNECTOR-DSUB;9P(M),2-PORT,DUAL TYPE 3712-000048 CONNECTOR-USB HOST:USB A TYPE,DIP 3722-000001 JACK-MODULAR:12P/2C,-,AU,GRAY,- 3722-000211 JACK-MODULAR:8P/8C,2R,RJ-45,BLK 3722-001044 JACK-MODULAR:12P,LED GRN/YEL,DIP MANUFACTURE DATE JC68-10564A LABEL(P)-PROTECTOR:SLB-3108H,ART,-,100 ROM VER. 0402-001189 DIODE-RECTIFIER:S1G-E3,M4,400V D1-D6,D11,D13,D14 0403-000755 DIODE-ZENER:BZT52C6V2,6.2V,500mW,SOD-123 0404-001051 DIODE-SCHOTTKY:SK14,40V,1A,DO-214AA, D7-D9 0404-001052 DIODE-SCHOTTKY:BAT43WS,BAT54WS,30V D10,D12,D15-D35 SAM4S SPS-500 SERIES...
- Page 132 U1,U2 2008-000001 R-CHIP:0 OHM,5%,1/10W,1608 R105 2008-000003 R-CHIP:22 OHM,5%,1/10W,1608 R14,R15,R183,R184 2008-000006 R-CHIP:56 OHM,5%,1/10W,1608 R7,R8,R11,R12 R6,R10,R50,R51,R74,R82, 2008-000008 R-CHIP:100 OHM,5%,1/10W,1608 R92,R110,R115,R130,R147 ,R152 2008-000012 R-CHIP:200 OHM,5%,1/10W,1608 R88,R89 2008-000015 R-CHIP:270 OHM,5%,1/10W,1608 R135,R140 R98,R101,R136,R137, 2008-000016 R-CHIP:300 OHM,5%,1/10W,1608 R141,R142 R17,R18,R91,R93,R106, 2008-000020 R-CHIP:470 OHM,5%,1/10W,1608 R145,R150 SAM4S SPS-500 SERIES...
- Page 133 R162 2008-000056 R-CHIP:47KOHM,1%,1/10W,1608,1% R94,R96,R133,R138 2008-000057 R-CHIP:56KOHM,5%,1/10W,1608 R83,R103,R114 2008-000063 R-CHIP:100KOHM,5%,1/10W,1608 R19,R21,R58,R111 2008-000065 R-CHIP:150KOHM,1%,1/10W,1608,1% R86,R122,R126 2011-001092 R-NETWORK:47ohm,5%,1/16W,L,CHIP,8P,TP RA1-RA5 C54-C56,C69,C74,C88, 2203-000192 C-CERAMIC,CHIP:100nF,+80-20%,50V,Y5V,TP C97,C100,C101, C103-C106,C108-C113 2203-000239 C-CERAMIC,CHIP:0.1nF,5%,50V,NP0,TP,2012 C80,C82,C94 2204-000004 C-CERAMIC,CHIP:22pF,5%,50V,1608 C73,C87 2204-000010 C-CERAMIC,CHIP:100pF,5%,50V,1608 C53,C71 C13,C14,C16,C17,C19, 2204-000015 C-CERAMIC,CHIP:470pF,5%,50V,1608 C20,C22-C31 2204-000017 C-CERAMIC,CHIP:820pF,5%,50V,1608 C67,C75,C79,C89,C98 SAM4S SPS-500 SERIES...
- Page 134 2801-003380 CRYSTAL-SMD:9.216MHZ,SX-1,20pF 3301-002000 CORE-MULTILAYER CHIP BEAD:CB,SMD,1608 3603-000001 POLY-SW;MINISMDC110F,6V,1.1A,SMD U15,U16 3711-000835 CON-HEADER:BOX,20P,2R,1.25MM,ST,SMD CN14 3711-000839 CON-HEADER:BOX,30P,2R,1.25MM,ST,SMD CN16 3711-004109 WAFER;BOX-HEADER,1R,8P,2.5mm,ST,WHITE CN21 3711-004118 WAFER;BOX-HEADER,1R, 3P,1.25mm,SMD CN22 3711-004123 WAFER;BOX-HEADER,1R, 8P,1.25mm,SMD CN20 3711-004128 WAFER;BOX-HEADER,1R, 5P,1.25mm,SMD CN26 3712-000028 CONNECTOR-BOX;HEADER,51P,1MM,ST,HRS CN9,CN13 JK27-60102A L-COIL:BDS-1055R,33uH,SMD,IND-330M-SM-12 JK41-10731A PCB-I/O:SPS-500,FR-4,2L,T1.6 SAM4S SPS-500 SERIES...
- Page 135 JK41-10739A PCB-CF CARD:SPS-500,FR-4,4L,T0.7 [2MByte] Part-No Description / Specification Q'TY Design-location Serviceable Remark JK92-01611B PBA CF:SPS-500,2MBYTE ASS’Y 3712-000063 CONNECTOR-CF CASE:50P,AUK CASE 3712-000064 CONNECTOR-CF CARD:50P,1.27mm,AUK JK68-40139A LABEL(P)-CF CARD:ART 100gr,35X30 CASE JC68-10564A LABEL(P)-PROTECTOR:SLB-3108H,ART,-,100 MANUFACTURE DATE 1106-001228 IC-SRAM:R1LV1616RSD-7SI,2MBYTE,uTSOP,52P 2204-000028 C-CERAMIC,CHIP:100nF,+80-20%,25V,Y5V,160 JK41-10739A PCB-CF CARD:SPS-500,FR-4,4L,T0.7 SAM4S SPS-500 SERIES...
- Page 136 Description / Specification Q'TY Design-location Serviceable Remark JK92-01613A PBA LCD:SPS-500,STD ASS’Y JC68-10564A LABEL(P)-PROTECTOR:SLB-3108H,ART,-,100 MANUFACTURE DATE 0403-000757 DIODE-ZENER:BZX84C3V3F,3.3V,300mW,SOT-23 0404-001052 DIODE-SCHOTTKY:BAT43WS,BAT54WS,30V D2-D9 0501-000457 TR-SMALL SIGNAL:MMBT2222A,NPN,350MW,SOT 0602-000001 LED;SSC-UR101,RED,1608,SMD LED1,LED2 0801-000887 IC-CMOS LOGIC:74HCT08,AND GATE,SOP,14P 0903-001170 IC-CPU:ATMEGA8-16AU,TQFP,32P 1006-000301 IC-TRANSCEIVER;DS90LV028A,SOIC8,LVDS-TTL 1203-001765 IC-REGULATOR;AME8807AEHAZ,SOP,8P 1203-001766 IC-REGULATOR;AME8816AEDV-3.3V,TO-263-5 8-10 SAM4S SPS-500 SERIES...
- Page 137 2204-000003 C-CERAMIC,CHIP:15pF,5%,50V,1608 C9,C11 2204-000010 C-CERAMIC,CHIP:100pF,5%,50V,1608 2204-000018 C-CERAMIC,CHIP:1nF,10%,50V,X7R,1608 C3,C4,C8,C10,C12,C14, 2204-000028 C-CERAMIC,CHIP:100nF,+80-20%,25V,Y5V,160 2204-000029 C-CERAMIC,CHIP:1uF,+80-20%,16V,Y5V,1608 2402-000168 C-AL,SMD:100uF,20%,16V,GP,TP,8.3x8.3x6.3 CE3-CE6 2801-003382 CRYSTAL-SMD:14.7456MHZ,SX-1,18pF 3708-001405 CON-FFC:4P,1mm,VERTICAL,SMD,NO-ZIP 3708-001410 CON-FFC:40P,0.5mm,VERTICAL,SMD,ZIP 3711-000835 CON-HEADER:BOX,20P,2R,1.25MM,ST,SMD 3711-000839 CON-HEADER:BOX,30P,2R,1.25MM,ST,SMD 3711-004118 WAFER;BOX-HEADER,1R, 3P,1.25mm,SMD 3711-004121 WAFER;BOX-HEADER,1R, 6P,1.25mm,SMD 3711-004123 WAFER;BOX-HEADER,1R, 8P,1.25mm,SMD JK41-10732A PCB-LCD:SPS-500,FR-4,2L,T1.6 SAM4S SPS-500 SERIES 8-11...
- Page 138 0801-000490 IC-CMOS LOGIC:74HCT164,8bit SERIAL to PA 2008-000044 R-CHIP:10KOHM,1%,1/10W,1608,1% 2008-000063 R-CHIP:100KOHM,5%,1/10W,1608 2204-000004 C-CERAMIC,CHIP:22pF,5%,50V,1608 2204-000029 C-CERAMIC,CHIP:1uF,+80-20%,16V,Y5V,1608 CC1-CC4 3711-004125 WAFER;BOX-HEADER,1R,10P,1.25mm,SMD SCN1 3711-004128 WAFER;BOX-HEADER,1R, 5P,1.25mm,SMD UCN2 3711-004133 WAFER;BOX:1R,3P,1.25mm,AN,IVR,12505WR-03 LCN1 3711-004138 WAFER;BOX:1R,8P,1.25mm,AN,IVR,12505WR-08 CCN2 3712-000054 CONNECTOR-USB:A-TYPE,QBIG,4P,1R,AN,SMD UCN1 3712-000060 CONNECTOR-SD CARD:SMD,12P,RoHS SCN2 JK41-10735A PCB-SD,CONV,LED,USB:SPS-500,FR-R,2L,T1.6 8-12 SAM4S SPS-500 SERIES...
- Page 139 LED HARNESS 3711-004133 WAFER;BOX:1R,3P,1.25mm,AN,IVR,12505WR-03 LCN1 JK41-10735A PCB-SD,CONV,LED,USB:SPS-500,FR-R,2L,T1.6 [USB B'D] Part-No Description / Specification Q'TY Design-location Serviceable Remark JK92-01614E PBA SUB:SPS-500,USB B'D,SVC ASS’Y JK39-40755A HARNESS-USB:5P,200mm,AT TAPE USB HARNESS 3711-004128 WAFER;BOX-HEADER,1R, 5P,1.25mm,SMD UCN2 3712-000054 CONNECTOR-USB:A-TYPE,QBIG,4P,1R,AN,SMD UCN1 JK41-10735A PCB-SD,CONV,LED,USB:SPS-500,FR-R,2L,T1.6 SAM4S SPS-500 SERIES 8-13...
- Page 140 0604-000159 REFLECT-SENSOR:SG2BC,4P,KODENSHI,STM21 JK39-40552A CBF HARNESS-PAPER END:STM-210,UL1061#26 JK41-10540A PCB-P/END:STM-210,FR-4,2L,T1.6,142.5*130 [NEAR PAPER END SENSOR PCB] Part-No Description / Specification Q'TY Design-location Serviceable Remark JK96-01232A ELA NEAR P/END SENSOR:STM-210,ER-52XX ASS'Y 0604-000159 REFLECT-SENSOR:SG2BC,4P,KODENSHI,STM21 JK39-40553A CBF HARNESS-N/PE SENSOR:STM-210,100MM JK41-10541A PCB-NEAR P/END:STM-210,FR-4,2L,T1.6mm 8-14 SAM4S SPS-500 SERIES...
- Page 141 8-7 SPS-530 JOINT(3inch) PCB Part-No Description / Specification Q'TY Design-location Serviceable Remark JK92-01617A PBA SUB:SPS-530,JOINT B'D ASS’Y 3708-001388 CONNECTOR-FPC:28P,1R,1.25mm,ST,WHITE JCN5 3708-001392 CONNECTOR-FPC:27P,1R,1.25mm,AN,BLACK JCN1 3711-003968 CON-HEADER:BOX,3P,1R,2.5mm,STRAIGHT JCN4 2204-000028 C-CERAMIC,CHIP:100nF,+80-20%,25V,Y5V,160 3711-004119 WAFER;BOX-HEADER,1R, 4P,1.25mm,SMD,IVY JCN2 3711-004124 WAFER;BOX-HEADER,1R, 9P,1.25mm,SMD JCN3 JK41-10737A PCB-PRT JOINT:SPS-530,FR-4,2L,T1.6 SAM4S SPS-500 SERIES 8-15...
- Page 142 8 PCB Layout and Parts List MEMO 8-16 SAM4S SPS-500 SERIES...
-
Page 143: Wiring Diagram
9 Wiring Diagram 9-1 Main PBA Block Diagram [TOP SIDE] [BOTTOM SIDE] SAM4S SPS-500 SERIES... - Page 144 VD19(RED0) IRQ_SPI#1_UPPER COM#1_RXD LANLED_LINK&ACT VD6(BLUE3) VDD(2.8V) COM3_CTS VD23(RED4) COM#1_TXD LANLED_SPEED VD14(GREEN4) XACM_Y6 COM#4_TXD VD21(RED2) TOUCH_YM COM#2_CTS LAN_TX+ VD15(GREEN5) XCAM_Y0 COM#4_RXD VD4(BLUE1) TOUCH_YP COM#2_RTS LAN_TX- VD20(RED1) XCAM_Y5 COM#4_RTS TOUCH_XM USB#1_D+ LAN_RX+ SPI#1CLK VD22(RED22) XCAM_Y2 COM#4_CTS TOUCH_XP LAN_RX CTX- SAM4S SPS-500 SERIES...
- Page 145 9 Wiring Diagram 9-3 IO PBA Block Diagram SAM4S SPS-500 SERIES...
- Page 146 XCAM_RESET COM#3_RXD SIGNAL NAME SIGNAL NAME COM#2_RXD XCAM_PCLK +24V XCAM_CLKOUT COM#3_TXD COM#1_RTS XCAM_HSYNC VDD(2.8V) COM#3_RTS COM#1_RXD LANLED_LINK&ACT VDD(2.8V) COM3_CTS COM#1_TXD LANLED_SPEED XACM_Y6 COM#4_TXD COM#2_CTS LAN_TX+ XCAM_Y0 COM#4_RXD COM#2_RTS LAN_TX- XCAM_Y5 COM#4_RTS USB#1_D+ LAN_RX+ XCAM_Y2 COM#4_CTS LAN_RX CTX- SAM4S SPS-500 SERIES...
- Page 147 FEED MOT DRIVE B TPH_STROBE #3,#4 FEED MOT DRIVE B TPH_CLK FEED MOT DRIVE /A TPH_CLK AUTO-CUT MOT DRIVE /A FEED MOT DRIVE /A AUTO-CUT MOT DRIVE A TPH_STROBE #1,#2 FEED MOT DRIVE A TPH_STROBE #1,#2 FEED MOT DRIVE A SAM4S SPS-500 SERIES...
- Page 148 DALLAS_SIGNAL CN23 (KEY BOARD FFC CONNECTOR 20PIN ) CN26 (USB#0 CONNECTOR 5PIN BOX TYPE) -> KEY SCAN LINE SIGNAL NAME SIGNAL NAME CN24 (KEY BOARD FFC CONNECTOR 8PIN ) -> KEY RETURN LINE Vserial 5V USB#0_DATA- USB#0_DATA+ SAM4S SPS-500 SERIES...
- Page 149 9 Wiring Diagram 9-5 LCD PBA Block Diagram [TOP SIDE] [BOTTOM SIDE] SAM4S SPS-500 SERIES...
- Page 150 LCD_VD15(GREEN5) TOCUH_XM TOUCH_XP LCD_VD14(GREEN4) TOUCH_YP TOUCH_YM BRIGHTNESS CONTROL LCD_VD13(GREEN3) VLED (5V) VLED (5V) LCD_VD12(GREEN2) VLED (5V) LCD_VD11(GREEN1) VLED (3.3V) LCD_VD11(GREEN1) VLED (3.3V) DATA ENABLE LCD_VD23(RED4) LCD_VD22(RED3) LCD_VD21(RED2) LCD_VD7(BLUE4) LCD_VD20(RED1) LCD_VD6(BLUE3) LCD_VD19(RED0) LCD_VD5(BLUE2) LCD_VD19(RED0) LCD_VD4(BLUE1) LCD_VD3(BLUE0) LCD_VCLK LCD_VD3(BLUE0) SAM4S SPS-500 SERIES...
- Page 151 LCD_DATA0 LCD_SCLK LCD_DATA7 LCD_EN LCD_SDAT LCD_DATA6 LCD_D/I LCD_DATA5 LCD_D/I LCD_EN LCD_DATA4 DISCONNECTION LCD_DATA3 VDD(5V) LCD_DATA2 BLVOT(4.2V) UCN1 (USB CONNECTOR 4P) UCN2 (LCD B’D CONNECTOR 8P) SIGNAL NAME SIGNAL NAME Vserial 5V USB#0_DATA- USB#0_DATA+ USB#0_DATA+ USB#0_DATA- Vserial 5V SAM4S SPS-500 SERIES...
- Page 152 JCN5 (3inch TPH FFC CONNECTOR 28PIN TYPE) SIGNAL NAME SIGNAL NAME TPH +24V TPH +24V TPH +24V TPH +24V TPH_CLK TPH_LATCH VDD(5V) TPH_STB#1,#2 TPH_STB#3,#4 TPH_STB#1,#2 TPH_STB#3,#4 THERMISTER TPH_DATA TPH +24V TPH +24V TPH +24V TPH +24V 9-10 SAM4S SPS-500 SERIES...
- Page 153 /WBE0 /RESET /ADDR21 /GCS1_SRAM#4 /GCS1_SRAM#3 /GCS1_SRAM#1 ADDR17 ADDR16 ADDR15 ADDR14 ADDR13 ADDR12 VBT3.3V VBT3.3V ADDR11 ADDR10 ADDR9 ADDR20 ADDR19 ADDR18 ADDR8 ADDR7 ADDR6 ADDR5 ADDR4 ADDR3 ADDR2 ADDR1 DATA0 DATA1 DATA2 DATA3 DATA4 DATA5 DATA6 DATA7 SAM4S SPS-500 SERIES 9-11...
- Page 154 VPH +24V CN3 (FEED MOT CONNECTOR 3P) DISCONNECTION VPH +24V SIGNAL NAME MOT_COMMON FEED_MOT_/B FEED_MOT_/B FEED_MOT_B THERMISTOR FEED_MOT_/B FEED_MOT_/A TPH_CLK AUTOCUT_SENS FEED_MOT_/A TPH_SRTOBE#3,#4 FEED_MOT_/B MOT_COMMON AUTOCUT_MOT_/A FEED_MOT_/B TPH_DATA AUTOCUT_MOT_A CN8 (LEVER OPEN CONNECTOR 2P) SIGNAL NAME LEVER_SENS 9-12 SAM4S SPS-500 SERIES...
-
Page 155: Block Diagram
10 Block Diagram SAM4S SPS-500 SERIES 10-1... - Page 156 10 Block Diagram MEMO 10-2 SAM4S SPS-500 SERIES...
- Page 157 1) 2line LCD Convert & SD Card Block -------------------------- 11-21 2) USB & LED Block -------------------------------------------------- 11-22 5. SRAM MEMORY PCB Schematics. -------------------------- 11-23 6. 2inch PRT JOINT PCB Schematics. ----------------------------- 11-24 7. 3inch PRT JOINT PCB Schematics. ----------------------------- 11-25 SAM4S SPS-500 SERIES 11-1...
- Page 158 11-2 SAM4S SPS-500 SERIES...
- Page 159 SAM4S SPS-500 SERIES 11-3...
- Page 160 11-4 SAM4S SPS-500 SERIES...
- Page 161 SAM4S SPS-500 SERIES 11-5...
- Page 162 11-6 SAM4S SPS-500 SERIES...
- Page 163 SAM4S SPS-500 SERIES 11-7...
- Page 164 11-8 SAM4S SPS-500 SERIES...
- Page 165 SAM4S SPS-500 SERIES 11-9...
- Page 166 11-10 SAM4S SPS-500 SERIES...
- Page 167 SAM4S SPS-500 SERIES 11-11...
- Page 168 11-12 SAM4S SPS-500 SERIES...
- Page 169 SAM4S SPS-500 SERIES 11-13...
- Page 170 11-14 SAM4S SPS-500 SERIES...
- Page 171 SAM4S SPS-500 SERIES 11-15...
- Page 172 11-16 SAM4S SPS-500 SERIES...
- Page 173 SAM4S SPS-500 SERIES 11-17...
- Page 174 11-18 SAM4S SPS-500 SERIES...
- Page 175 SAM4S SPS-500 SERIES 11-19...
- Page 176 11-20 SAM4S SPS-500 SERIES...
- Page 177 SDCARD ① ⑩ ① ⑩ CON-BOX;8P,1.25MM,AN,12505WR SAM4S SPS-500 SERIES 11-21...
- Page 178 PWR(LED) LAN(LED) 11-22 SAM4S SPS-500 SERIES...
- Page 179 SAM4S SPS-500 SERIES 11-23...
- Page 180 FPC CABLE 11-24 SAM4S SPS-500 SERIES...
- Page 181 SAM4S SPS-500 SERIES 11-25...
- Page 182 MEMO 11-26 SAM4S SPS-500 SERIES...
-
Page 183: Update Log
Use this page to record any special servicing information such as Service Bulletins or Supplements. When possible, record changes to Code numbers directly on the actual Parts List. Always record Service Bulletin numbers and Application Dates on this log to ensure that your data is always as current as possible. SAM4S SPS-500 SERIES... - Page 184 ⓒ Shin Heung Precision. Aug. 2009 Printed in KOREA V1.1 Code No. : JK68-70127A...
Need help?
Do you have a question about the SPS-500 SERIES and is the answer not in the manual?
Questions and answers
How do I add discount %
To add a discount percentage on the Sam4s SPS-500 Series, use a % key programmed for discount. For example:
1. Ring up the items (e.g., PLU#2 and PLU#3).
2. Press the subtotal (SBTL) key (optional).
3. Press the appropriate % key (e.g., %1) that has a preset discount percentage (e.g., 10%).
4. The discount amount will be subtracted from the total.
5. Press CASH to finalize the sale.
If using an open % key (e.g., %3), enter the percentage (e.g., 15), then press the % key to apply the discount.
This answer is automatically generated