AMX MAX-HT04 Operation/Reference Manual
Max ht series digital media servers
Hide thumbs
Also See for MAX-HT04:
- Datasheet (2 pages) ,
- Installation manual (2 pages) ,
- Operation/reference manual (80 pages)

Related Manuals for AMX MAX-HT04


Summary of Contents for AMX MAX-HT04
- Page 1 Operation/Reference Guide MAX HT Servers Digital Media Servers MAX-HT04 MAX-HT12 MAX-HT04T MAX-HT12T L a s t R e v i s e d : 9 / 0 3 / 2 0 0 9 ® M AX b y A M X...
- Page 2 AMX is not responsible for products returned without a valid RMA number. AMX is not liable for any damages caused by its products or for the failure of its products to perform. This includes any lost profits, lost savings, incidental damages, or consequential damages.
-
Page 3: Table Of Contents
Table of Contents Table of Contents MAX HT Servers ....................1 Overview ........................1 MAX-HT Home Theater Servers ................2 Product Specifications ..................... 3 Related Documents ......................4 MAX HT Servers - Setup and Configuration ............5 Overview ........................5 Networking Specifications for MAX Servers ............. 5 Online Database...................... - Page 4 Table of Contents IP Settings ......................16 Preparing the MAX Server for Receiving Periodic Updates .......... 17 Output Module Setup .................... 17 Adding New Modules to the System................18 Viewing all Modules in the System................18 Removing Modules From the System ................19 RAID 5 Status......................
- Page 5 Table of Contents DVD Drives - Compatible Formats................35 DVD Drives Used ....................35 MDL Series - DVD Drives ..................35 Replacing HDDs in MAX Servers ..............37 Overview ........................ 37 Replacing HDDs in HT Servers ................37 Step 1: Identify the Drive That Needs To Be Replaced ..........37 Step 2: Physical Removal and Replacement of the Drives..........
- Page 6 Table of Contents MAX HT Servers...
-
Page 7: Max Ht Servers
Settings section on page 31 for details. Use the WinMAX software to configure and control MAX servers as well as manage content from any Windows PC. Refer to the WinMAX Software Instruction Manual (available online at www.amx.com) for information and instructions. MAX HT Servers... -
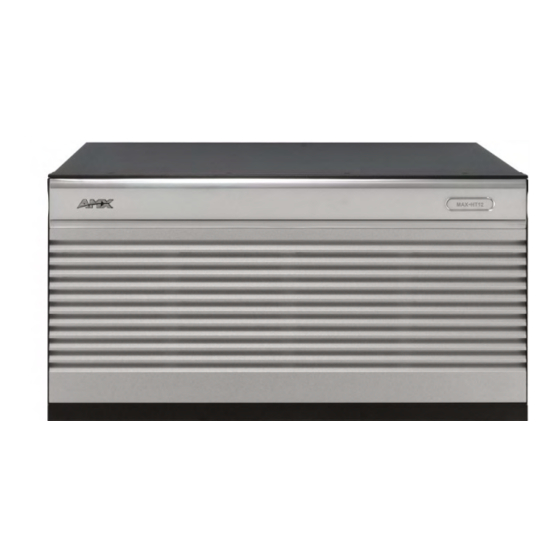
Page 8: Max-Ht Home Theater Servers
MAX HT Servers MAX-HT Home Theater Servers DVD/CDRW tray Storage Disc Drives Power ON/OFF toggle switch Master Power USB 1 port Power cable RS-232 ETHERNET CONTROL switch connector switched GB Control segment USB 2 port (to NetLinx Master or PC) PS/2 keyboard A/V OUT &... -
Page 9: Product Specifications
Operating System: Linux Power: 110-240 VAC +/- 10%, 50/60Hz AC Current Draw - MAX-HT04 / HT04T: • Bootup/Power Cycle Peak - 3.0A @ 120V = 360 watts 120 VAC: • Normal Usage Peak - 1.9A @ 120V = 228 watts •... -
Page 10: Related Documents
4.30.23 or greater - contact AMX Technical Support for details Related Documents The following AMX documents provide additional information on the HT Servers and related devices, and are available online at www.amx.com: Use the WinMAX software to add/remove DVD/CD content on the server, and control playback. -
Page 11: Max Ht Servers - Setup And Configuration
Use the WinMAX software to add/remove content on the MAX Server, as well as control playback and configure the server. Additional documentation, including the WinMAX Software Instruction Manual and the MAX by AMX Reference Guide are available online at www.amx.com. -
Page 12: Online Database
MAX HT Servers - Setup and Configuration Online Database MAX systems (firmware version 4.34 or higher) rely on an online media database for disc recognition. The online database provides all media information (such as disc title, track/chapter information, artist information, etc.). In order to identify discs (CDs and/or DVDs) as they are added to the MAX Server, the MAX Server must have permanent access to the internet. -
Page 13: Step 2: Connect The Power Cable(S) And Apply Power
MAX HT Servers - Setup and Configuration Connect a PS/2 mouse and keyboard, and a VGA monitor directly to the MAX Server to access the on- board interface, called the MAX Admin Menu (FIG. 5). You’ll use the options in the Admin Menu to configure communication settings and add/remove MAX-AVP Audio/Video Players as well as MAX- AVM and MAX-AOM modules. -
Page 14: Step 4: Add Max-Avps And Avm/Aom Modules To The Server
MAX HT Servers - Setup and Configuration For detailed descriptions of all options in the MAX Admin Menu, refer to the MAX Admin Menu section on page 13. Step 4: Add MAX-AVPs and AVM/AOM Modules to the Server Before you can use MAX-AVP Audio-Video Players MAX-AVM or MAX-AOM modules, they must each first be added to the server, via the Output Module Setup options in the MAX Admin Menu. -
Page 15: Additional Information On Usb Ports
MAX HT Servers - Setup and Configuration Notes: Always assign 4 consecutive server outputs to each MAX-AOM, even if you don’t plan to use all of the AOM’s outputs right away. Assign the 4 server outputs (per AOM) starting either with output #1 (if there are no AVPs/ AVMs on this server), or immediately after the last output assigned to an AVP or AVM. -
Page 16: Connecting Max-Aom Modules
If it is not already installed, load the WinMAX application on your PC. WinMAX can be downloaded from www.amx.com as a self-extracting executable. If you intend to connect to the MAX via a LAN connection, verify that the PC is communicating properly with the network, and that the MAX Server is powered and booted up. -
Page 17: Loading Media Content On The Max Server
MAX HT Servers - Setup and Configuration You can also use WinMAX to establish a Telnet connection with the MAX to access the MAX Admin Menu: in the WinMAX System Information tab, click on Server Configuration. You will be prompted for a User Name and Password. - Page 18 MAX HT Servers - Setup and Configuration MAX HT Servers...
-
Page 19: Max Admin Menu
MAX Admin Menu MAX Admin Menu Overview MAX servers utilize a built-in interface called the MAX Admin Menu that allows access to various administrative functions for the MAX Server. To access the MAX Admin Menu, you must establish a telnet session with the server. There are two ways to access the MAX Admin Menu - either via the Server Configuration option in WinMAX, or by connecting directly to the MAX Server. -
Page 20: Accessing The Admin Menu Via Direct Connection To The Max Server
(read-only). • RAID 5 CLI: The options on this page are only for use by AMX Technical Support. • Add RAID Disks: The options on this page allow you to migrate unassigned ports to a controller unit. -
Page 21: System Information
Server and AMX Technical Support, for remote troubleshooting and support operations. • Disconnect Support: Terminates the connection between the MAX Server and AMX Techni- cal Support. • Cover Art: This option retrieves updated cover art for discs in the MAX Server’s media library. -
Page 22: Ip Settings
MAX Admin Menu System Information (Cont.) • Date: Today’s date (MM/DD/YY). • Time: Current time (HH:MM:SS) • Time Zone: Local time zone. • Total Storage: Total amount of disc space available for content storage on this server. • Space Used: Total amount of disc space currently being used. -
Page 23: Preparing The Max Server For Receiving Periodic Updates
MAX Admin Menu FIG. 10 MAX Admin Menu - Configure TCP/IP Preparing the MAX Server for Receiving Periodic Updates The IP Settings (Gateway and Primary DNS) in the WinMAX Server Configuration screen must be set correctly. To prepare your server for automatic updates: 1. -
Page 24: Adding New Modules To The System
FIG. 13 Add Output Module ( MAX-HT04 and -HT12 Home Theater servers support up to two AOM modules, so the output can be either 1 or 2. If you are only using one AOM with these servers, the output should be set to 1. -
Page 25: Removing Modules From The System
RAID 5 CLI This set of options rebuilds the server’s RAID array. This option is only for use by AMX Technical Support. If the RAID array is rebuilt, all content on the server will be lost and the unit be rendered inoperable. -
Page 26: Log Management
MAX Admin Menu Log Management FIG. 17 MAX Admin Menu - Log Management MAX Servers have the ability to log various internal activities, primarily for troubleshooting purposes. The options on this page allow you to view and delete log files, and control the logging level for the server. -
Page 27: Date, Time Locale
MAX Admin Menu FIG. 19 Example of a log display Date, Time Locale This set of options allows you to specify/adjust the system’s date, time and location settings (FIG. 20). FIG. 20 MAX Admin Menu - Date, Time Locale MAX HT Servers... -
Page 28: Setting System Date And Time
MAX Admin Menu Setting System Date and Time When you select Date, Time, Locale from the MAX Admin Menu, a wizard is invoked which steps you through the process of setting the date and time for the system: 1. The first screen to appear is the Configure Timezones screen (FIG. 21). FIG. -
Page 29: Shell
This option opens an MS-DOS window for sending specific commands directly to the server. Modify max.ini FIG. 25 MAX Admin Menu - Modify max.ini These options on this page are only for use by AMX Technical Support. MAX HT Servers... -
Page 30: Authenticate Hdd
2. Enter the 8-digit serial number of the HDD. (printed on a decal located on the bottom panel of the HDD). 3. Enter the 16-digit authentication key supplied by AMX for that HDD (printed on a slip of paper included with the replacement drive). -
Page 31: Viewing All Hdds In The Max Server
MAX Admin Menu FIG. 27 Admin Menu, Authenticate HDD, and Add HDD dialogs Viewing All HDDs In the MAX Server Select View from the Authenticate HDD menu to view all the serial numbers and keys for HDDs in the system (FIG. 28). Note that this list only indicates HDDs that have been successfully authenticated. FIG. -
Page 32: Parental Control
OK. Online Tech Support FIG. 31 MAX Admin Menu - Online Tech Support This option allows you to establish a connection between the MAX Server and AMX Technical Support, for remote troubleshooting and support operations. MAX HT Servers... -
Page 33: Cover Art
MAX Admin Menu Cover Art This option retrieves updated cover art for discs in the MAX Server’s media library. Change Region The region code setting for the MAX Server’s internal DVD-ROM drive must match the region code of the DVD(s) you are attempting to load. If a DVD is inserted that has a region code that is different from that of the DVD-ROM in the MAX Server, you will receive an error message indicating that there is no disc in the drive when you press the Identify Disc button in the Record tab. -
Page 34: Update Firmware
MAX Admin Menu 5. Use the up/down arrow buttons on your keyboard to select the appropriate region code setting for your region, and press the spacebar to make your selection (indicated by an "X" to the left of the number). The number of resets still available is indicated at the top of the Change Region page (FIG. -
Page 35: Manually Updating The Firmware
This set of options allows you to either Reboot or Shutdown the MAX Server. Exit This option exits the MAX Admin menu. Exit and Disconnect This option exits the MAX Admin menu and terminates the connection to AMX Support (established via the Online Tech Support option). MAX HT Servers... - Page 36 MAX Admin Menu MAX HT Servers...
-
Page 37: Dvd Region Code Settings
DVD Region Code Settings DVD Region Code Settings Overview All DVD players and most DVD discs are labeled for operation within a specific geographical region in the world. This is know as a Region Code. DVD discs are encoded for a specific region, and must match the region code of the physical DVD drive to be played. -
Page 38: Default Region Code Setting
DVD Region Code Settings Default Region Code Setting By default, the MAX Server’s DVD-ROM drives are set to read DVDs with Region 1 encoding (for U.S., Canada and U.S. Territories). Depending on what region of the world you are installing and operating the MAX, you may need to change the region code setting in order to read DVDs. -
Page 39: Changing The Region Code Setting On Max Servers
DVD Region Code Settings Changing the Region Code Setting on MAX Servers MAX-HT Servers and the MDL200 Multi-Disc Loader feature internal DVD-ROM drives. The region code setting for the internal DVD-ROM must match the region code of the DVD disc(s) you are attempting to load. -
Page 40: Changing The Dvd Region Code Setting On Max Servers
DVD Region Code Settings Changing the DVD Region Code Setting On MAX Servers 1. Insert a DVD with your local region coding in the MAX Server’s DVD-ROM drive. 2. In the System Information tab, click the Server Configuration button to access the Admin Menu. 3. -
Page 41: Max Servers Dvd Drives - Supported Formats
MAX Servers DVD Drives - Supported Formats MAX Servers DVD Drives - Supported Formats DVD Drives - Compatible Formats The following tables indicate the compatibility of several common DVD Drives used in MAX Servers, relative to DVD formats: DVD Drives - Compatible Formats Drive Model Panasonic CW-8124-B Plextor PX-504A... - Page 42 MAX Servers DVD Drives - Supported Formats MAX HT Servers...
-
Page 43: Replacing Hdds In Max Servers
(FG2178-100) for replacements. Only HDDs provided by AMX can be used as replacements in MAX HT Servers, and in order to replace a HDD in an MAX HT Server, the drive must be installed and authenticated according to the steps outlined in this document. -
Page 44: Step 2: Physical Removal And Replacement Of The Drives
Replacing HDDs in MAX Servers FIG. 38 Admin Menu 4. Select RAID 5 Status. This option displays a listing of HDDs in the HT Server. Look for the drive that is labeled as “Degraded”. The drives on HT Servers are physically labeled with numbers on the front panel. HT04 Servers use drives labeled 1-4, and HT12 Servers use drives 1-12 (see FIG. -
Page 45: Step 3: Add The New Drive To The System
When entering the Serial Number, use the following syntax (no quotes): “WD- WXXXXXXXXXXX” 4. Enter the 16-digit Key supplied by AMX for that HDD (printed on a slip of paper included with the replacement drive). 5. Select Restart MAX Daemon (in the Admin Menu). - Page 46 Replacing HDDs in MAX Servers MAX HT Servers...
-
Page 47: Rack Mounting Max Servers
Rack Mounting MAX Servers Rack Mounting MAX Servers CAUTION: Safety Instructions Use the following safety guidelines to help ensure your own personal safety and to help protect your system and working environment from potential damage. Installing systems in a rack without the front and side stabilizers installed could cause the rack to tip over, potentially resulting in bodily injury under certain circumstances. -
Page 48: Rack Mounting Ht Servers
Rack Mounting MAX Servers Rack Mounting HT Servers Each MAX-HT Server comes with a Rack-Mounting Kit. Each Rack-Mounting Kit supports one server and includes all hardware required to mount HT Servers in a standard 19-inch (48-cm) equipment rack. The parts included in the Kit include: 2 Slide Rail Assemblies (each consists of a Stationary section, an Intermediate section and a Chassis section;... -
Page 49: Step 2: Slide Intermediate Sections Into The Stationary Sections
Rack Mounting MAX Servers 1. Remove the four plastic plugs from each side of the MAX Server. 2. Install the chassis sections onto the MAX Server chassis using 4 flat-head PHILLIPS screws (included) per side, as shown in FIG. 42. (rear) (front) Chassis Sections... -
Page 50: Step 3: Attach The Extension Brackets
Rack Mounting MAX Servers Step 3: Attach the Extension Brackets With the Intermediate and Stationary Sections together, you can now attach the Extension Brackets. The Extension Brackets attach to the rear end of the Stationary Section, and allow the Rail Assembly to be anchored to the rear of the equipment rack. -
Page 51: Step 4: Mount The Adapter Bars To The Rack-Rail Assemblies
Rack Mounting MAX Servers Step 4: Mount the Adapter Bars to the Rack-Rail assemblies 1. Use the included mounting hardware to attach an Adapter Bar to the front and rear of each of the two Rack-Rail assemblies: To ensure a proper fit, make sure that each Adapter Bar is mounted flush against all sides of the tabs on the Rack-Rail assembly. -
Page 52: Step 5: Mount The Rail/Bracket Assemblies Into The Equipment Rack
Rack Mounting MAX Servers Step 5: Mount the Rail/Bracket Assemblies Into the Equipment Rack Once the Extension Brackets (or End Brackets) and Adapter Bars have been attached to the Rail Assemblies, the Rail/Bracket Assemblies are ready to be mounted into the equipment rack. Install the Rack-Rail assemblies into the equipment rack, aligning the holes on the Adapter Bars to the mounting rails in the rack as shown in FIG. -
Page 53: Step 6: Load The Ht Server Into The Rack
Rack Mounting MAX Servers Step 6: Load the HT Server Into the Rack Once the Rail Assemblies have been installed into the equipment rack cabinet, the server can be mounted on the rails and slid into the rack (FIG. 49): 1. - Page 54 Rack Mounting MAX Servers MAX HT Servers...
- Page 55 Rack Mounting MAX Servers MAX HT Servers...
- Page 56 It’s Your World - Take Control™ 3000 RESEARCH DRIVE, RICHARDSON, TX 75082 USA • 800.222.0193 • 469.624.8000 • 469-624-7153 fax • 800.932.6993 technical support • www.amx.com...
Need help?
Do you have a question about the MAX-HT04 and is the answer not in the manual?
Questions and answers