
Subscribe to Our Youtube Channel
Related Manuals for AMX MAX Servers


Summary of Contents for AMX MAX Servers
- Page 1 Operation/Reference Guide MAX Servers HT Home Theater and MMS Multimedia Servers L a s t R e v i s e d : 9 / 1 0 / 2 0 0 7 ® M AX b y A M X...
- Page 2 RMA number. AMX is not liable for any damages caused by its products or for the failure of its products to perform. This includes any lost profits, lost savings, incidental damages, or consequential damages. AMX is not liable for any claim made by a third party or by an AMX Dealer for a third party.
-
Page 3: Table Of Contents
Step 4: Add MAX-AVPs and AVM/AOM Modules to the HT Server... 22 Adding MAX-AVP Players and/or MAX-AVM Modules ... 22 Adding MAX-AOM Audio-Only Modules ... 23 Additional Information on USB Ports: MMS-01S, -02S and 02SB Servers... 23 MAX Servers: HT Home Theater and MMS Multimedia Servers Table of Contents... - Page 4 Modify max.ini ... 38 Authenticate HDD ... 39 Authenticating a new HDD ... 39 Viewing All HDDs In the MAX Server... 40 Removing HDDs From the MAX Server... 40 Parental Control ... 41 MAX Servers: HT Home Theater and MMS Multimedia Servers...
- Page 5 Default Region Code Setting... 46 Changing the Region Code Setting on MAX Servers... 46 Changing the DVD Region Code Setting On MAX Servers ... 47 MAX Servers DVD Drives - Supported Formats ...49 DVD Drives - Compatible Formats ... 49 MAX Servers - DVD Drives Used...
- Page 6 Step 4: Mount the Adapter Bars to the Rack-Rail assemblies ... 68 Step 5: Mount the Rail/Bracket Assemblies Into the Equipment Rack... 69 Step 6: Load the HT Server Into the Rack ... 70 MAX Servers: HT Home Theater and MMS Multimedia Servers...
-
Page 7: Max Servers - Overview
MAX servers accommodate single and multi-room video distribution, allowing the user to search and select chapters, titles and tracks. Video is stored in native DVD format to fully capture the quality of the original video. Music is stored in native audio CD format. Additionally, MAX servers provide playback of MP3 files. -
Page 8: Related Documents
MAX Admin Menu. You’ll use the options in the Admin Menu to configure communication settings and add/remove MAX-AVM and MAX- AOM modules. Refer to the MAX Servers - Setup and Configuration section on page 19 for details. -
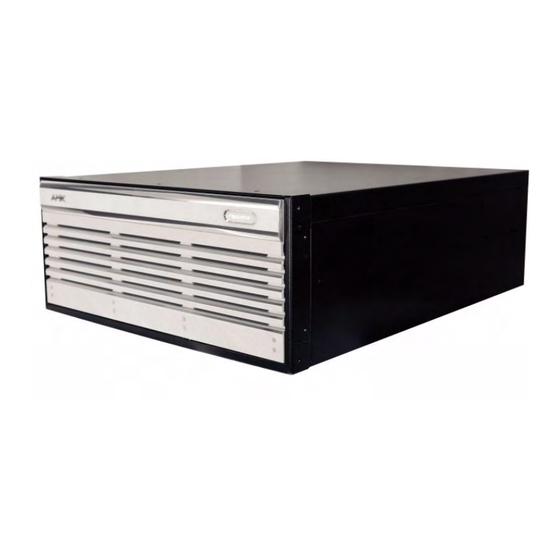
Page 9: Max Ht Servers - Photos And Specifications
24 hours before use. Failure to allow this initialization to complete may cause performance problems during media playback. MAX Servers: HT Home Theater and MMS Multimedia Servers MAX HT Servers - Photos and Specifications Storage Disc Drives... -
Page 10: Product Specifications
• 5 RU (mounts in a standard 19” equipment rack) • MAX-HT04: 60 lbs (27.22 kg) • MAX-HT12: 68 lbs (30.84 kg) • MAX-HT04: 83.9 lbs (38.06 kg) • MAX-HT12: 91.9 lbs (41.69 kg) • MAX Servers: HT Home Theater and MMS Multimedia Servers... - Page 11 Included Accessories: Other AMX/MAX Equipment: Certifications: Required Firmware version: MAX Servers: HT Home Theater and MMS Multimedia Servers MAX HT Servers - Photos and Specifications • Operating Temperature: 10º to 35º C • Operating Relative Humidity: 20% to 80% (non-condensing) •...
- Page 12 MAX HT Servers - Photos and Specifications MAX Servers: HT Home Theater and MMS Multimedia Servers...
-
Page 13: Max Mms Servers - Photos And Specifications
Power: AC Current Draw (AMP): Front Panel Components: (remove Faceplate to access) Rear Panel Components: MAX Servers: HT Home Theater and MMS Multimedia Servers MAX MMS Servers - Photos and Specifications PS/2 keyboard & mouse ports USB port RS-232 A/V OUT... - Page 14 • MAX-AOM Audio-Only (USB) Module (FG 2178-55) • MAX-AOM-EX Expansion Kit (FG 2178-56) • MAX-MDL200 Multi-Disc Loader (FG 2179-01) • MMS-HDD250G Replacement 250MB HDD (FG 2178-250) UL Listed E252362, FCC, CE MAX Servers: HT Home Theater and MMS Multimedia Servers...
-
Page 15: Mms-02S Multimedia Server
Power: AC Current Draw (AMP): Front Panel Components: (remove Faceplate to access) Rear Panel Components: MAX Servers: HT Home Theater and MMS Multimedia Servers MAX MMS Servers - Photos and Specifications PS/2 keyboard & mouse ports USB port RS-232 A/V OUT... - Page 16 • MAX-AOM Audio-Only (USB) Module (FG 2178-55) • MAX-AOM-EX Expansion Kit (FG 2178-56) • MAX-MDL200 Multi-Disc Loader (FG 2179-01) • MMS-HDD250G Replacement 250MB HDD (FG 2178-250) UL Listed E252362, FCC, CE MAX Servers: HT Home Theater and MMS Multimedia Servers...
-
Page 17: Mms-02Sb Multimedia Server With Backup
Power: AC Current Draw (AMP): Front Panel Components: (remove Faceplate to access) Rear Panel Components: MAX Servers: HT Home Theater and MMS Multimedia Servers MAX MMS Servers - Photos and Specifications PS/2 keyboard & mouse ports USB port RS-232 A/V OUT... - Page 18 • MAX-AOM Audio-Only (USB) Module (FG 2178-55) • MAX-AOM-EX Expansion Kit (FG 2178-56) • MAX-MDL200 Multi-Disc Loader (FG 2179-01) • MMS-HDD250G Replacement 250MB HDD (FG 2178-250) UL Listed E252362, FCC, CE MAX Servers: HT Home Theater and MMS Multimedia Servers...
-
Page 19: Mms-04S Multimedia Server
(remove Faceplate to access) Rear Panel Components: Dimensions (HWD): (without rack ears) Weight: MAX Servers: HT Home Theater and MMS Multimedia Servers MAX MMS Servers - Photos and Specifications PS/2 keyboard & mouse ports USB 2 port USB 1 port... - Page 20 • MAX-AOM Audio-Only (USB) Module (FG 2178-55) • MAX-AOM-EX Expansion Kit (FG 2178-56) • MAX-MDL200 Multi-Disc Loader (FG 2179-01) • MMS-HDD250G Replacement 250MB HDD (FG 2178-250) UL Listed E252362, FCC, CE MAX Servers: HT Home Theater and MMS Multimedia Servers...
-
Page 21: Mms-12S Multimedia Server
AC Current Draw (AMP): Front Panel Components: (remove Faceplate to access) Rear Panel Components: MAX Servers: HT Home Theater and MMS Multimedia Servers MAX MMS Servers - Photos and Specifications Faceplate snaps on/off to allow access to the hard drives Power Supply Reset PS/2 keyboard &... - Page 22 • MAX-AOM Audio-Only (USB) Module (FG 2178-55) • MAX-AOM-EX Expansion Kit (FG 2178-56) • MAX-MDL200 Multi-Disc Loader (FG 2179-01) • MMS-HDD250G Replacement 250MB HDD (FG 2178-250) UL Listed E252362, FCC, CE MAX Servers: HT Home Theater and MMS Multimedia Servers...
-
Page 23: Mms-900 Multimedia Server
DVD/CDRW tray PS/2 keyboard & mouse ports RS-232 FIG. 9 MMS-900 Multimedia Server MAX Servers: HT Home Theater and MMS Multimedia Servers MAX MMS Servers - Photos and Specifications Reset button Hard drive activity LEDs ETHERNET CONTROL switched GB Control segment... -
Page 24: Product Specifications
• MAX-AVM Audio-Video Module (FG 2178-50) • MAX-AOM Audio-Only (USB) Module (FG 2178-55) • MAX-AOM-EX Expansion Kit (FG 2178-56) • MAX-MDL200 Multi-Disc Loader (FG 2179-01) • MMS-HDD250G Replacement 250MB HDD (FG 2178-250) MAX Servers: HT Home Theater and MMS Multimedia Servers... -
Page 25: Max Servers - Setup And Configuration
Use the WinMAX software to add/remove content on the MAX server, as well as control playback and configure the server. Additional documentation, including the WinMAX Software Instruction Manual and the MAX by AMX Reference Guide are available online at www.amx.com. -
Page 26: Online Database
In the event that the HT Server has sat without power for more than an hour, you should allow the server to charge for up to 18 hours to ensure that the batteries are fully charged, before use. For best results, always use a UPS with MAX Servers and avoid removing all power from the unit. -
Page 27: Step 2: Connect The Power Cable(S) And Apply Power
2. Flip the Master Power Supply switch to On. 3. Push the Power On/Off pushbutton to apply power. 4. Allow up to one minute for the server to boot-up. MAX Servers: HT Home Theater and MMS Multimedia Servers MAX Servers - Setup and Configuration... -
Page 28: Step 3: Access The Max Admin Menu
2. In the Enter Output Number field, specify the output on the server that you want to assign to this AVP or AVM (range = 1 - 33). Each AVP/AVM requires one output. Select OK to proceed. MAX Servers: HT Home Theater and MMS Multimedia Servers... -
Page 29: Adding Max-Aom Audio-Only Modules
3 and 4 on USB 1 (the ports that are unused by the two built-in audio outputs), as well as ports 1 and 2 on USB 2 (as indicated in the table below): MAX Servers: HT Home Theater and MMS Multimedia Servers MAX Servers - Setup and Configuration... -
Page 30: Additional Information On Usb Ports: Mms-04S, -12S, -900 And Max-Ht Servers
On the AVPs, the power switch is on the rear panel. Power up the MAX-HT before applying power to the AVP(s) and/or AVM(s). USB Port Connection (1 or 2) Audio Output (1-4) 1‘ AVM 3... MAX Servers: HT Home Theater and MMS Multimedia Servers... -
Page 31: Connecting Max-Aom Modules
If you are connecting to the server via a PC network, be sure that the IP address and Subnet Mask settings are appropriate for your network configuration. Consult your network administrator for help with this. MAX Servers: HT Home Theater and MMS Multimedia Servers MAX Servers - Setup and Configuration... -
Page 32: Loading Media Content On The Max Server
In WinMAX, open the Movies tab. Then, select a DVD title (MAX servers ship with one DVD loaded and ready for playback), and click the Play button. Playing a CD Open the Music tab. Then, select a CD title (MAX servers ship with one CD loaded and ready for playback), and click the Play button. Periodic Updates The MAX server can receive periodic updates for its system software and internal information database. -
Page 33: Max Admin Menu
MAX Admin Menu Overview MAX servers utilize a built-in interface called the MAX Admin Menu that allows access to various administrative functions for the MAX server. To access the MAX Admin Menu, you must establish a telnet session with the server. -
Page 34: Accessing The Admin Menu Via Direct Connection To The Max Server
Displays status information for the servers RAID 5 array, including indi- vidual status for each of the disc drives (read-only). The options on this page are only for use by AMX Technical Support. The options on this page allow you to migrate unassigned ports to a controller unit. -
Page 35: System Information
• S/R Number: • Firmware Ver.: • Date: MAX Servers: HT Home Theater and MMS Multimedia Servers The options on this page allow you to add, remove and view hard disc drives (HDDs) in the MAX server. This page allows you to enable parental control functionality. -
Page 36: Ip Settings
The number of DVDs currently loaded in the server’s library. The current status of the server’s RAID array. The current synch status of the server’s RAID array. The version and date of the Media Database. MAX Servers: HT Home Theater and MMS Multimedia Servers... -
Page 37: Preparing The Max Server For Receiving Periodic Updates
MAX Admin Menu - Output Module Setup This set of options allows you to add, view and delete external output modules (MAX-AVM audio-video modules and/or MAX-AOM audio-only modules), as well as MAX-AVP Audio-Video Players. MAX Servers: HT Home Theater and MMS Multimedia Servers MAX Admin Menu... -
Page 38: Adding New Modules To The System
1 or 2. If you are only using one AOM with these servers, the output should be set to 1. If you are adding a MAX-AVM audio-video module, the range is 1-25 (all MAX servers support up to 25 AVMs). -
Page 39: Viewing All Modules In The System
This page displays (read-only) status information for the servers RAID 5 array, including individual status for each of the disc drives (FIG. 23). Press OK to return to the MAX Admin Menu. MAX Servers: HT Home Theater and MMS Multimedia Servers MAX Admin Menu... -
Page 40: Raid 5 Cli
MAX Admin Menu - RAID 5 Status RAID 5 CLI This set of options rebuilds the server’s RAID array. This option is only for use by AMX Technical Support. If the RAID array is rebuilt, all content on the server will be lost and the unit be rendered inoperable. -
Page 41: Log Management
MAX Admin Menu - Log Management MAX Servers have the ability to log various internal activities, primarily for troubleshooting purposes. The options on this page allow you to view and delete log files, and control the logging level for the server. -
Page 42: Deleting Log Files
Date, Time Locale This set of options allows you to specify/adjust the system’s date, time and location settings (FIG. 27). FIG. 27 MAX Admin Menu - Date, Time Locale MAX Servers: HT Home Theater and MMS Multimedia Servers... -
Page 43: Setting System Date And Time
To change the date, move the highlighted cursor to the Date window and use the arrow keys to navigate to the correct date. Press the spacebar to select the correct date. MAX Servers: HT Home Theater and MMS Multimedia Servers MAX Admin Menu... -
Page 44: Shell
This option opens an MS-DOS window for sending specific commands directly to the server. Modify max.ini FIG. 32 MAX Admin Menu - Modify max.ini These options on this page are only for use by AMX Technical Support. MAX Servers: HT Home Theater and MMS Multimedia Servers... -
Page 45: Authenticate Hdd
2. Enter the 8-digit serial number of the HDD. (printed on a decal located on the bottom panel of the HDD). 3. Enter the 16-digit authentication key supplied by AMX for that HDD (printed on a slip of paper included with the replacement drive). -
Page 46: Viewing All Hdds In The Max Server
FIG. 36 Authenticate Menu - Select HDD(s) to Remove dialogs Once the HDD(s) have been removed from the System, they can be physically removed from the server without damaging the RAID array. MAX Servers: HT Home Theater and MMS Multimedia Servers... -
Page 47: Parental Control
FIG. 38 MAX Admin Menu - Online Tech Support This option allows you to establish a connection between the MAX server and AMX Technical Support, for remote troubleshooting and support operations. MAX Servers: HT Home Theater and MMS Multimedia Servers... -
Page 48: Cover Art
DVDs together by region to minimize the number of times you’ll have to change the region The number of region code setting resets still available is indicated here (Max resets = 5). MAX Servers: HT Home Theater and MMS Multimedia Servers... -
Page 49: Changing The Region Code Setting On Your Max Server
If an update is detected, the firmware will automatically be downloaded and installed on the MAX server. MAX Servers: HT Home Theater and MMS Multimedia Servers MAX Admin Menu... -
Page 50: Manually Updating The Firmware
This option exits the MAX Admin menu. Exit and Disconnect This option exits the MAX Admin menu and terminates the connection to AMX Support (established via the Online Tech Support option). MAX Servers: HT Home Theater and MMS Multimedia Servers... -
Page 51: Dvd Region Code Settings
• REGION 3: • REGION 4: • REGION 5: • REGION 6: MAX Servers: HT Home Theater and MMS Multimedia Servers USA, Canada Japan, Europe, South Africa, Middle East, Greenland S.Korea, Taiwan, Hong Kong, Parts of South East Asia Australia, New Zealand, Latin America (including Mexico) -
Page 52: Default Region Code Setting
The region code setting for the MAX Server’s DVD-ROM can be changed via the Change Region option in MAX Admin Menu (accessible via the Server Configuration option in WinMAX): MAX Servers: HT Home Theater and MMS Multimedia Servers... -
Page 53: Changing The Dvd Region Code Setting On Max Servers
Also, insure that the last region code setting made matches the region in which the MAX will be installed. Changing the DVD Region Code Setting On MAX Servers 1. Insert a DVD with your local region coding in the MAX Server’s DVD-ROM drive. - Page 54 DVD Region Code Settings MAX Servers: HT Home Theater and MMS Multimedia Servers...
-
Page 55: Max Servers Dvd Drives - Supported Formats
MAX Servers DVD Drives - Supported Formats DVD Drives - Compatible Formats The following tables indicate the compatibility of several common DVD Drives used in MAX Servers, relative to DVD formats: DVD Drives - Compatible Formats Drive Model DVD-ROM Panasonic CW-8124-B... -
Page 56: Mdl Series - Dvd Drives
The following table indicates the compatibilities of the DVD Drives in the MDL Series (Powerfile): MDL Series (PowerFile) - DVD Drives C200ROM and C200 R200ROM R200ROM • DVD-ROM, DVD-R • DVD-ROM, DVD-R, DVD-RW, DVD+R, DVD+RW, DVD-RAM,DVD+/-RW • Reads all formats listed above MAX Servers: HT Home Theater and MMS Multimedia Servers... -
Page 57: Replacing Hdds In Max Servers
MAX-HT servers utilize 400GB hard drives, and require the 400GB drive (FG 2178-400) for replacements. Only HDDs provided by AMX can be used as replacements in MMS servers, and in order to replace a HDD in an MMS server, the drive must be installed and authenticated according to the steps outlined in this document. - Page 58 4. Click on the Configure tab at the top of the screen to access the Configure page (FIG. 45) which lists all drives in each array and their status. If a drive has failed, it will be labeled “Degraded” rather than “OK”. MAX Servers: HT Home Theater and MMS Multimedia Servers...
- Page 59 PORT 4 PORT 10 PORT 5 PORT 11 FIG. 46 Port to HDD correlation - MMS-04S, MMS-12S and MMS-900 servers MAX Servers: HT Home Theater and MMS Multimedia Servers Degraded PORT 2 PORT 3 MMS-04S (front) PORT 8 PORT 11...
-
Page 60: Step 2: Physical Removal And Replacement Of The Drives
Push tab to the right to unlock the hinged front panel Flip the hinged front panel out, and use it as a handle to pull the drive/tray assembly out of its slot. MAX Servers: HT Home Theater and MMS Multimedia Servers MMS Servers... -
Page 61: Step 4: Authenticate The New Hdd
2. Enter the 8-digit serial number of the HDD. (printed on a decal located on the bottom panel of the HDD). 3. Enter the 16-digit authentication key supplied by AMX for that HDD (printed on a slip of paper included with the replacement drive). -
Page 62: Replacing Hdds In Ht Servers
Admin Menu, Authenticate HDD, and Add HDD dialogs Replacing HDDs in HT Servers The AMX line of MAX HT servers support hot-swappable 400GB hard disk drives (HDDs), accessible behind the faceplate on the front panel (FIG. 49). Typically a new HDD will be required only if an existing one has failed. -
Page 63: Step 1: Identify The Drive That Needs To Be Replaced
Remove the drive from the drive tray. The drive is secured to the tray with four screws on the bottom panel. MAX Servers: HT Home Theater and MMS Multimedia Servers Replacing HDDs in MAX Servers... -
Page 64: Step 3: Add The New Drive To The System
When entering the Serial Number, use the following syntax (no quotes): “WD- WXXXXXXXXXXX” 4. Enter the 16-digit Key supplied by AMX for that HDD (printed on a slip of paper included with the replacement drive). 5. Select Restart MAX Daemon (in the Admin Menu). -
Page 65: Max Admin Menu
• Remove: Select to remove a selected HDD from the system. One or more drives can be removed at a time. Refer to the MAX Admin Menu section on page 27 for more information. MAX Servers: HT Home Theater and MMS Multimedia Servers Replacing HDDs in MAX Servers... - Page 66 Replacing HDDs in MAX Servers MAX Servers: HT Home Theater and MMS Multimedia Servers...
-
Page 67: Rack Mounting Max Servers
Therefore, consideration should be given to the overall temperature of the rack. Do not step on or stand on any component when servicing other components in a rack. MAX Servers: HT Home Theater and MMS Multimedia Servers Rack Mounting MAX Servers... -
Page 68: Rack Mounting Mms-01S/02S/02Sb/04S/12S Servers
5. Slide the server (with Inner Server Rails attached) into the Outer Slide Rails in the rack. Each step is described in more detail in the following subsections. Locking Tab Hole Locking Release Tab Screws: • 20 - Large • 20 - Small/Long • 12 - Small/Short MAX Servers: HT Home Theater and MMS Multimedia Servers... -
Page 69: Step 1: Prepare The Slide Rail Assemblies
Extension Bracket feet should point in towards the server or out towards the rack. 3. Repeat the process for the opposite Outer Rail. MAX Servers: HT Home Theater and MMS Multimedia Servers Rack Mounting MAX Servers Locking Release tab Slide the end of the Inner Server Rail under the tab protruding from the side of the MMS server. -
Page 70: Step 4: Install The Outer Rail/Extension Racket Assemblies In The Rack
Be careful when pressing the Inner Server Rail release latches and sliding the server into the rack. The slide rails could pinch your fingertips. Extension Bracket Feet Outer Rail Locking plate Extension bracket MAX Servers: HT Home Theater and MMS Multimedia Servers... -
Page 71: Rack Mounting Ht And Mms-900 Servers
10 flat-head screws, 10 round-head screws Extension Brackets (2) Screws: 10 round head, 10 flat head, 10 locking nuts FIG. 57 Included Rack Kit Parts MAX Servers: HT Home Theater and MMS Multimedia Servers Rack (front) Locking Tab Hole INTERMEDIATE SECTION (2) STATIONARY SECTION (2) -
Page 72: Caution: Safety Instructions
1. Remove the four plastic plugs from each side of the MAX server. 2. Install the chassis sections onto the MAX server chassis using 4 flat-head PHILLIPS screws (included) per side, as shown in FIG. 58. MAX Servers: HT Home Theater and MMS Multimedia Servers... -
Page 73: Step 2: Slide Intermediate Sections Into The Stationary Sections
3. Slide the Intermediate Section in, to the point that the Breaker tab on the Intermediate Section rests against the Stopper on the top guide-rail on the Stationary Section, and the locking tab snaps into place. MAX Servers: HT Home Theater and MMS Multimedia Servers Chassis Sections The Locking Tab on each Chassis Section should... -
Page 74: Step 3: Attach The Extension Brackets
Rack-Rails, the bottom of the Adapter Bar should be flush with the bottom of the Rack-Rail (FIG. 61). Mounting tabs (rear) Secure to the rear rails on the equipment rack MAX Servers: HT Home Theater and MMS Multimedia Servers Extension Bracket (rear) -
Page 75: Step 5: Mount The Rail/Bracket Assemblies Into The Equipment Rack
Install the Rack-Rail assemblies into the equipment rack, aligning the holes on the Adapter Bars to the mounting rails in the rack as shown in FIG. 63: MAX Servers: HT Home Theater and MMS Multimedia Servers Rack Mounting MAX Servers... -
Page 76: Step 6: Load The Ht Server Into The Rack
RUs in the equipment rack. Align the bottom hole on the Adapter Bar to the top hole of the lower-adjacent RU in the equipment rack. Rear mounting rail on the equipment rack MAX Servers: HT Home Theater and MMS Multimedia Servers... - Page 77 Intermediate Section Rails, securing the server in place. Equipment Rack FIG. 65 Sliding the server chassis into the rack MAX Servers: HT Home Theater and MMS Multimedia Servers Intermediate Section (fully extended) Chassis Section CAUTION!
- Page 78 Rack Mounting MAX Servers MAX Servers: HT Home Theater and MMS Multimedia Servers...
- Page 79 Rack Mounting MAX Servers MAX Servers: HT Home Theater and MMS Multimedia Servers...
- Page 80 It’s Your World - Take Control™ 3000 RESEARCH DRIVE, RICHARDSON, TX 75082 USA • 800.222.0193 • 469.624.8000 • 469-624-7153 fax • 800.932.6993 technical support • www.amx.com...
Need help?
Do you have a question about the MAX Servers and is the answer not in the manual?
Questions and answers