Outback Omega 100 Assembly And Operating Instructions Manual
Hide thumbs
Also See for Omega 100:
- Assembly and operating instructions manual (25 pages) ,
- Assembly and operating instructions manual (23 pages) ,
- Assembly and operating instructions manual (24 pages)
Table of Contents
Advertisement
Quick Links
Assembly and Operating Instructions for
Outback® Omega 100, Omega 200, and Omega 300 Gas Barbecues
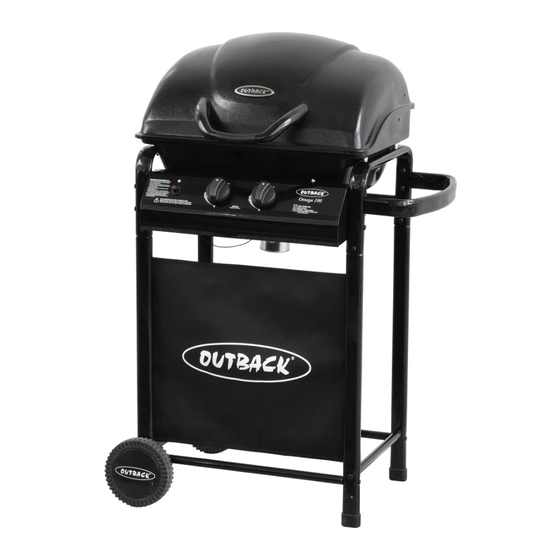
Omega 100
Photographs are not to scale.
Specifications subject to change
without prior notice.
•
For outdoor use only. Not for commercial use.
•
Read instructions before using the appliance. Failure to follow instructions could
result in death, serious bodily injury, and/or property loss.
•
Warning: accessible parts may be very hot. Keep young children away.
•
Do not move the appliance during use.
•
Turn off the gas supply at the gas bottle after use.
•
Any modification of the appliance, misuse, or failure to follow the instructions may
be dangerous and will invalidate your warranty. This does not affect your statutory
rights.
WARNING
•
Retain these instructions for future reference.
•
Leak test your barbecue annually. Check the hose connections are tight and leak
test each time you reconnect the gas bottle.
•
For Flare-up control please refer to the 'OPERATION' section of this manual.
FOR YOUR SAFETY
If you smell gas:
1.
Shut off gas to the appliance.
2.
Extinguish any open flame.
3.
Open barbecue lid or hood.
4.
If odour continues, discontinue use and
contact your local dealer.
Gas Barbecues
Omega 200
FOR YOUR SAFETY
1.
Do not store or use petrol or other flammable
vapours or liquids in the vicinity of this or any
other appliance.
2.
A gas bottle not connected for use shall not be
stored in the vicinity of this or any other appliance.
EN (Europe)
Omega 300
0359
Advertisement
Table of Contents

Related Manuals for Outback Omega 100


Summary of Contents for Outback Omega 100
- Page 1 Gas Barbecues Assembly and Operating Instructions for Outback® Omega 100, Omega 200, and Omega 300 Gas Barbecues EN (Europe) Omega 100 Omega 200 Omega 300 Photographs are not to scale. Specifications subject to change 0359 without prior notice. • For outdoor use only. Not for commercial use.
-
Page 2: Parts List
A. Parts List Quantities vary according to model purchased. Specifications subject to change without prior notice. For more details on hardware, please see the corresponding Hardware Reference Diagram for your barbecue model. OUTBACK® OMEGA RANGE CODE PART OMEGA 100 OMEGA 200... - Page 3 B1. Parts Diagram: Omega 100 Quantities vary according to model purchased. Specifications subject to change without prior notice. For more details on hardware, please see ‘Hardware Reference Diagram: Omega 100.’ Pre-assembled body unit includes the following individual parts: A11 A12 A13 A14...
- Page 4 B2. Hardware Reference Diagram: Omega 100 Specifications subject to change without prior notice. D4, D9...
- Page 5 C1. Parts Diagram: Omega 200 Quantities vary according to model purchased. Specifications subject to change without prior notice. For more details on hardware, please see ‘Hardware Reference Diagram: Omega 200.’ Pre-assembled body unit includes the following individual parts: A5 A10 A11 A12 A13 A14...
- Page 6 C2. Hardware Reference Diagram: Omega 200 Specifications subject to change without prior notice. D5, D9 D4, D9 D6, D9, D10 D7, D9...
- Page 7 D1. Parts Diagram: Omega 300 Quantities vary according to model purchased. Specifications subject to change without prior notice. For more details on hardware, please see ‘Hardware Reference Diagram: Omega 300.’ Pre-assembled body unit includes the following individual parts: A5 A10 B1 A11 A12 A13 A14...
- Page 8 D2. Hardware Reference Diagram: Omega 300 Specifications subject to change without prior notice. D5, D9 D4, D9 D6, D9, D10 D7, D9...
- Page 9 Please lay out all nuts and bolts and check lengths before assembling. Whilst every care is taken in the manufacture of this product, care must be taken during assembly in case sharp edges are present. Omega 100 Omega 200 Omega 300...
- Page 10 Omega 100 Omega 200 Omega 300 NOTE: Ensure that the legs with the Velcro attached to them are at the front of the barbecue. Omega 100 Omega 200 Omega 300...
- Page 11 Omega 100 Omega 200 Omega 300 Omega 200, Omega 300 users skip this step and proceed directly to Step 7. Omega 100 Omega 200 Omega 300...
- Page 12 Omega 100 Omega 200 Omega 300 Omega 100 users skip this step and proceed directly to Step 8. Omega 100 Omega 200 Omega 300...
- Page 13 Omega 200, Omega 300 users skip this step and proceed directly to Step 10. Omega 100 Omega 200 Omega 300 Omega 100 users skip this step and proceed directly to Step 13. Omega 200 users perform this step for both left and right side shelves.
- Page 14 Omega 100 Omega 200 Omega 300 Omega 100, Omega 200 users skip this step and proceed directly to Step 13. Fit the side burner venturi tube over the gas Connect ignitor wire to pushbutton lead. valve outlet. This is a loose fit and not a gas tight seal.
- Page 15 Omega 100 Omega 200 Omega 300 Insert grease cup into wire cup holder. Omega 100 Omega 200 Omega 300...
- Page 16 Omega 100 Omega 200 Omega 300 Omega 100 Omega 200 Omega 300...
- Page 17 Omega 100 Omega 200 Omega 300 ASSEMBLY IS NOW COMPLETE. PROCEED TO THE NEXT PAGE FOR INSTRUCTIONS ON OPERATION AND MAINTENANCE. REFER TO THE LEAK TEST INSTRUCTIONS ON PAGE 19.
-
Page 18: Installation
days. A spanner may be required to change F. Important Information bottles. Butane bottles, will supply sufficient gas in summer, but performance of Please read these instructions carefully the barbecue may be affected once the gas before assembly and use. temperature starts to fall below +10°C. -
Page 19: Operation
H.3 Fixing a Gas Hose to the Barbecue control knob to the off position and turn gas Connect the gas hose to the gas rail inlet on off at the bottle or regulator. Wait five the left hand side of the barbecue. Do not minutes, then repeat the above steps. -
Page 20: Care And Maintenance
Outback® stockist. meat or meat products as these tend to have a high fat and water content. Also, the J1. -
Page 21: Technical Specifications
36mbar or brass wire brush. Do not use a steel scraper or wire brush. Clean with hot soapy water and Gas Consumption: rinse well. Omega 100: 446g/hr Omega 200: 446g/hr Omega 300: 446g/hr J6. Fixings Side Burner: 165g/hr All screws and bolts, etc. should be checked Countries of Use: and tightened on a regular basis. -
Page 22: Troubleshooting
L. Troubleshooting Problem Possible Cause Solution Burner will not light using the LP gas cylinder is empty Replace with full cylinder ignition system Faulty regulator Have regulator checked or replaced Obstructions in burner Clean burner Obstructions in gas jets or gas hose Clean jets and gas hose Electrode wire is loose or disconnected on Reconnect wire...
Need help?
Do you have a question about the Omega 100 and is the answer not in the manual?
Questions and answers