Table of Contents
Advertisement
Quick Links
BUILDING AND INSTRUCTION MANUAL
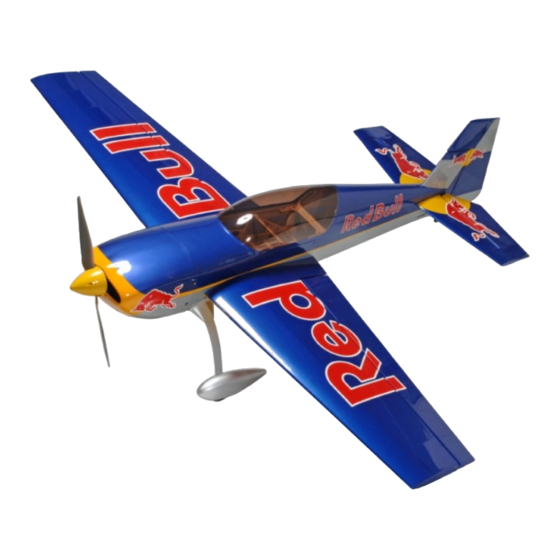
FLWA4003 - Extra 300 LP ARF
Please read the instruction manual carefully and take notice of the safety guidelines.
If the model is given to a third party, always include this instruction manual to the model
Distributed by
V3
Fully licensed through the
Red Bull GmbH - Austria
Wing load
Wingspan
Length
Take off weight
Wing area
Wing load
Electric drive set
Gas engine
www.hobbico.de
1700 mm
1570 mm
3770 g
50.2 dm²
75 g/dm²
FW 5065
25-30 ccm
Advertisement
Table of Contents

Related Manuals for Hobbico Flitework Extra 300LP FLWA4003


Summary of Contents for Hobbico Flitework Extra 300LP FLWA4003
- Page 1 Electric drive set FW 5065 Gas engine 25-30 ccm Please read the instruction manual carefully and take notice of the safety guidelines. If the model is given to a third party, always include this instruction manual to the model www.hobbico.de Distributed by...
-
Page 2: Table Of Contents
TABLE OF CONTENTS Nitro and gas engines ..............9 General informations ..............2 Nitro engines ..................9 Environment protection infos ............2 Gas engines ................. 10 Introduction ..................3 Tank assembling and installation ........11 Safety precautions ................3 Template for the Flitework Recommended accessories ............4 Motorsets (008-5060/65) ............ -
Page 3: Introduction
Introduction Congratulations for purchasing the Flitework Extra 300LP. We say thanks for your trust and we wish you a lot of happy flights with your new Extra 300 LP. The Extra 300LP is one of the best aerobatic planes in the world. The competition pilots of the Flying Bulls commit this versions very successful in different contests. -
Page 4: Recommended Accessories
Tel: 01805 110111 (nur für Deutschland) (Anrufkosten: recommended. 14 Cent/Min. a. d. dt. Festnetz; Mobilfunk max. 42 Cent/Min.) ❍ 1/2 oz. Thin Pro CA (GPMR6001) Email: Hobbico-Service@Revell.de ❍ 1/2 oz. Medium Pro CA+ (GPMR6007) ❍ 6-Minute Epoxy (GPMR6045) SPARE PARTS ❍... -
Page 5: Fitting The Landing Gear
FITTING THE LANDING GEAR: Fit the fairings close to the fuselage. Use sandpaper or a file to adapt the correct mounting angle. Put the fairings along the hangers to the body and fix with double sided adhesive tape or use the 2 mm screws for fastening. The landing gear is a stable aluminium construction. -
Page 6: Rudder Assembling
RUDDER ASSEMBLING Now you can glue the rudder into the slots of fuselage. Assemble the tail gear like shown in the pictures below and mount to the fuselage using 3 wood screws. The pivot points of rudder and tail gear should be the same. About 5 cm away from the pivot point drill a 4-4.5 mm hole. -
Page 7: Assembling Of The Elevator
ASSEMBLING OF THE ELEVATOR If you use one elevator servo, we recommend the Flitework Put the elevator unit into the fuselage and adjust carefully. 4020M servo with 90N/cm traction force. (Order no.: 007- Take a thin non permanent marker and make a line along the 4020M) If you use 2 servos for elevator, we recommend fuselage on both sides onto the elevator unit. -
Page 8: Wing Assembly
WING ASSEMBLY Then, attach the aluminium spacers to the firewall using washers on both sides of the firewall and SHSC 4 x 20 mm Fit the ailerons to the wings like rudder and elevator, using thin screws. Add a drop of threadlocker compound ont the screws. CA or PVA glue. -
Page 9: Secure The Canopy
SECURE THE CANOPY NITRO AND GAS ENGINES As a wide range of gas engine can be fitted on the Extra, the se instructions are only informative and each user will define the exact way to install his engine. NITRO ENGINES For the Extra 300 LP, we suggest to use a two strokes .120 ci engine or a four strokes .140 ci engine You can mount the attached motor holder directly to the... -
Page 10: Gas Engines
Similar to the nitro engine mounting you use the cross mark on firewall for correct engine orientation. Also it is useful to make a paper template from the mounting points of the used gas engine. To keep the scale design of the cowling, the engine should be mounted hanging with cylinder down. -
Page 11: Tank Assembling And Installation
TANK ASSEMBLING AND INSTALLATION Check the leakproofness of the tank and fix it in the shown position with zip ties. Use some damping material under the tank, that the vibrations of the motor cannot reach the tank unabated. Vibrations may cause foamy fuel and therefore unstable motor operation. -
Page 12: Rc Components
RC COMPONENTS 4 CHANNEL RADIO SETUP MODE 1 RUDDER RIGHT AILERON MOVES UP MOVES LEFT AILERON MOVES DOWN RIGHT ELEVATOR CARBURETOR WIDE OPEN MOVES DOWN 4 CHANNEL RADIO SETUP MODE 2 RUDDER MOVES RIGHT AILERON MOVES UP RIGHT LEFT AILERON MOVES DOWN Der 6s 4000 Akku lässt sich mit Akkubändern (BestNr.: 008- ELEVATOR CARBURETOR WIDE OPEN... -
Page 13: Balance The Model Laterally
At this stage the model should be in ready-to-fly condition BALANCE THE MODEL LATERALLY with all of the systems in place including the engine, landing gear, covering and the radio system. ❏ 1. With the wing level, have an assistant help you lift the model by the engine propeller shaft and the bottom of the ❏... -
Page 14: Preflight
PREFLIGHT all screws remained tight, the hinges are secure, the prop is secure and all pushrods and connectors are secure. CHARGE THE BATTERIES Follow the battery charging instructions that came with your RANGE CHECK radio control system to charge the batteries. You should always charge your transmitter and receiver batteries the night before Ground check the operational range of your radio before the you go flying and at other times as recommended by the radio... -
Page 15: Engine Safety Precautions
ENGINE SAFETY PRECAUTIONS CHECK-LIST Failure to follow these safety precautions may result in During the last few moments of preparation your mind may severe injury to yourself and others. be elsewhere anticipating the excitement of the first flight. Because of this, you may be more likely to overlook certain ❍... - Page 16 ❍ 21. Range check your radio when you get to the flying field. Remember to think. Have a ball! But always stay in control and fly in a safe manner. GOOD LUCK AND GREAT FLYING! www.hobbico.de Distributed by...
Need help?
Do you have a question about the Flitework Extra 300LP FLWA4003 and is the answer not in the manual?
Questions and answers