Table of Contents
Advertisement
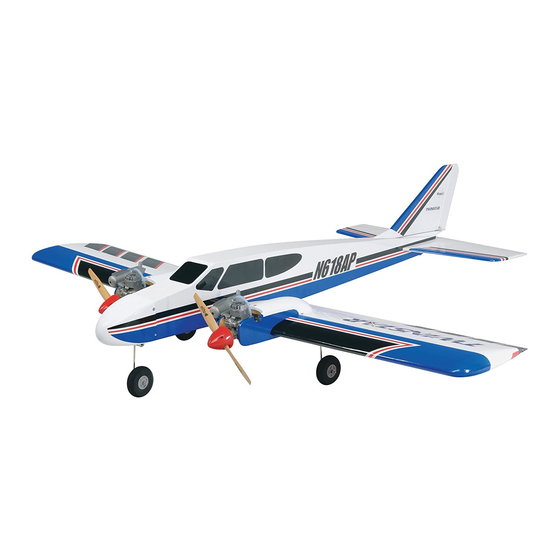
Wingspan: 56 in [1420mm]
Wing Area: 560 sq in [36.1dm
Weight: 5-5.5 lb [2270 – 2490g]
Wing Loading: 21 – 23 oz/sq ft [64 – 70g/dm
Length: 40 in [1015mm]
Radio: 4-Channel with five servos
Engine: .15-.25 cu in [2.5-4cc] two-stroke, .26-.40 cu in
[4.5-6.5cc] four-stroke
Hobbico
®
guarantees this kit to be free from defects in both material and workmanship at the date of purchase. This warranty does
not cover any component parts damaged by use or modification. In no case shall Hobbico's liability exceed the original cost of
the purchased kit. Further, Hobbico reserves the right to change or modify this warranty without notice.
In that Hobbico has no control over the final assembly or material used for final assembly, no liability shall be assumed nor accepted
for any damage resulting from the use by the user of the final user-assembled product. By the act of using the user-assembled product,
the user accepts all resulting liability.
If the buyer is not prepared to accept the liability associated with the use of this product, the buyer is advised to return this
kit immediately in new and unused condition to the place of purchase.
To make a warranty claim send the defective part or item to Hobby Services at the address below:
Include a letter stating your name, return shipping address, as much contact information as possible (daytime telephone number, fax
number, e-mail address), a detailed description of the problem and a photocopy of the purchase receipt. Upon receipt of the package
the problem will be evaluated as quickly as possible.
READ THROUGH THIS MANUAL BEFORE STARTING
CONSTRUCTION. IT CONTAINS IMPORTANT INSTRUCTIONS
AND WARNINGS CONCERNING THE ASSEMBLY AND
USE OF THIS MODEL.
HCAZ3076 for HCAA2076 V1.0
INSTRUCTION MANUAL
2
]
2
]
3002 N. Apollo Dr. Suite 1
Champaign IL 61822
WARRANTY
Hobby Services
USA
™
Champaign, IL
(217) 398-8970
E-mail: airsupport@hobbico.com
Entire Contents © Copyright 2004
Advertisement
Table of Contents

Related Manuals for Hobbico TWINSTAR


Summary of Contents for Hobbico TWINSTAR
-
Page 1: Instruction Manual
Further, Hobbico reserves the right to change or modify this warranty without notice. In that Hobbico has no control over the final assembly or material used for final assembly, no liability shall be assumed nor accepted for any damage resulting from the use by the user of the final user-assembled product. By the act of using the user-assembled product, the user accepts all resulting liability. -
Page 2: Table Of Contents
For the latest technical updates or manual corrections to the TABLE OF CONTENTS TwinStar visit the Hobbico web site at www.hobbico.com . Open the “Airplanes” link, then select the TwinStar ARF. If there is new technical information or changes to this model a “tech notice” INTRODUCTION ..............2 box will appear in the upper left corner of the page. -
Page 3: Additional Items Required
If necessary, modify the This is the list of hardware and accessories required to part to ensure the best fit. finish the Twinstar ARF. Order numbers are provided in parenthesis. • Whenever the term glue is written you should rely upon your experience to decide what type of glue to use. -
Page 4: Ordering Replacement Parts
The fastest, most economical service can be provided by your hobby dealer or e-mail order company. To locate a hobby dealer, visit the Hobbico web site at www.hobbico.com . Choose “Where to Buy” at the bottom of the menu on the left side of the page. -
Page 5: Kit Contents
If any parts are missing or are not of acceptable quality, or if you need assistance with assembly, contact Product Support. When reporting defective or missing parts, use the part names exactly as they are written in the Kit Contents list. Hobbico Product Support 3002 N Apollo Drive, Suite 1 Champaign, IL 61822 Telephone: (217) 398-8970, ext. -
Page 6: Preparations
PREPARATIONS 1. If you have not yet done so already, remove the major parts of the kit from the box (wings, fuse, tail parts, etc.) and inspect them for damage. If any parts are damaged or missing, contact Product Support as listed on page 5. 2. -
Page 7: Join The Wing Halves
Join the Wing Halves 7. Mix a small amount of epoxy. Coat the inside of the aileron torque rod holes with epoxy. DO NOT put epoxy in the hinge slots. 1. Locate the three 1/8" [3mm] die-cut plywood wing 8. Fit the ailerons to the wings with the hinges and the joiners. -
Page 8: Mount The Engines
6. Test fit the wing joiner into both wing panels. The joiner should slide in with little resistance up to the centerline. Test fit the wing panels together, making sure that they are flush without any gaps. 2. Mount the engine mount to the left firewall with four 4-40 x 3/4"... -
Page 9: Assemble & Install The Fuel Tanks
Assemble & Install the Fuel Tanks 6. Use the Great Planes ® Dead Center ™ Engine Mount Hole Locator (GPMR8130) or your preferred method to mark the engine mount holes onto the engine mount. 1. Cut two 4" [100mm] pieces from the 24" [600mm] long gray plastic tube. -
Page 10: Mount The Tail
Mount the Tail 4. Place a 1/2" [13mm] thick piece of foam in the bottom of the tank compartment. Be certain the vent tube inside the tank is pointing upward. 1. Cut the covering from the wing bolt holes. Center the wing bolt plate on the bottom of the wing and trace around it with a ballpoint pen. - Page 11 5. Use a sharp hobby knife to remove the covering from 9. Stick a pin into the top of the fuse centered at the front the stab and fin slots. of the turtle deck. Tie a small loop in one end of a 42" [1000mm] piece of non-elastic string.
-
Page 12: Finish The Wing
Finish the Wing 12. Remove the stab from the fuse. Use a sharp #11 hobby knife to cut the covering from the stab 1/16" [1.6mm] inside the lines you marked. Use care to cut only into the covering and not into the wood. Wipe away the marks on 1. - Page 13 5. Glue the aileron servo tray in place with medium CA. 10. Center the aileron trim and turn the transmitter on. Plug the aileron servo and battery into the receiver. Attach the pushrods to the aileron torque rod horns. Center the ailerons and mark the location the pushrod crosses the servo arm.
- Page 14 13. Slide the throttle pushrod through the tube. It is 19. Trim the plastic nacelle covers along the trim lines. very important that the throttle pushrod move freely. To While holding the cover in place, drill three 1/16" [1.6mm] ensure that it does, bend the pushrod as shown. holes as shown.
-
Page 15: Install The Radio Gear
24. Cut the fuel line that comes from the clunk so it is the correct length to reach the carburetor. 3. Connect a large control horn to each clevis, using the second hole from the outside. Use the pushrods to set the location for the control horns. -
Page 16: Install The Landing Gear
10. Slide the plywood pushrod tube support over the nose wheel pushrod tube. 6. Mount the two servos, following the manufacturer’s recommendations. 11. Screw the nylon clevises 20 turns onto the 17-1/2" [445mm] pushrods. Place a silicone retainer over the clevis. Slide the 17-1/2"... - Page 17 2. Determine where the set screw for each wheel collar 5. Slide the brass screw-lock pushrod connector body will be positioned on the gear legs. Remove the wheel and down the pushrod. Slide the nose gear up through the wheel collars. File a flat spot on the bottom of the axle for steering arm and tighten the 6-32 socket head cap screw on the set screws.
-
Page 18: Mount The Receiver & Battery
9. Place two nylon landing gear straps over the landing 2. Wrap receiver and battery in foam. gear wire as shown. Drill a 1/16" [1.6mm] pilot hole for each hole in the landing gear strap. Harden the holes with thin CA. Install 3. -
Page 19: Get The Model Ready To Fly
If, after you have become accustomed to the way the TwinStar ARF flies, you would like to change the throws to suit your taste, that is fine. However, too much control throw could make the model difficult to control, so remember, “more is not always better.”... -
Page 20: Balance The Model Laterally
Balance the Model Laterally This is where your model should balance for the first flights. Later, you may wish to experiment by shifting the C.G. up to 3/16" [5mm] forward or 3/16" [5mm] back to 1. With the wing level, have an assistant help you lift the change the flying characteristics. -
Page 21: Balance The Propellers
Balance the Propellers ENGINE SAFETY PRECAUTIONS Failure to follow these safety precautions may result in severe injury to yourself and others. Keep all engine fuel in a safe place, away from high heat, sparks or flames, as fuel is very flammable. Do not smoke near the engine or fuel;... -
Page 22: Check List
GENERAL CHECK LIST 1. I will not fly my model aircraft in sanctioned events, air shows, or model flying demonstrations until it has been proven to be airworthy by having been previously, successfully flight tested. During the last few moments of preparation your mind may be elsewhere anticipating the excitement of the first flight. -
Page 23: Flying
The TwinStar ARF is a great-flying model that flies smoothly Take it easy with the TwinStar ARF for the first few flights, and predictably. The TwinStar ARF does not, however, gradually getting acquainted with it as you gain confidence. - Page 24 Remember to think. Have a ball! But always stay in control and fly in a safe manner. GOOD LUCK AND GREAT FLYING! Hobbico Ultra-Tote ™ Convenience and carrying capacity – factory-painted Ultra- Totes offer both. They’re 90% prebuilt and ARH (Almost- Ready-to-Haul), so they’re easy to put to work almost...
Need help?
Do you have a question about the TWINSTAR and is the answer not in the manual?
Questions and answers