Table of Contents
Advertisement
Hobbico guarantees this kit to be free from defects in both material and workmanship at the date of purchase. This warranty does
not cover any component parts damaged by use or modification. In no case shall Hobbico's liability exceed the original cost of
the purchased kit. Further, Hobbico reserves the right to change or modify this warranty without notice.
In that Hobbico has no control over the final assembly or material used for final assembly, no liability shall be assumed nor
accepted for any damage resulting from the use by the user of the final user-assembled product. By the act of using the user-
assembled product, the user accepts all resulting liability.
If the buyer is not prepared to accept the liability associated with the use of this product, the buyer is advised to return
this kit immediately in new and unused condition to the place of purchase.
READ THROUGH THIS MANUAL BEFORE STARTING CONSTRUCTION. IT CONTAINS IMPORTANT
INSTRUCTIONS AND WARNINGS CONCERNING THE ASSEMBLY AND USE OF THIS MODEL.
© Copyright 2002
See more of our products at www.hobbico.com
WARRANTY
1610 Interstate Drive Champaign, IL 61822
®
(217) 398-8970, Ext. 2
airsupport@hobbico.com
HCAZ3039 for HCAA16** Ver 1.0
Advertisement
Table of Contents

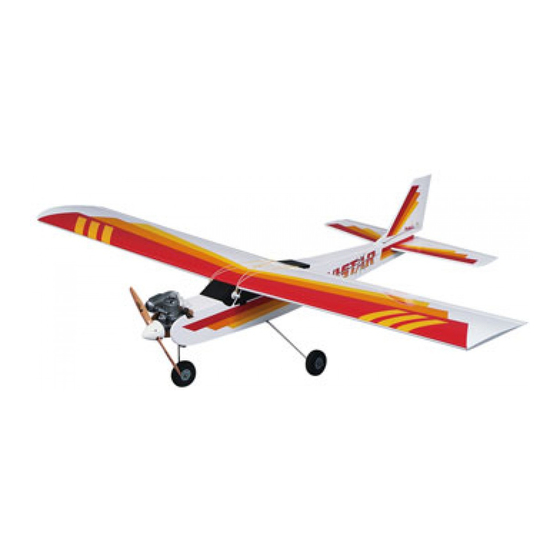
Related Manuals for Hobbico AVISTAR 40 Select


Summary of Contents for Hobbico AVISTAR 40 Select
- Page 1 WARRANTY Hobbico guarantees this kit to be free from defects in both material and workmanship at the date of purchase. This warranty does not cover any component parts damaged by use or modification. In no case shall Hobbico’s liability exceed the original cost of the purchased kit.
-
Page 2: Field Equipment
Note the the Avistar .40 Select, if not assembled and operated correctly, Hobbico ARF/RTF Field Pack near the end of the box that could possibly cause injury to yourself or spectators and includes these items in an “economy”... -
Page 3: Charge The Batteries
PART I: ASSEMBLY Check the box as you complete each step. Charge the Batteries . In the fuselage (fuse), connect the plug from the battery pack, colored red, to the plug from the on/off switch, labeled “BATTERY.” . Presently, the rechargeable batteries in the plane and in the transmitter are not fully charged. They may require additional charging for setting up the radio after the plane has been assembled. - Page 4 . Connect the elevator pushrod to the fourth hole in the . Insert the main landing gear wires into the holes in the elevator control horn. Connect the rudder pushrod to the landing gear blocks in the bottom of the fuselage. Secure the second hole in the rudder control horn.
-
Page 5: Check The Control Directions
PART II: SETUP Now the plane is assembled, but there are a few things that must be done before it will be ready to fly.You must carefully perform all of the following Setup procedures. If possible, have your flight instructor assist you. If you have not yet charged the batteries, you may continue with the setup procedures. -
Page 6: Adjust The Throttle
Center the Controls The control surfaces (ailerons, elevator, rudder) are to be centered when the control sticks and trims are centered. Here’s how to do it: Adjust the Elevator First. Stabilizer Elevator . With the transmitter and receiver on, center the elevator trim Elevator NOT Centered With Stab lever on the transmitter. -
Page 7: Set The Control Throws
Set the Control Throws The control throws are a measure of how far the flight controls move. If the controls move too much, the plane will respond too quickly and be difficult to control. Due to the great effect the control throws have on the way a model flies, the control throws must be checked. -
Page 8: Balance The Model
Balance the Model This important step may also be referred to as “checking the C.G.” (center of gravity). Do not disregard this step. The C.G. can have an even greater effect on how a model flies than the control throws. If the model has too much weight in the nose (“nose-heavy”), it could be difficult to takeoff and land and lose some of its self-correcting tendencies. -
Page 9: Gather Your Tools
Charge the Batteries The night before you go flying, charge the batteries in the plane and in the transmitter overnight. Gather Your Tools In addition to the engine starting equipment mentioned near the beginning of the manual, you should start a collection of tools that may be required for adjustments and maintenance at the flying field. - Page 10 PART IV: FLYING The following flying instructions are in no way an endorsement for learning to fly on your own, but are printed so you can know what to expect and what to concentrate on while learning under the tutelage of your instructor. Further, these flight instructions may be referenced once you begin flying on your own.
-
Page 11: Maintenance Tips
Hardware items (screws, nuts, bolts) are also available from these outlets. If you need assistance locating a dealer to purchase parts, visit www.hobbico.com and click on “Where to Buy.” If this kit is missing parts, contact Hobbico Product Support. -
Page 12: Building Notes
BUILDING NOTES Kit Purchased Date: _______________________ Date Construction Finished: _________________ Where Purchased:_________________________ Finished Weight: __________________________ Date Construction Started: __________________ Date of First Flight: ________________________ FLIGHT LOG...
Need help?
Do you have a question about the AVISTAR 40 Select and is the answer not in the manual?
Questions and answers