Table of Contents

Related Manuals for Power smart DB5023


Summary of Contents for Power smart DB5023
- Page 1 Questions, problems, missing parts? If you have questions about this product or need technical support, call the Amerisun customer service department at 1-800-791-9458. Also contact Amerisun at Amerisuninc.com and e-mail support@amerisuninc.com"...
- Page 2 Feature Indentification Clearing width and depth: Approx. 46 cm x 20 cm (18 in. x 8 in.) Max. throwing distance: 10 m (30 ft.)
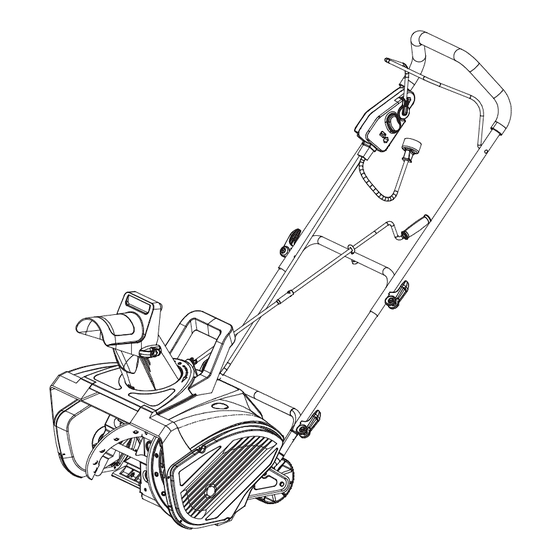
- Page 3 Feature Identification...
- Page 4 M4x18 M8x50 8x 28x3 Handle Saddle Screw Handle Camlock 6x 13x1 BT4x12 Chute Deflector Knobs Qty.2 NOTE: An electrical outdoor rated extension cord is needed to operate this snow thrower. An extension cord is NOT included. See page 14 for extension cord selection information.
- Page 5 (usually orange color). The extension cord MUST be of the proper gauge size depending on it's length (see page 14). To prevent the extension cord from disconnecting during operation, tie it around the top right side of the middle frame before connecting it to the snow thrower as shown in Figure 2 on page 14.
- Page 7 Before beginning assembly of product, make sure all parts are present. Compare parts in package to hardware contents on page 4. Tools required for assembly Phillips screwdriver and 7 mm wrench.
- Page 8 1. Position the middle frame (B) with the arrow on the "UP" decal pointing UP when viewed from rear. Align the middle frame mount holes to the holes on the lower frame (A). Note: If middle frame (B) is installed upside-down, the chute crank rod eye-bolt will not line up when installing the chute crank rod.
- Page 9 4. Position upper frame (C) as shown (handle bar up) in image 4. Align mount holes with holes on middle frame (B) 5. Insert the handle saddle screw (AA) with the metal washer (BB) into the aligned holes on each side. The metal washer (BB) should be inserted outside of the frame.
- Page 10 8. Loosen the two knobs on the chute deflector (G). Lift the chute deflector (G) so that it locks securely onto the discharge chute (H). 9. Loosen the two knobs on the chute deflector (G). Set the chute deflector to the desired angle and tighten the chute deflector knobs.
- Page 11 10.Locate the upper chute crank (E) in the parts bag Remove the screw (EE) and nut (DD) from the upper chute crank (E) using a Phillips screwdriver and wrench. 12. Tighten the screw (EE) into the aligned holes using the Phillips screwdriver. Fasten the nut (DD) with wrench...
- Page 13 nut(GG).
- Page 14 1. For safe and efficient use of your snow thrower, use only a UL-rated extension cord recommended for outdoor use. Refer to the Extension Cord Chart below. Don't touch the appliance or its plug with wet hands or while standing in water. Wearing rubber boots offers some protection.
- Page 15 1. Connect extension cord to the male plug on the snow thrower then connect extension cord to proper AC power source. 2. Press the start switch button in fully and hold in. The start switch button is located on the switch housing (N).
- Page 18 DRIVE BELT REPLACEMENT WARNING Entanglement Hazard - Before performing any service procedures, make sure the snow thrower is disconnected from the power source. Note: Record component position before disassembly, to assist in reassembly. 1. Using Phillips screwdriver, remove 4 screws attaching belt cover to housing. 2.
- Page 19 4. Inspect the new belt to ensure it is the correct size and type. Original – Part Number 5PJ670 5. Manually push the belt tension pulley up to allow installation of the new belt. 6. Position the belt onto the small drive pulley, then while holding the belt tension pulley away from the belt, carefully wind the belt onto the large pulley.
- Page 20 CARE AND MAINTENANCE Make sure to turn off the switch and disconnect the extension cord before performing any maintenance task on your snow thrower. Run the snow thrower for a few minutes to melt away any snow on the snow thrower. Turn the snow thrower's power off.
Need help?
Do you have a question about the DB5023 and is the answer not in the manual?
Questions and answers